It’s one thing to add terabytes of extra storage space to your home network, but it’s another to have your own private, local large language model at your beck and call instead of having to rely on ChatGPT for all things AI. After getting Ugreen’s new iDX6011 Pro set up and running, that’s exactly what I did.
Late last year, I finally tried out a NAS (Network Attached Storage) device and it’s been one of the best upgrades for my home network yet. In fact, I’d say it’s made as much of a difference as switching to fiber internet and one of the best Wi-Fi 7 routers. While my mesh router gave me faster speeds and whole-home connectivity, what I love about my NAS is that I can quickly and easily access my stored videos, photos, and files from anywhere in the world.
Up until very recently, setting up a NAS was complicated and expensive. However, that all changed when Ugreen, Minisforum, Beelink, and a host of other PC hardware makers entered the space which was previously dominated by legacy players like Synology and QNAP.

Although Ugreen’s first DXP devices were aimed at prosumers, and its DH series catered to the less tech-savvy among us, the flagship iDX6011 Pro is treading new ground entirely.
I’m still somewhat of a NAS-newbie myself, but after checking out this powerful new machine, I can safely say the future has arrived. While the extra power and ports make a massive difference, it’s the built-in local AI that really transforms this NAS from a file storage device to a multipurpose one.

A NAS built like a server
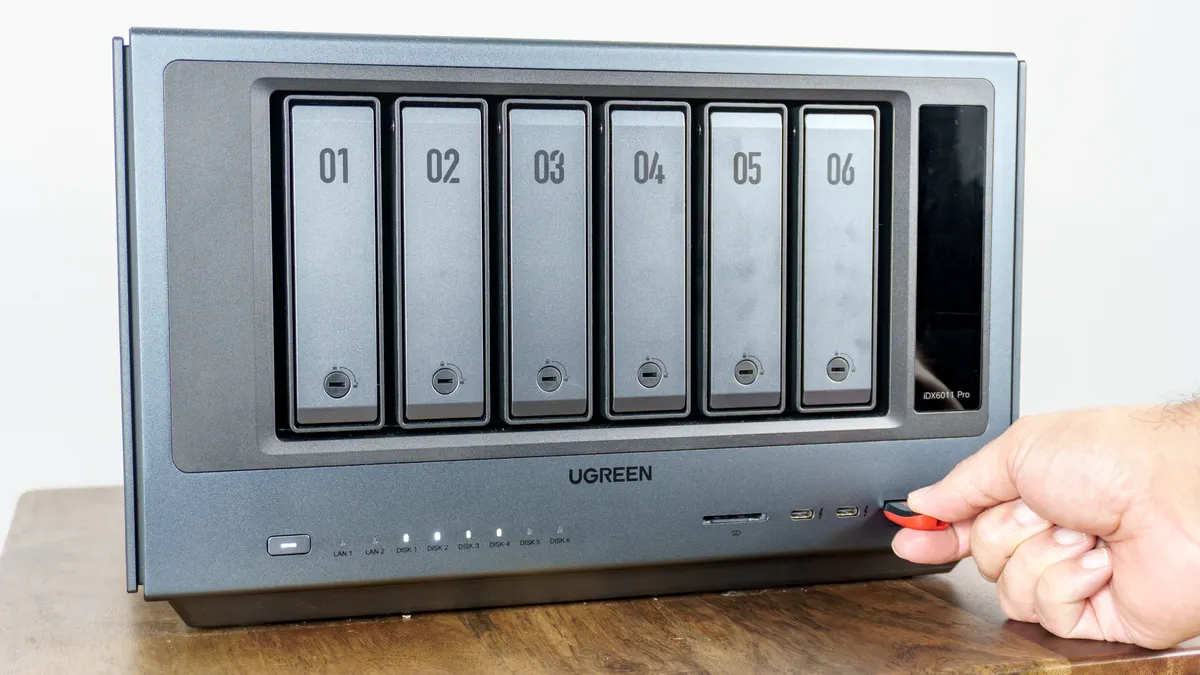
At 8.3 × 13.7 × 10.2 inches and nearly 22 pounds on its own (without hard drives installed), the iDX6011 Pro is a massive machine. Thanks to its matte aluminum alloy casing, it’s also a significant step up from the plastic enclosure of the DH4300 Plus I tested out previously.
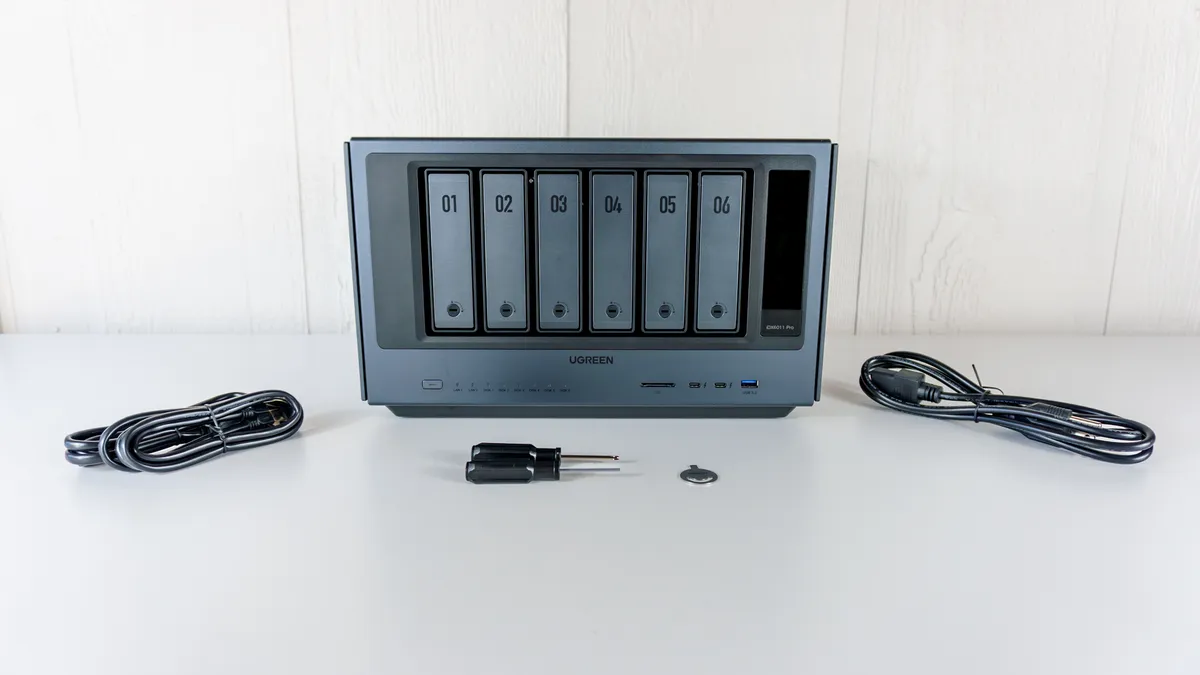
In the box, you get the iDX6011 Pro itself, high-speed Ethernet cables, a power cable, and some tools — though you won't necessarily need them depending on which type of drives you install.
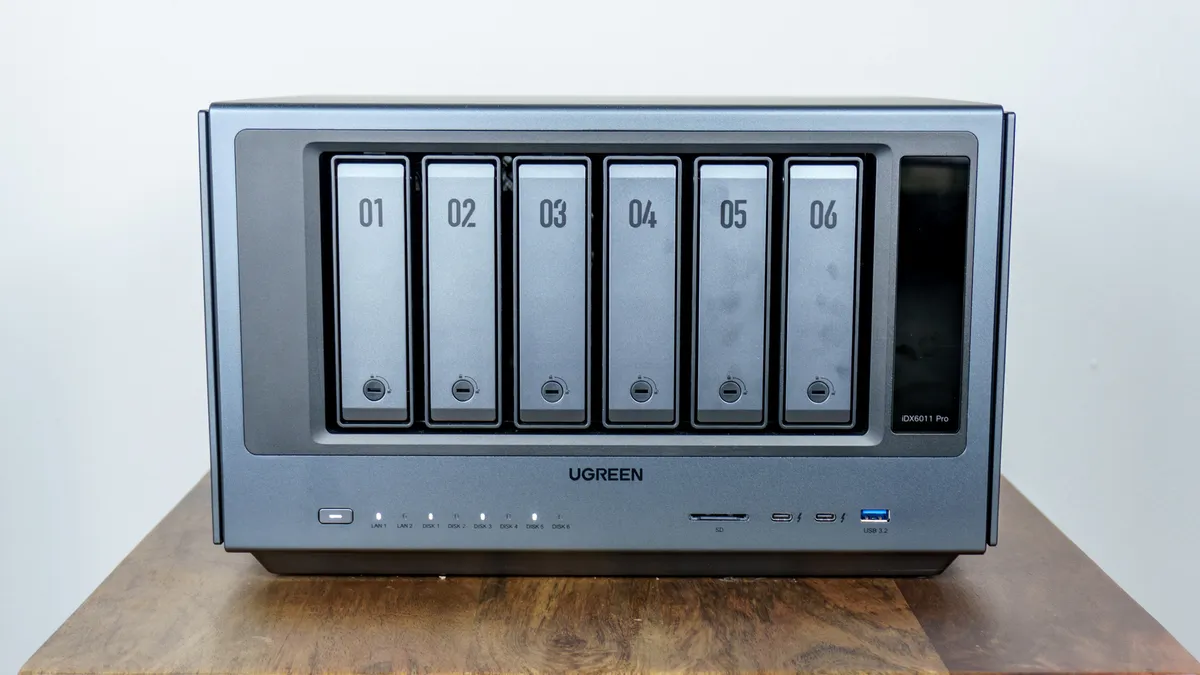
Around front, you get six drive bays with enclosures that pop out for easy access. Next to them on the right is a vibrant 3.71-inch vertical LCD screen, but more on that later. On the bottom of the iDX6011 Pro, there’s a power button on the left, LED indicators for each of your drives, and a handful of useful ports — including dual Thunderbolt 4 ones, a high-speed USB-A port, and an SD card slot. This way, you can transfer files onto the device using one of the best external hard drives, a flash drive, or even an SD card without having to pull out your phone or get on your computer.
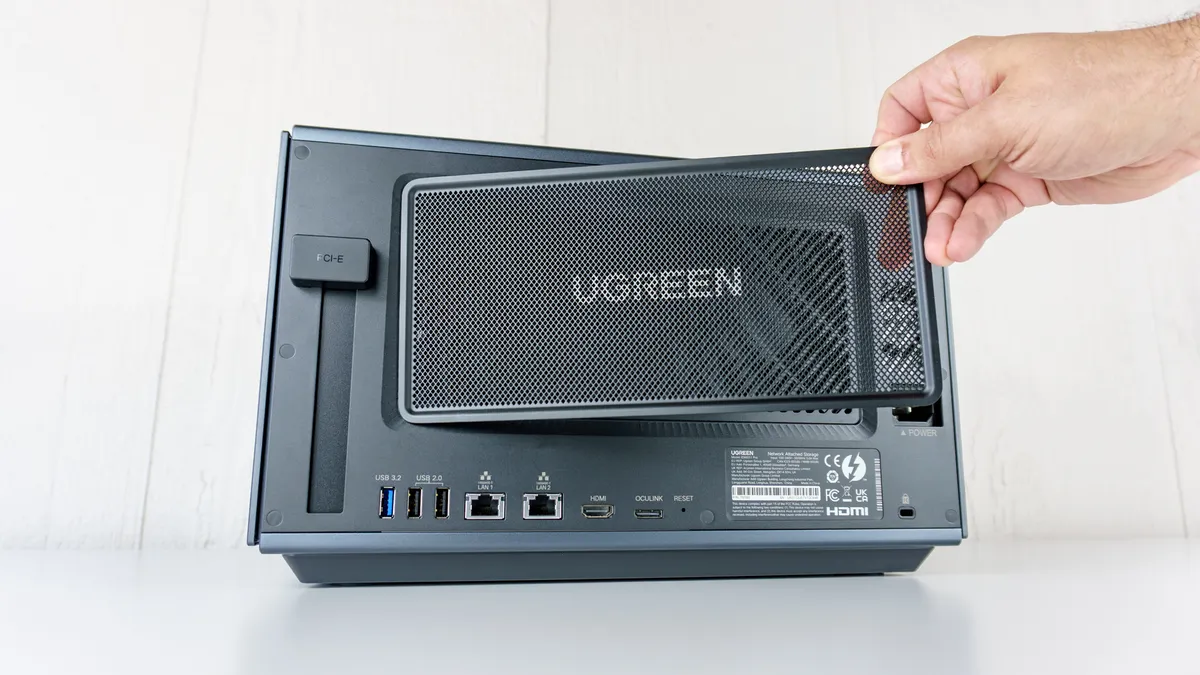
Just like with one of the best gaming PCs, there’s a magnetic dust cover around back. Speaking of PCs, the iDX6011 Pro uses a standard PC power cable because, with an Intel Core Ultra 7 255H processor and 64GB of LPDDR5x on board, this NAS is basically a computer itself.
One thing you don’t ever see on a NAS, though, is the PCIe expansion slot on the far left. While PCIe is often used to add one of the best graphics cards to a standard computer, here it’s used for other specialized cards — like those for even faster networking, extra NVMe storage, or even a dedicated video capture card.
When it comes to graphics cards, you can actually connect one of those, too, via the OCuLink port around back. The reason for doing this would be to run even more demanding AI workloads locally, not for gaming. However, depending on your needs, you might not even have to go this far since the Intel chip that powers the iDX6011 Pro features 96 TOPS (Trillions of Operations Per Second) right out of the box.
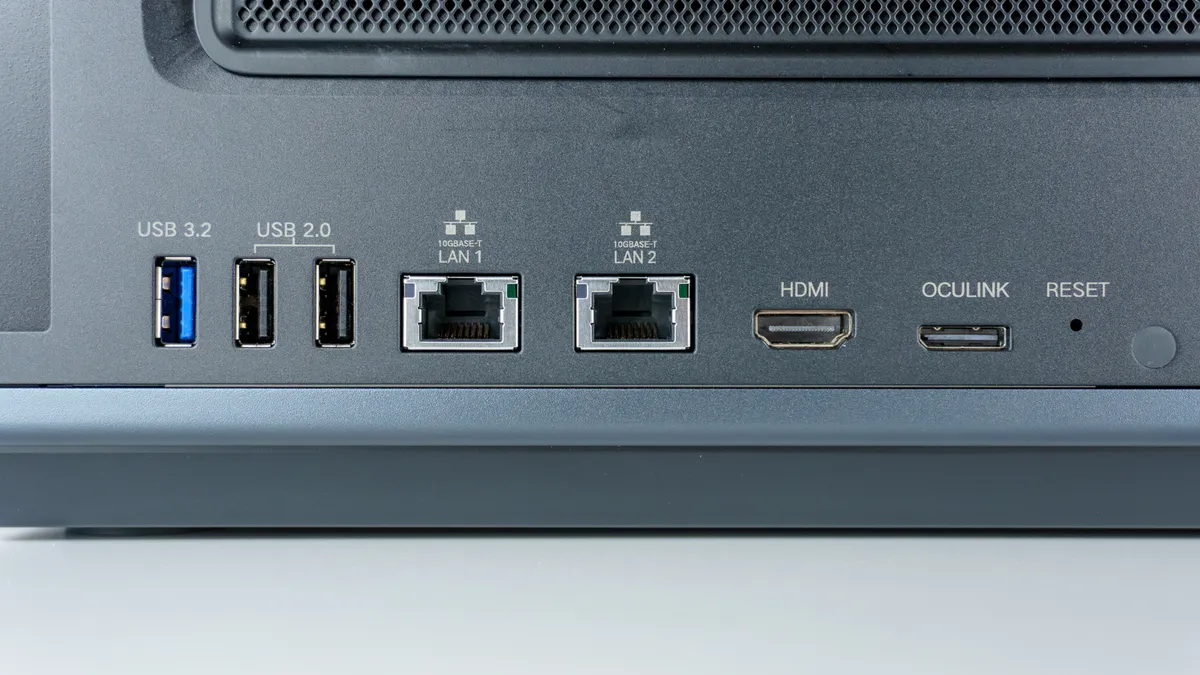
In addition to that OCuLink port, you also get another high-speed USB-A port, two USB 2.0 ports, an HDMI 2.1 port, and dual 10 Gigabit Ethernet ports around back. The 10G Ethernet ports are especially important, as they let you transfer data back and forth much faster than I could with the 2.5G Ethernet port on the DH4300 Plus.
With everything out of the box, it was time to start installing the hard drives and getting the iDX6011 Pro ready for its initial setup.
From detailed to toolless
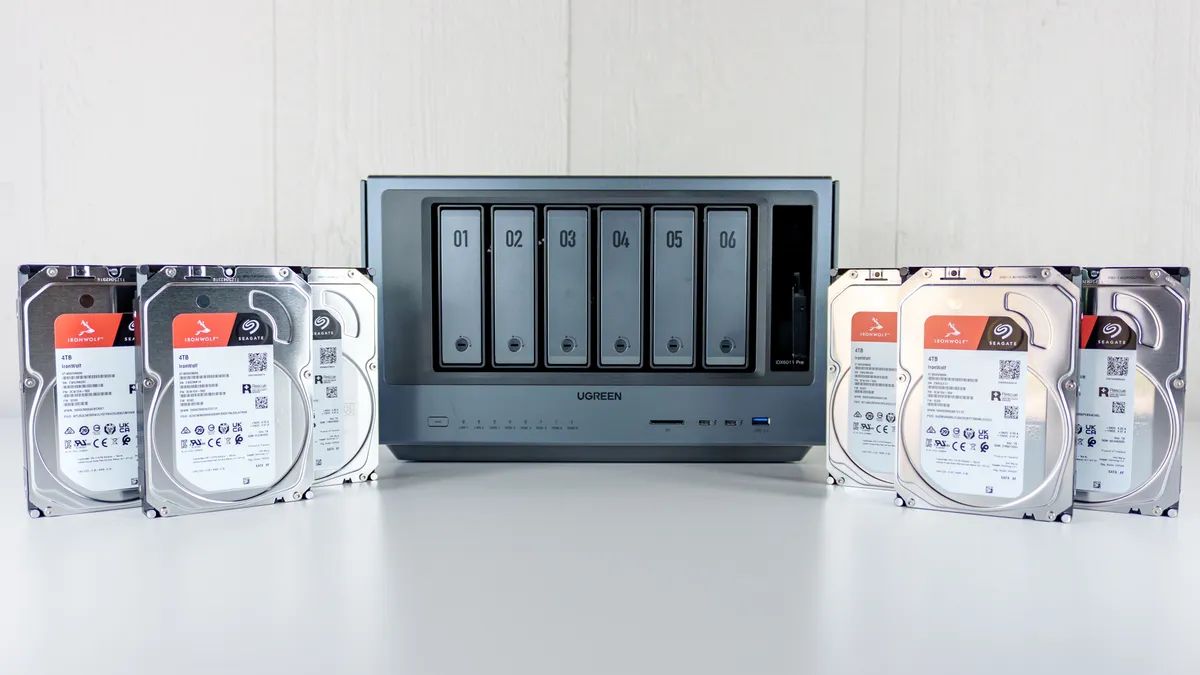
Alongside the iDX6011 Pro, Ugreen also sent over several 4TB Seagate Ironwolf drives to fill up all six slots on the front of the device. With six 4TB drives, that would theoretically give me 24TB of storage space. However, since redundancy is one of the reasons you’d opt for a NAS over just a large external hard drive, in practice, you end up working with less storage overall so that you have extra space for backups in the event of a drive failure.
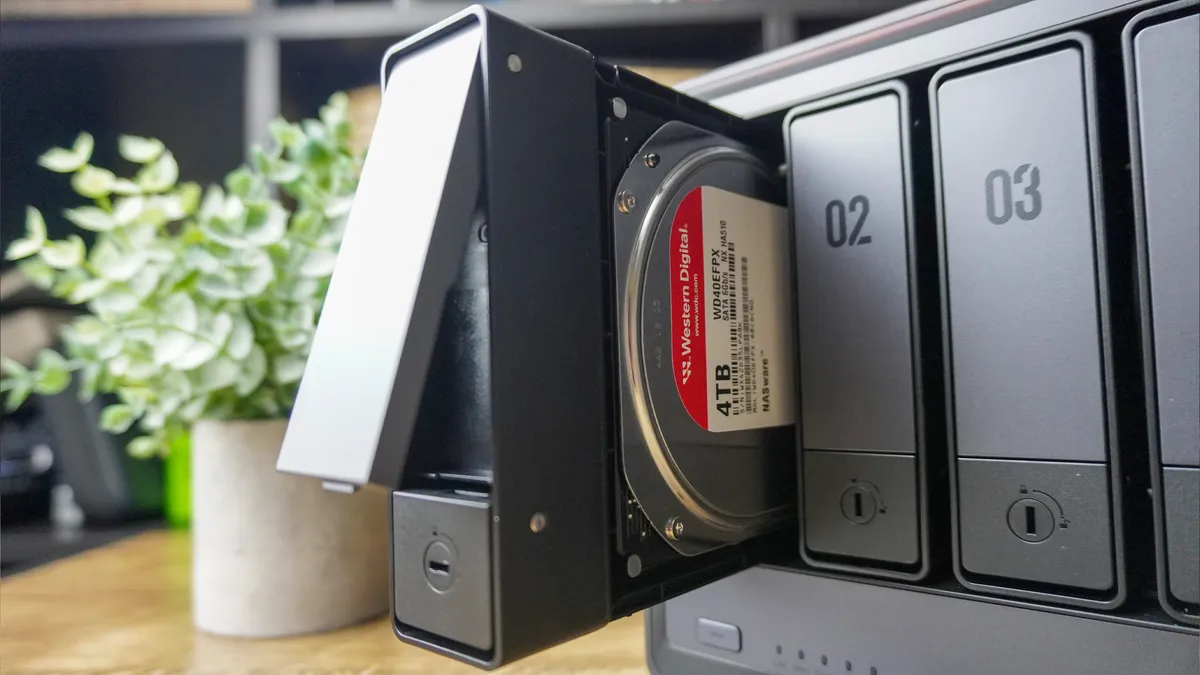
When I added four of these same hard drives to the DH4300 Plus, there was a bit more work involved since I had to physically screw in each drive before inserting it. With the iDX6011 Pro though, if you’re using standard 3.5-inch hard drives, then you don’t need to screw them in at all. With smaller SSDs though, you will have to use the included screws.
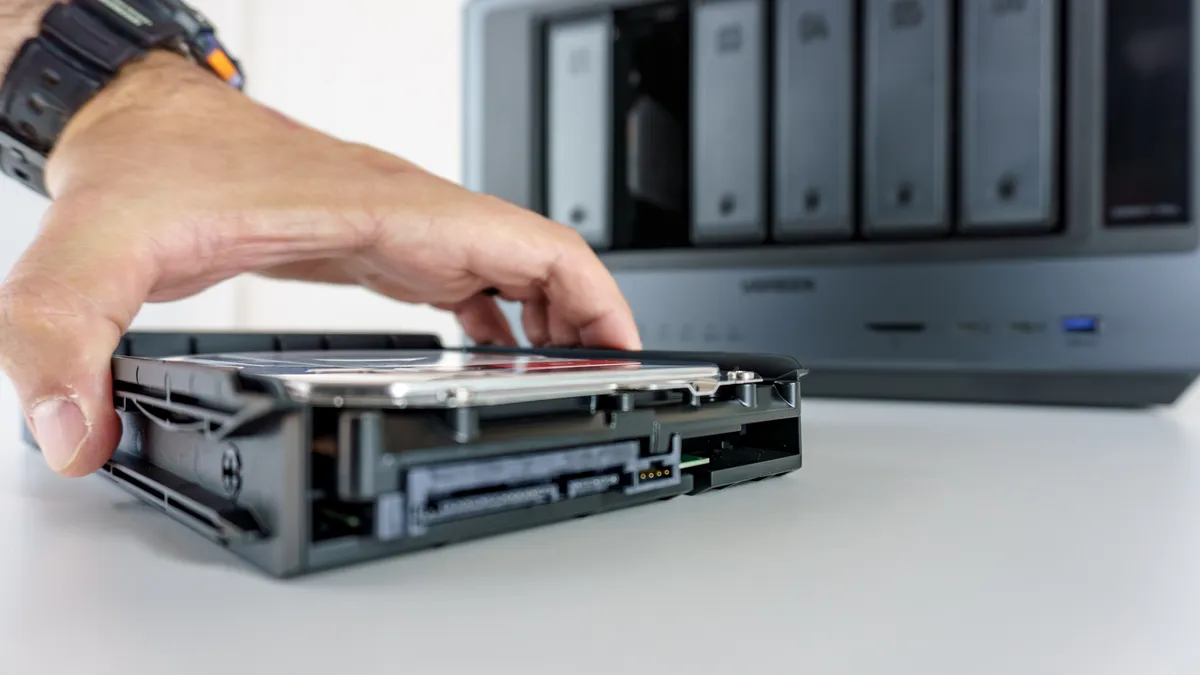
The quick release mechanism Ugreen implemented here is pretty great. After taking a drive bay out, you press down a tab on the back and the enclosure expands. Then you put your hard drive in and push both sides of the enclosure together to lock it in place. From there, you just slide the drive into the iDX6011 Pro and you’re good to go.
After doing this with all six of the drives, it was time to get the iDX6011 Pro plugged into the wall and connected to my home network. Given this is a much larger NAS with powerful components that require plenty of airflow, I decided to put it on top of a side table on its own. Once I plugged its power cord into the wall, I then proceeded to connect it via Ethernet cable to my eero Max 7 mesh router on top of the cabinet I turned into a hidden hub with the rest of my networking gear.
Even if you don’t have one of the best Wi-Fi routers with a 10 Gigabit Ethernet port around back, the iDX6011 Pro should connect to the router you have just fine. However, one with faster ports will give you better upload and download speeds. Now for that second 10G port, you can use that to connect the iDX6011 Pro directly. You’ll run into a similar problem with most PCs or Macs though, as they typically come equipped with gigabit or maybe 2.5G Ethernet ports. Fortunately, you can always add a networking card to your PC or opt for a Mac with a faster Ethernet port like how you can spend an extra $100 to get a 10G one on the Mac mini M4.
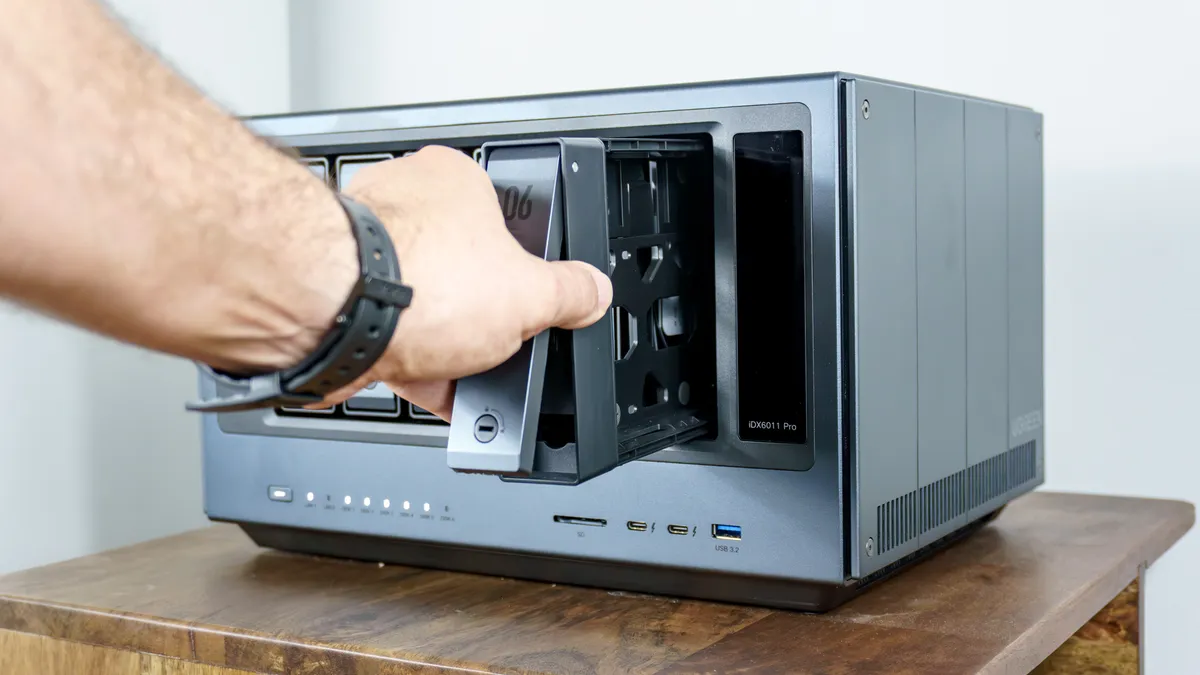
Besides making installation a breeze, Ugreen’s quick release mechanism also makes it easy to swap out one hard drive for another. This can come in handy when you want to quickly pull data off an old hard drive or if one of your drives fails and you need to replace it with a new one.
With the iDX6011 Pro set up and plugged in, I was ready to jump on my PC and do the initial configuration via my browser. While the hardware side of things was a massive upgrade over my last NAS, I was most excited to see if the software — and specifically that local AI — could live up to the hype.
Power you can touch
While you can download the Ugreen NAS app on your iPhone or Android device for the initial setup, you don’t have to. Instead, on a computer connected to the same network, all you have to do is open your browser and head to find.ugnas.com. There, you should see a picture of your Ugreen NAS and can begin the setup process that way.
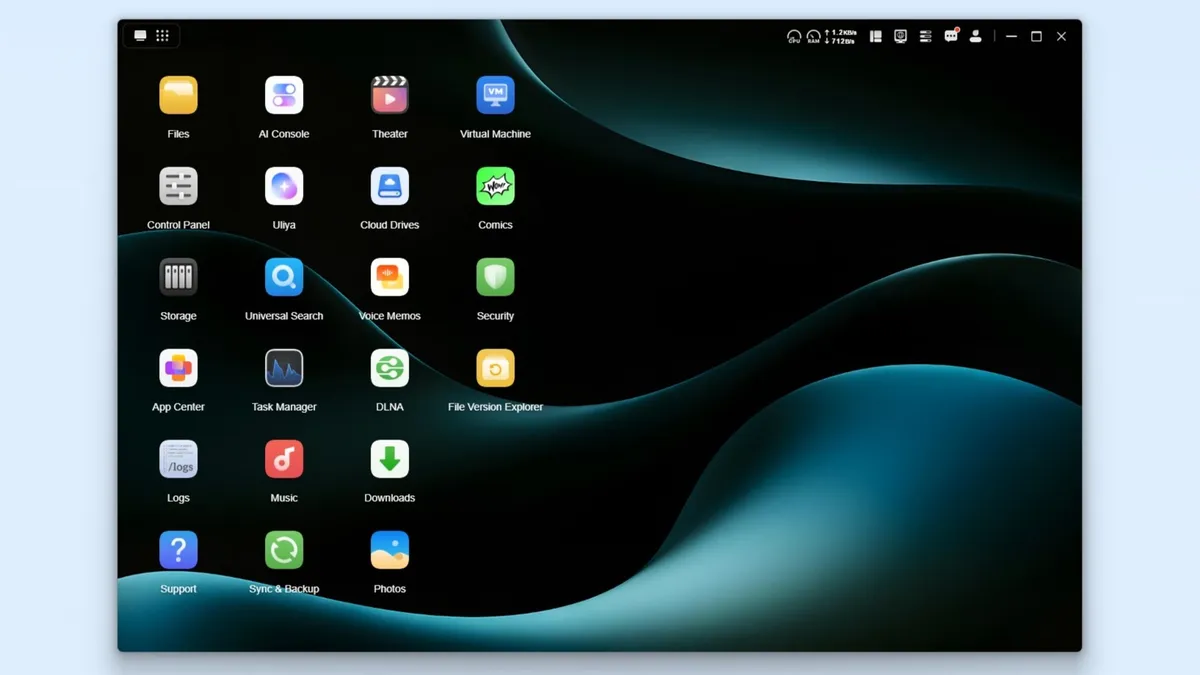
After setting up my username and password, the iDX6011 Pro installed a few updates and I found myself in Ugreen’s UGOS Pro operating system. In the OS, you need to do a few things first like creating a storage pool and setting up the system’s local AI assistant Uliya.
Since I have multiple drives and want to be able to fully recover one in the event of a failure, I went with a RAID 5 configuration for my storage pool. Remember what I said about losing some theoretical storage space? Well, in this configuration, I have 20TB of usable storage and 4TB is dedicated to parity, which allows the system to reconstruct my data if one of those six drives fails. There are a few different configurations to choose from but Ugreen explains the ins and outs of each one from within its Storage app in an easy to understand way.
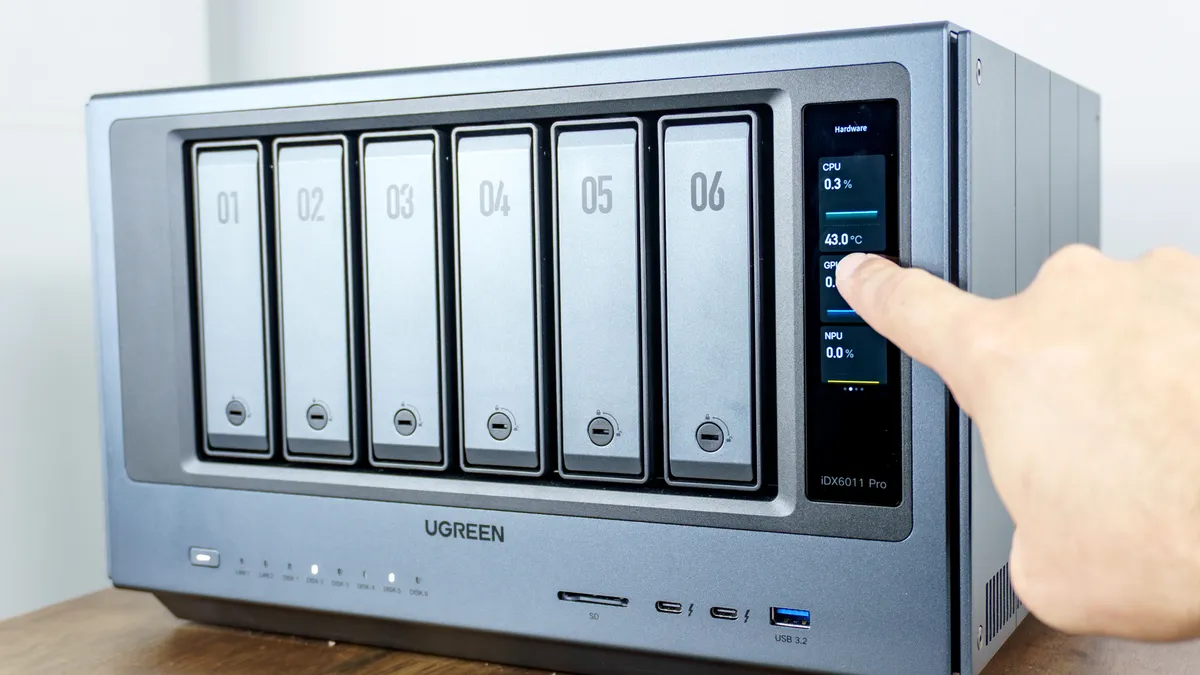
With every other NAS, you either have to open its respective app on your phone or computer or login via your browser to get info on its performance and available storage space. This isn’t the case on the iDX6011 Pro. With a tap and a few swipes on its 3.71-inch vertical touchscreen, you have quick access to all of those stats. While I wish you could customize it a bit further, you can change the background wallpaper, select your preferred language and control the screen’s brightness.
Since I’m always switching between computers as part of my work reviewing the best mini PCs (one of the reasons I wanted a NAS in the first place), I had mostly been accessing my NAS via my browser. However, to make things a bit easier on my main computer, I decided to install Ugreen’s dedicated NAS app on my PC instead. It works the same way as the browser approach but you don’t have to deal with an address bar and bookmarks taking up space at the top of the window.
One of the most useful upgrades with the iDX6011 Pro are the ports at the front. With the DH4300 Plus, you only get a single USB-C port up front but with this one, you have even more options. Those Thunderbolt 4 ports make for faster data transfers while the SD card reader lets you get photos right off your camera’s SD card. Personally, I like having that USB-A port up front to get data off of my older flash drives without needing an adapter or worse, a dongle.
Given that I’m quite familiar with UGOS, I already knew which apps I wanted to install but there are plenty of other useful ones in Ugreen’s App Center. This time around though, there were a few iDX6011 Pro specific apps that let you put the Intel Core Ultra 7 255H’s NPU to good use. Now it was time to try them out and see whether or not having a local AI assistant made for a better NAS.
From storing to analyzing files
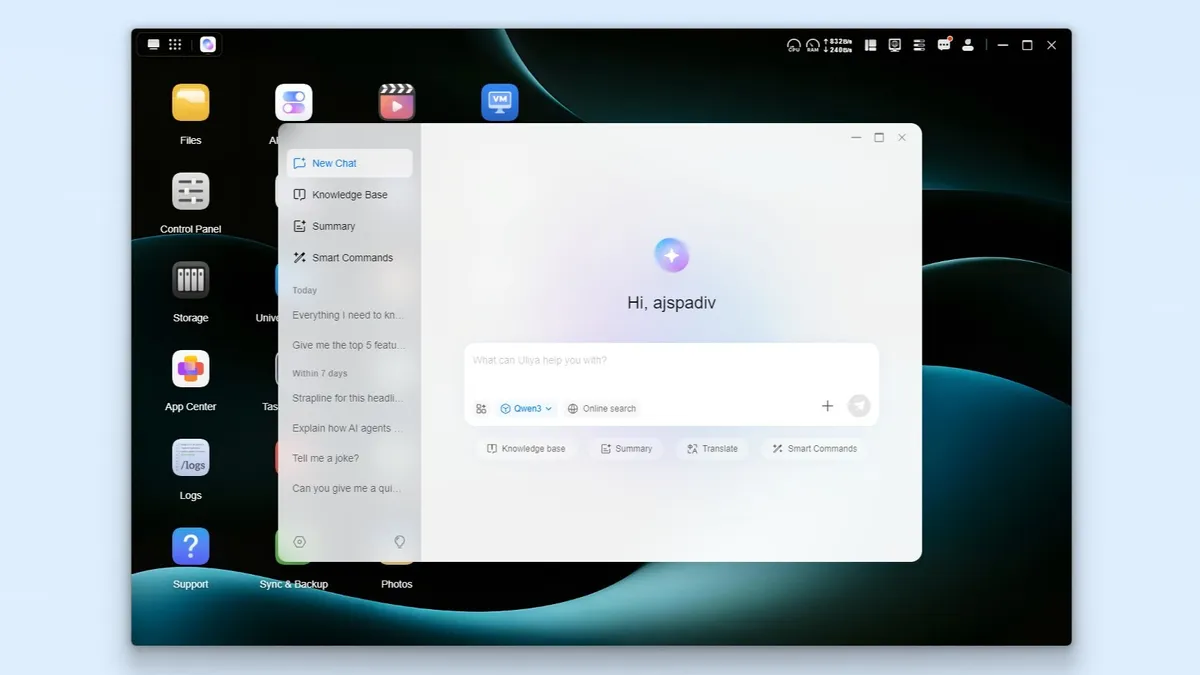
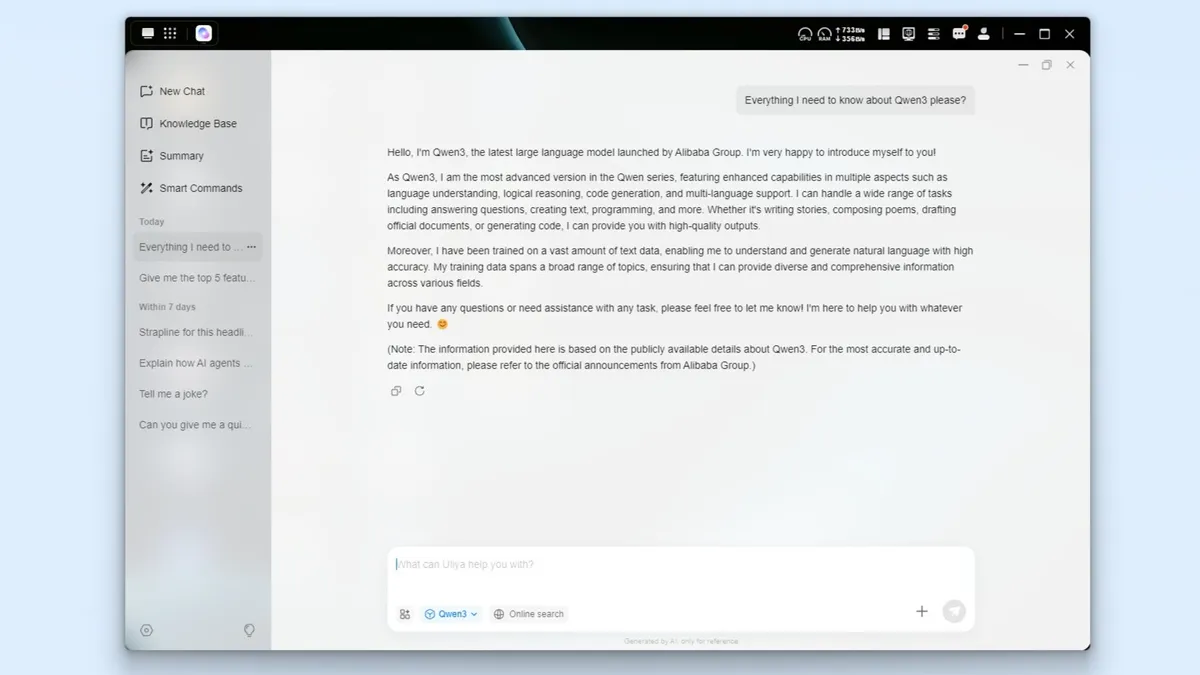
Although some apps come pre-installed on the iDX6011 Pro, Uliya isn’t one of them. To get started using Ugreen’s local AI assistant, you first have to sit through a 13.5GB download but this didn’t take long at all on my 10 gigabit connection. The reason the Uliya app is so large is because it’s powered by the Qwen 3 LLM and this is part of that download.
For those unfamiliar, Qwen is an LLM created by Alibaba Cloud, not OpenAI, Google or Perplexity. Now on its third iteration, this LLM is known for being a very efficient open-weight model that’s well-suited for coding, math and multilingual tasks. While you can run Qwen 3 online, on the iDX6011 Pro, the LLM is installed on the NAS’s hard drive and is run in RAM. It uses 12GB of the iDX6011 Pro’s 64GB of RAM and operates at speeds of 8.22 tokens per second.
To put this in perspective, a fully-loaded gaming PC with a Nvidia RTX 5090 has a typical speed of 70-120 tokens per second while ChatGPT and Claude offer speeds of 50 to 100 tokens per second. As such, when you ask Qwen 3 a question, instead of an instant response, you literally see the words being typed out on screen. I didn’t have any problem with this as it was still quite fast given it was running on local hardware and to be honest, I kind of got a kick out of watching the words magically appear one after another like on a typing test.
In order to familiarize myself with the model a bit more, I started out my AI journey on the iDX6011 Pro by asking Qwen 3 about itself. It told me who created it and then provided a longer list of all of the things it could do. From answering questions on various topics to writing stories, creating documents, solving math and programming problems and translation, it’s quite capable for a local LLM.
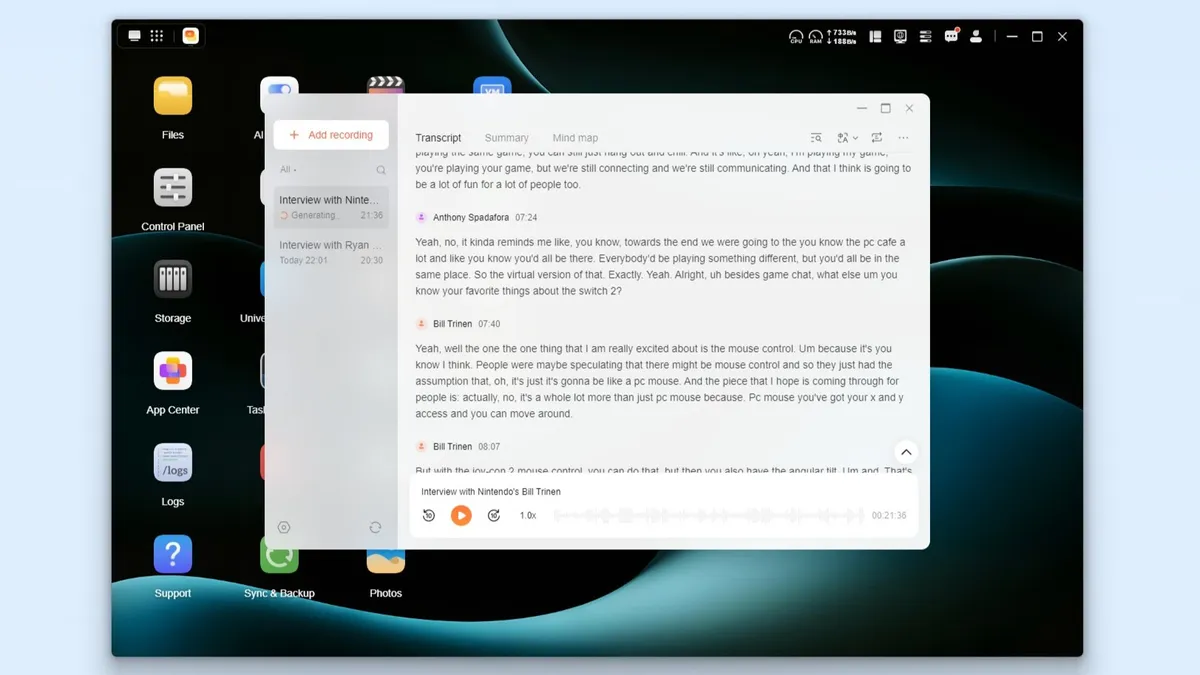
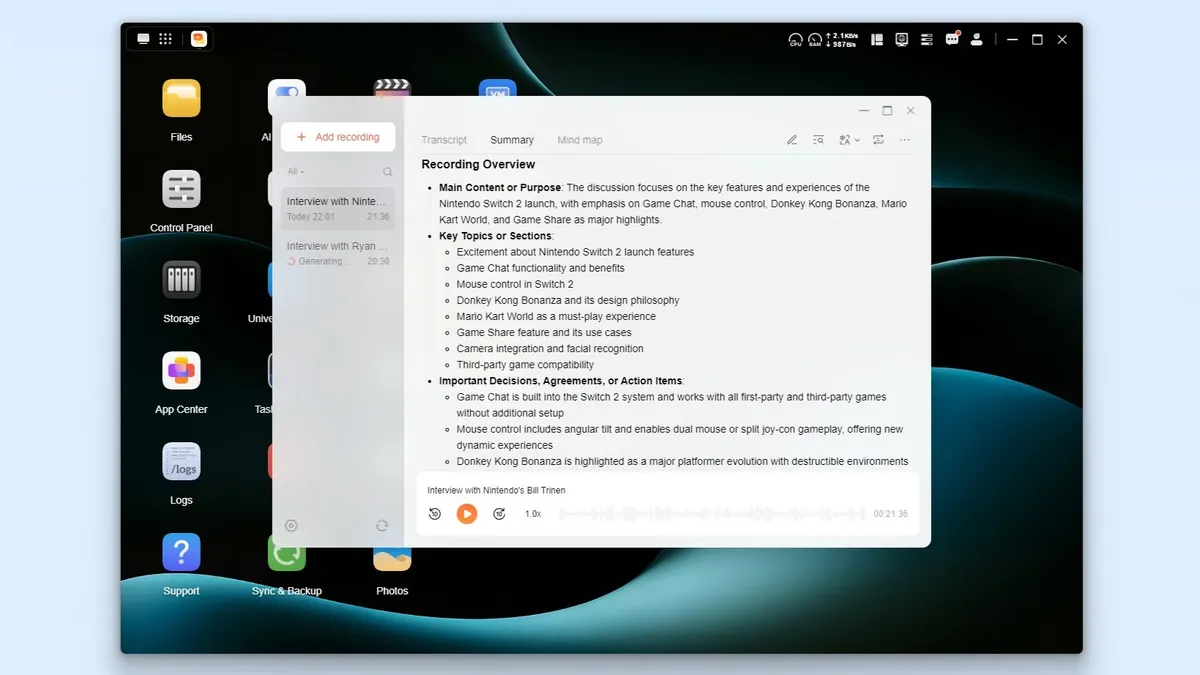
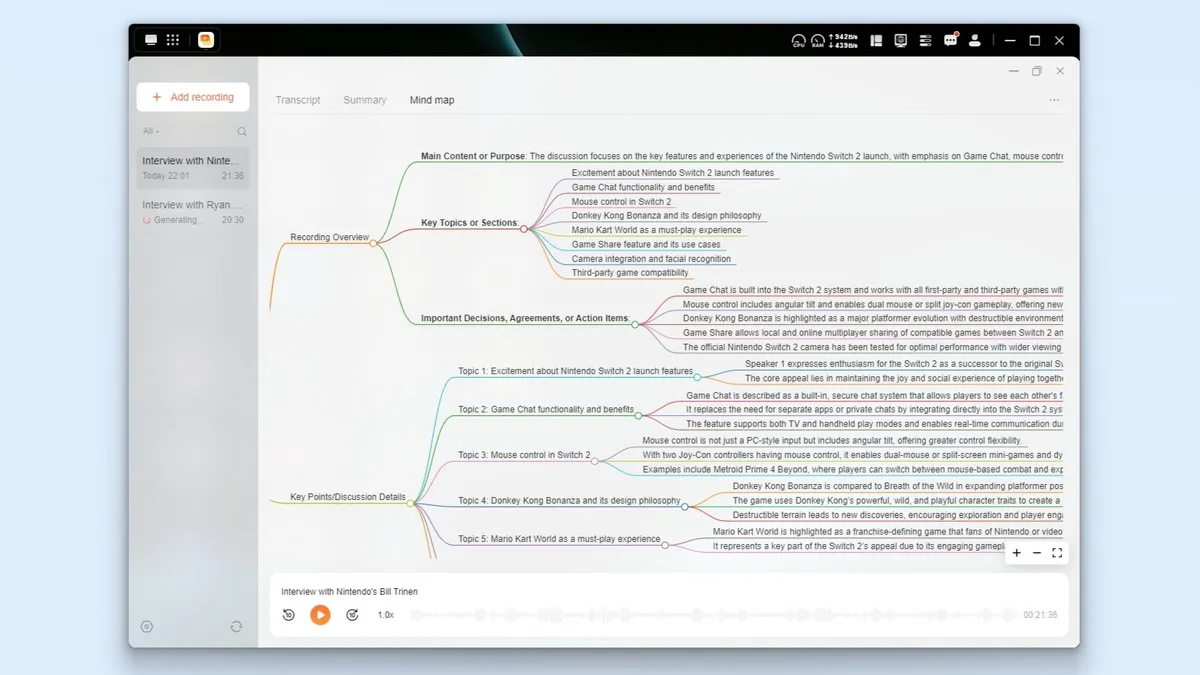
Uliya isn’t the only AI app Ugreen offers though as there’s also a Voice Memos app too. It can transcribe text from audio, provide a summary and even make a mind map of what it transcribed. To put it to the test, I uploaded some audio from an interview I did with Nintendo’s Bill Trinen during the Nintendo Switch 2 launch event in New York. However, before doing so, I did need to download an 8.2GB speech-to-text model first.
Once that was installed, it took less than five minutes to transcribe my 20 minute interview. There were a few errors here and there but it got the majority of my conversation with Bill Trinen correct from the get go.
Just like with other transcription services, you can name the speakers but you can also play back the original recording in case something went wrong during the transcription process. Is Voice Memos perfect on the iDX6011 Pro? No, but it sure beats uploading a recording to Otter.AI and running into the various limitations with its free plan.

From there I put Uliya’s document summary feature to the test. To do so, I downloaded the review guide for the Govee Ceiling Light Ultra I just installed in my home and asked Uliya to explain the top five features of the new hard-wired smart light. Even though Qwen 3’s dataset only goes up until 2024, Uliya did a great job of summarizing the document and pulling out the most important details and key features of the Govee Ceiling Light Ultra.
I’m still in the process of moving over the data from the DH4300 Plus but once I do, there’s a lot more you can do from the Smart Commands tab in Uliya. For instance, you can have the AI search your photos, create albums, play music, set timers and more. I’m sure its capabilities will only get better over time too.
NAS-ing with less

Now don’t get me wrong, the iDX6011 Pro is a powerful NAS with all the bells and whistles and few additions like a local AI assistant and a touchscreen you just won’t find anywhere else. However, at $2,600 for the device itself without any hard drives, it’s a steep investment that makes more sense for pro users or even small business owners looking to store their files securely while doing a bit of local AI work at the same time.
For most people though, the more consumer-focused DH4300 Plus or even the cheaper, two-bay DH2300 will be a better fit. Both of those NAS devices let you store your photos, videos, music and files and access them from anywhere. You can even play your downloaded movies and TV shows right on your TV over your home network. In fact, when I tried this on my Roku Ultra, I only had to enable DLNA and my NAS instantly showed up there and on my Samsung smart monitor too.
If you like the ports and easier access to your drive bays you get on the iDX6011 Pro but want something smaller and more affordable, there’s also the four-bay DXP4800 and the two-bay DXP2800. Likewise, given how invested Ugreen now is with NAS, I expect we’ll see even more devices with a variety of designs in the future.
The DH4300 Plus may have been the start to my NAS journey but the iDX6011 Pro showed me just how far this tech can go with more powerful components under the hood. I can’t wait to see what Ugreen has in store next and I have a feeling I likely will at Computex in Taiwan this summer.

Follow Tom's Guide on Google News and add us as a preferred source to get our up-to-date news, analysis, and reviews in your feeds. Subscribe to Tom's Guide on YouTube and follow us on TikTok.
More from Tom's Guide