
 Club Benefits


With every new smartphone comes an abundance of images showing what the camera can do. But when you take the new device for a spin, your pictures may look nothing like the amazing samples that got your heart racing. Is the camera not as good as advertised? Maybe. But maybe you just need pointers. What follows are ten photos I snapped with my iPhone 5 and tips on how I got each one to shine, including making edits in the free Instagram app. But most of these are universal tips: You can use them with other phones and apps.
Have your own great smartphone photos and tips you'd like to share? Email pics to techphotos@tomsguide.com, and tell us how you got them. We'll publish the best.
1. Try off-center composition

Resist the temptation to always put your subject in the middle of the frame. When taking a photo of Grant’s Tomb in New York City, I moved slightly to the side and turned the camera to create a pleasing vertical composition instead of the typical horizontal. The building became less monolithic and more artistic, while the background and shadows add context. One composition trick: Imagine a tic-tac-toe board drawn over your lens and try to not put the subject smack dab in the center square.

MORE: 10 Best Ad Blockers and Privacy Extensions
2. Select the exposure point

I was recently on a boat with some friends watching an amazing Kansas sunset. When I held my iPhone up, it automatically set the exposure to brighten up a darker part of the scene, which would have made the sky too light. But iPhones and some other cameras allow you to pick the point where the camera judges exposure. I tapped a spot to the left of the sun that resulted in a better average of the light and dark areas. I then increased color in Instagram before posting (more about that later).
3. Crop out what what's not important:

On a trip to the Denver Botanic Garden I came upon a large reflecting pool. A storm had just passed overhead, and the clouds made the water look like a sheet of black glass. Posting the final shot in Instagram’s square format, I was able to crop in to give more importance to the reflections while only hinting at the actual size of the building. The crop also eliminated some foreground, thus bringing the reflection forward. I also used Instagram to increase color saturation.
4. Turn up saturation

Sometimes you are happy with a photo's composition but feel that it needs something more to make it shine. After capturing the unique arrangement of old vs. new buildings in lower Manhattan, I thought the buildings and sky appeared a bit lackluster. Using Instagram's saturation tool, I turned up color saturation, allowing the different color buildings to stand out from each other. Cropping the photo eliminated distracting elements in the foreground.
DOWNLOAD: Instagram for iPhone
5. Boost contrast

I shot this stunning vista while hiking through Red Rock Park in Colorado. After finding the right exposure point and snapping a photo, I used Instagram to bump up color saturation. But the photo still seemed dull. So I used Instagram's contrast tool, which brightens the light areas of photos and darkens the shadow areas, making details pop more. I then applied the standard square Instagram crop.
6. Shoot for the highlights

Walking around Downtown Denver during a dramatic sunset, I found the need to employ a cardinal rule of pro photography: Shoot for the highlights, process for the shadows. I tapped the screen to optimize exposure for the brightest elements, letting the rest of the image be a little too dark. Then, using Instagram's new advanced editing tools, I brought up the dark areas to even out the exposure without overexposing the light areas. The saturation was also increased to give richness to the sunset.
7. Adjust the shadows

Getting a kid to take off his or her hat for a photo is an ordeal and probably won't result in a smiling face. So how can we deal with the shadows over the face? One of the more powerful tools in today’s photo apps gives people the ability to adjust the shadow areas without affecting the whole image. Using the Shadow Adjustment tool in Instagram, I was able to lighten just the shadows without overexposing the rest of the image.
MORE: Camera Face-Off: iPhone 5s vs Galaxy S5
8. Use filters to add flair

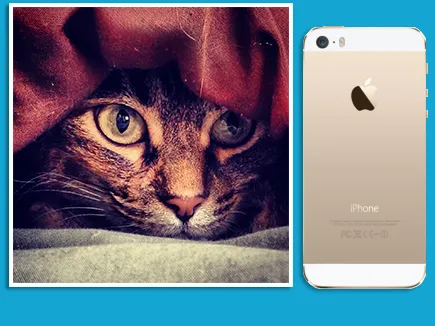
It was a cold, snowy day in January when I caught a photo of my cat peeking out from under the covers. I cropped in to her face, but the photo still needed something. That’s where a filter comes in. Without having to mess with the custom editing tools, a filter can add the right emphasis without the fuss. I just selected Instagram's X-Pro II filter, which boost the contrast and saturation and turned the Lux setting to 10
9. Anticipate the Shot

I was standing on a bridge just outside of Coors Field in Denver to watch a 4th of July fireworks show. From past experience, I know that by the time you see a firework explode, it's too late to capture a photo. Instead, as that first explosion lit up the sky, I tapped the screen to set focus and exposure (as I did with the sunset photo). I waited until I saw another rocket launching and held my finger on the shutter button so I could capture a series of photos and chose the best one.
10. Use HDR for detail in high contrast

The plane took off from Denver, and before I knew it we were at 38,000 feet, flying east into the night. But the majestic clouds outside my window seemed muddy in my photos because they lacked contrast. So I used the camera's high dynamic range mode. HDR takes three photos every time you hit the shutter: one exposed for the darkest details, one for the lightest, and one averaged for the whole photo. Your camera app combines the best elements from each photo into one optimal image.
- How to Take Better Photos with Your iPhone
- The Best DSLR Cameras Available Now
- Best Phone Cameras 2014
Tom's Guide Senior photographer Jeremy Lips seldom goes without his DSLR, but he always has his iPhone 5. Follow him @JeremyLipsPhoto on Google+, and on Instagram. Follow us @tomsguide, on Facebook and on Google+.
