


The iPhone has consistently offered one of the best phone cameras on the market over the years, with the iPhone 5s beating every other phone we have tested for photo quality. But even the best camera needs a good photographer to bring out its full potential. If you aren't satisfied with the look of your iPhone photos, fear not: With a few simple setting tweaks, you can seriously boost image quality.
Many of these adjustments are possible with the iPhone's minimalist built-in camera app. But for the best photos, investing no more than $5 in the right apps will transform your iPhone's camera into the image powerhouse it was destined to be.
Taking action photos with the iPhone
The most important factor for action photography is a fast shutter speed to freeze (or partly freeze) movement. Apple's iOS 7 doesn't allow an app to set shutter speed (the upcoming iOS 8 will), but if you shoot under bright light, the camera will have to use higher shutter speeds to get proper exposure.
MORE: How to Take Better Photos with Your Galaxy S5
The iPhone, especially the 5 and 5s, have relatively fast autofocus speed, given the limits of phone camera tech. But to ensure you get just the right moment, use the camera's burst mode to fire off a series of shots, increasing the chance that at least one of them will capture the ideal moment. Simply holding down the shutter button in the native iPhone app triggers burst shooting of 10 photos per second on the iPhone 5s.
We used burst mode when taking photos of a twirling dancer at an outdoor festival. The bright sun allowed for a high shutter speed, and we were able to pick out from the many shots the one in which her face is both toward the camera and lit by the sunlight.

The dancer is still turning towards the camera in the photo at far left, and has turned away in the one on the far right. The one in the middle is just right.
How to use the iPhone's flash
The general rule of camera flash is: Use it as little as possible. That's especially true with the built-in flashes on phones and pocket cameras, which tend to overexpose images and completely change the color of the scene. (Standing back from your subject can help a little with the overexposure.) Because the flash is so close to the lens, light tends to shine straight onto and illuminate the red retina in the back of your subject's eyes, for that demonic look. Nevertheless, if it's really dark, you simply have to use flash.
The iPhone 5s changes some of the rules. In low light, its True Tone flash mixes light from LEDs of two different colors, allowing it to better match the "warm" ambient light — especially indoors — and produce better-looking skin tones, whatever the color of the person's complexion. It doesn't necessarily help with redeye, though. So experiment by taking photos slightly off-angle to your subjects.
MORE: Why Autofocus is the New Megapixel

Regardless of what iPhone model you have, the best time to use flash may be on a bright day if the sun is behind your subject. Such a "backlit" setup is not ideal, but sometimes it's inevitable. Regardless of settings, no camera has the dynamic range to reconcile a face in deep shadow and a brilliant bright sky behind it. Instead, take the iPhone out of its default Auto flash mode and set it to On to provide a "fill flash" to take the shadow off a person's face. This may cause the background to be a bit overexposed, but it's the better way to go if the person is the subject of your photo. The iPhone flash isn't terribly powerful against sunlight, so you will have to get pretty close to your subject — no more than 4 feet away.

How to improve exposure
Exposure is what it sounds like: The intensity of light the image sensor is exposed to. By default, iPhones (and many cameras) use pattern (aka matrix or evaluative) metering, which sets the best exposure for the image as a whole.

Photo using default (pattern) exposure.
Some parts of photos are more important than others, so the iPhone lets you specify where to optimize exposure by tapping that part of the screen when previewing your shot. (This also sets the focus point.) In a photo of a building against the sky, for example, you can tap on the building to lighten up that portion, which may leave the sky too light. Or you can tap on the sky, which may leave the building dark.

Exposure point set on building (left) and on sky (right).
If your subject is against a very bright background, such as direct sunlight, tapping the background can produce the artistic effect of displaying your subject in silhouette.

Exposure point set on man (left) and on window (right).
Bonus Tip: Adjust your screen brightness for the ambient light to set exposures that will look good not only on your iPhone but also on any device. Dim the screen at night, and pump it up in sunlight. (You may still have to step into shade to see the screen.) Using the screen isn't a perfect tool for judging exposure — high-end cameras display actual measurements — but it's the best you've got.
MORE: Phone Camera Face-Off: iPhone 5s vs. Galaxy S5
Using HDR on the iPhone
IPhones, especially the 5s, have good dynamic range: the span of brightness a camera can capture before highlights blow out or shadows turn black. Like many other phones and cameras, the iPhone has a high dynamic range, or HDR, mode that combines three photos — one brighter, one darker, one medium — to expand its range even closer to what we see in real life.

HDR photo shows detail in the building and returns some of the blue sky.
The iPhone's HDR feature offers less of a boost than some other cameras (in part because the iPhone doesn't need as much). But it helps in some cases. For occasional use of HDR, go with the iPhone's native camera app.
Using exposure lock and exposure compensation
Simply tapping the bright or dark part of an image to optimize exposure for it is easy. More challenging are the many cases in which you need a balance between dark and light elements, and the iPhone's pattern metering can't get it right. Using the iPhone's built-in app, you can tweak exposure by tapping on areas in the midtones between extreme dark and extreme light.
When you find the right spot, you can make sure the iPhone keeps that exposure setting with Exposure Lock. Just hold your finger on the part of the screen you want to be metered for a few seconds until you see the yellow Exposure/Autofocus square pulsate. When you remove your finger, a small yellow banner with the text AE/AF LOCK appears near the top of the screen. Exposure Lock is also handy when you can't find the right midtone in the view you want to shoot. You can point the camera somewhere else — where it does achieve better exposure — and then lock exposure so the camera won't readjust when you go back to the subject you want to shoot.
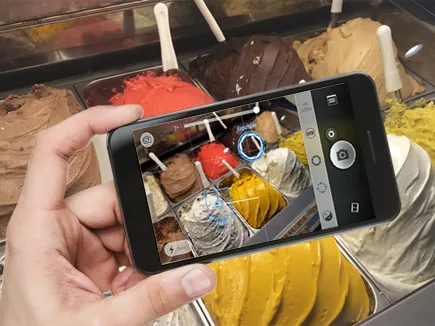
To set separate exposure and focus points, you'll need an app. Both the $1.99 Camera+ and $1.99 ProCam 2 apps allow you to separate exposure and focus. With the exposure locked, you can still reframe the photo and then tap and lock the part you want to be in focus. You could point the camera anywhere afterward, and those settings wouldn't change.

Exposure and Focus Lock in Camera Plus app.
We used this capability when photographing an assortment of gelato at an ice cream parlor. In the default mode, the chocolate sunk into the shadows, so we locked exposure on the chocolate to lighten up the image. But we wanted to focus on the chocolate-chip flavor in the foreground, so we locked focus there.

Final image using Exposure and Focus Lock. The white dots are reflections on the glass display case.
If the exposure still looks off, you can tweak it with Exposure Compensation: a slider that makes the entire image lighter or darker. Both apps feature a scale that starts at zero and goes to +2 (brighter) and -2 (darker). The units, called Exposure Values (EV), represent a doubling or halving of light: Going from 0 to +1 makes the photo twice as bright, for example; going to +2 makes it four times as bright. In most cases, adjusting exposure by one-third or two-thirds EV is plenty.

Exposure compensation in ProCam 2 app.
MORE: A Digital Camera Glossary
Getting better color in iPhone photos
In general, iPhones capture very good color. Based on our lab tests, the iPhone 5s is one of the most color-accurate phone cameras out there. But sometimes you don't want accuracy: You want a little punch. This is especially true on both very bright and very gray days, in which accurate colors are washed out or muted, respectively. In these cases, you may need apps that allow you to increase the color saturation in photos.
The iPhone's own app is no help here. It offers only primitive filters that make a photo greenish or orangey or black and white or some other extreme distortion, but don't provide any fine adjustment.
Camera+ doesn't offer color adjustments (except in editing mode). But ProCam 2 provides a simple, powerful slider that takes color saturation all the way from black and white to drenched.

Zero-color saturation (black-and-white) at left, normal saturation in middle, and high saturation, respectively, in ProCam 2 app.
Under even moderate light, the iPhone's auto white-balance feature keeps colors pretty accurate. But under very low light — especially orangey incandescent bulbs — even professional cameras toss color accuracy out the window in their default settings. To get good-looking color in these conditions, you need to manually adjust the camera's white balance, another feature that only ProCam 2 offers.

The White Balance slider in ProCam 2.
MORE: How Many Megapixels Do You Really Need?
White balance is yet another slider in ProCam 2, this one marked with icons. A sun icon denotes the default setting, good for most bright conditions. Above it (or to the right, depending how you hold the iPhone) are icons for lighting conditions with a "cooler" or bluer cast, such as photos taken with flash (represented by a thunderbolt) on a cloudy day. Icons in the opposite direction are for increasingly "warmer" or redder conditions, such as candlelight.

Default white balance in ProCam 2.
Using the Tungsten preset (indicated by a light bulb icon) under incandescent light neutralized most of the orange cast from light bulbs in a café at night without completely removing the warm ambiance.

Tungsten white balance in ProCam 2.
Senior editor Sean Captain has been writing about photography for a decade and loves that his job requires him to go out and take pictures. Follow him @seancaptain and on Google+. Follow us @tomsguide, on Facebook and on Google+.

