These 7 iOS camera tips will make you look like a pro capturing content with an iPhone
Don't settle for the same boring shots
Here at Tom’s Guide our expert editors are committed to bringing you the best news, reviews and guides to help you stay informed and ahead of the curve!
You are now subscribed
Your newsletter sign-up was successful
Want to add more newsletters?
Daily (Mon-Sun)
Tom's Guide Daily
Sign up to get the latest updates on all of your favorite content! From cutting-edge tech news and the hottest streaming buzz to unbeatable deals on the best products and in-depth reviews, we’ve got you covered.

Weekly on Thursday
Tom's AI Guide
Be AI savvy with your weekly newsletter summing up all the biggest AI news you need to know. Plus, analysis from our AI editor and tips on how to use the latest AI tools!

Weekly on Friday
Tom's iGuide
Unlock the vast world of Apple news straight to your inbox. With coverage on everything from exciting product launches to essential software updates, this is your go-to source for the latest updates on all the best Apple content.

Weekly on Monday
Tom's Streaming Guide
Our weekly newsletter is expertly crafted to immerse you in the world of streaming. Stay updated on the latest releases and our top recommendations across your favorite streaming platforms.
Join the club
Get full access to premium articles, exclusive features and a growing list of member rewards.
The camera is the cornerstone of your iPhone. There’s no denying that. Have you ever noticed that during a new iPhone launch, they save the camera specs for last? That’s because it's the show-stopper.
I never noticed it until now, but I’ve been capturing photos and videos on my iPhone 17 Pro much like everyone else. Just point and shoot, that’s all. The irony is that even though the iPhone camera is so sought after, many of us fail to take advantage of all of the great features hidden within the camera app — including myself.
Everyone knows how to point and shoot, switch to the selfie camera, and how to turn the flash on and off. That’s where most of our knowledge stops, or we simply have become so complacent with being ordinary. But I think you’re leaving a lot of proverbial meat on the bone.
I know very well that my iPhone 17 Pro is one of the best camera phones around, but I want to share some of the hidden camera features I’ve been exploring with the iOS camera app. You’ll learn quickly like me how you can unleash your iPhone camera’s potential once you master these simple pro tricks.
Set your Action Button to never miss the shot
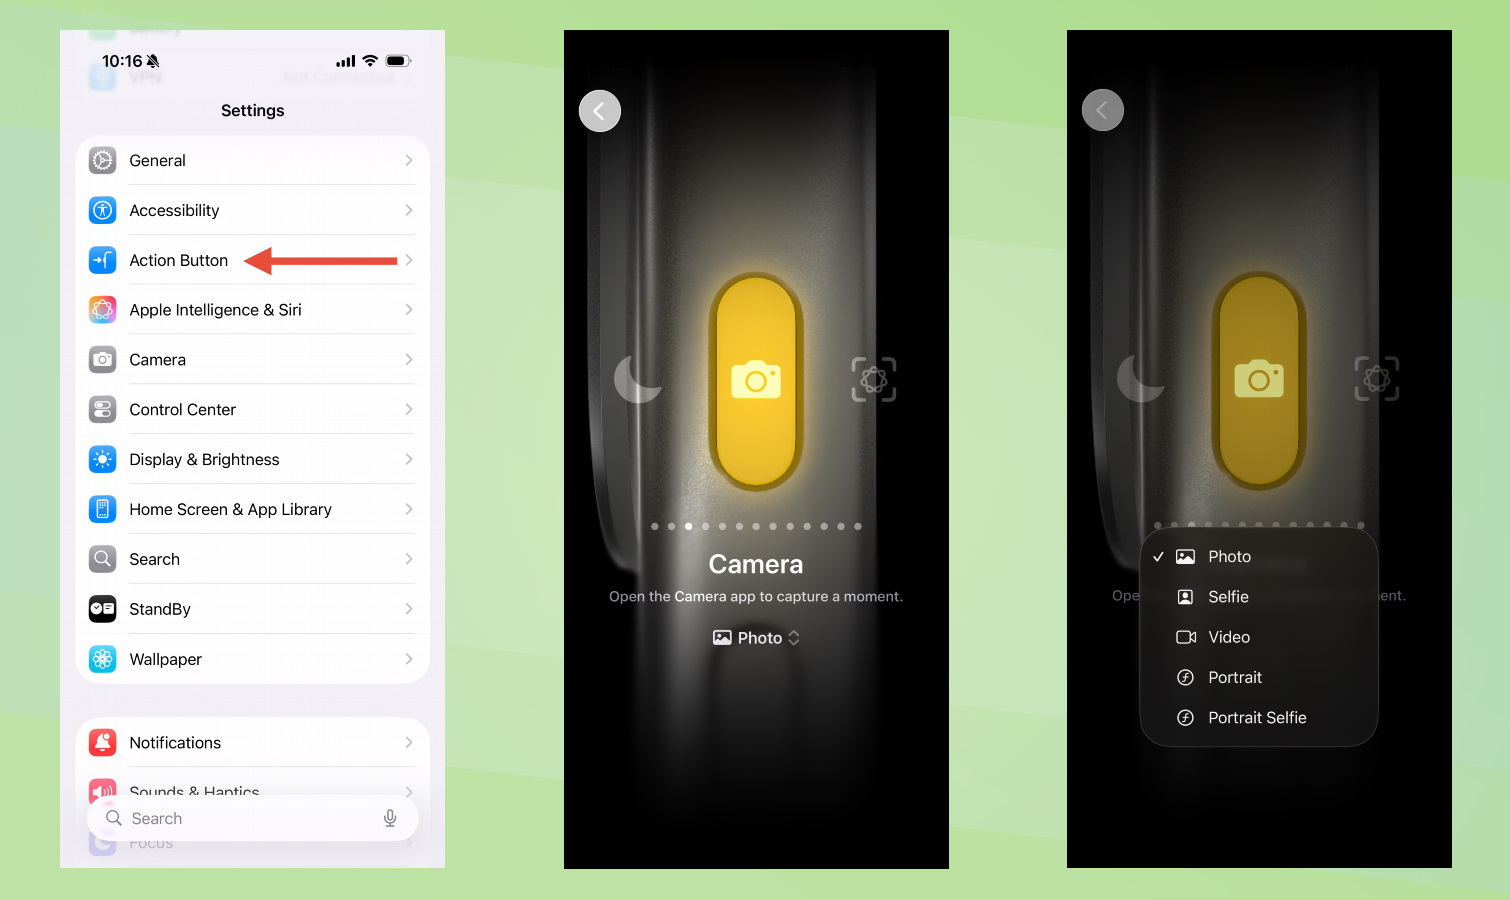
The iPhone Action Button is the tiny button that sits atop the volume button on the left side of newer iPhones. You can set it to launch different apps or shortcuts within your iPhone. When you’re the type of person that takes pictures of any and everything, setting the Action Button to open your camera is a logical choice to make, especially if don't have a new one with the Camera Control.
To do this, go to your settings and scroll down to the menu item “Action Button.” Then side scroll the options until you land on “Camera.” Below, you’ll see a little “Photo” icon. If you click it, it opens a menu which you can select whether the camera opens your back camera, your selfie camera, video, portrait or portrait selfie.
Keep your videos consistent with locking focus and exposure
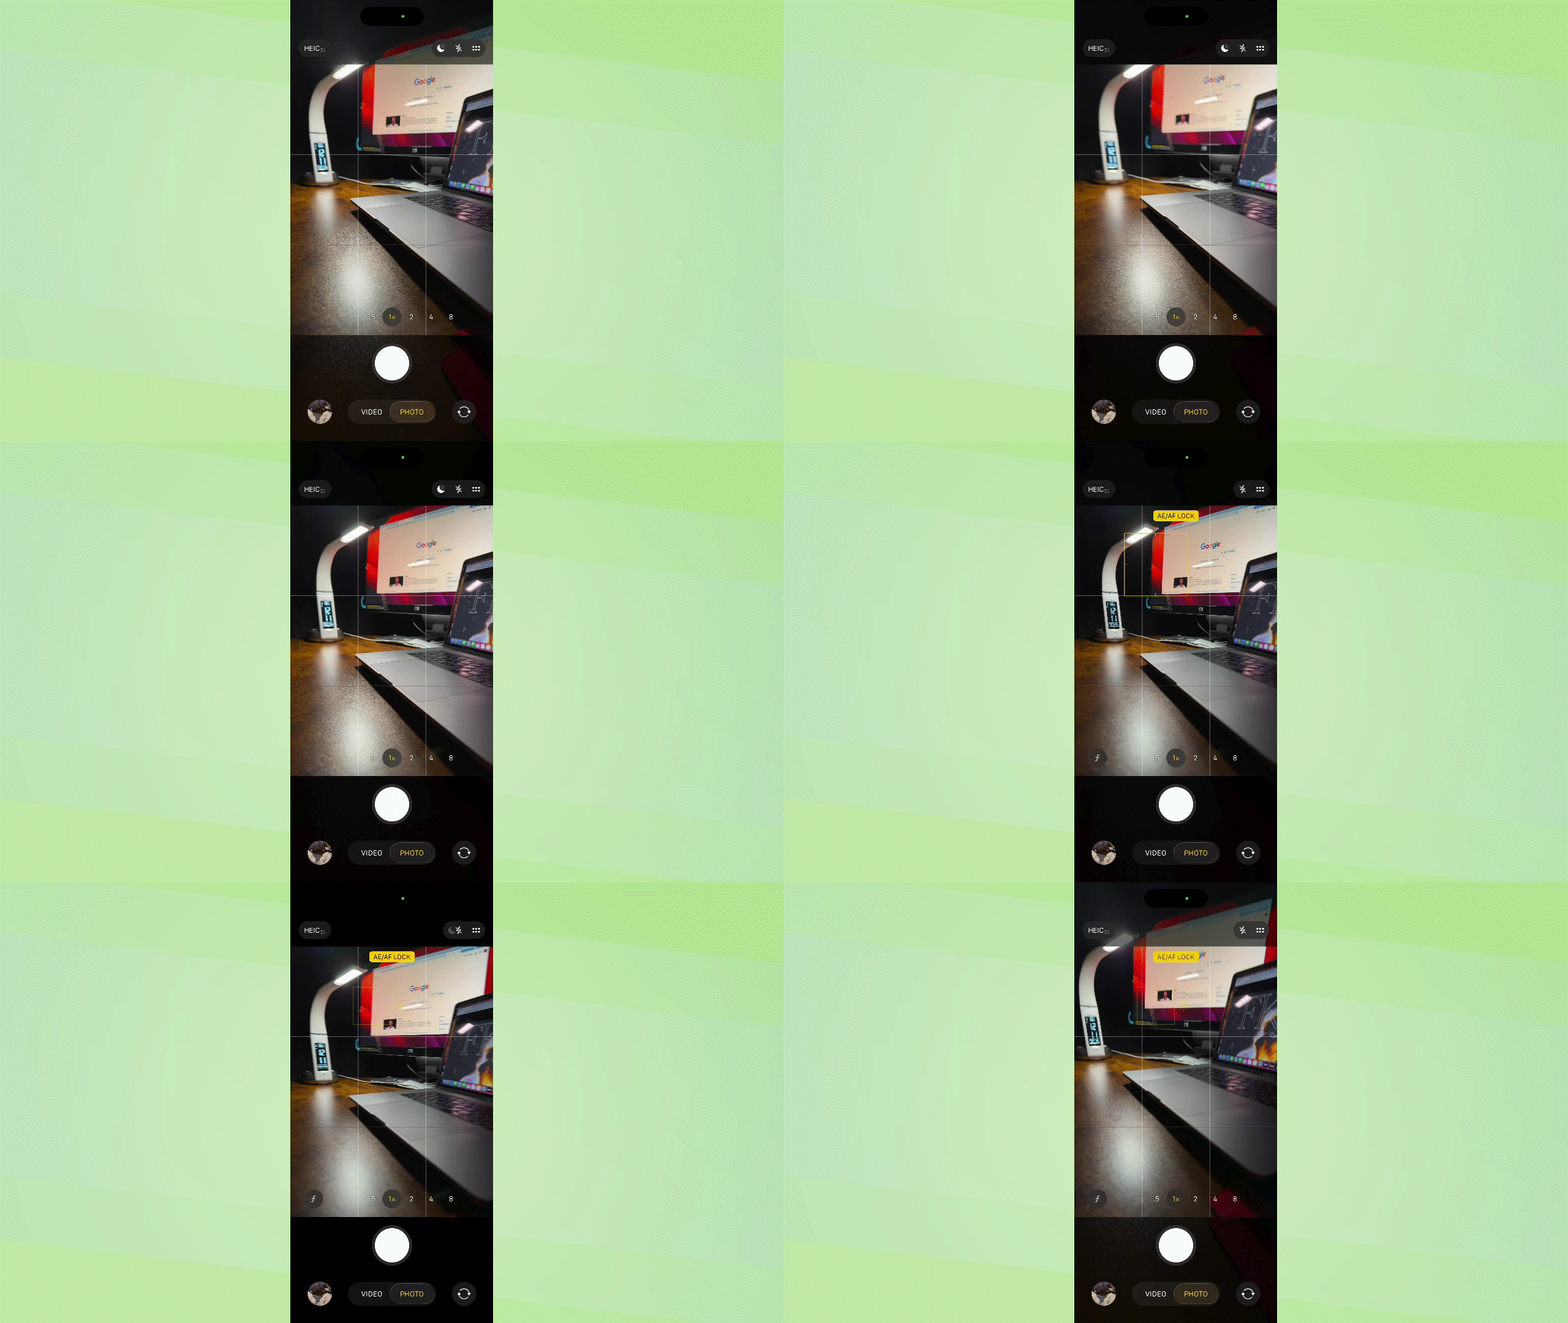
The default setting on your camera will auto focus and adjust lighting on the fly. While its great for many situations, it can be detrimental when you’re trying to match lighting between shots like in this clone video.
Get instant access to breaking news, the hottest reviews, great deals and helpful tips.
For something like this, you need the lighting and focus to stay the exact same between each take, so the final edit looks like it was all one single shot. Thankfully, locking your focus and exposure is simple.
Open your camera app. You can tap on your screen to display a little yellow square with the sun. That’s the focus and exposure. To lock it, press your screen and hold until you see “AE/AF Lock.” Once you see that, the Auto Exposure/Auto Focus locks on the area where you pressed and held.
You’ll see from the example that the numbers on the clock are blurry because the camera is having a hard time adjusting to different light sources as I’m moving the camera around. As soon as I lock the focus and exposure, the numbers on the digital clock become clear regardless of me moving around.
Transform your photo into a gif
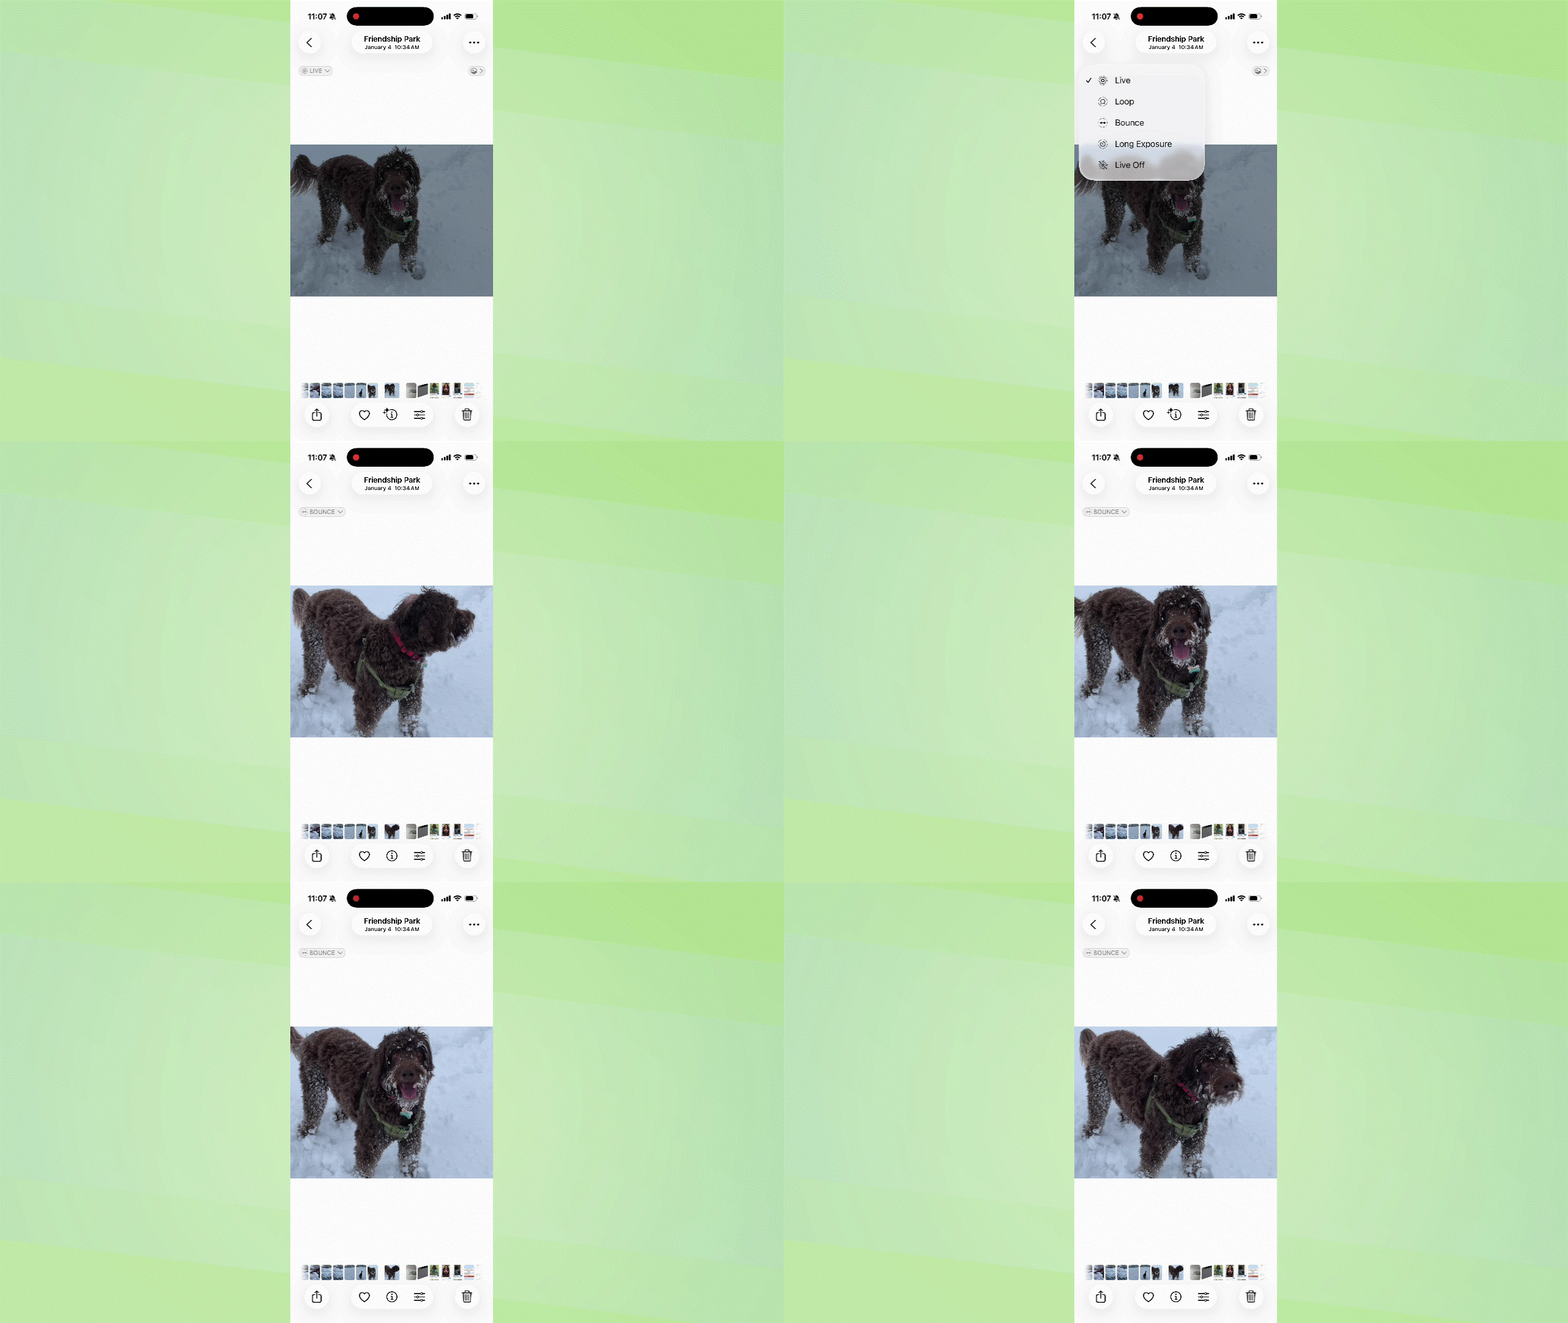
This is arguably one of my favorite things to do, especially with the million live photos I have of my dog. First, take a live photo (preferably of your furry best friend), then view the live photo in your gallery.
In the top left hand corner, click the drop down menu next to “Live” and you’ll see options for Loop or Bounce. I’ve found bounce is the option that most resembles a gif as you’ll see above.
More options to choose from with burst shots
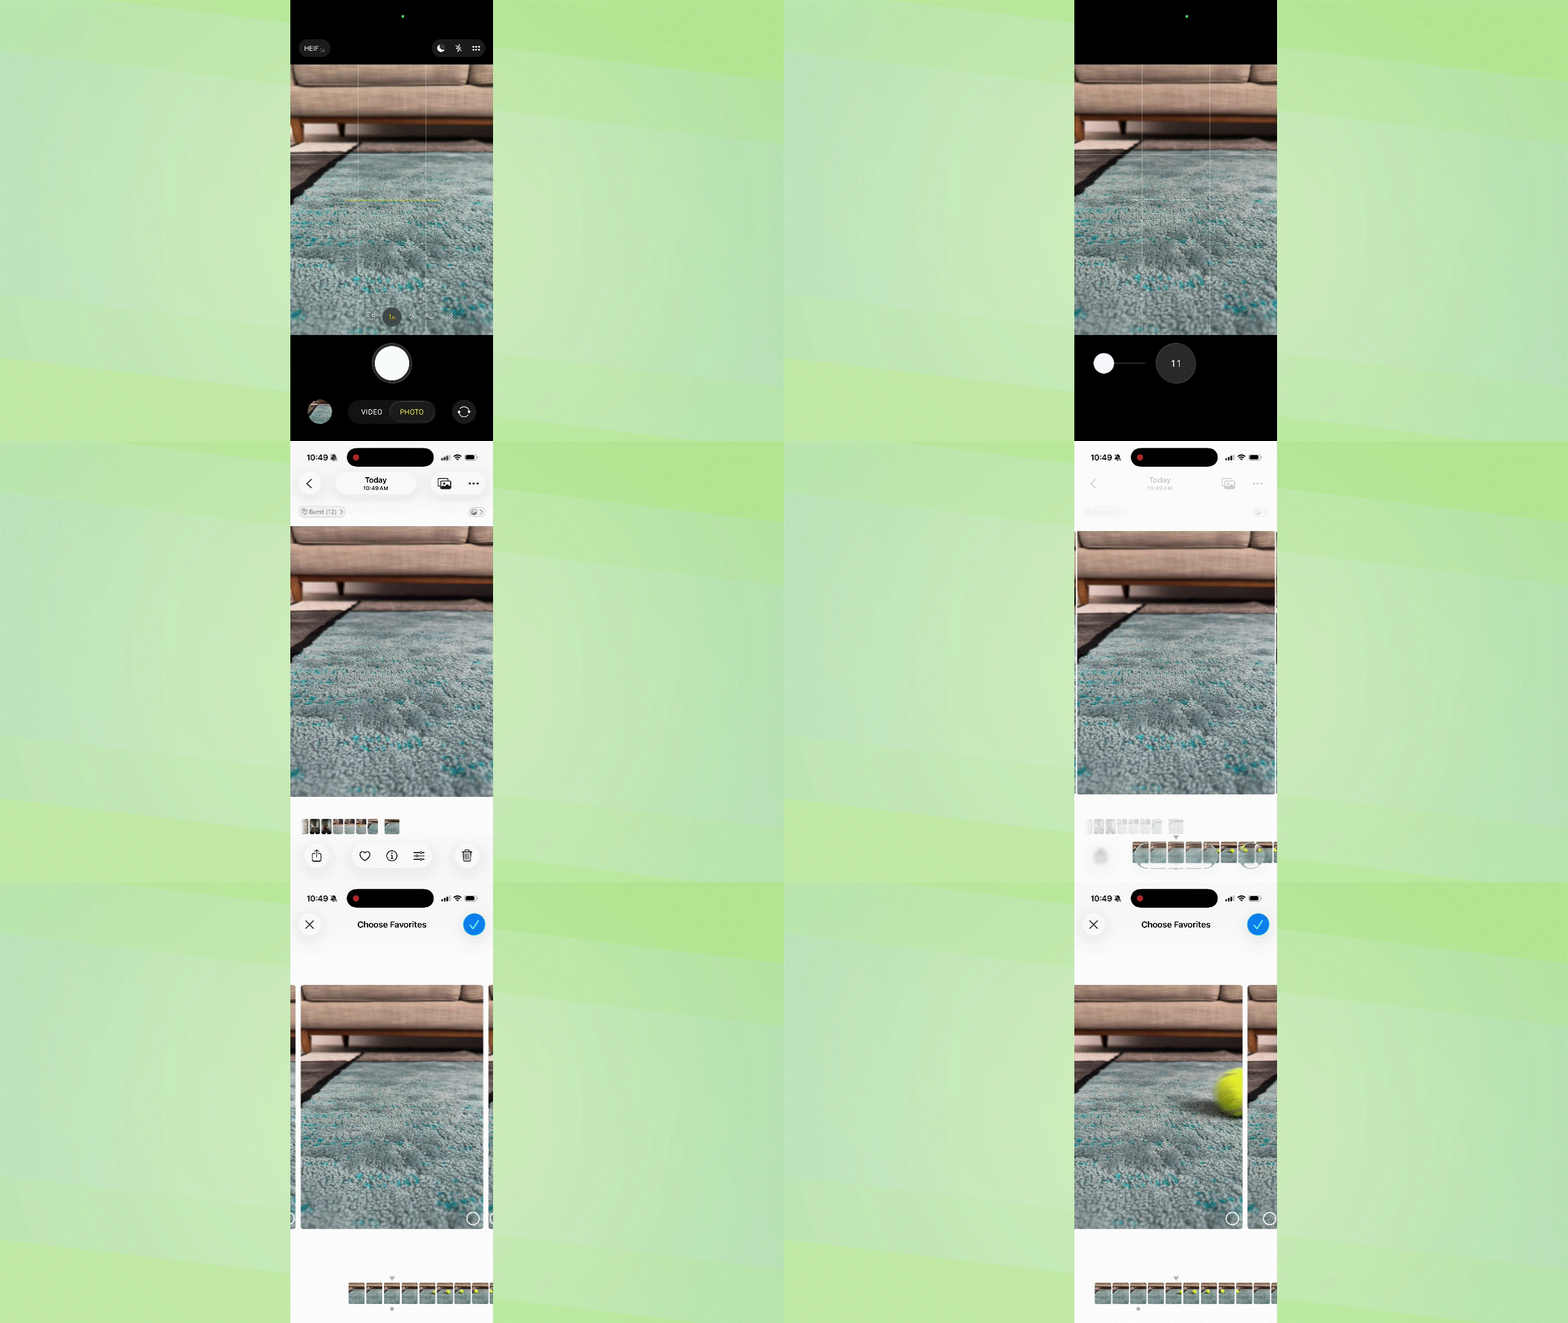
There are two ways to activate this feature. The first is right in the camera app itself. If you press the shutter button, and swipe to your left, your camera will take burst photos. This is a great way to capture several pictures a moving person, animal or object.
The other way is to go to your settings and select camera. Scroll down to the “Use Volume Up for Burst” and toggle that on. Now, open your camera and when you press and hold the volume up button, your camera will take several burst photos.
Get that cinematic background blur
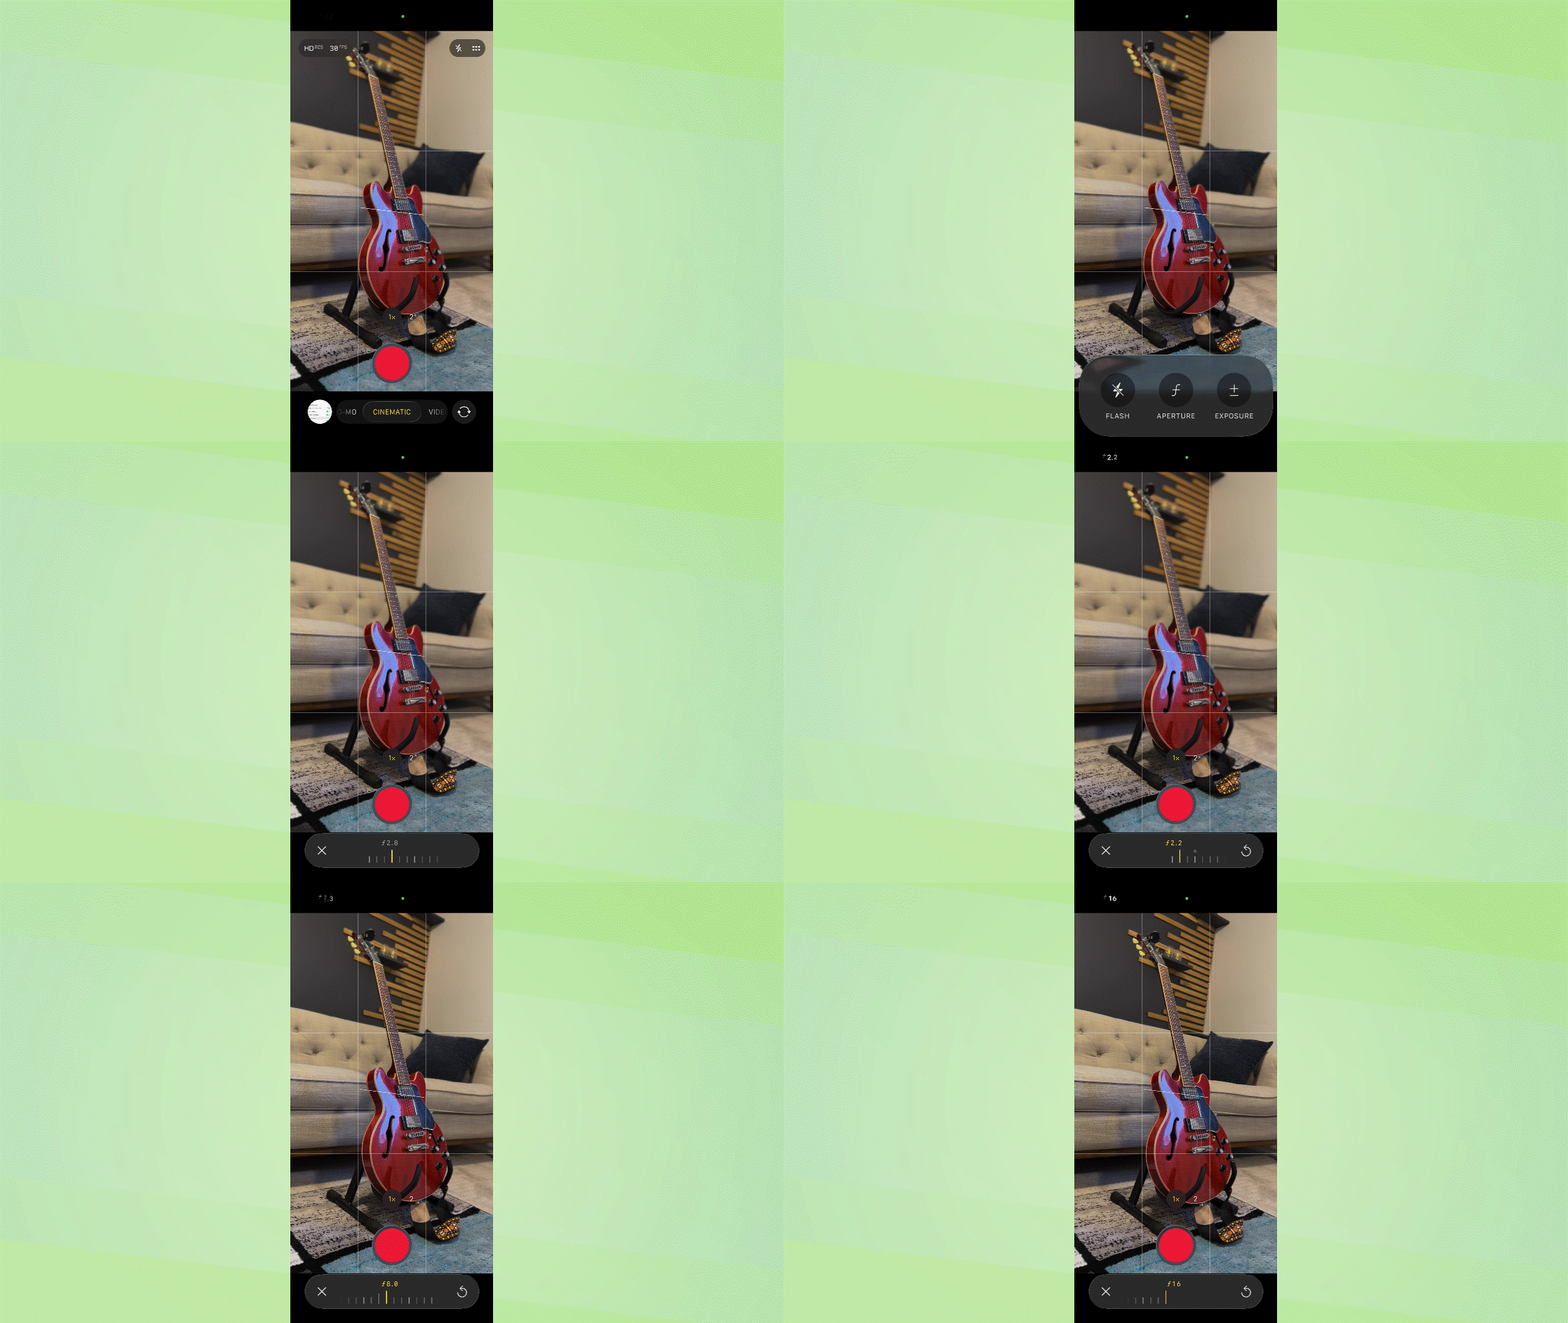
When you want your subject to stand out more in Cinematic mode, you can easily adjust background blur to achieve this feat.
Open your camera and change the video setting to Cinematic by selecting it on the bottom. Click the top right icon to pull up the video settings menu. Select Aperture. A higher aperture results in a sharper image, and a lower aperture will blur the background.
Don’t be afraid to experiment with angles
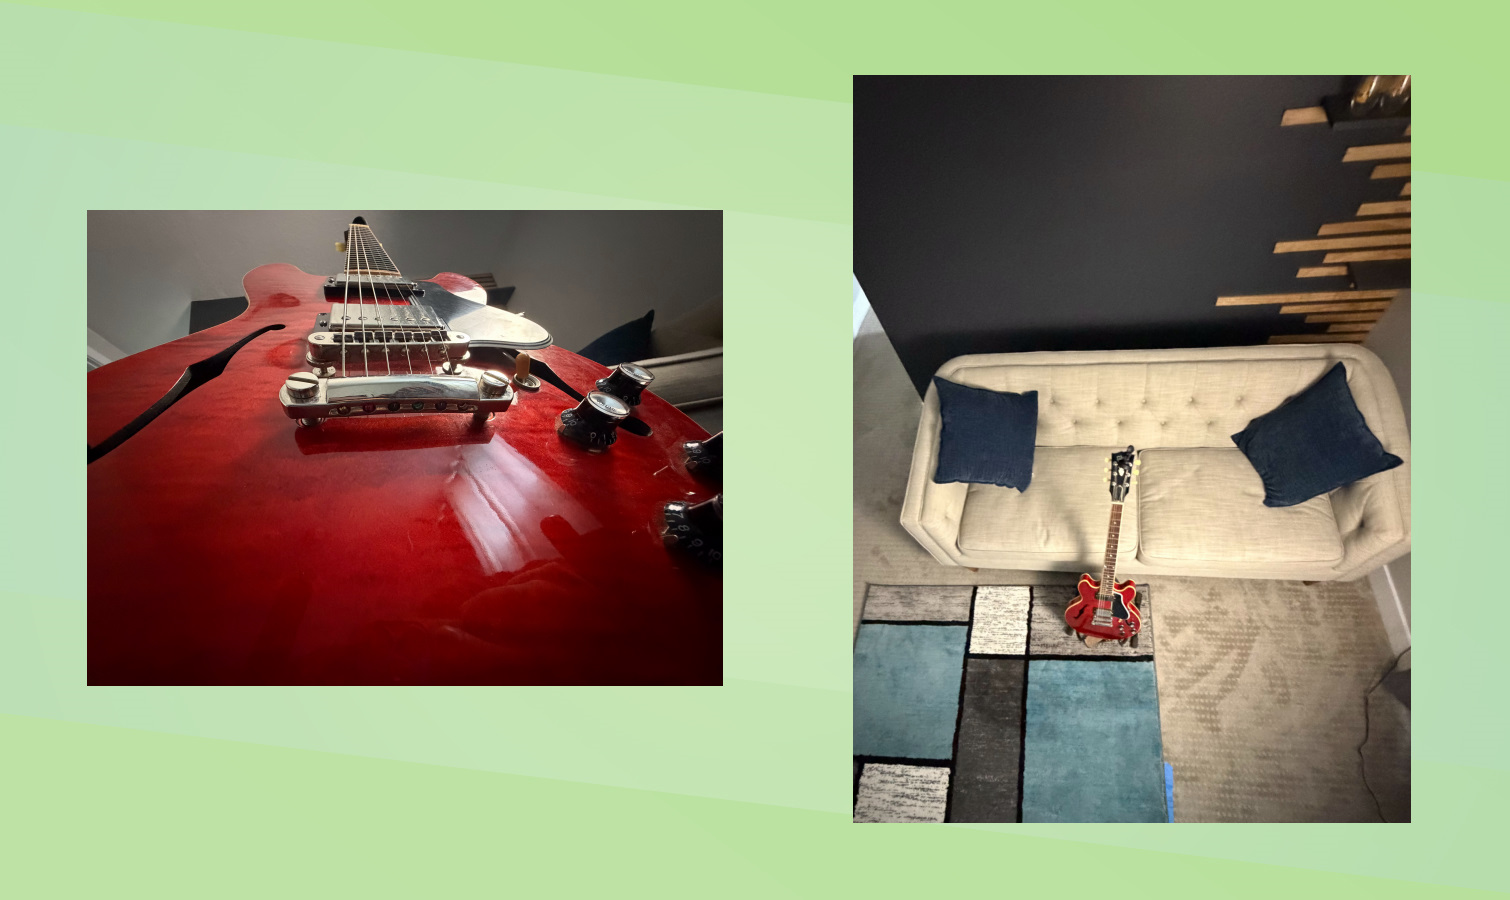
This tip isn’t so much a feature, but a helpful iPhone photography tip. Most people will hold their camera slightly above their subject and angle down — known as the selfie angle. But you can get some really interesting photos by adjusting your angle.
For instance, you can make subjects look larger than life by putting your iPhone on the ground and shooting straight up. This creates an “ant’s perspective” shot.
Contrarily, you can get the opposite effect by shooting at a high vantage point. In the example, look how my guitar goes from looking like a sky scrapper to a toy just by changing the angle of the shot.
Don't be afraid to switch to the telephoto lens more
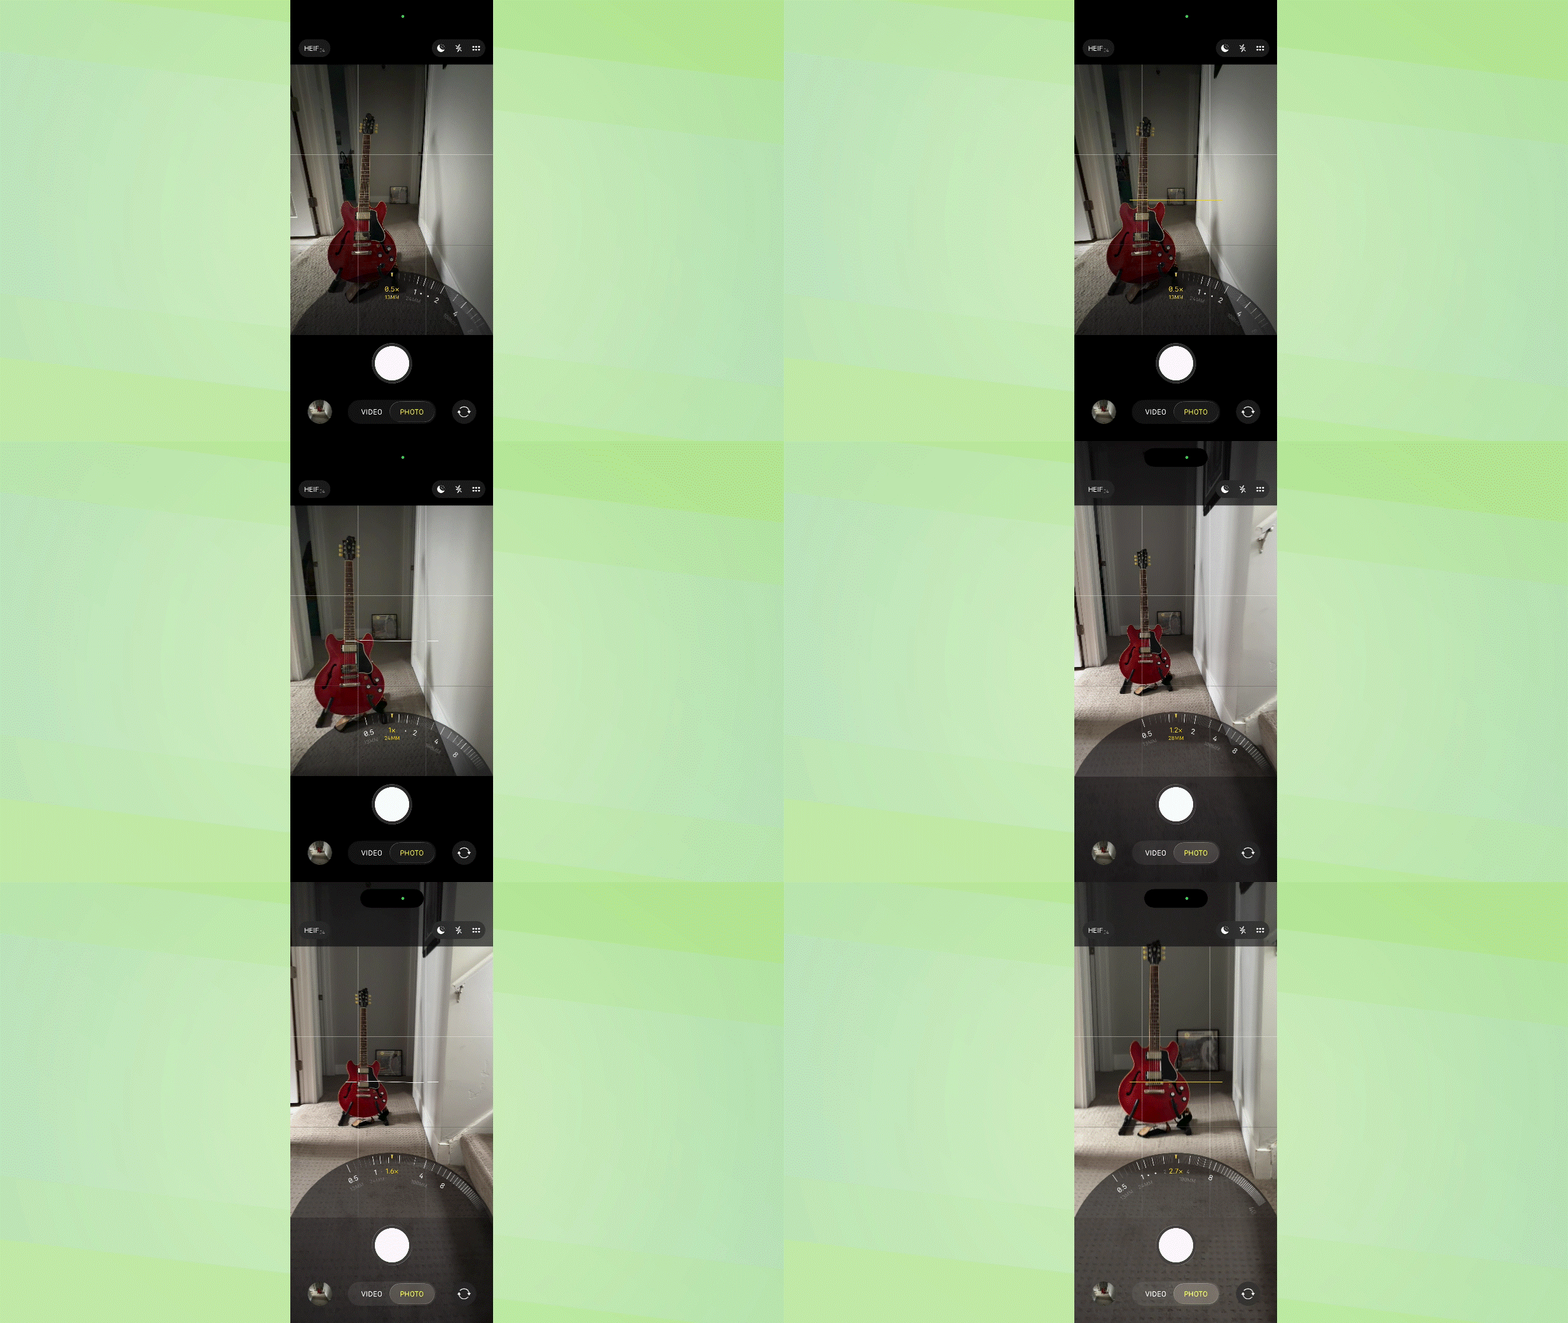
The telephoto lens is a powerful tool within the iPhone camera system, but few take advantage. Using this lens you can pull the background of your photo closer (more zoomed in) behind your subject. Take a look at the example. I placed a framed picture behind the guitar. At the beginning the picture looks far away.
As I’m zooming in, I step backwards, keeping my subject (the guitar) roughly the same size, but the photo behind is more zoomed in. You can use this tactic to pull in landscapes or landmarks into view without making your subject look zoomed-in and blurry.

Follow Tom's Guide on Google News and add us as a preferred source to get our up-to-date news, analysis, and reviews in your feeds.
More from Tom’s Guide
- Google has patched a critical Chrome zero-day flaw — update your browser immediately
- Google’s Gemini 3 is here — and it’s already beating ChatGPT in key benchmarks
- I just discovered the best Google Maps feature you (probably) haven't tried yet
Jonathan Knoder is a freelance writer and covers a variety of topics from tech to lifestyle, but he has a special affinity for audio gear and smart home tech. He is based in Ogden, Utah and his writing has been featured in Top Ten Reviews, Tom's Guide, SPY.com, Security Sales and Integration, and Salt City Hoops. Jonathan graduated from Weber State University with a degree in digital media. Outside of work, Jonathan is usually playing guitar and drums, at the park with his dog, or slicing it into someone's house at his local golf course.
You must confirm your public display name before commenting
Please logout and then login again, you will then be prompted to enter your display name.
 Club Benefits


