I check my email countless times each day but the same can’t be said for my mailbox but for good reason. Unlike with my inbox, I almost never get physical mail I’m actually excited to open. Instead, it’s usually just a pile of bills and junk mail and the latter would be much better off in my spam folder.
Due to this, unopened mail has a tendency of piling up in my mailbox. In fact, it actually got so bad a few years ago that the post office stopped delivering mail to my home. This was the wake-up call to finally do something about it which is why I installed a smart sensor in my mailbox.
Last summer though, I woke to find my mailbox and the smart sensor inside it lying on the ground. Who knows, maybe it was the weather or a reckless driver but either way, I needed a new mailbox with a sturdier post. While it did take a bit of work installing the new mailbox, doing so gave me the opportunity to upgrade to a new smart mailbox sensor. Given that I went with a plastic mailbox with a backdoor this time around, this allowed me to pull off a much cleaner install.

If you dread checking the mail as much as I do or often forget to check like I used to, here’s how I gave my mailbox the ultimate upgrade and let my smart home handle one of my most annoying tasks.
A different kind of motion sensor

If you're a smart home enthusiast like myself, then you’re likely familiar with motion sensors and know all about how you can use them to turn on the lights or trigger other actions. The Ring Mailbox Sensor works in much the same way but it’s specifically designed to be placed inside your mailbox.

Back when I got my first Ring Mailbox Sensor, you needed to have a Ring Bridge ($49, Amazon) to get it to work.
Now though, thanks to Amazon Sidewalk which works just like Apple’s Find My network, you no longer need one. However, if you don’t feel comfortable having your devices connected to Amazon’s low-bandwidth wireless network, you can also use either a Ring Bridge or a Ring Alarm Pro Base Station to add the Ring Mailbox Sensor to your home network.

The Ring Mailbox Sensor is powered by three AAA batteries and pairs with your smartphone through the Ring app. Depending on how often your mail gets delivered, its batteries should last for up to a year before you need to replace them. If you’re setting up a brand new Ring Mailbox Sensor, it may take a few minutes as several updates need to be installed before you can mount it.
Second time’s the charm

As I mentioned before, the Ring Mailbox Sensor comes with an antenna to help its signal reach other Amazon Sidewalk-enabled devices or your Ring Bridge. Installation is optional if you have a plastic mailbox instead of a metal one but I chose to install it anyways.


Getting your Ring Mailbox Sensor installed begins with drilling a hole in the back of your mailbox for its antenna. Fortunately, Ring includes a large drill bit for this in case you don’t have one on hand. Keep in mind though that if you plan on using the antenna, you'll want to drill a hole and run the cable before attaching your Ring Mailbox Sensor to the back of your mailbox.

The reason for this is that the antenna plugs into the back of the sensor and can’t easily be accessed once you attach it using adhesive tape. You also want to leave a bit of room on either side so that you can easily detach the sensor when you need to change out its batteries.
I just recently put new batteries in the Ring Mailbox Sensor and doing so was very easy. You just pull out the tabs on either side, remove the sensor, swap out the old batteries with new ones and then reattach the sensor. After which, it took a minute or so for the Ring app to recognize that it was back online but then I was good to go for about a year.
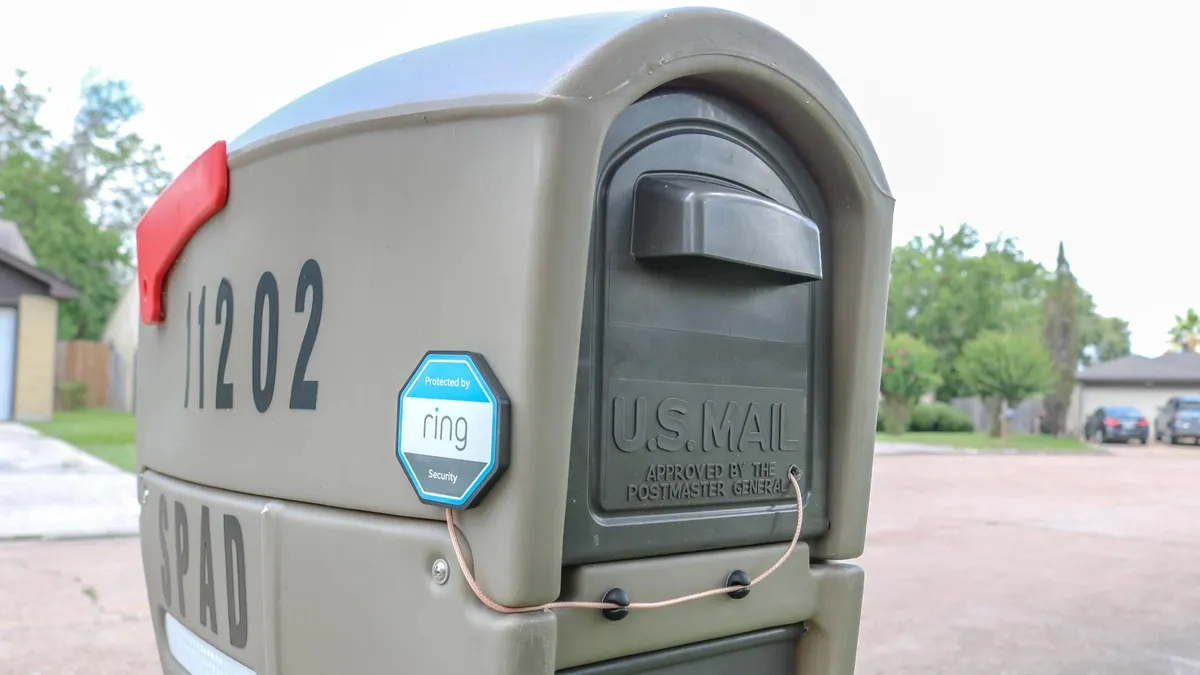
The antenna’s cable is about a foot long so that you have enough room to position it on either side of your mailbox. Since I live on a cul-de-sac, I decided to place the antenna on the left side of my mailbox where it would be clearly visible. The antenna itself is made of black plastic but Ring gives you a sticker to put over it which looks nice but could also help deter porch pirates.
You’ve got mail

With my replacement Ring Mailbox Sensor installed on my new mailbox, it was time to add it to my smart home. If you don’t have a smart home or aren’t interested in starting one, don't worry as you still get alerts from the Ring app whenever the sensor detects motion. However, the Ring Mailbox Sensor is actually what got me started with the best Alexa speakers in the first place before I eventually upgraded to the Echo Show 15 and then later, the Echo Show 21 in my kitchen.
As someone who grew up with AOL back in the 90s, my first thought was “You’ve got mail” and here’s how I set it up.
If you have an Alexa-enabled smart speaker or one of the best smart displays from Amazon, you can easily incorporate the Ring Mailbox Sensor into your smart home. From having a security camera record when your mail arrives to having your porch lights turn on, there’s a whole lot you can do with this little motion sensor.
As someone who grew up with AOL back in the 90s though, my first thought was “You’ve got mail” so here’s how I set it up.

Once you have your Ring Mailbox Sensor added to the Alexa app, tap on More at the bottom right corner. Then tap on the Plus icon to create a new routine and select your Ring Mailbox Sensor after tapping on Add an event under WHEN. From there, you need to choose the Detected option. Under Alexa Will, you need to select Alexa Says and enter a phrase like “You’ve got mail.” Finally, you need to pick which smart speaker or smart display Alexa will speak from. To finish off your routine, just tap Save at the bottom.

With a routine like this one in place, anytime someone opens your mailbox, you’ll hear “You’ve got mail” on your preferred smart speaker or smart display. However, you can also have Alexa deliver this line from your phone if you want too.
Making the mail fun again

Now, adding a smart sensor to your mailbox likely won’t change what kind of mail gets delivered to your house but with the right Alexa routine, it just might make getting junk mail a bit more exciting, especially if you’re a fan of the Tom Hanks and Meg Ryan film. Even if you’re not, at least letters won’t pile up in your mailbox when you forget to check.
I swear by the Ring Mailbox Sensor and think it’s one of the best smart home devices you can get. Not only is it inexpensive but it’s also fairly easy to install and use. Likewise, it lets you turn a mundane task into something a bit more interesting.
Now that you don’t need to buy a $50 bridge separately for it to work, the Ring Mailbox Sensor is almost a no-brainer if you’re a smart home enthusiast like myself.
More from Tom's Guide
- I gave my backyard the ultimate glow-up with these outdoor smart lights
- Amazon Echo Show 15 vs Echo Show 21: which wall-mountable smart display should you buy?
- I used this smart light strip to transform my living room and it's been a game changer for my home