Home Hacks is my new Tom’s Guide column where I detail the small but meaningful improvements I’ve made around my home. From adding useful new accessories to my desk setup to using smart home gadgets in unexpected ways and of course, repurposing old devices, I hope I can give you some inspiration for your next project.
Hiding all of the wires to achieve a completely clean install is the kind of thing you might consider when buying one of the best TVs. This is especially true if you’ve been waiting to ditch your old set for an art TV like Samsung’s The Frame with its signature flush mount.
When it comes to the best smart displays or a digital wall calendar like those from Cozyla or Skylight, though, most people don’t think that far ahead. While you might have a general idea of where you want to mount one, you won’t know for sure until you bring it home and realize there's no outlet in sight.
I found myself in that exact situation with my first wall-mounted smart display, the Echo Show 15. I didn’t even consider hiding its power cable until it was already on the wall and I was midway through the setup process. By then, it was too late — I was stuck staring at a dangling white cord.

I’m currently testing the Cozyla Calendar 2+, and instead of taking the easy way out again, I decided it was finally time to do things the right way. Here’s how I used one $35 accessory to completely hide its power cable, and why I’d do it again in a heartbeat. The best part? This home hack works with any wall-mountable smart display, digital calendar, or even that old tablet you’ve been meaning to repurpose.
Third time’s the charm
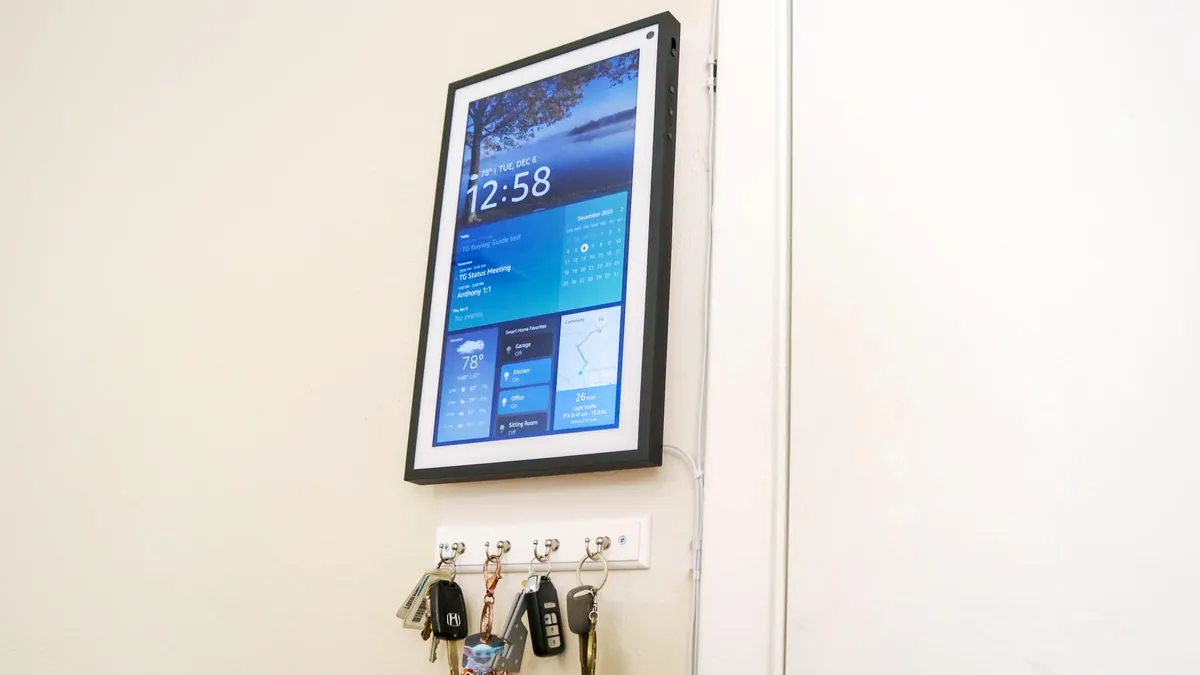
Back when I first bought my Echo Show 15, I decided to mount it next to the door that leads to our garage. That way, a glance would let me know the weather and check my calendar before heading out, but I could also use it to quickly turn on the best smart lights in my kitchen when I arrived home.
Since I installed it next to a door, I figured I could run its power cable down along the door frame just like I did with the security camera mounted on the ceiling above it. I used plastic clips with adhesive backing to hold both wires in place, and while that installation wasn’t the prettiest, it worked at the time.

When Amazon reached out about reviewing the larger Echo Show 21, I jumped at the opportunity, especially as it used the same metal mounting bracket as the Echo Show 15. That meant I wouldn’t have to take the old one down, and instead, I could just slide off the smaller smart display and slide the new one into place.
Halfway through getting the Echo Show 21 set up, though, I thought to myself, why not try running its power cable through the wall as I had successfully done so with an HDMI cable out in my living room. Well, I gave it a try, but I hit a sideways stud known as a fire block halfway up the wall.
Although I was discouraged at the time, it actually worked out in the end since running a power cable through the wall like that isn’t just a code violation, it actually poses a fire risk. Your standard power cord isn’t rated to go in the wall, and while it might have worked, things could have turned ugly fast.

When I first got the Cozyla Calendar 2+ wall-mounted, I initially thought I’d use an adhesive cable cover to hide its power cable. Unfortunately, its power cable has a ferrite bead — one of those magnetic cylinders used to block electronic interference — a few inches from where it plugs in. Besides being unsightly, this meant that a standard cable cover wouldn’t work.
I’ll admit the Calendar 2+ hung on my wall like that with its power cable dangling in the air for longer than I’d like to admit. However, after installing my first set of hardwired smart lights, I figured it was time to install my first outlet. So that’s exactly what I did, but a standard outlet just wouldn’t do.
In addition to that ferrite bead at the end, the Calendar 2+’s power adapter is on the large side too, at three inches tall. As such, to hide it behind the display, I’d need a recessed outlet deep enough to accommodate it. The first one I bought was too large as there’s only three and a half inches between the backside of the wall and the drywall. After a bit more research, though, I stumbled upon the perfect one for this project.

Instead of going straight back, the Data Comm recessed wall plate with cable pass through ($34, Amazon) I purchased puts the metal junction box for the included outlet at an angle. With less than four inches to work with, this allowed me to fit an outlet behind the Cozyla Calendar 2+ with plenty of room to spare for its bulky adapter and any extra cable length.
With the right recessed outlet for the job, it was time to do something I hadn’t done before: start cutting into the drywall in my kitchen.

From dangling to recessed

Since I didn’t want to put any more holes in the wall than I had to, I decided to try to install the recessed outlet in between the existing mounting screws for the Calendar 2+.
You see, unlike the Echo Show 15 or 21 and the Skylight Calendar, Cozyla doesn’t use a metal mounting bracket. Instead, its digital wall calendar looks a lot closer to the VESA brackets you find on one of the best monitor arms, while those four screws serve as a sort of quick-release mechanism.
I was wary at first, but after drilling a few small holes and using a drywall saw to cut out a small square, I realized that, unlike with the other wall in my kitchen, this one didn’t have a fire block halfway up. To make sure, though, I ran a new strand of Romex electrical cable up from the existing outlet at the base of the wall to the small hole I made. When I successfully fished it through, I knew I was good to go.

From there, I drilled some more holes — so I could slide the drywall saw in — and got to cutting out the large rectangle needed for the recessed wall plate I bought. It came with a template I traced beforehand, which made it easy to get my hole in the wall to the right dimensions.
If I had known I was going to do things this way from the start, I would have moved the Calendar 2+ farther to the left. Instead, my original mounting holes were on either side of the stud the outlet below is attached to, which is why I had to offset the rectangle for the wall plate. Now, if I were adding an outlet for the Echo Show 15 or 21 or the Skylight calendar, which all use metal mounting brackets, I could have installed the recessed outlet right behind it.
With my hole cut out and my electrical cable through the wall, I then had to wire the outlet inside the junction box. I know wiring an outlet seems intimidating, but it was surprisingly straightforward. Since I was pre-wiring the new junction box before connecting it to the 'live' source, I was able to take my time getting the connections perfect.
Once the outlet was ready, I slid it into the wall and tightened the screws to extend the dog ears — those swing-out tabs that sandwich the plate against the drywall to keep it from budging.

Connecting to the existing power was the most nerve-wracking part. After killing the breaker, I used a non-contact voltage tester to ensure the wires were truly 'cold'. To connect the new electrical wire to the existing one, I used Wago connectors instead of traditional wire nuts; they're essentially the 'LEGO bricks' of the electrical world, and that made fitting multiple wires into a small space much easier.
That took a bit more work than how I described it above, but once you get going, wiring a new electrical outlet feels a lot like building a PC. If you’re worried or not confident enough to do so on your own, you should definitely hire an electrician. For a job like this, you’re looking at paying between $150 to $350, depending on where you live and how complex your wall is. That might sound like a lot, but can you really put a price on peace of mind? Likewise, you won’t have to troubleshoot anything, and a professional’s work will be up to code.
After getting my new outlet connected, I switched on the power and used a plug-in tester to make sure I did everything correctly. Much to my surprise, I had. Now it was time to see if the recessed outlet I picked out would accommodate both the Calendar 2+’s power adapter and the extra cable length I’d no longer have hanging down my wall.

Portrait or landscape, still hidden

After plugging in the power adapter and tucking its extra cable behind it, it was time to see how the Calendar 2+ looked mounted on my wall without a dangling power cord.
In the picture above, I have it hung on just the two screws on the right for illustration purposes. However, even I was surprised it stayed up like that long enough for me to take this photo.

Unlike the Echo Show 15 and 21, which have their power ports right in the middle, the one on the Calendar 2+ is located next to its USB-A ports and USB-C port. Since it’s on the bottom edge in portrait mode, I left a bit of extra cable when plugging it in. This ensured that it wouldn’t get caught when rotating the display from portrait mode to landscape mode and vice versa.

With its power adapter plugged in behind it, the Cozyla Calendar 2+ looks like an entirely different device. Instead of being fixated on a dangling cord, my eyes now go straight to the high-resolution display and the family calendar I have set up on it — just as the manufacturer intended.
When the display is in landscape mode, the recessed wall plate is completely invisible. In portrait mode, you can catch just a hint of the white housing if you're standing far off to the left, but even that is a massive improvement over the visual clutter I had before.
I know getting this hung up on a power cable and going to all this trouble to conceal it might seem ridiculous to some people. However, as I take the cable management at all of my desk setups quite seriously, why shouldn’t I pay the same amount of attention to the digital calendar on my wall?
Definitely not an impulse buy

If you have trouble keeping track of your entire household’s daily schedules (or even just your own), picking up a digital calendar like the Calendar 2+ I’m currently testing out, or another one from Cozyla or Skylight might seem like the perfect solution. However, before you do so, I strongly recommend you carefully consider where you’re going to put it first.
With the smaller, 15.6-inch version of the Calendar 2+, it does come with a tabletop stand, while the rotating wall mount is sold separately. With the 24 and 32-inch versions, it’s the opposite. You get a wall mount in the box, but if you don’t want to go that route, you can buy a stand separately.
Now with the Skylight Calendar, the 15-inch version comes with a metal stand but can also be wall-mounted, whereas the larger 27-inch version can only be wall-mounted.

Then, with the Echo Show 15 and 21, you get a mounting bracket in the box but have to purchase a tabletop stand separately.
Regardless of which smart display or digital calendar you get, you want to think long and hard about where you’re going to put it and how close the nearest outlet is. If you plan carefully, you may not need to add an extra outlet as I did.
Still, the result speaks for itself, and I couldn’t be happier with how this project turned out, as I learned a lot along the way. In fact, now that I’m done with this recessed wall outlet, my next big project will be adding an in-wall media box behind my TV — a major stepping stone toward the full recessed network box I’ve been planning to install since I decided to wire my whole house for Ethernet.
For $34 and an hour or so of actual work, the recessed outlet behind my Cozyla Calendar 2+ is one of the best home hacks I’ve done yet. I’m actually now tempted to drill through that fire block and do the same thing with the Echo Show 21 on the other wall in my kitchen — though this time, I'll definitely be bringing my long, flexible drill bits.
Until then, though, let me know if you’d ever consider taking a project like this one on by yourself in the comments below.

Follow Tom's Guide on Google News and add us as a preferred source to get our up-to-date news, analysis, and reviews in your feeds.
More from Tom's Guide
- I turned an old monitor into a digital dashboard and it's a game changer
- I added this $30 accessory to my desk setup and it finally let me use dual monitors comfortably for video calls
- I used this classic IKEA cart to build a rollable workstation for my laptop and it lets me work comfortably from anywhere