Club Benefits


Apple Maps is one of the strongest navigation apps out there, despite it's rocky start. Having Apple Maps on your iPhone right out of the box makes it one of the most valuable tools at your disposal, rather than the subject of ridicule it was a decade ago.
Not only does Apple Maps offer a huge range of features, Apple has also been regularly updating the app with new features and tools — fast catching up to rival Google Maps. Apple Maps offers more than just simple navigation. That is a big part of what it does, but there are tons of features and tricks hiding in places you didn't think to look.
From educating you about future vacation spots, grabbing ride shares, viewing the world from street level and more. Here are 17 of the best Apple Maps tips and tricks you can try right now.

Use offline maps

If you've installed the iOS 17, you'll finally be able to use Apple Maps without an active data connection. Simply tap your initials in the bottom right side of the screen, followed by Offline Maps and Download New Map. From there you search for an area or place and tap the Download button. The map will then be saved to let you get around regardless of whether you have cell signal.
Use Apple Maps on the web
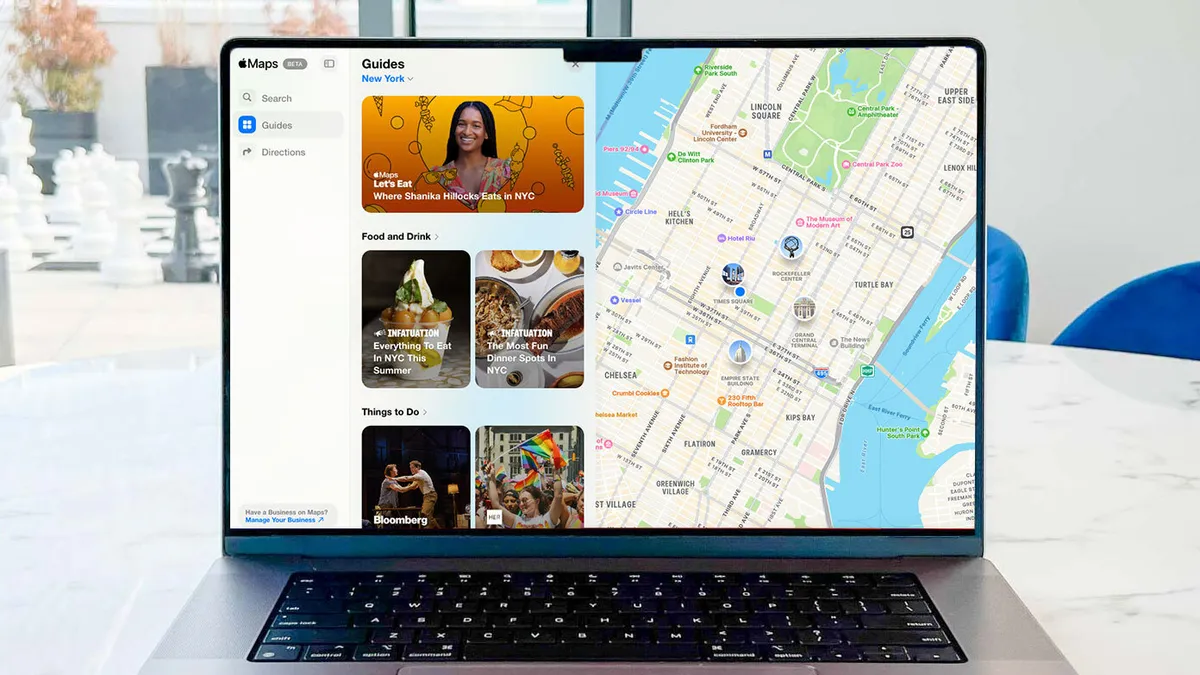
After over a decade of only be available in app form on mobile and Mac, Apple has has come to desktop web browsers as well. Simply head to www.beta.maps.apple.com
The service is still in beta for the time being, but it means Mac and iPad owners can access Apple Maps without having to download the app first. It also means Windows desktops can access Apple Maps in Chrome, Firefox or Edge. Available features include maps, navigation, Guides and search.
Unfortunately Android browsers aren't supported, meaning anyone without an iPhone will have to use Google Maps or Waze.
Touchscreen gestures

Navigating Apple Maps is significantly easier if you know which gestures can help you move beyond your immediate vicinity. You likely know that swiping in one direction or another physically moves the map view, but there are others to be aware of.
The most notable is the pinch-to-zoom gesture, which is used on several different apps. Tap the screen with two fingers, and move them away from each other to zoom out, or closer together to zoom in.
gMap orientation can change by tapping with two fingers, and spinning them both round in a circle. You can also change the tilt level, and turn a flat 2D map into 3D mode by swiping up and down with two fingers simultaneously.
Look Around with Apple’s take on Street View

Street View is a term closely linked to Google Maps, but Apple Maps has its own version as well, dubbed Look Around. The principle is essentially the same: you find a location on a map and get to see what it looks like if you were actually standing there at street level.
Accessing it is simple. If you drop a pin on the map you’ll see a square in mid-left with a pair of binoculars. Tap that and a pop-up window will take you down to street level. That window only covers the full screen by default, but you can bring up a split screen mode with a map by tapping the arrows in the top left.
Navigating with Look Around is just as easy. In full screen mode, simply tap the place you want to go and the camera will move around. With the pop-up window you can tap a pot on the map and be teleported there instantly.
Navigate with AR directions

Like Google Maps, Apple Maps offers immersive directions in augmented reality. By scanning the buildings around you, Apple Maps can offer step-by-step directions from street level. However it only works in major cities.
First thing to do is set up your Directions and make sure it's set to Walking before you hit Go. If AR navigation is available, you'll see a hexagon icon on the right side of the screen.
Your iPhone's camera will open up, and prompt you to scan the buildings around you. That's how it pinpoints your exact location, showing off directions and street signs in 3D as you look around.
Create your own collections and guides

If you’re heading on vacation, or you plan to have a day out with friends or family, Apple Maps can help you organize everything. Using the Collections feature, you can gather everything in a single place, and share it with others.
You can do this by searching for a location or topic of interest, like Museums and picking one of the results. Once you’ve found something you like, scroll down until you see a box that says Guides. Tap it and select New Guide, type in a name when prompted and tap Create in the top right corner. Future locations can then be added to this collection with a single tap.
To access your collection later, pull up the search bar menu at the bottom of your screen and scroll down until you find the section called My Guides.
Share your ETA

If you’re meeting someone at your destination, it can be helpful to let them know when you’re arriving. Like so many other navigation apps, Apple Maps can take all the hassle out of it with real time updates on your ETA.
Once you have navigation active, tap the arrow in the bottom right and hit Share ETA. The app will prompt you to select a contact, and once you pick someone you will see a blue circle wrap around their profile picture followed by the word Sharing.
When you go back to your map, you’ll see a line at the bottom of the screen that says Sharing with 1 person. It’s worth mentioning, however, that Apple Maps doesn’t let the contact track your position, and you can stop sharing at any time. Instead they get text messages with your ETA, and updates if something changes — like if there’s suddenly heavy traffic.
Find useful stuff nearby

Apple Maps’ Nearby feature is incredible for finding amenities in your local area — whether you’re in a new place or want to branch out from your normal routine. Using it is easy too: Tap the Search bar at the bottom of your screen, and look for the section labelled Find Nearby.
It’s right under your search history, and tapping each category will search your local area for that particular thing. Options include gas stations, restaurants, parking lots, and more.
Find where you parked

It can be hard to find where you parked your car, especially if you’re in a particularly gargantuan parking lot. Fortunately Apple Maps can do this job for you, provided you connect your phone to CarPlay or in-car Bluetooth while you’re driving.
Go to Settings > Privacy > Location Services and make sure Location Services are enabled. From there go to System Services > Significant Locations and activate that — you may need your passcode or Face/Touch ID at this stage. Finally go back to the main Settings menu and go to Apple Maps > Show Parked Location. Every time your phone disconnects from the car, Apple Maps will log where you are.
To find your car simply open Maps, hit Search > Parked Car. You can then see your car on the map, and get directions if you really need them.
Take a 3D tour with Flyover

Whether you’re heading to a new city for a trip, or you want the same vacation experience without getting off your couch, Apple Maps’ Flyover feature is worth checking out. Flyover opens up a 3D view of select cities across the world, letting you explore them from the air or take a pre-recorded tour.
Search for the city you want to see, and tap the Flyover button in the pop-up menu. Once the AR-style interface opens, tap Start Tour on the bottom menu to have Apple maps give you a virtual helicopter tour of all the best sights.
You can also navigate the 3D aerial map using the same gestures you’d use to navigate the Apple Maps app, or by physically moving your phone around — as you would with an AR app.
Clear your location history

One of the key benefits of Apple Maps is Apple’s commitment to privacy. This means Apple doesn’t store any information on an external server, instead keeping it all on your phone — and masking your precise location after 24 hours.
But if you’d rather Apple Maps didn’t keep tabs on you at all, you can clear your location history very easily. Go to Settings > Privacy > Location Services > System Services > Significant Locations > Clear History. Your phone may ask you to enter your passcode, or verify you are you with Face or Touch ID, but that’s the only other thing you need to do.
Send directions from your desktop

Apple Maps isn’t just available on mobile devices, it’s also accessible from Macs. The two platforms are linked as well, meaning you can look up directions on your desktop machine and send it to your phone where it’ll be a lot more useful.
To do this hit the Share button at the top of your screen, the one with the arrow sticking out of the square, and pick the Send to X’s iPhone or Send to X’s iPad options. You can also reach the share menu by hitting File > Share.
Find places en-route
Getting from place to place isn’t always direct, and you may find you need to stop for something along the way. Fortunately Apple Maps gives you the option to add stops to existing directions, without having to set up the navigation from scratch.
From your navigation screen hit the arrow in the bottom right corner and then Add a Stop. A screen will pop up with six options: Fast food, gas stations, coffee, parking, grocery stores and banks. Picking one, you then get another menu, complete with all the different options along the way.
Picking one means Apple Maps switches gear, sending you to whatever detour you’ve chosen. Once you’re finished doing what you need to do, your original destination will appear letting you carry on your journey like nothing happened. If you decide to ski[ the stop, you can tap the blue banner at the top of the screen that says Resume route to [destination].
Switch on Do Not Disturb mode

The last thing you need when you’re driving is the distraction of emails, text messages, or phone calls coming through. That’s why Apple Maps now lets you automatically switch on Do Not Disturb Mode when it senses you’re out on the road. Notifications will still come through, but your phone will stay silent while you’re driving.
Open the Control Center menu by swiping down from the top right corner of your screen and press the Focus button. That’s between the flashlight and auto rotate toggles. From there hit New Focus > Driving.
iOS will then ask you if you want to whitelist any contacts, which you can skip by tapping Allow None. One the following screen tap Turn Driving on Automatically then Done. Now, wherever you’re driving, your phone will automatically stay quiet.
Indoor maps

Just because you’re inside doesn’t mean Apple Maps can’t help you get around. Certain big locations, like airports and shopping malls, also have indoor maps — enabling you to locate stores, bathrooms, restaurants and whatever else there might be inside.
All you need to do is zoom into a location and look for a toggle that says Look Inside, then zoom in to see a map of the interior. If that spot has multiple floors, which it no doubt will, you can switch floors by hitting the floor button on the right, underneath the toggle that switches the map between 2D and 3D.
Once you're finished getting to grips with Apple Maps, be sure to check and see what the outcome of pitting Apple Maps vs Google Maps. Of course if you've decided Apple Maps isn't for you, we have guides essential Google Maps tips and tricks and Waze tips and tricks — since both apps of which are freely available on iOS devices.