How to set and manage bookmarks on Kindle
Knowing how to set and manage bookmarks on Kindle helps keep track of your digital library.
The debate continues to rage on whether reading is best enjoyed on a physical book or one of Amazon’s best Kindles.
Those who prefer paper and ink may champion the tactile sensation of turning a page or the fact they don’t need to charge, but the fact is Kindles have a lot going for them. The ability to store thousands of books on one device or the option to bring up a soft backlit glow (on models like the Kindle Paperwhite) for reading in the dark is invaluable. And if you can’t always take your Kindle with you, you can still sync it with the Kindle app on iOS or Android and pick up where you left off on your phone.
If you need further proof of why Kindles make for such great reading companions, check out my colleague Tony’s view on why real books are good, but Kindles are better.
But let's say you’ve got a Kindle and you’re already using it — do you know all the features it’s got tucked up its sleeve? Amazon is very up front about trying to make the Kindle experience as distraction-free as possible, so many of the things you can do with a Kindle aren’t immediately obvious straight away.
One of the most useful features digital readers have with Kindle devices is adding and managing bookmarks. Okay, we admit, it’s not as simple as just sticking a physical bookmark between a couple of pages, but it’s not far off.
Adding bookmarks to the volumes in your digital library allows you to easily locate and navigate between parts of your book.
Here’s how you add a bookmark to your Kindle and enhance your reading experience.
Get instant access to breaking news, the hottest reviews, great deals and helpful tips.
How to add a bookmark on Kindle
Your Kindle will automatically remember the last page you were reading when it goes on standby, but adding bookmarks means you can quickly jump around or mark important pages (or passages) that you want to remember later on.
There are two main ways to do it:
1. Tap the corner of the screen
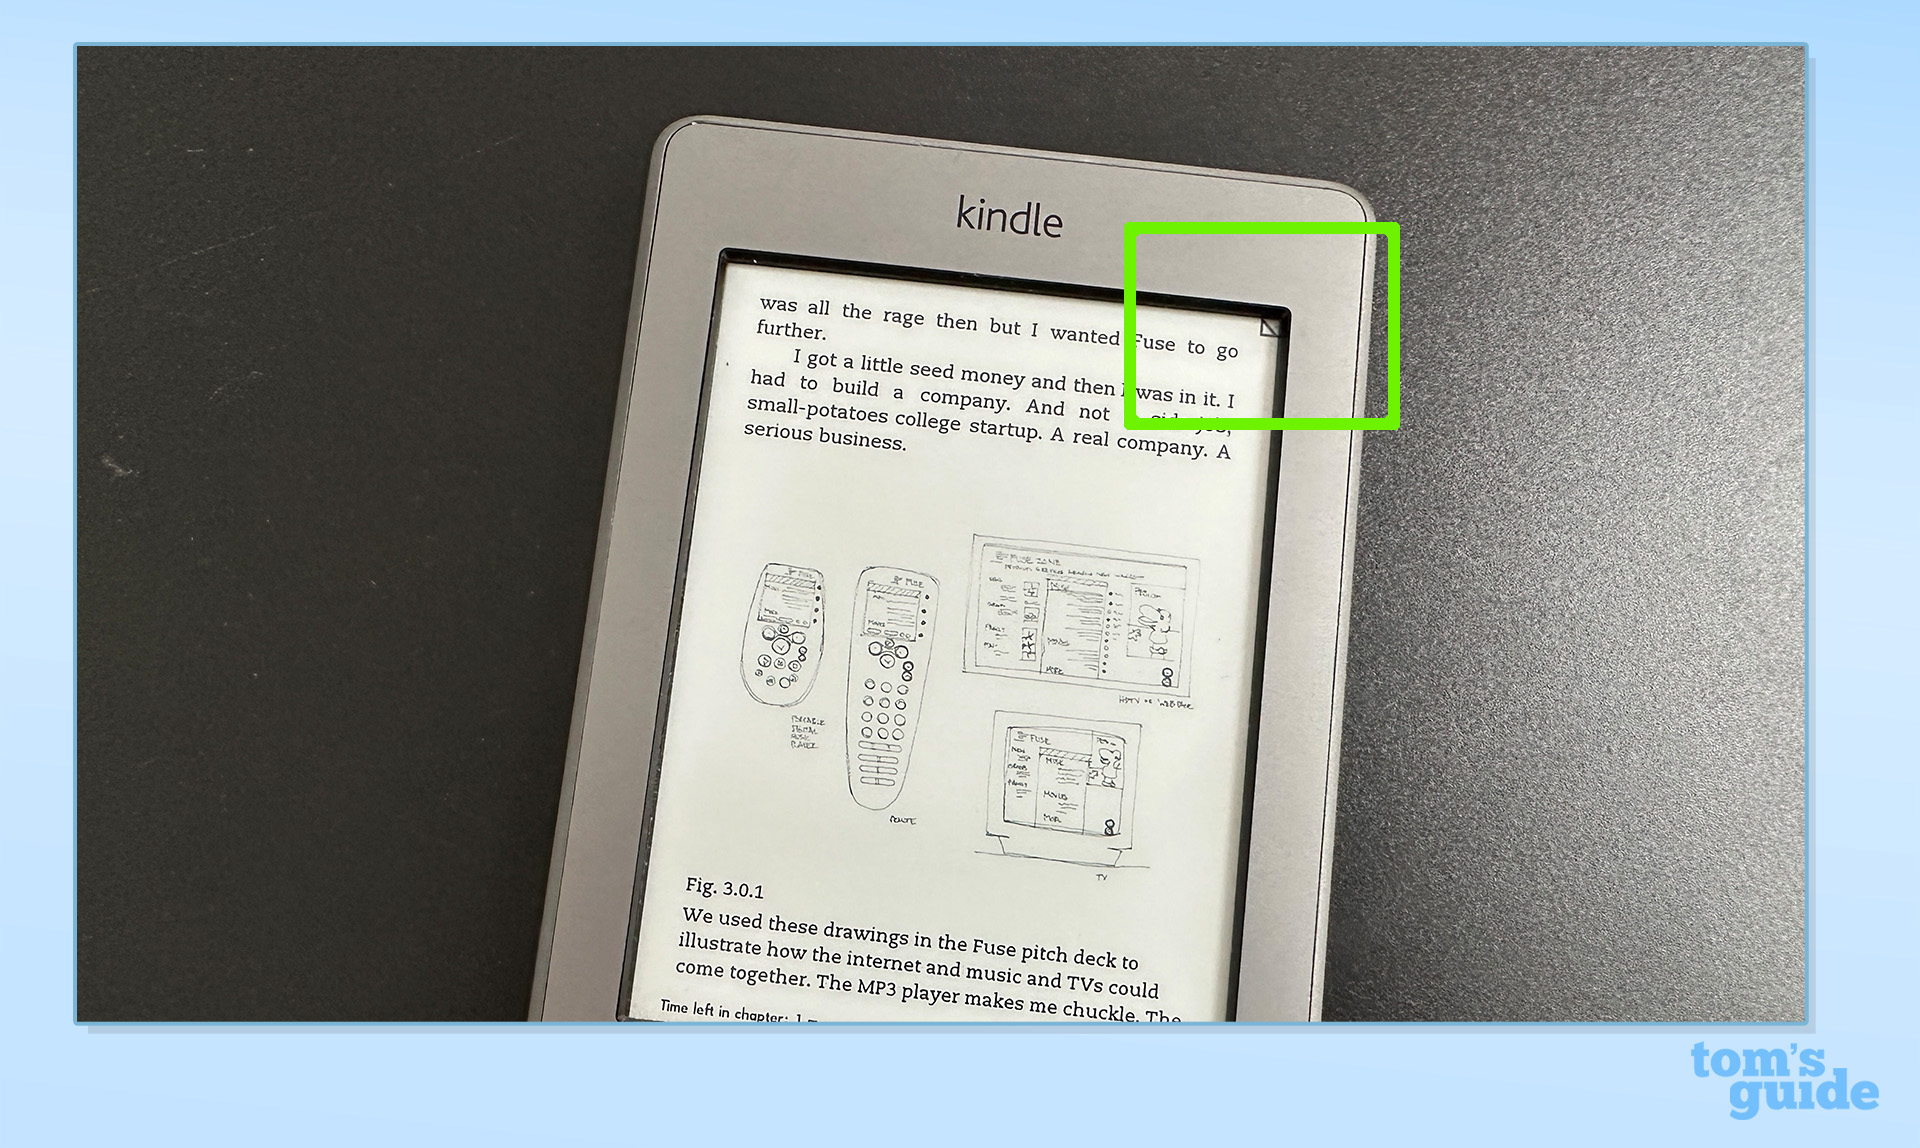
Firstly, from within the book and on the page you want to keep, you can simply tap the top right-hand corner of the screen to quickly add a bookmark. It will appear as a small arrow in the corner, which will disappear as soon as you turn the page.
2. Add a bookmark through the main menu
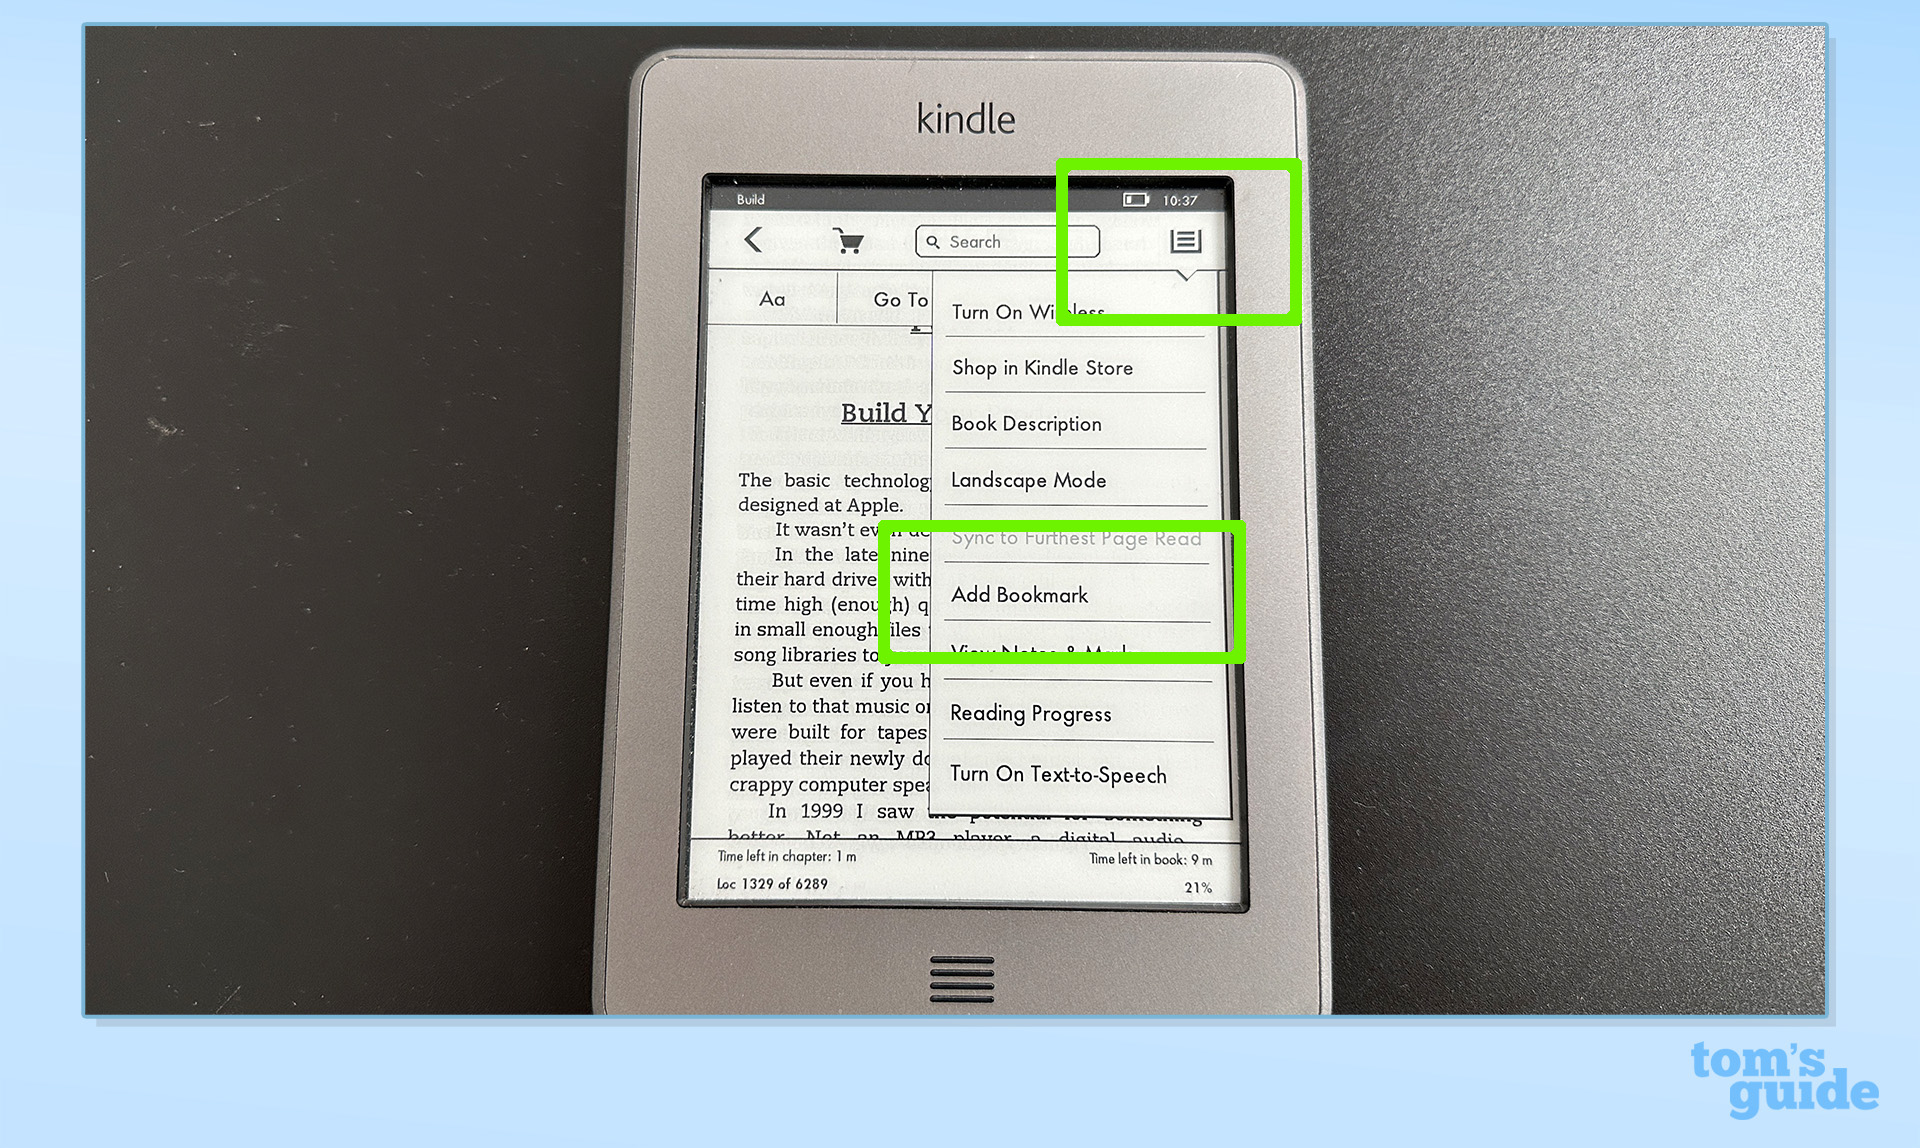
A slightly more long-winded version is to tap the top of the screen to bring up the top-line menu and then tap the three horizontal lines to activate the drop-down menu. Then, tap Add Bookmark which will have the same effect.
How to find and manage your bookmarks
Once you've started adding your bookmarks, you'll want to be able to see (and, if necessary, remove) them. Here's how to do just that.
1. View all your bookmarks
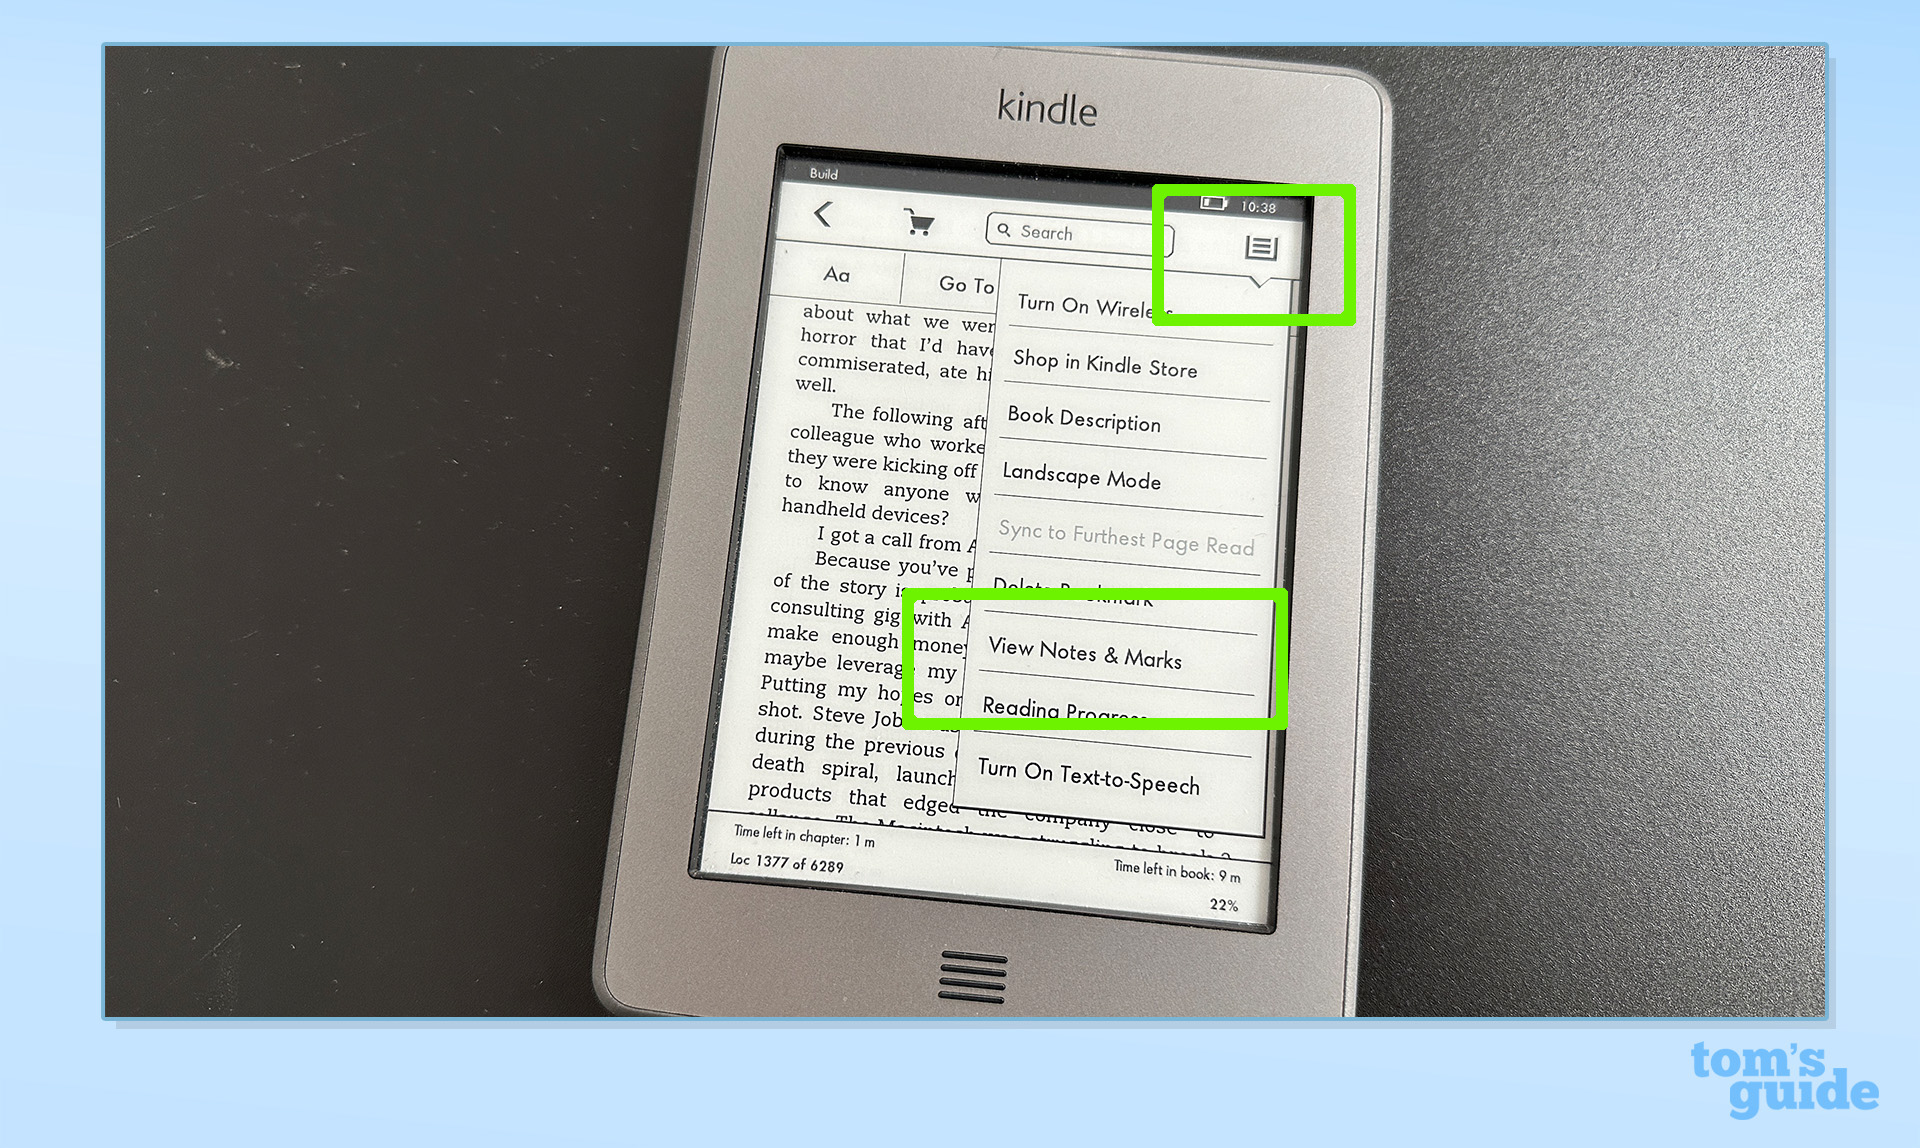
Once you’ve added bookmarks to your book, you can find them all in the drop-down menu from within any book. Tap the top of the screen, then tap the three horizontal lines to reveal the menu and tap View Notes and Marks.
2. Delete or navigate to one of your bookmarks
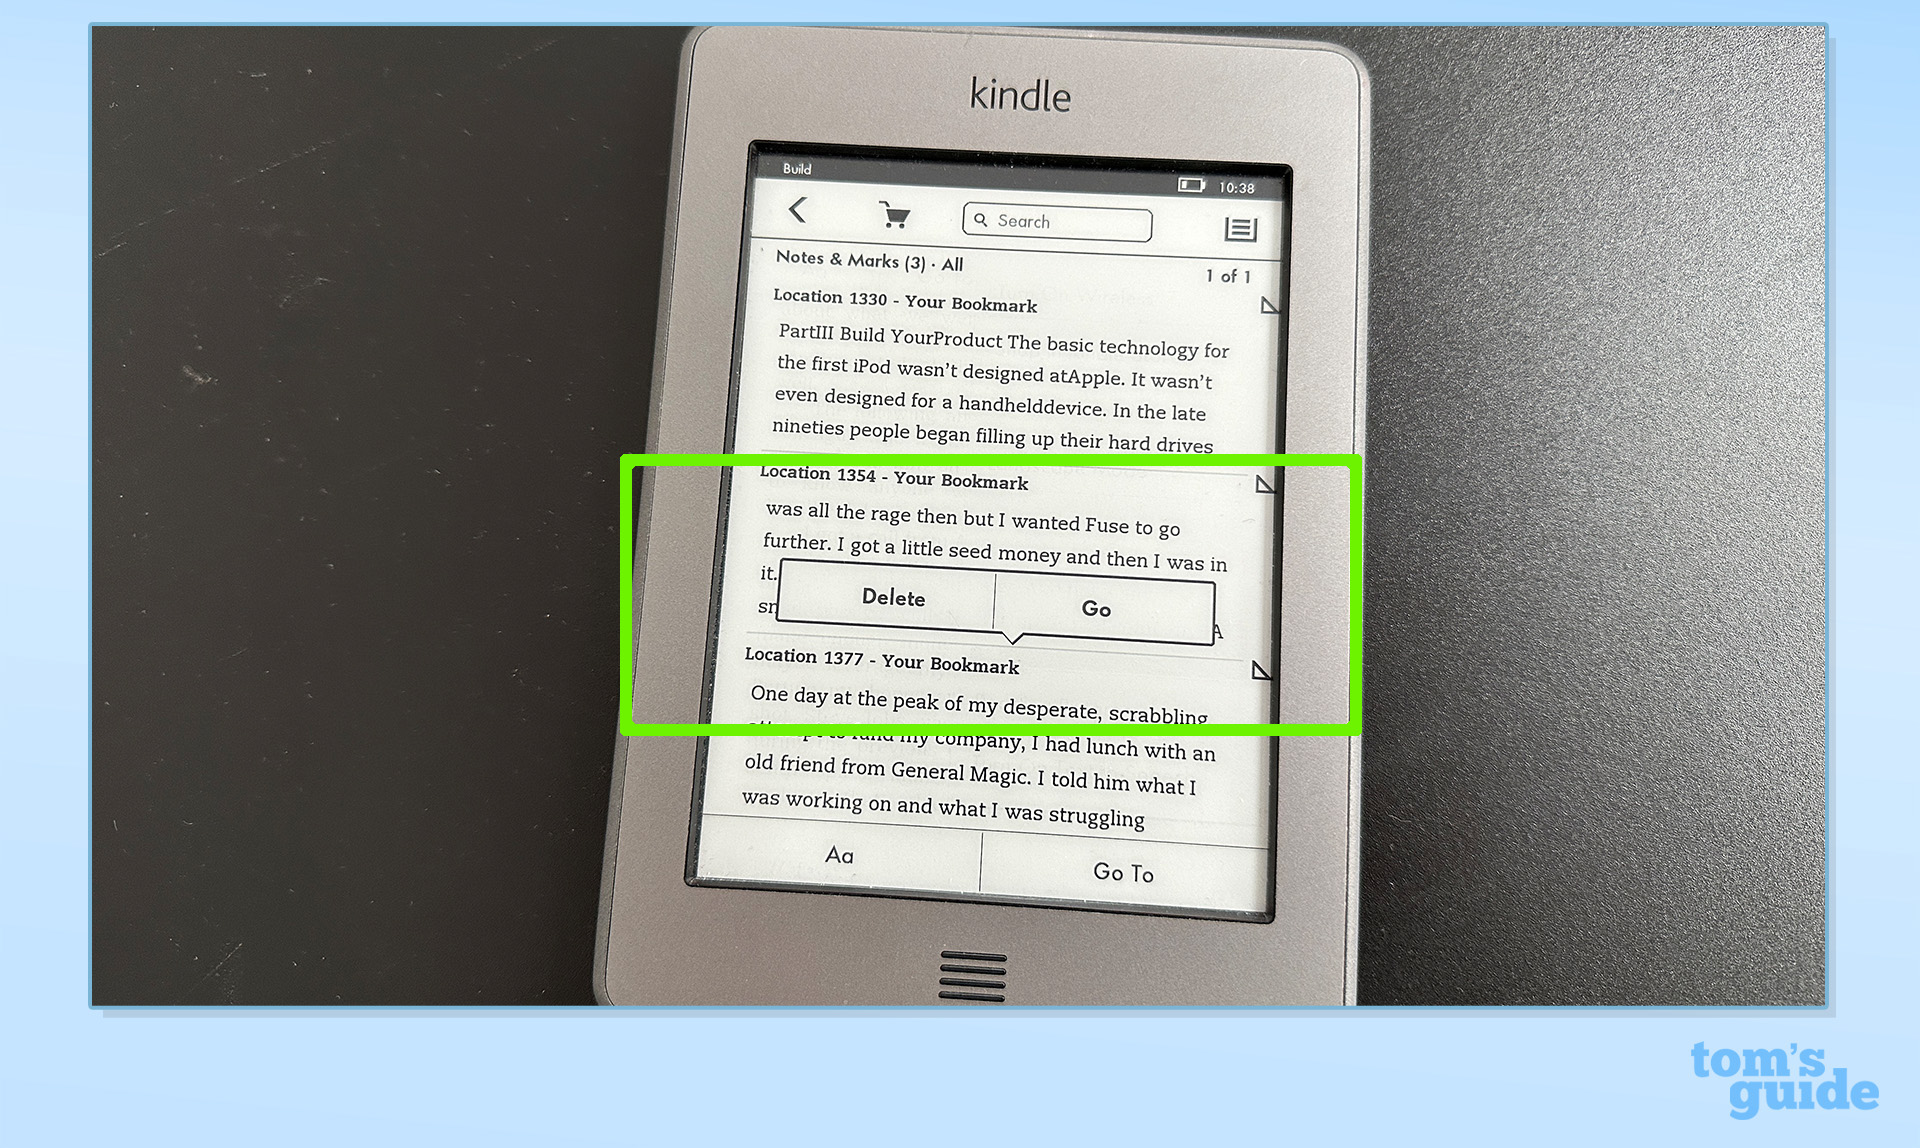
If you want to delete one of your bookmarks, there are several ways to do this as well. You can either do this in the View Notes and Marks menu mentioned above. Simply tap and hold anywhere on the passage of text to bring up the option to either delete the bookmark or navigate to it in the book. This is useful if you’ve got a lot of bookmarks you want to delete in a batch.
3. Delete a bookmark via the drop-down menu
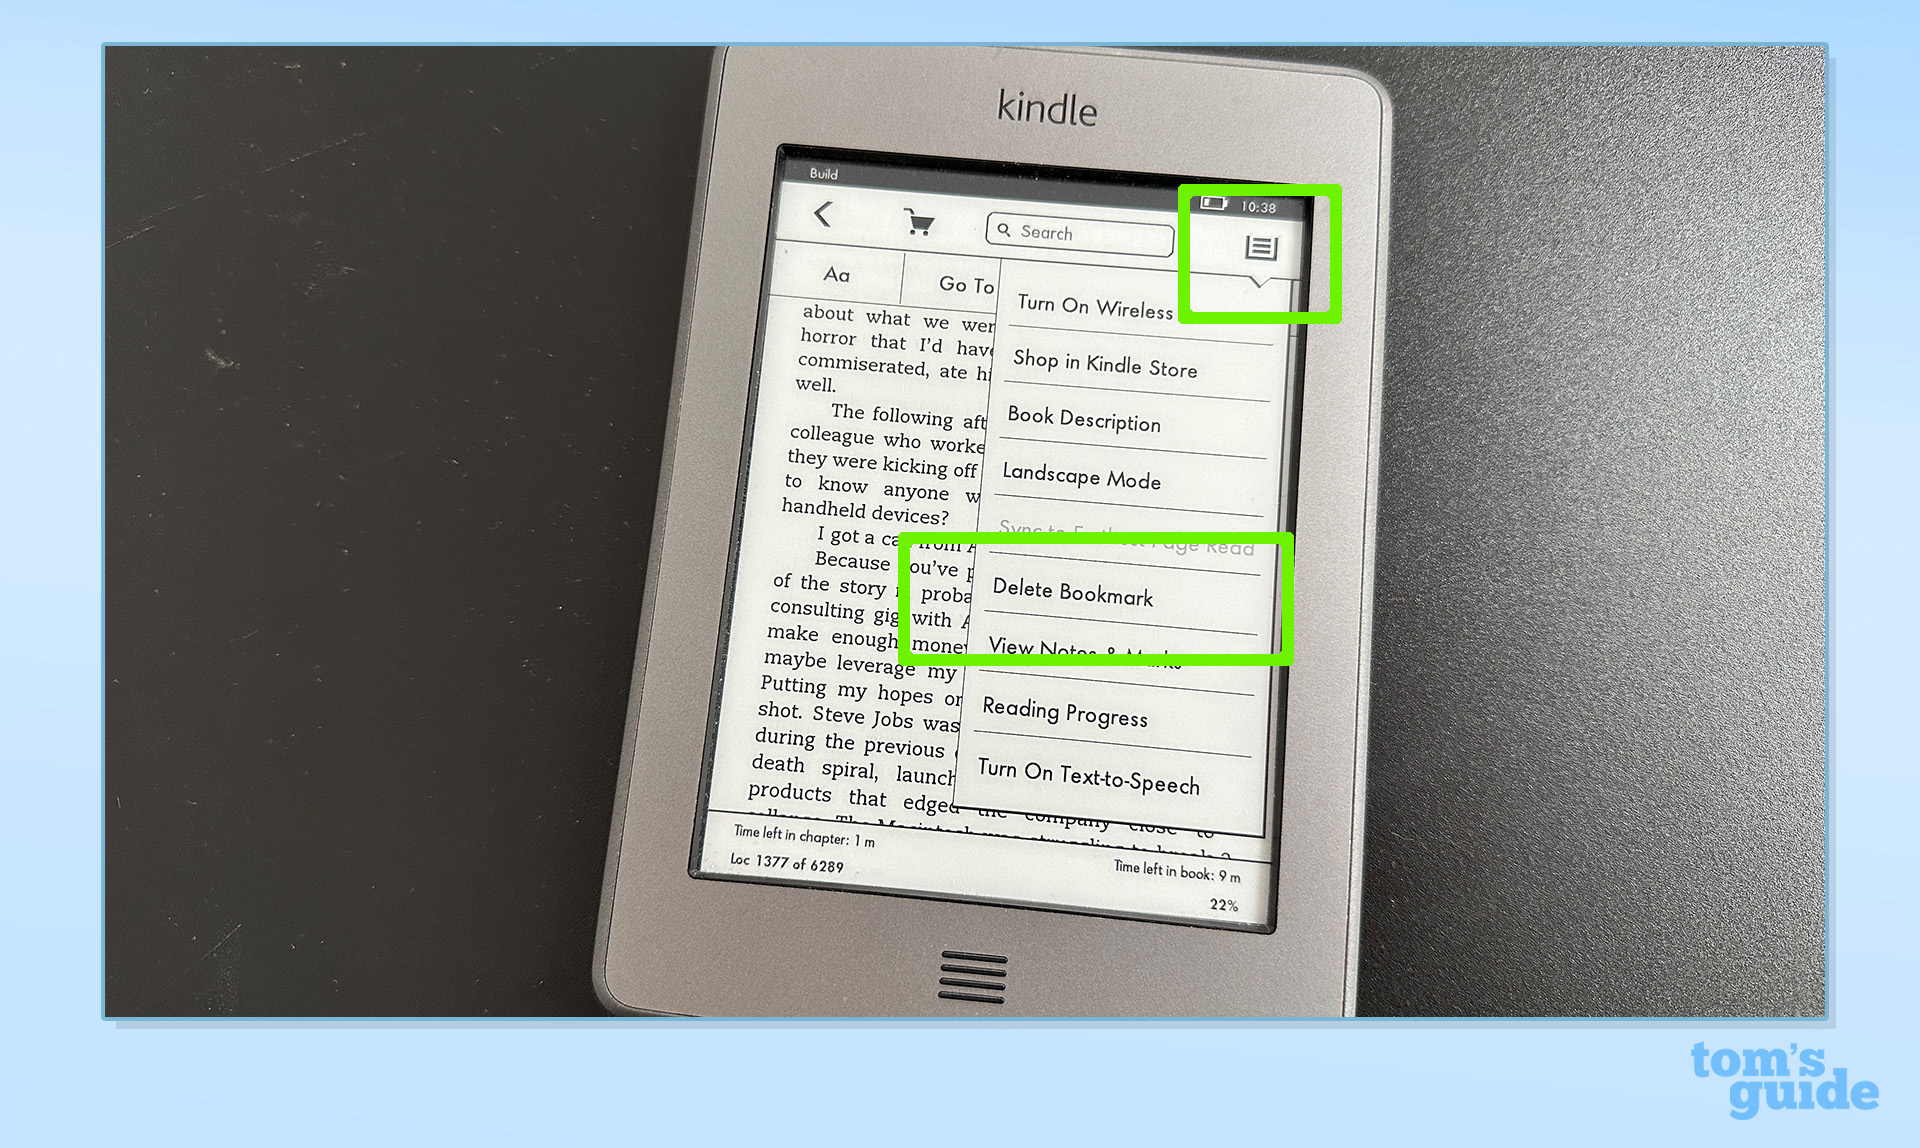
Alternatively, you can repeat the steps for adding a bookmark. Either tap on the small triangle in the corner of the screen to remove the mark (perhaps you added it accidentally) or trigger the drop-down menu where you’ll now see a Delete Bookmark option.
You can mark as many pages as you like across as many books as you’re reading. Which is a great way to stay on top of things if you’ve got more than one book on the go.
If you’re using a newer or more advanced Kindle than the basic one I used for this tutorial, then the process is still the same.
4. Add and remove bookmarks on a Kindle Oasis
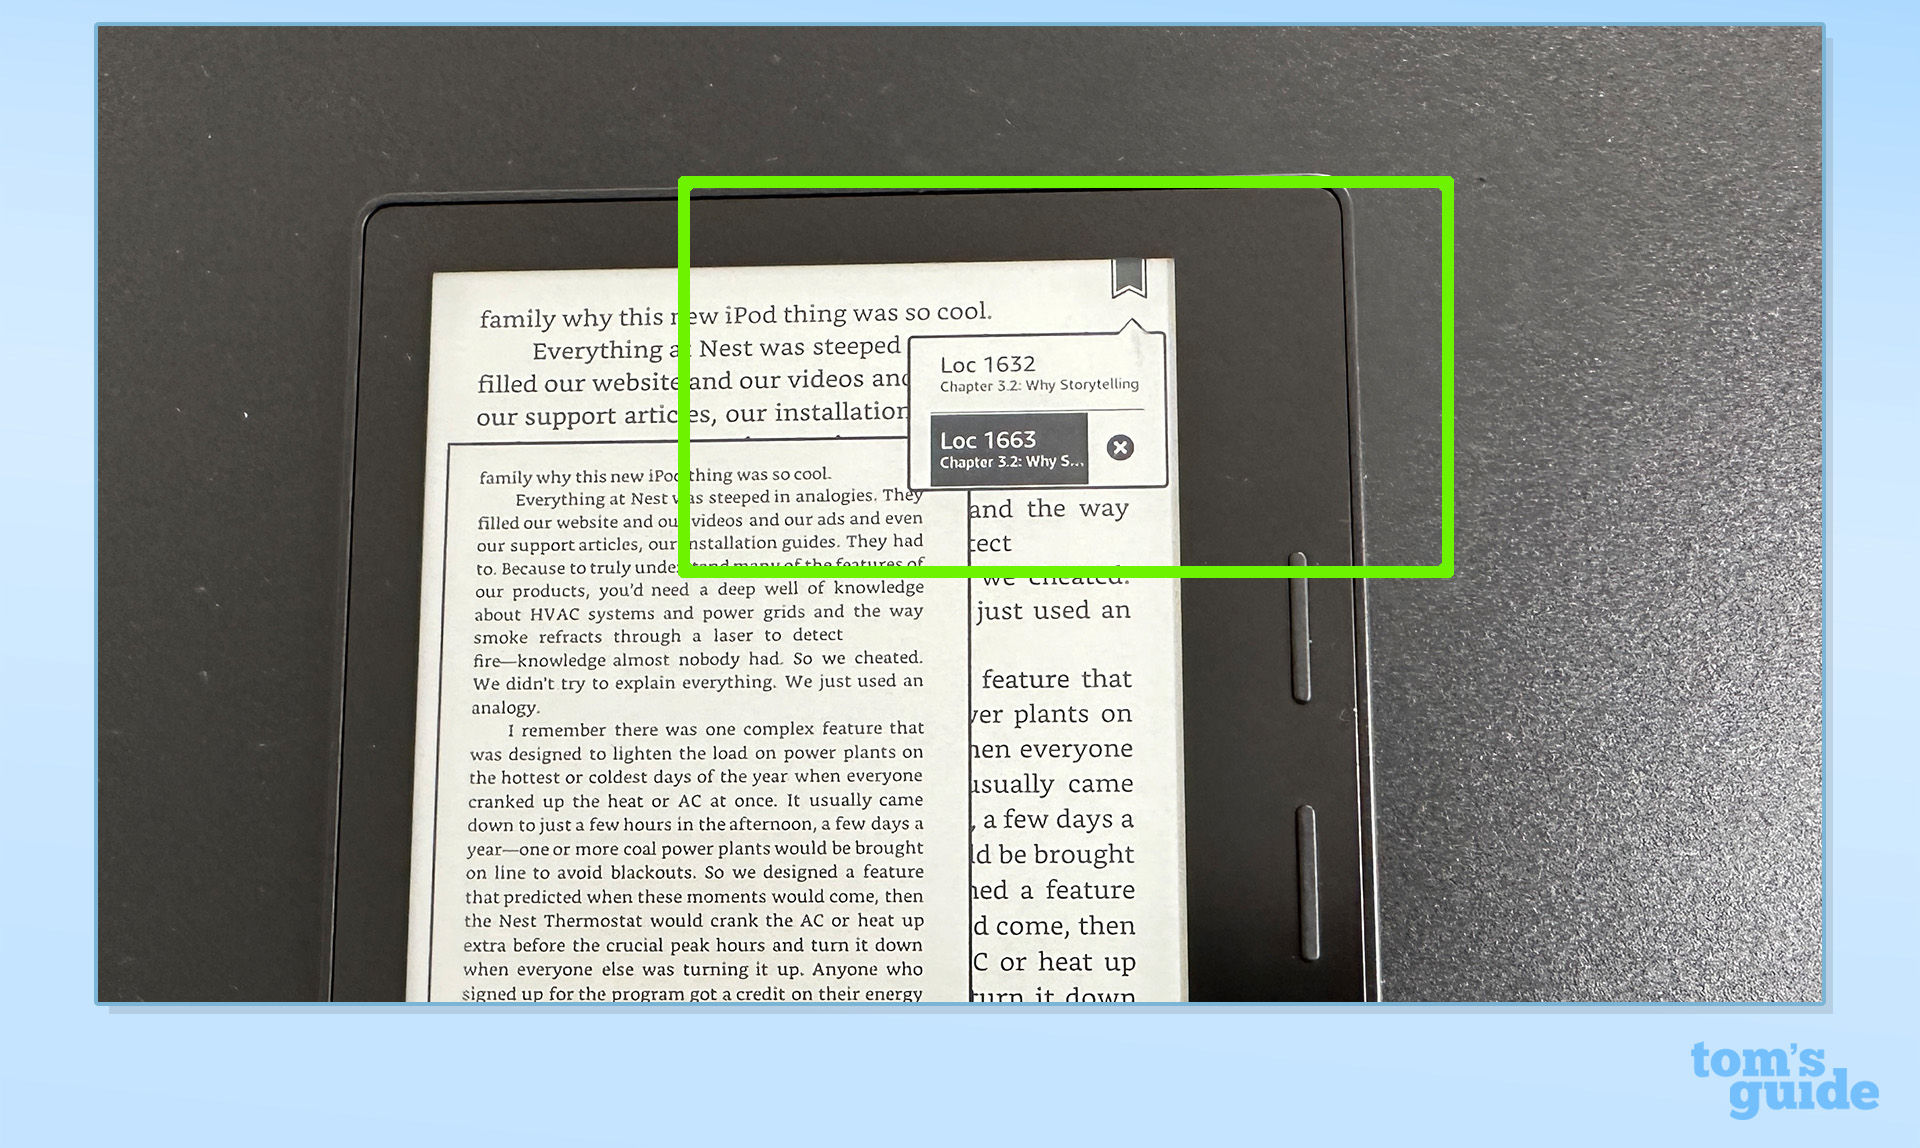
Tap on the top right-hand corner to set a bookmark — which actually looks like a bookmark rather than a small arrow.
If you bookmark more than one page, they’ll appear as a drop-down menu automatically that will show when you tap the mark.
To delete one, simply tap the small black X that appears next to it.
And there you go! That’s how you can easily add and manage bookmarks on a Kindle device. If you’ve just got a Kindle then check out our guide on how to set up a Kindle right here or, alternatively, here’s our Kindle Scribe review if you’re planning to upgrade.
More from Tom's Guide
- Amazon Kindle (2022) review: The e-reader for most
- Real books are good, but Kindles are better
- The best Amazon Fire tablets in 2023

Jeff is UK Editor-in-Chief for Tom’s Guide looking after the day-to-day output of the site’s British contingent.
A tech journalist for over a decade, he’s travelled the world testing any gadget he can get his hands on. Jeff has a keen interest in fitness and wearables as well as the latest tablets and laptops.
A lapsed gamer, he fondly remembers the days when technical problems were solved by taking out the cartridge and blowing out the dust.
 Club Benefits


