


Hands up if you suffer from back pain? If you’re nodding along to that question, know that you’re not alone. According to the World Health Organisation, a massive 619 million people globally reported suffering from low back pain in 2020, and this number is set to increase to 843 million cases by 2050.
Fortunately — along with staying active, strengthening your core, and practising good posture — there are several ways to relieve tightness and tension in your back. “And for many, introducing some simple, yet effective yoga exercises can create a world of difference,” confirms Les Mills international trainer, presenter, and assessor Samantha Russell. In fact, according to Russell, many types of yoga can help with back pain. “Predominantly because most types of yoga incorporate stretching, core work, and mobilisation exercises which are commonly lacking in many daily routines,” the expert adds.
To help you find some relief from the tightness and tension felt in your back, Russell has shared five of her favorite go-to yoga moves to ease the discomfort. So set aside 10 minutes, roll out a yoga mat, and prepare to get stuck into the simple exercises that can help take the edge off.

1. Low Lunge (Anjaneyasana)

Often hailed as one of the best ways to unlock tight hips, this stretch will help activate your stiff hip flexors, which may be causing you back pain. “When we have tight hip flexors (which can come about from extended periods of sitting), they can pull the pelvis and lower back out of alignment, creating strain, stiffness, and causing pain,” Russell explains. “By releasing these muscles and creating more mobility through the hips, the body can find its way back to better alignment, improving posture and relieving pain.”
How to do it:
- Roll out a mat and start from an all fours kneeling position with knees directly under hips and hands beneath shoulders.
- Step one foot forward in line with the hip. Ensure that the front knee is directly over the ankle for safe alignment.
- Hands can support the upper body by resting on the front thigh, or, if available, reach fingertips to the floor, either side of the front foot.
- Slowly ease the body forward/down, sinking into the stretch. The ideal spot is where you feel a gentle and pleasant stretching sensation in the hip crease area.
- Take slow, deep breaths using the out breath to help relax your body and mind.
- Hold for at least 15 seconds before repeating on the other side.
2. Cat–Cow Stretch (Marjaryasana–Bitilasana)

You don’t have to be a yogi to have heard of, or performed, the humble cat-cow stretch. “It’s a super-easy and gentle exercise that is commonly seen in many different class types,” Russell says. “It gently mobilises the spine, improving spinal articulation, it also lengthens the muscles across the back and can help strengthen the core.”
How to do it:
- Start on all fours with your hips directly over your knees and hands under your shoulders.
- Inhale and gently lift eyes to the horizon, whilst arching lower back, pressing belly
- towards the floor. The tailbone should be pointing towards the ceiling in spinal extension.
- Exhale and start to slowly round the back towards the ceiling (this is your cat), releasing head and neck so that the eyes now look back towards the knees. Draw your belly in towards the spine as you do this in spinal flexion.
- Repeat several times, moving slowly from one position to the other, and notice how with each breath and each rep, the spine finds a little more freedom.
3. Bird Dog (a.k.a. Superman)
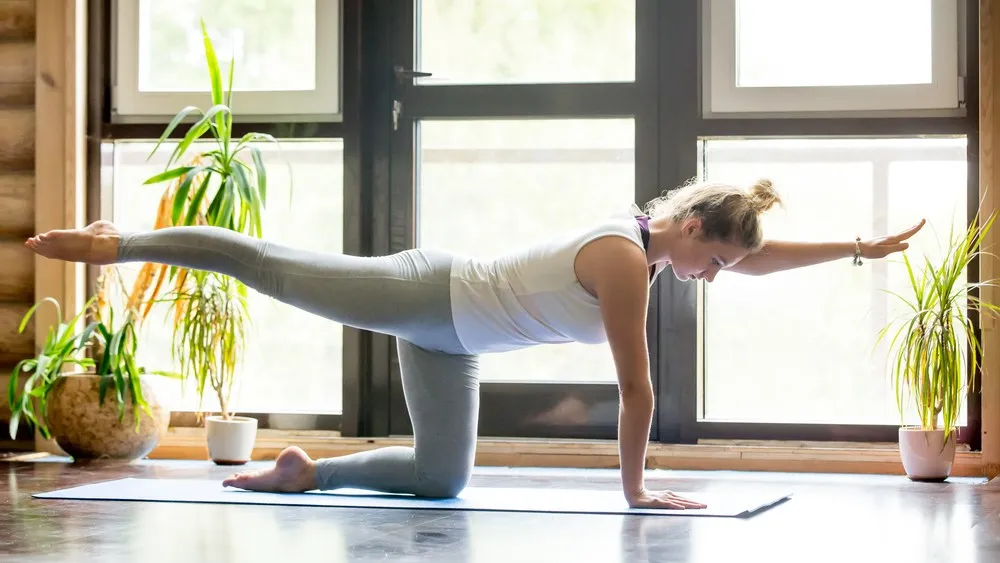
“OK, I admit, this is less of a pose, more of an exercise, but it’s a fantastic
exercise that gives you a lot of bang for the buck,” Russell flags. “Firstly, bird dog challenges core stability, secondly, it develops strength in the glutes and posterior chain, and thirdly, it’s really great for developing balance and coordination.”
How to do it:
- Start on all fours with your hips directly over your knees and your hands under your shoulders. Gently draw your navel to your spine to stabilise the lower back.
- Press your shoulders back and down away from your ears. You should feel the shoulder blades hug the back of the ribs.
- Inhale, then exhale, slowly sliding the fingers of the right hand forward on the mat with the option of simultaneously sliding the toes of the left foot backwards.
- Squeeze the glutes and keep the core braced as you perform this slowly and with control.
- Return to the starting position.
- If it feels achievable, challenge yourself by lifting fingers and toes away from the floor up to a maximum of hip/shoulder height, keeping your leg in line with your hips, and your arm in line with your shoulder.
- Complete 6-10 reps before switching to the other side.
4. Hip Bridge (Setu Bandha Sarvangasana)
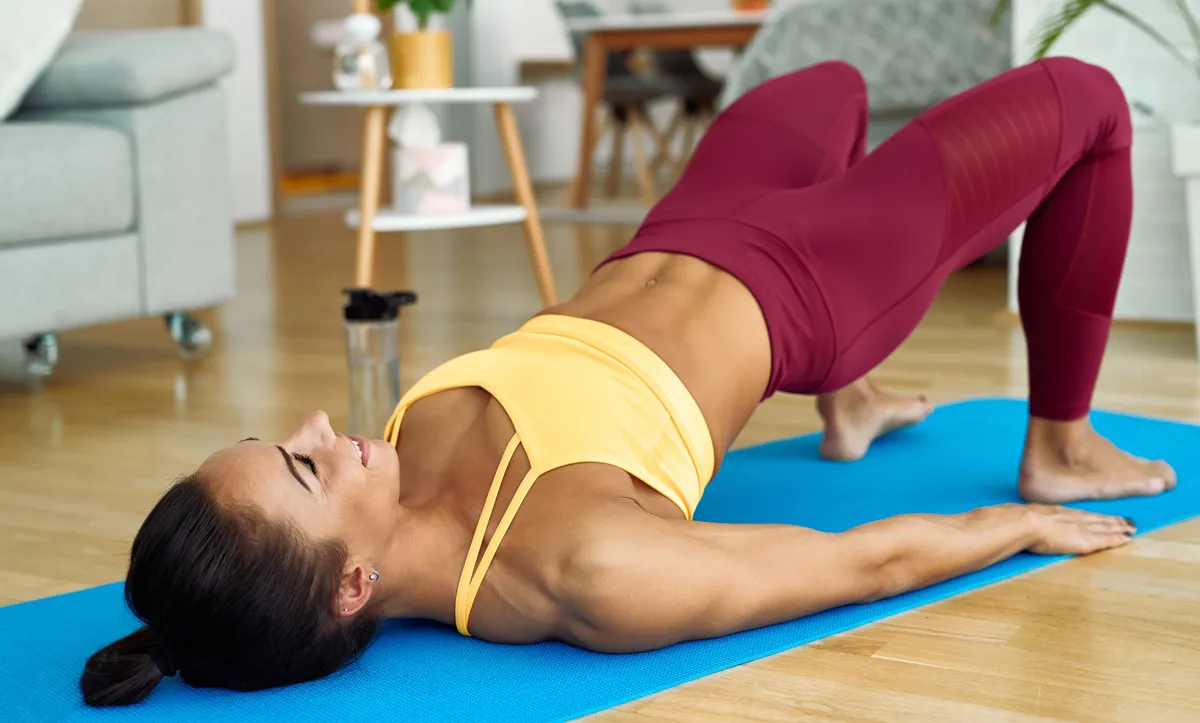
With many of us spending hours (and hours) at a time hunched over desks with rounded shoulders, Russell says this spinal extension move can help combat the ill effects of today’s common lifestyle postures. “This is a wonderful antidote as it reverses that position and both strengthens and stretches key muscles that support the spine,” she explains.
How to do it:
- Lie on your back with your knees bent and feet hip-width apart. Bring the heels close to the hips so that when in an elevated position, the heels will be beneath the knees.
- Keep your arms out by your sides, with palms down for a more supported option or palms up for a more challenging option.
- Inhale and as you exhale, squeeze the glutes and start to tuck your tailbone under, peeling the spine off the floor one vertebra at a time. If your palms are facing down, you can gently press them against the floor to assist.
- Continue to press hips skywards until the body forms a diagonal slope from knees down to shoulders. It’s important to stop once you feel the weight on the top of your shoulders. You should avoid coming so high that the back of the neck feels pressure.
- Think about bringing your chest towards your chin and keeping your thighs parallel as you rise.
- Hold for a few seconds before slowly reversing back down, lowering one vertebra at a time and with control.
5. Supine Twist (Supta Matsyendrasana)

“Another one of my all-time favourite poses,” Russell says. “This feels so divine to do and has numerous benefits, such as increasing spinal mobility and increased flexibility of the back muscles and glutes (depending on variation)”.
The expert says that this pose also has additional benefits, such as stress relief. “That’s because it has a calming effect and can also stimulate the digestive system and de-toxify the body,” the trainer notes.
How to do it:
- Lie on your back with your knees bent and feet hip-width apart.
- Keep your arms out by your sides with your palms facing up.
- Inhale, and as you exhale, very slowly lower both knees towards one side whilst keeping both shoulders anchored to the floor.
- Turn your head in the opposite direction of the knees for the cervical spine twist.
- Hold this position for around 10-60 seconds, depending on how it feels for you.
- Repeat on the opposite side.

Follow Tom's Guide on Google News and add us as a preferred source to get our up-to-date news, analysis, and reviews in your feeds.
More from Tom's Guide
- I tried doing the ’Prone W’ exercise every day for 2 weeks, and my mid-back pain practically disappeared
- I suffer from sciatica — here's 9 exercises I swear by to stretch and strengthen the lower back
- Physical therapists say this is the one 90-second exercise you should do to reduce lower back pain and release tension

