


The weekly clean is something we all have in common. From dusting to vacuuming, there are certain chores that must be done regularly, otherwise you face the prospect of a messy home and potentially harmful side effects, such as allergens and mold. So, it’s essential that we keep on top of these routine chores.
The trouble is, even if you find cleaning therapeutic and relaxing, it can soon grow repetitive and time-consuming. And as more chores are added to the list, before you know it, you’re losing countless hours to your cleaning commitments every week. Despite this, there are still 9 gross things you forget to clean around your home.
It doesn’t have to be this way though. With the right methods, tools and organization, you can actually reduce your cleaning time by as much as half. Your quality of cleaning doesn’t have to suffer as a consequence either. To explain, we’ve pulled together 9 tips and tricks to halve your cleaning time — so you can have a little more free time, without worrying about what guests will think of your home.

If time truly is tight, here are 7 quick cleaning jobs to make your home look better and 7 ultimate spring cleaning hacks the experts swear by.
1. Prioritize

The first step is to prioritize exactly what needs cleaning around your home. Start with the bare essentials which require the most attention, such as the toilets, sinks, surfaces and floors. If you’ve got unexpected guests showing up, keep your time frame in mind and stick to the most important areas, such as the bathroom they will use and the entryway. In this case, you will need to be realistic and prioritize based on exactly how much time you have. Don’t worry about any areas where the guests are unlikely to visit in this case, and keep your cleaning light, so you have time to cover all areas.
If you’re facing a weekly clean, prioritization is still important. You might be cleaning some areas more often than you should, and others less so. Break down exactly what you clean and how often, and consider whether there are any items or areas which show little to no change when you clean them. For instance, baseboards only need wiping down every two weeks, while awkward areas, such as under the couch and behind furniture, will collect less debris compared to beneath the dining table. We’re not saying to forget these areas, only to clean what you need to and when, otherwise you could be wasting time cleaning areas which don’t require it yet.
Just make sure you include and regularly clean the most essential areas — there might even be other spaces you neglect that could do with more attention, so now’s your chance to revamp your cleaning routine. The other smaller jobs can be tackled less often, as and when required.
2. Create a cleaning schedule

Now that you know what you need to clean, you can create your very own cleaning schedule to map out the tasks. These are really handy, because it can help you plan out and track the time you want to spend cleaning. This avoids the cleaning overrunning and taking up more time than expected, and it can also come in use for mapping out less regular chores, such as cleaning the oven, so they don’t get forgotten about. You need to be realistic with your schedule though, considering the quality of cleaning required and how long each chore should require. Once established, you need to keep up with it too, otherwise you'll just end up cleaning for extended periods of time, as usual.
To keep up with your schedule, make sure there are no distractions around the home. If your schedule shows that there’s not enough time to tackle everything in one session, it can help you prioritize and break up the tasks. Don’t give yourself too much to do at once because it’s just overwhelming. You can always recruit others to help and add them to the schedule too, that way the work and cleaning time is divided.
3. Clean in the right order

That’s right, there is a right order to clean. And by following this, you can potentially speed up your cleaning time and get better results as well. There are some common rules when it comes to the order of cleaning. One of the biggest ones is to always dust before you use one of the best vacuum cleaners — otherwise the dust you kick up into the atmosphere as you work your way around the surfaces will just land on your freshly-vacuumed floors. Another common rule is to work your way from top to bottom in each room, which similarly stops any residue from collecting on the lower levels after you’ve cleaned them. Don’t forget to declutter before you start cleaning as well; that way you collect everything up at once, rather than piece by piece. This gives you a clear space to work on.
To speed up your cleaning time, you need to consider the best order of cleaning in relation to your specific routine. For instance, if jobs can seamlessly follow one another, with less hassle and effort involved, this will naturally speed up the process, and make it more methodical too. So, move from bathroom to bathroom, and keep tasks and similar rooms grouped together. You could finish your first bathroom by cleaning the toilet, then move straight onto the toilet in the second bathroom, so you don’t need to mess with your gloves and products etc. Try to get into a routine, rather than rush yourself as you clean. That way, you will progress in the most efficient and effective manner.
4. Keep on top of clutter

As mentioned earlier, keeping on top of clutter is essential. This can really slow us down when it comes to our cleaning day because everything needs to be sorted before you can even get started. Try to get into the habit of keeping up with your clutter day-to-day. Don’t set anything down that you tell yourself you will sort later. Instead, make a decision and deal with the item there and then. This includes all the usual suspects, such as junk mail, shopping you've yet to unpack, and items of clothing that are neither clean nor dirty, and end up on the floor. You will save the energy spent picking it up later.
To avoid clutter building up in the future, make a system of where everything in your home should go. That way, when clutter comes along, you know immediately how to deal with it, such as filing it away or tossing it straight into the recycling. By giving everything a dedicated home, it’s less likely to wind up in limbo on your floors or counters.
5. Use the right tools

Using the right cleaning tools can help speed up the cleaning process too. Without these, you could end up waiting for longer and scrubbing much harder than necessary, with poor results. We recommend distilled white vinegar and baking soda for all kinds of cleaning tasks around the home. These natural cleaners are brilliant for descaling, deodorizing and shifting general grime when combined. They can be used for anything, from unblocking drains to removing limescale from the shower. Just take care as there are 7 things you should never clean with white vinegar.
Microfiber cloths are the best for cleaning surfaces because they effectively pick up dust and grime, without leaving lint behind. Plus, they’re soft enough that they won’t damage fragile items in the process. It’s also worth flagging that a squeegee, such as the OXO Good Grips All-Purpose Squeegee ($9.95, Amazon), is much faster for wiping out the shower versus using a window vacuum. In my experience, the latter takes much longer and doesn’t provide a streak-free finish. So, a squeegee and towel are a much better combination.
6. Don’t let tough jobs build up
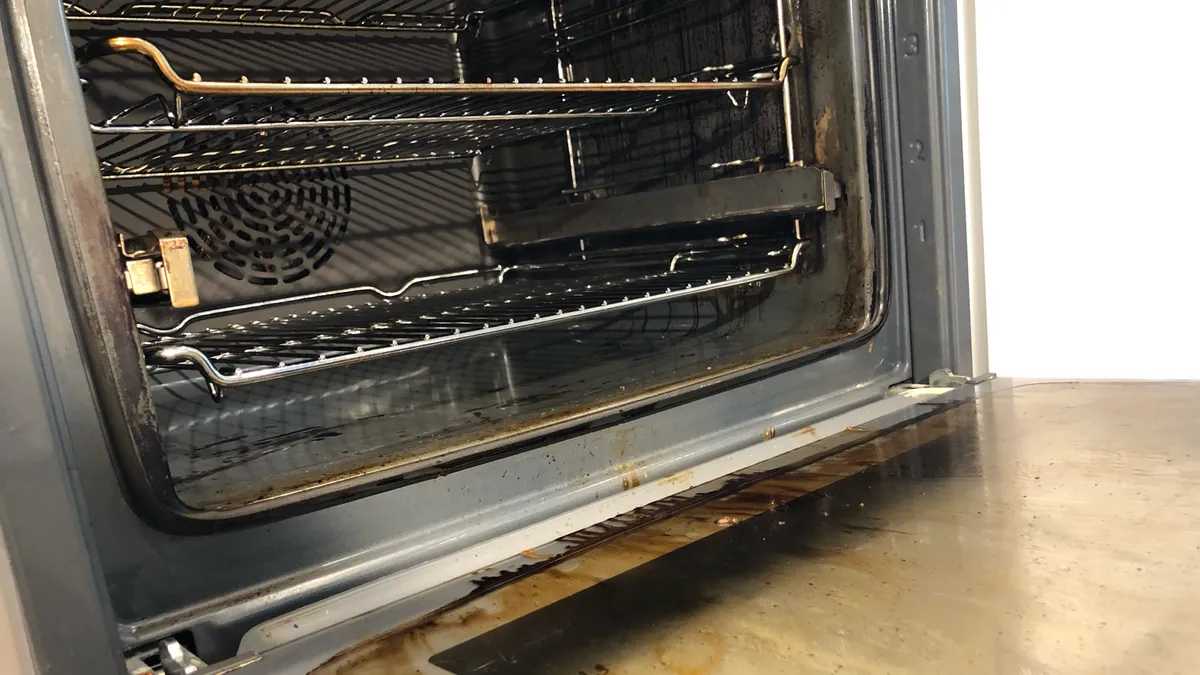
If you want to speed up your cleaning time, don’t let certain tasks build up to the point that it takes much more effort to clean them. For instance, the longer you put off cleaning your oven, the more residue will bake on, making it increasingly difficult and time-consuming to clean.
Cleaning your other appliances will require more effort the longer you leave them as well, such as your washing machine and dishwasher. Plus, with all of these, you could hinder the performance and potentially damage the appliance by ignoring them. So, make sure you take the time to clean these unappealing areas as often as necessary. The more regularly you clean them, the less effort will be required in the future.
7. Let things soak

Soaking items will lessen the grip of any stubborn residue, which naturally makes them much easier and quicker to clean. If you intend to soak items, make sure you do this before you start cleaning so the items are given a sufficient amount of time. For instance, baking sheets and burnt pots and pans can be scrubbed clean in a matter of seconds after being left to soak overnight.
Soaking applies to other chores as well. Any cleaning products which need time to soak on surfaces should be applied and left for as long as necessary before you remove them. This will make the process much easier, so it’s worth giving your products some time to take effect.
8. Invest in a robot vacuum
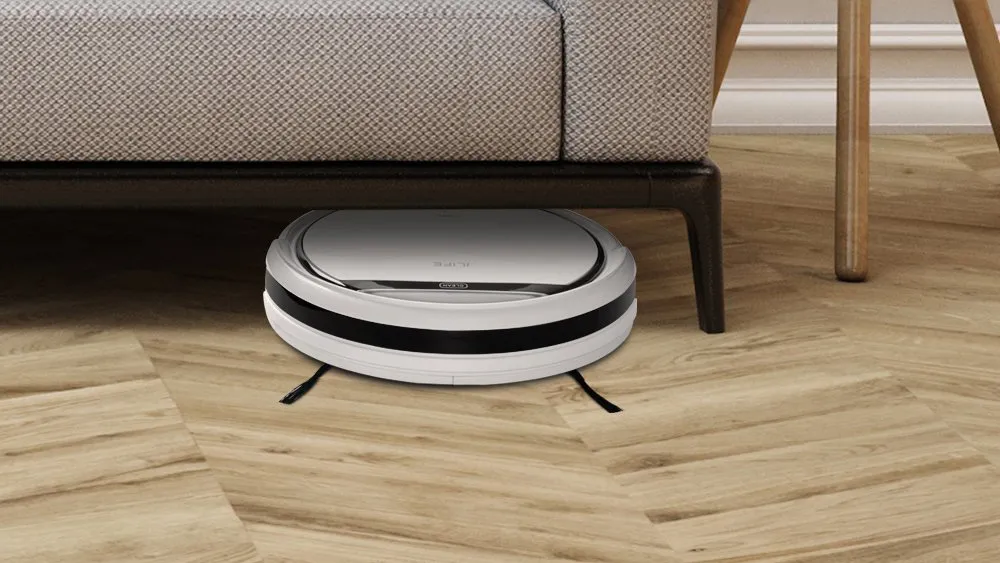
If you want to put your feet up as your floors are cleaned, why not invest in one of the best robot vacuums? These clever devices will work their way around your home, picking up any dust and debris in their path. Plus, you can get a helping hand with the mopping as well by buying one of the best robot mops, or a hybrid version between the two. Just keep in mind that these aren’t quite developed enough to fully replace your upright vacuum yet. So, you will still need to step in when required.
They are much more independent these days though. Thanks to self-emptying bases, emptying the dustbin so often is no longer necessary. And with object recognition, which is available with some premium designs, running over wires is a thing of the past.
9. Use the best cleaning methods
Even with all of the above, your cleaning process will be slow if you don’t use the right methods. Check out our guide on how to clean every room of your home, for step-by-step guidance on every cleaning task imaginable. With the right tools and method, you will clean in the most efficient manner possible, with the best results to show for it.
Be sure to check out what makes baking soda and vinegar so good at cleaning, and 10 cleaning mistakes that will ruin your home. Plus, here's 9 things you’re hoarding, which you should throw away right now.

