

The last time I went in for a full gel set, I left the chair feeling completely underwhelmed. The nail prep was rushed; my nail beds were burning under the UV lamp; and the whole experience felt like paying a premium price for unnecessary damage.
Spending nearly $100 every few weeks just to end up with thin, sensitive nails made me rethink the entire cycle. I wanted strong, glossy nails without having to rely on expensive salon visits, or harsh chemicals.
It turns out that timing couldn't be better. Regulators across the UK and Europe banned a common gel-curing chemical known as TPO due to health and safety concerns. While European salons phase out the ingredient, it remains widely used in salons across the United States.
Even without an official FDA ban, the shift is a timely wake-up call. Between aggressive scraping during removal, heat spikes under the lamp, and high maintenance costs, taking a break from gels is often the best thing you can do for your hands.
If your nails are thin, peeling, or sensitive, here is how to rebuild your natural nails at home, and keep a high-shine finish without the salon price tag.
1. Understand the damage barrier

Gel polish acts like a armor, but taking it off is where the real damage happens. Soaking in heavy acetone, scraping with metal tools, and aggressive buffing strip away your nail's natural moisture and top keratin layers. That is why your nails feel thin, soft, and bendy the second the gel comes off.
Instead of trying to harden them immediately with harsh chemicals, the goal is to give your natural keratin structure room to breathe and repair.
2. Rehydrate with lightweight oils

Hydration is non-negotiable when you are breaking up with gel polish. Hand lotions are great for skin, but they mostly sit on the surface. Lightweight plant oils like jojoba or sweet almond oil are thin enough to actually sink deep into the nail plate and cuticles rather than sliding off.
Slicking on a dedicated nail oil twice a day restores flexibility, stopping your nails from flaking, snapping, or cracking down the middle.
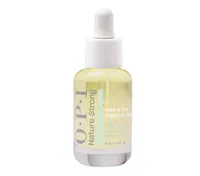
3. Switch to a peptide or keratin strengthener

Step away from old-school nail hardeners. Most traditional formulas rely on ingredients like formaldehyde which artificially stiffen the nail plate, making it brittle, inflexible, and far more prone to snapping.
I learned this the hard way during a nervous habit relapse: if you are a nail-biter or picker, these rock-hard coatings turn a nervous nibble into a jagged, painful tear right down to the quick.
Instead, opt for modern treatment base coats packed with keratin peptides, biotin, or gentle AHA acids. These feed fragile areas the nutrients they need to build real internal strength, keeping your nails flexible enough to bend without shattering.
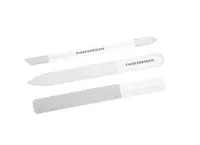
4. Swap your emery board for a glass file

Of all the tweaks I made to my routine, this single swap made the biggest difference in how beautiful and healthy my nails actually look. When your nails are already fragile, sawing back and forth with a cheap, gritty emery board acts like a serrated knife, creating tiny micro-tears along the edge that lead to peeling days later.
Switching to a fine glass or crystal file completely changed the game. It gently seals the keratin layers together as you shape. I also recommend sticking to a soft, rounded squoval shape for a few weeks. In my experience, sharp square corners love to catch.
5. Fake the gel finish

You can easily mimic that glossy, salon-fresh set at home without UV light or harsh chemicals. The secret is layering: start with a ridge-filling base coat to smooth out any lingering gel damage, apply two coats of a sheer neutral, and finish with a quick-dry top coat and dash of cuticle oil.
This gives you that mirror-like shine and high-end finish, minus the heat spikes, high prices, and painful scraping later.

Follow Tom's Guide on Google News and add us as a preferred source to get our up-to-date news, analysis, and reviews in your feeds. Make sure to click the Follow button!
More from Tom's Guide