Want window snapping on your Mac? Use this awesome trick
If you're missing the Windows snapping feature, there's a cure
Here at Tom’s Guide our expert editors are committed to bringing you the best news, reviews and guides to help you stay informed and ahead of the curve!
You are now subscribed
Your newsletter sign-up was successful
Want to add more newsletters?

Daily (Mon-Sun)
Tom's Guide Daily
Sign up to get the latest updates on all of your favorite content! From cutting-edge tech news and the hottest streaming buzz to unbeatable deals on the best products and in-depth reviews, we’ve got you covered.

Weekly on Thursday
Tom's AI Guide
Be AI savvy with your weekly newsletter summing up all the biggest AI news you need to know. Plus, analysis from our AI editor and tips on how to use the latest AI tools!

Weekly on Friday
Tom's iGuide
Unlock the vast world of Apple news straight to your inbox. With coverage on everything from exciting product launches to essential software updates, this is your go-to source for the latest updates on all the best Apple content.

Weekly on Monday
Tom's Streaming Guide
Our weekly newsletter is expertly crafted to immerse you in the world of streaming. Stay updated on the latest releases and our top recommendations across your favorite streaming platforms.
Join the club
Get full access to premium articles, exclusive features and a growing list of member rewards.
I recently wrote an article about the reasons why I prefer working on macOS versus Windows. Aside from the customary OS-wars comments and emails you learn to expect after publishing such a piece, I was also given some very friendly, useful advice.
See, one my favorite Windows 11 features is the snapping tool, which easily allows you to snap windows to various parts of the screen, in a range of different formats. And while you can split screen on Mac, there's not really any equivalent macOS function that performs anywhere near as well as Windows' snapping — nor is there anything coming with macOS Sonoma. Several readers got in touch to tell me that there's actually a macOS app for that: Rectangle.
Unfortunately, I can't install Rectangle on my work Mac, as it's a corporate machine which doesn't allow third party applications. However, I have tried Rectangle on a non-work machine, and it's great! So, this article is to show anyone unfamiliar with Rectangle (and who wishes snapping worked better on macOS) how to go about getting everything set up.
If you're new to macOS, or if you use both operating systems and want to be able to snap on macOS like you can on Windows, read on!
How to get window snapping on Mac
Note: Rectangle is a third party application trusted by many in the community. However, there are risks involved with installing third party apps downloaded from the internet. Ensure you download the application from the official Rectangle website and that you scan any files using one of the best antivirus software applications.
1. Download the Rectangle app
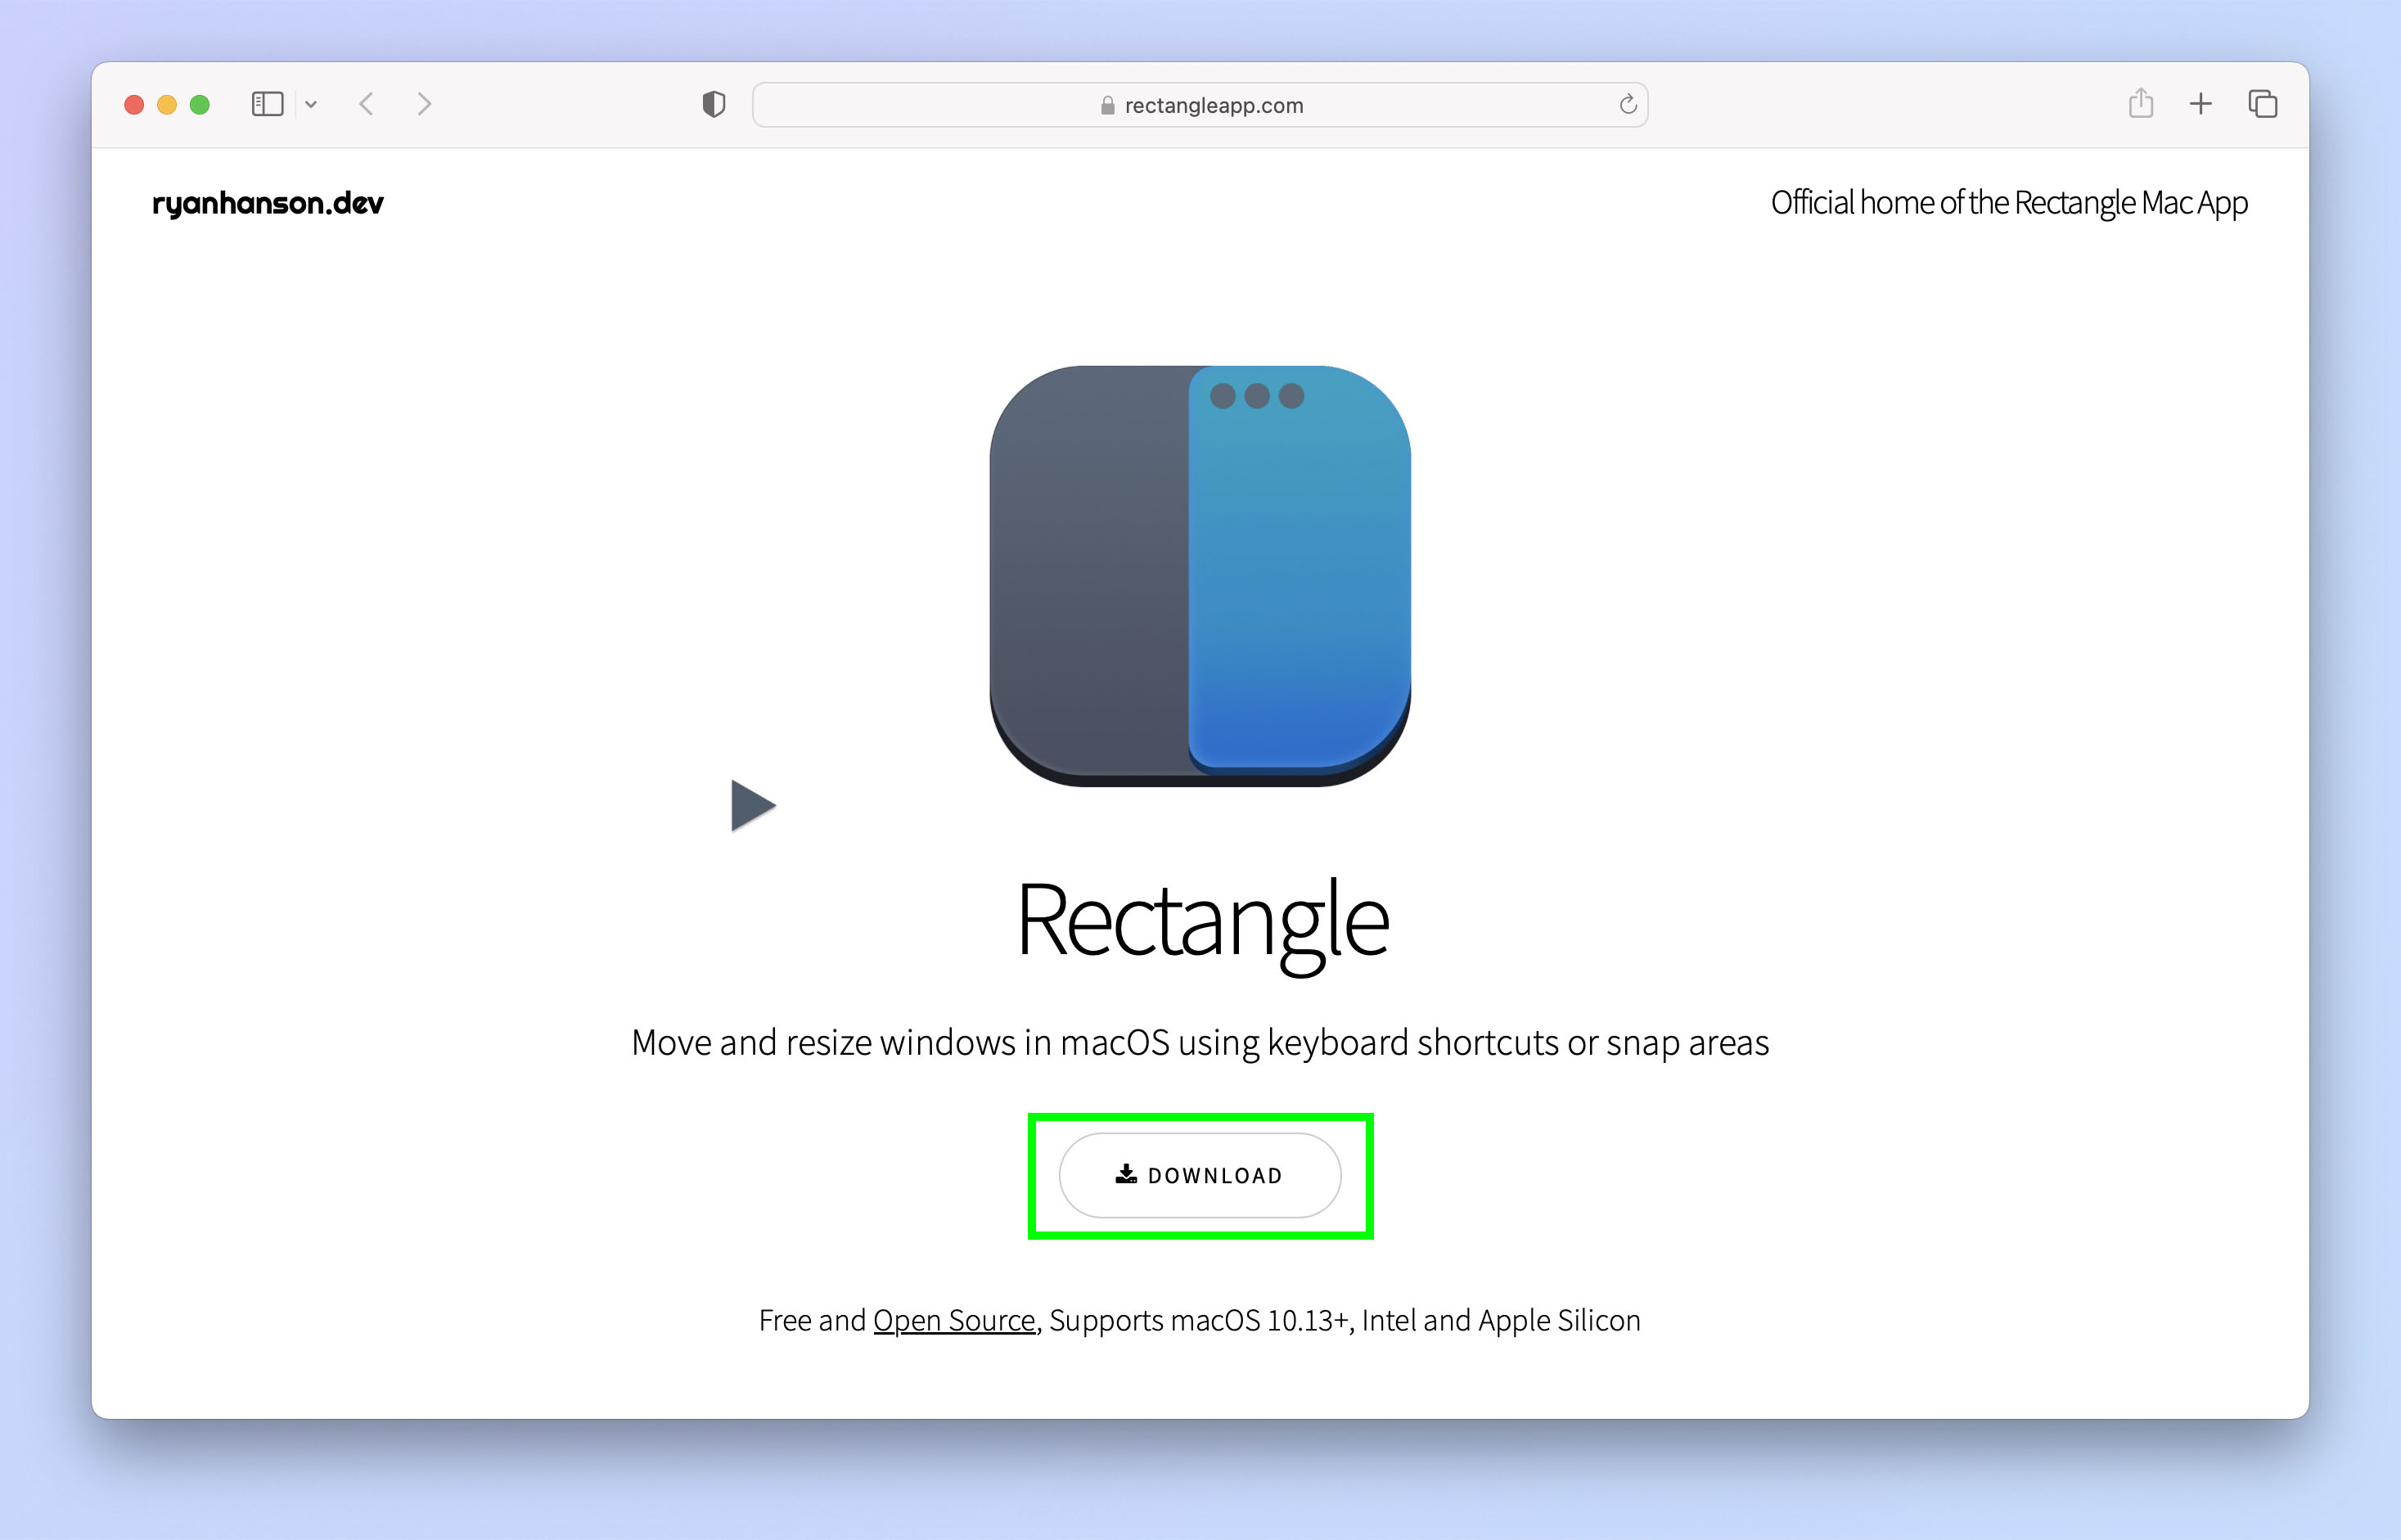
Head to the Rectangle website and click Download.
2. Click Allow if prompted
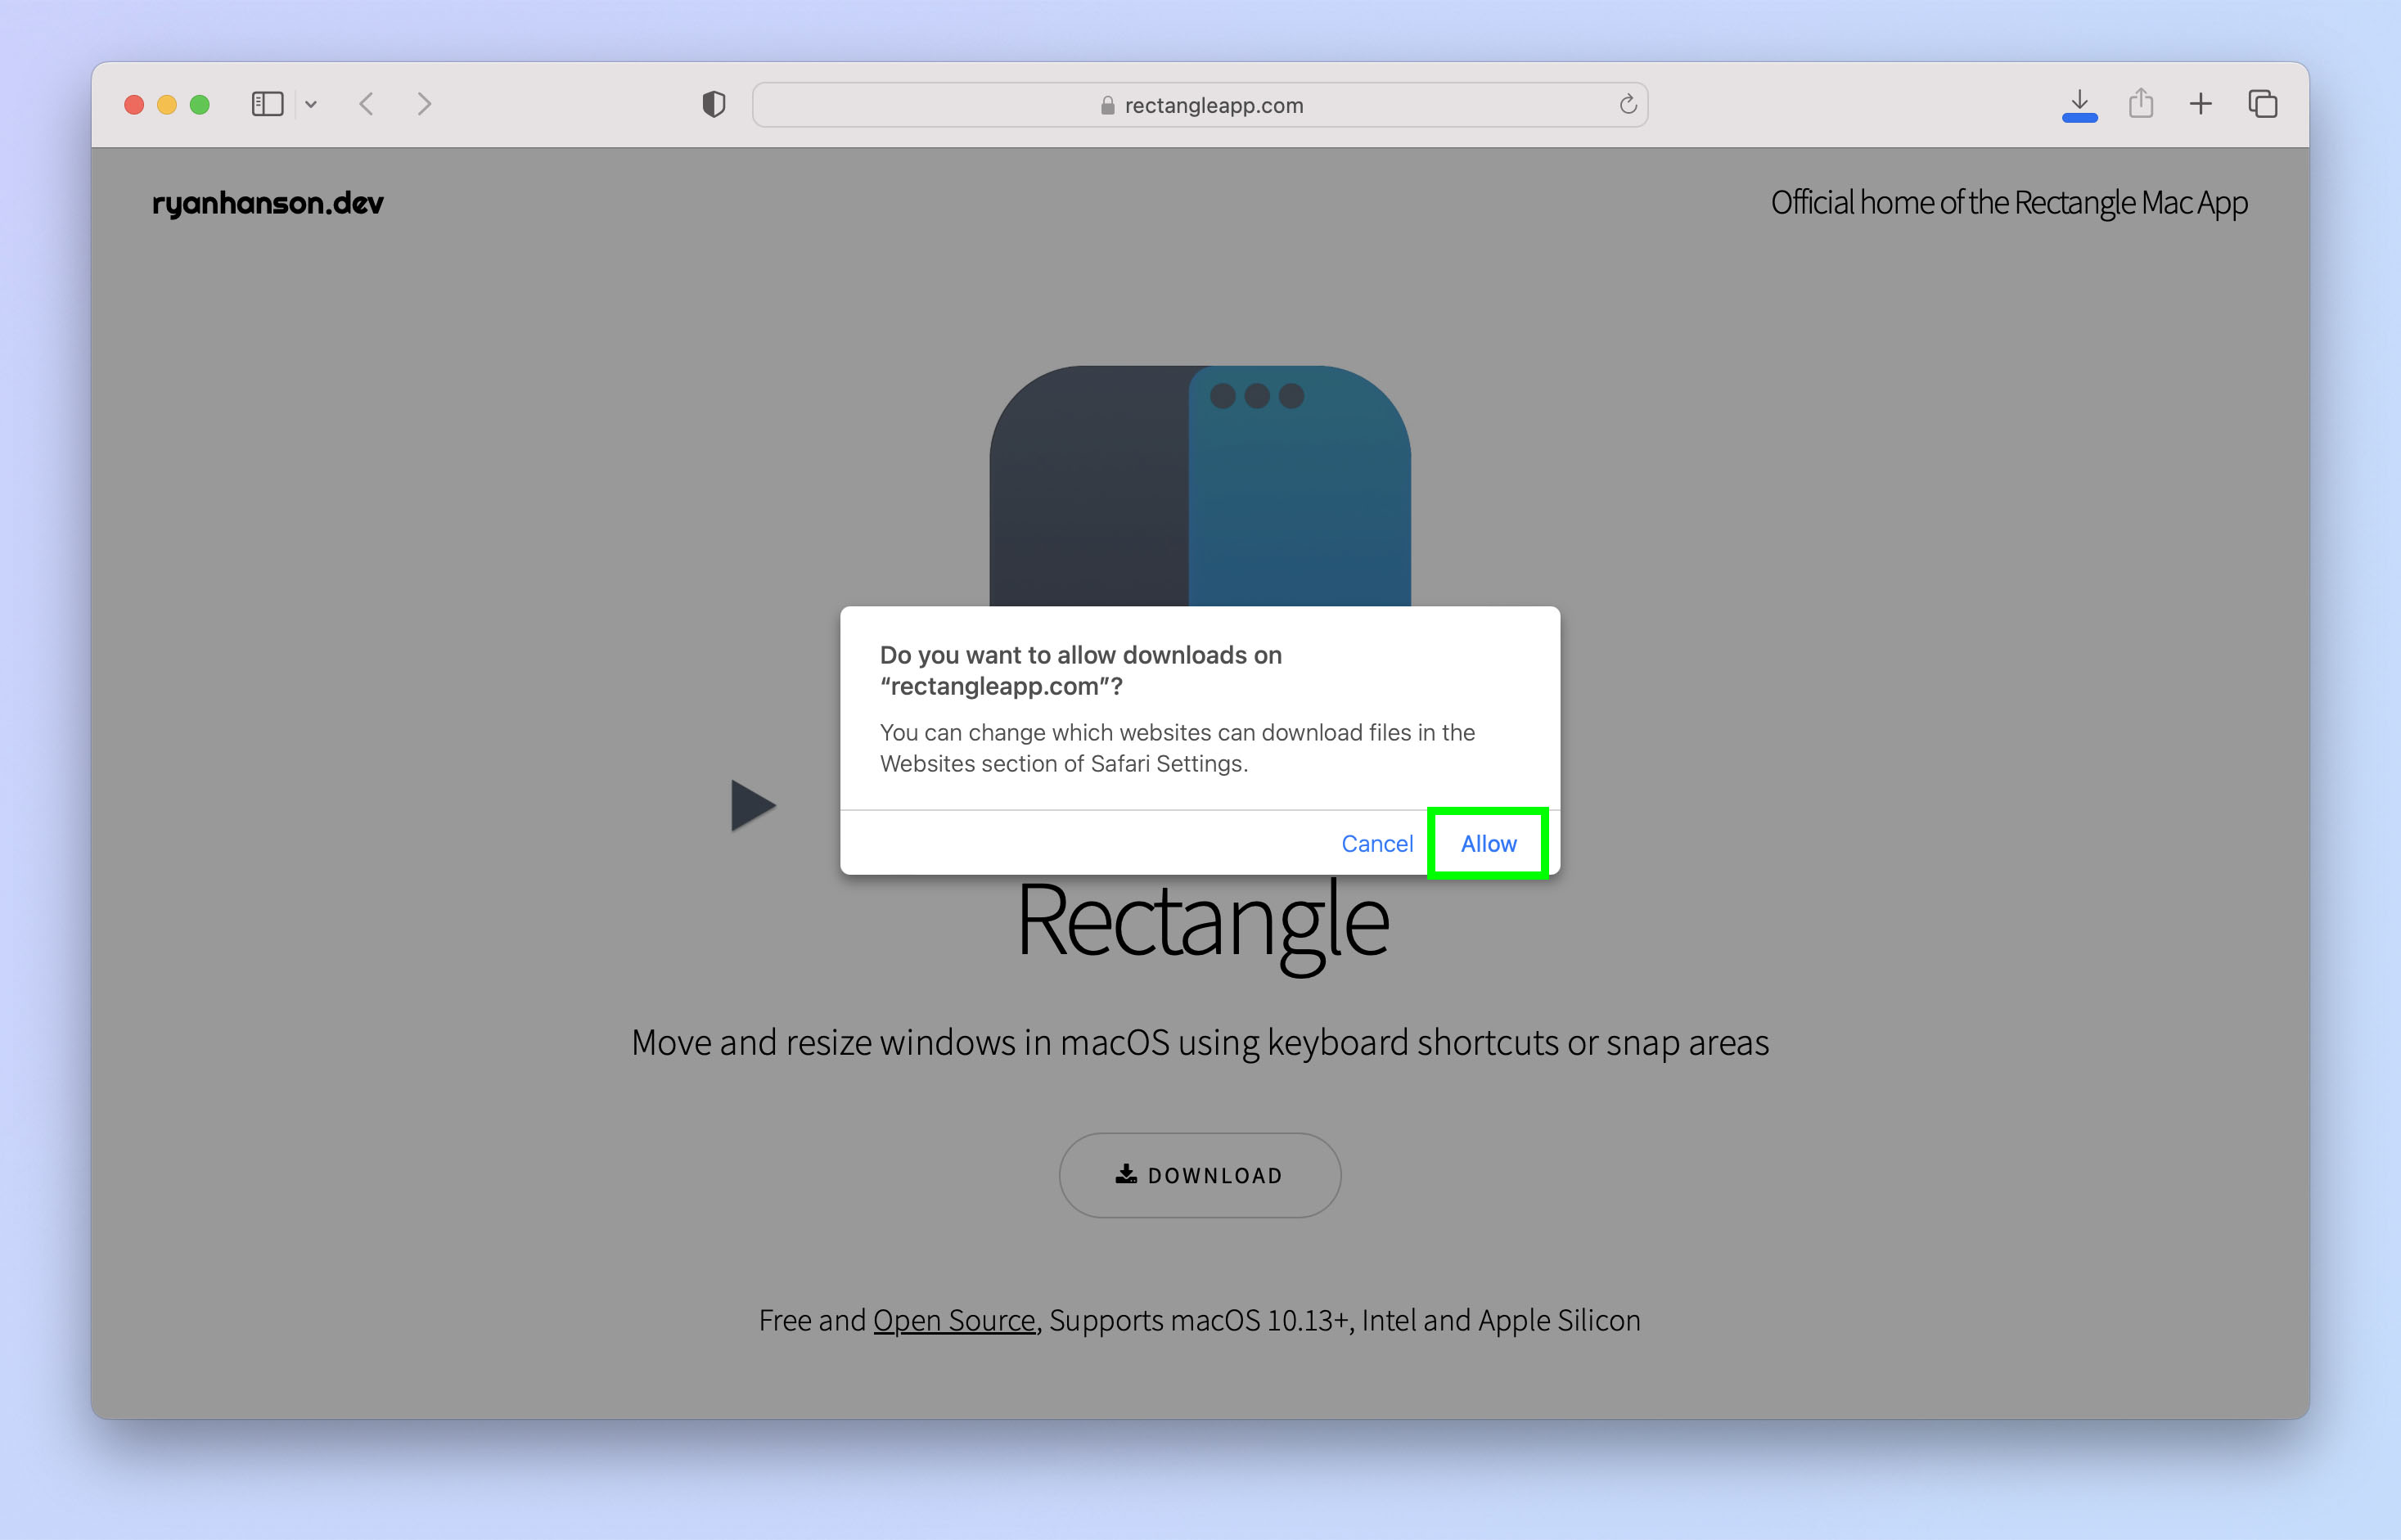
If prompted with a download warning, click Allow.
3. Install Rectangle
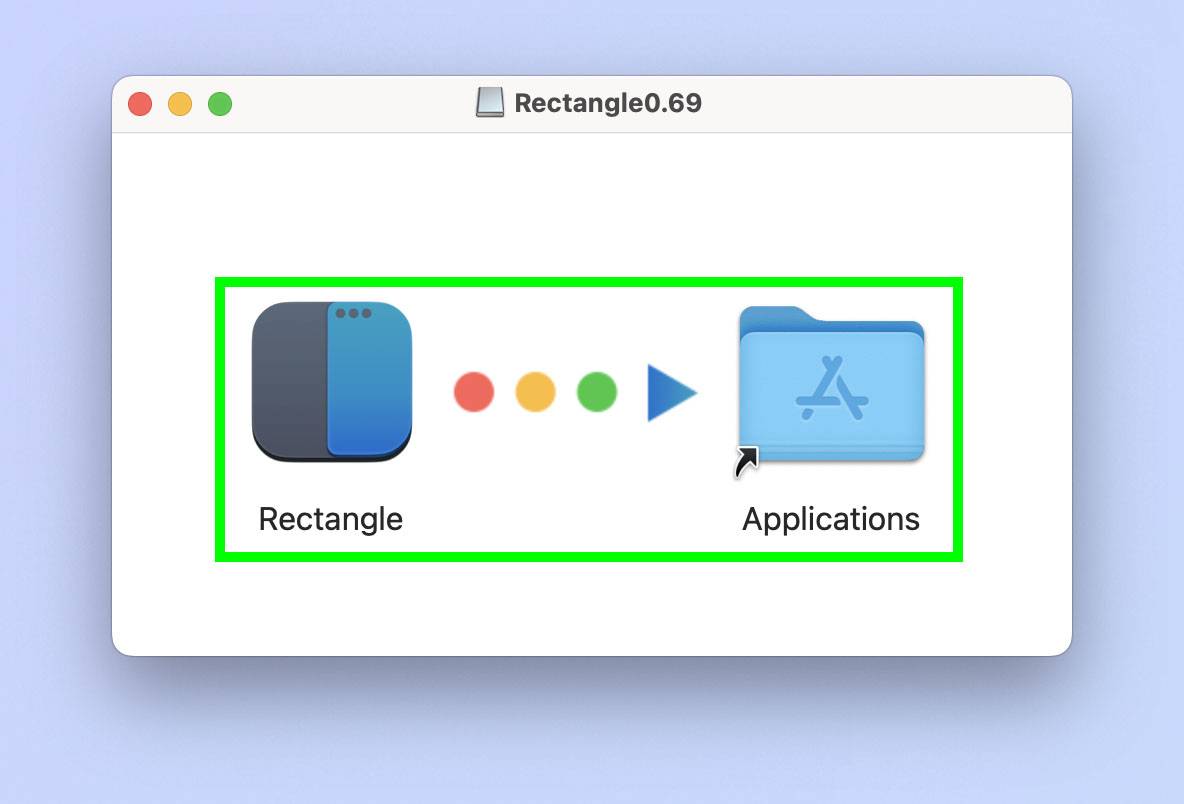
Once downloaded, double click the Rectangle .dmg in your downloads folder. Drag the Rectangle app tile to the Applications folder.
4. Click Open if prompted
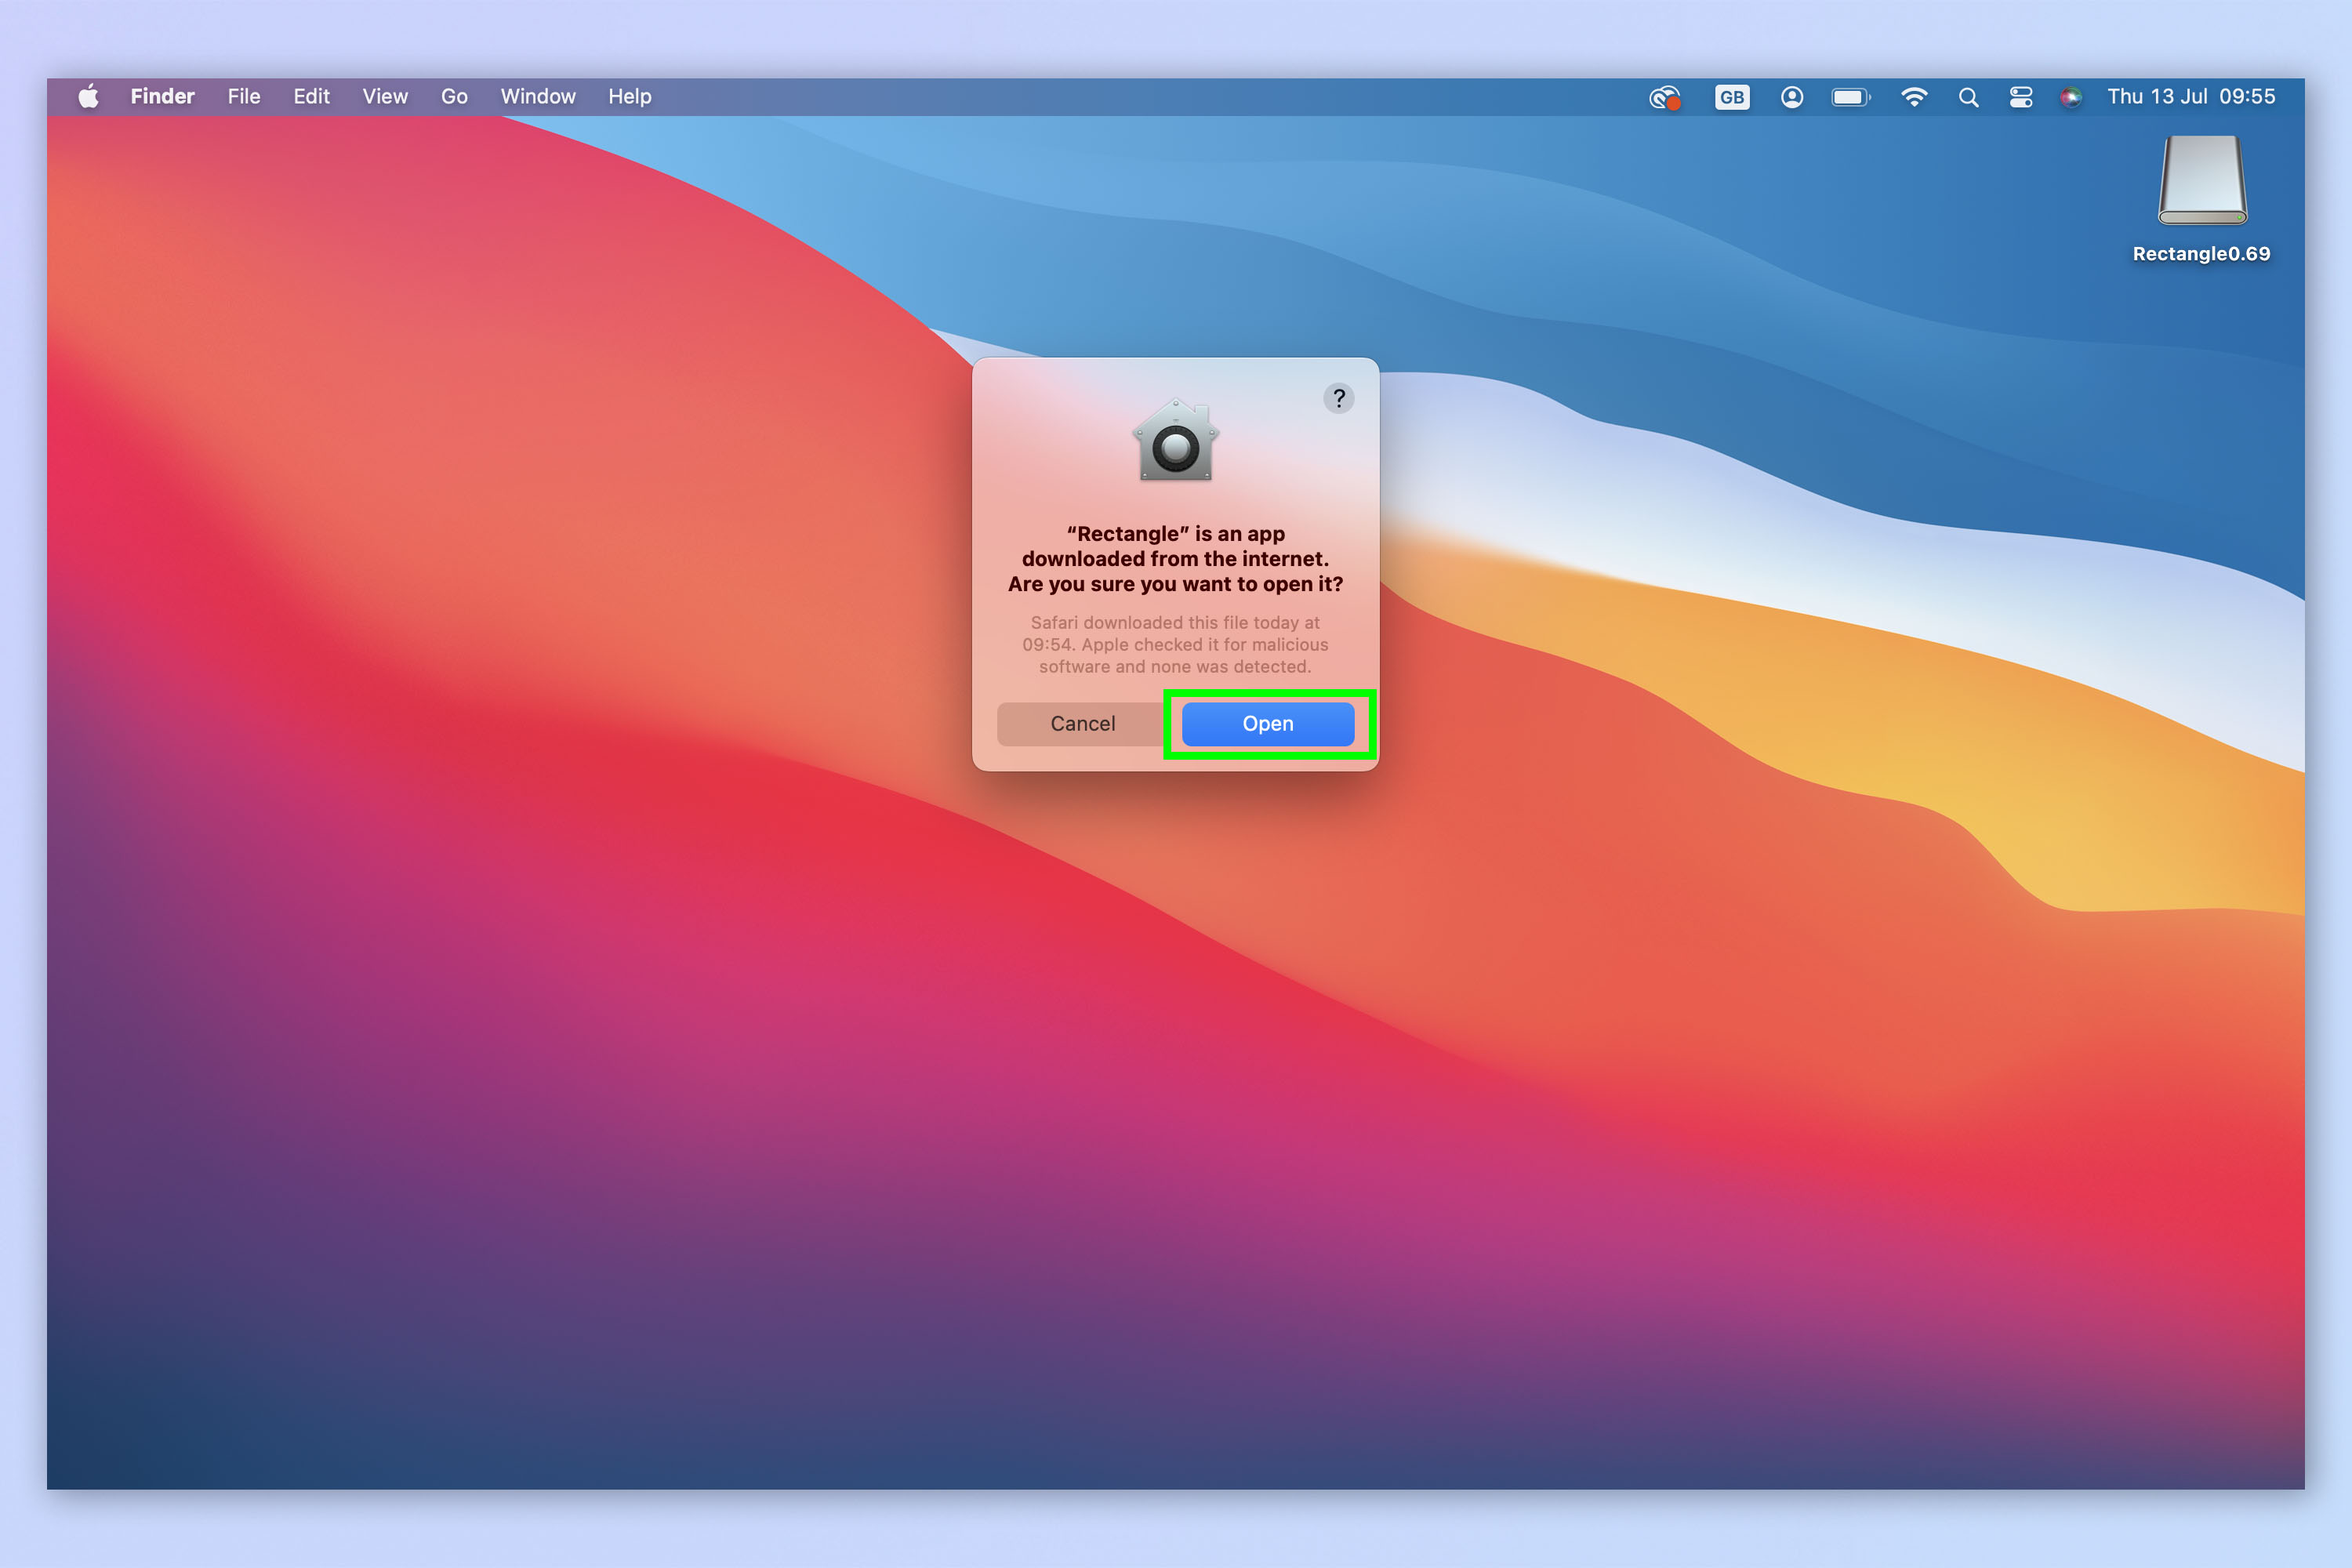
If a warning message about installing third party applications pops up, click Open. Again, ensure you have downloaded the application from the official Rectangle website before proceeding here.
5. Authorize Rectangle
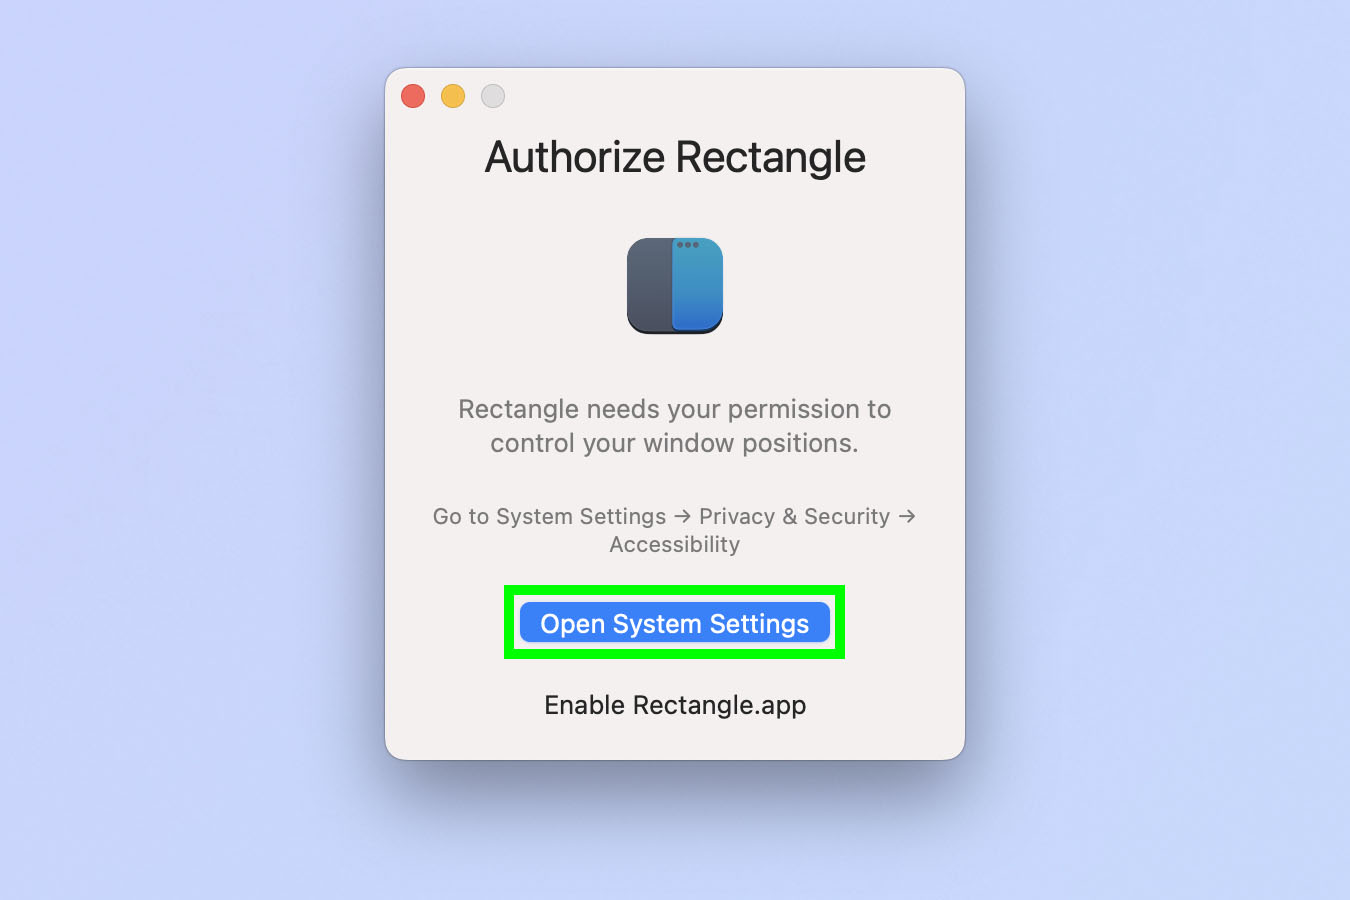
Your permissions settings may now allow Rectangle to control the position of windows on screen. If you receive a pop up about this, click Open System Settings. Alternatively, you can get to the right settings page manually: open System Preferences and click Privacy & Security. Then click Accessibility.
6. Toggle on Rectangle
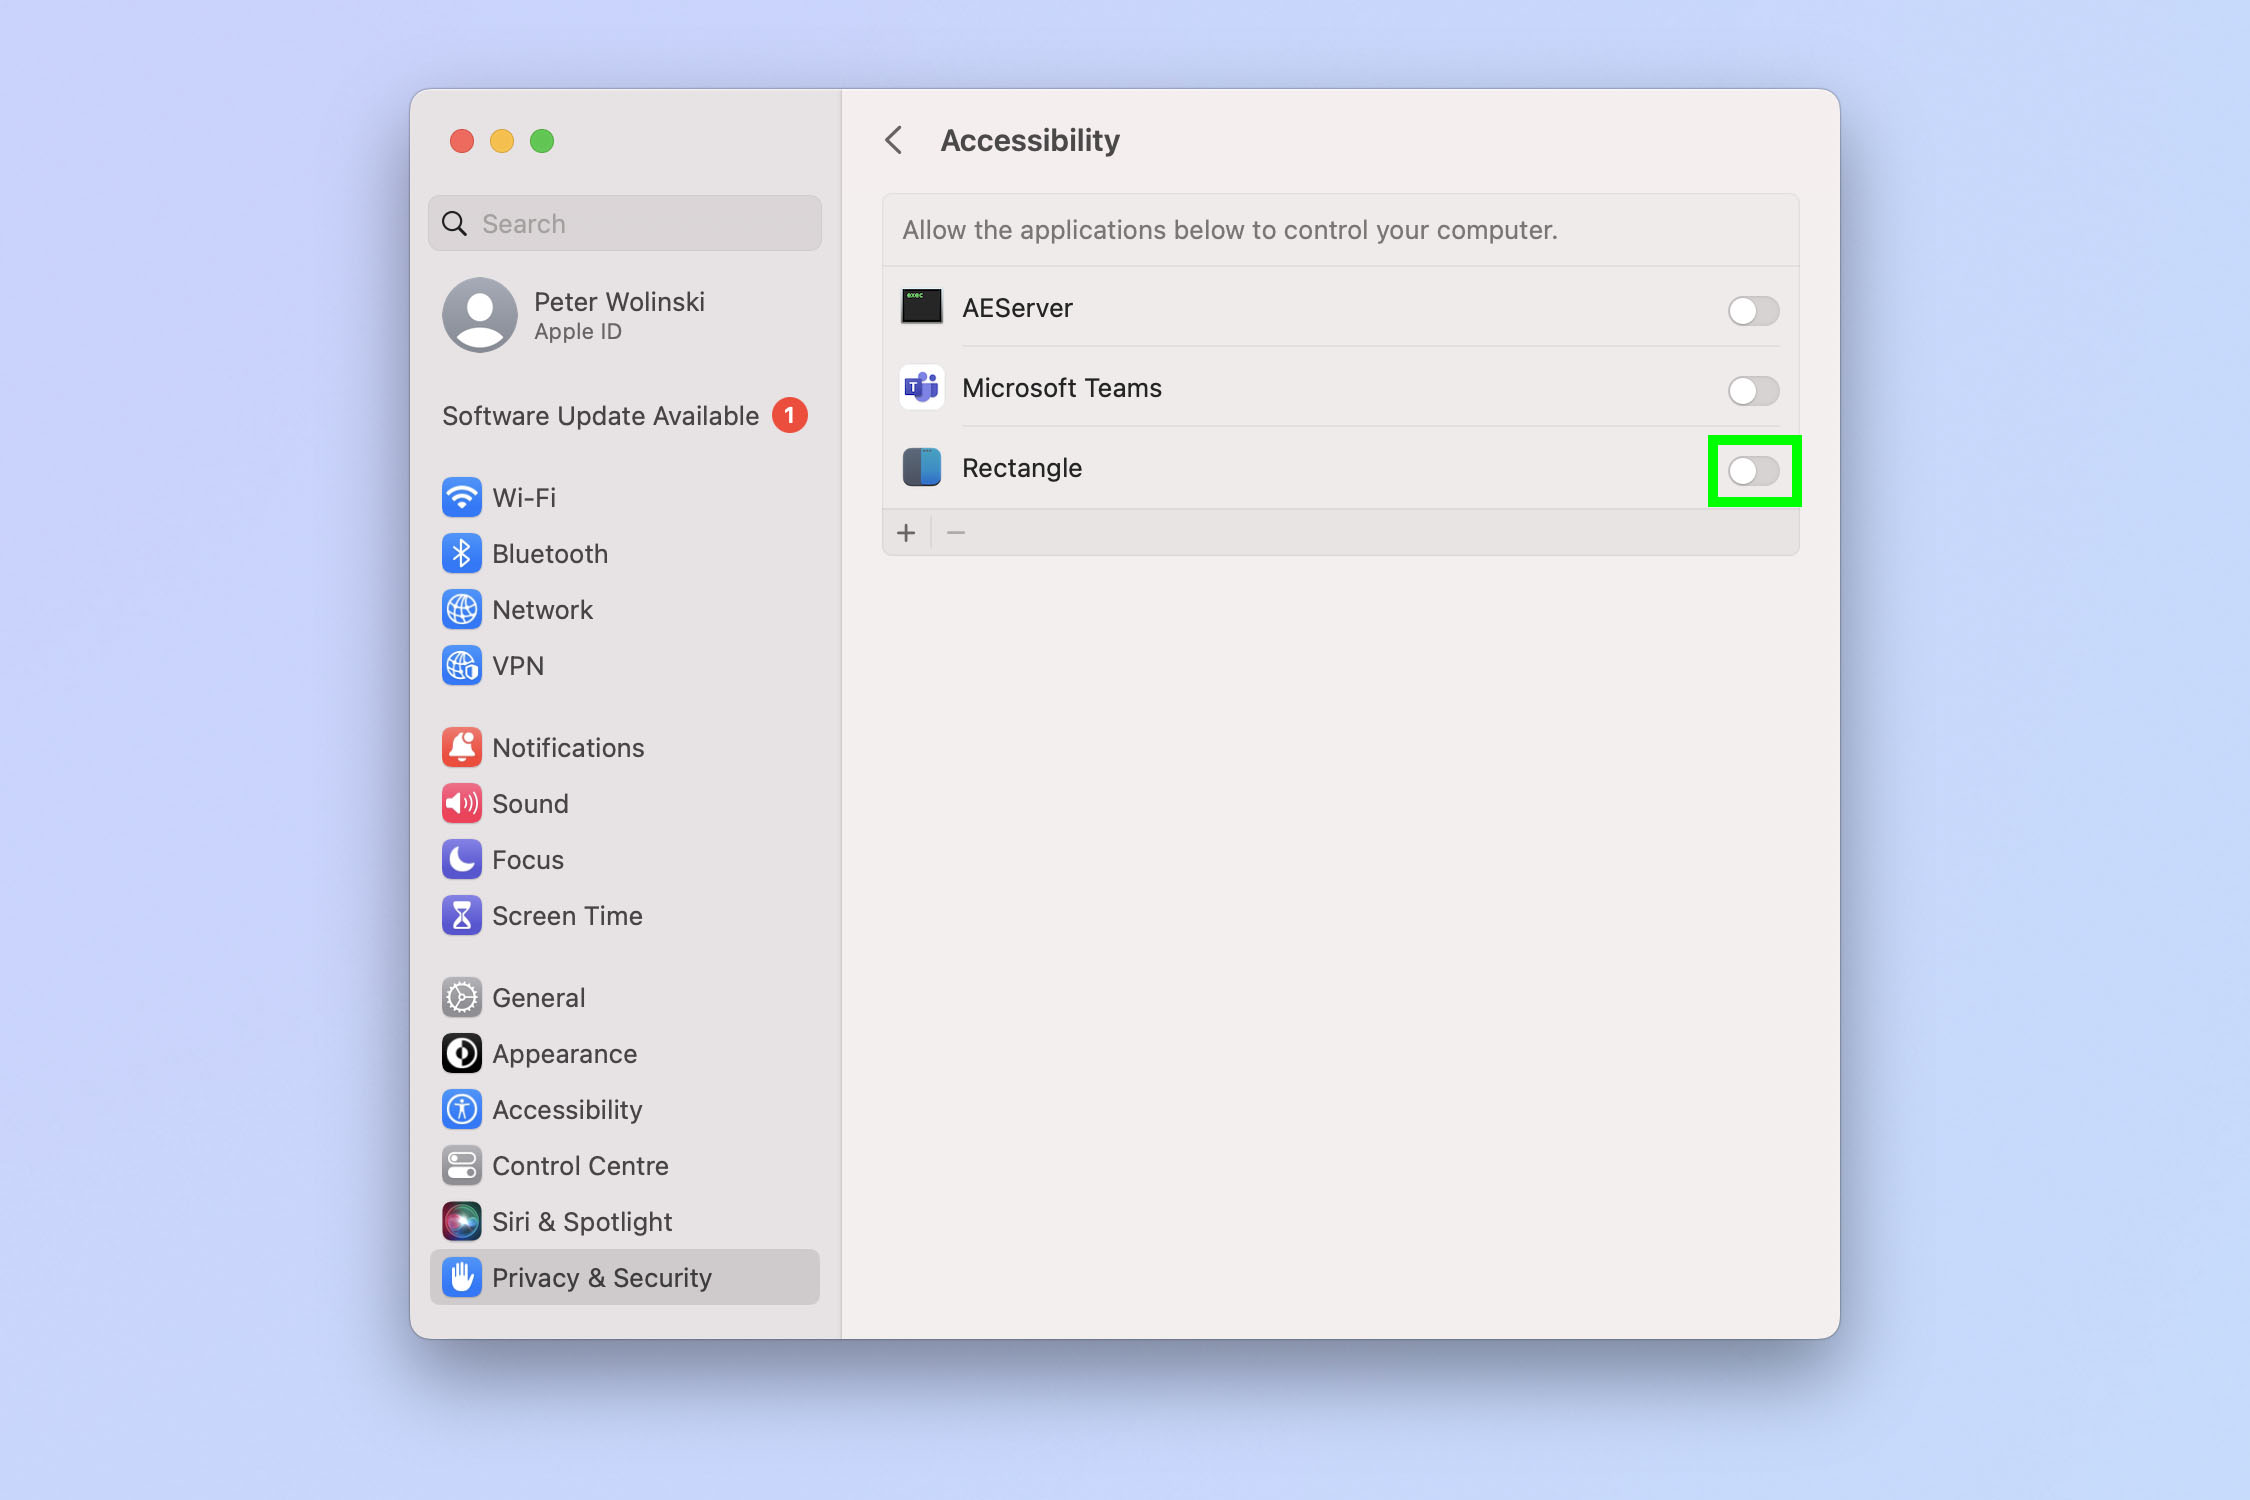
Now click the Rectangle toggle to allow it to control windows on your screen.
7. Authorize changes if prompted
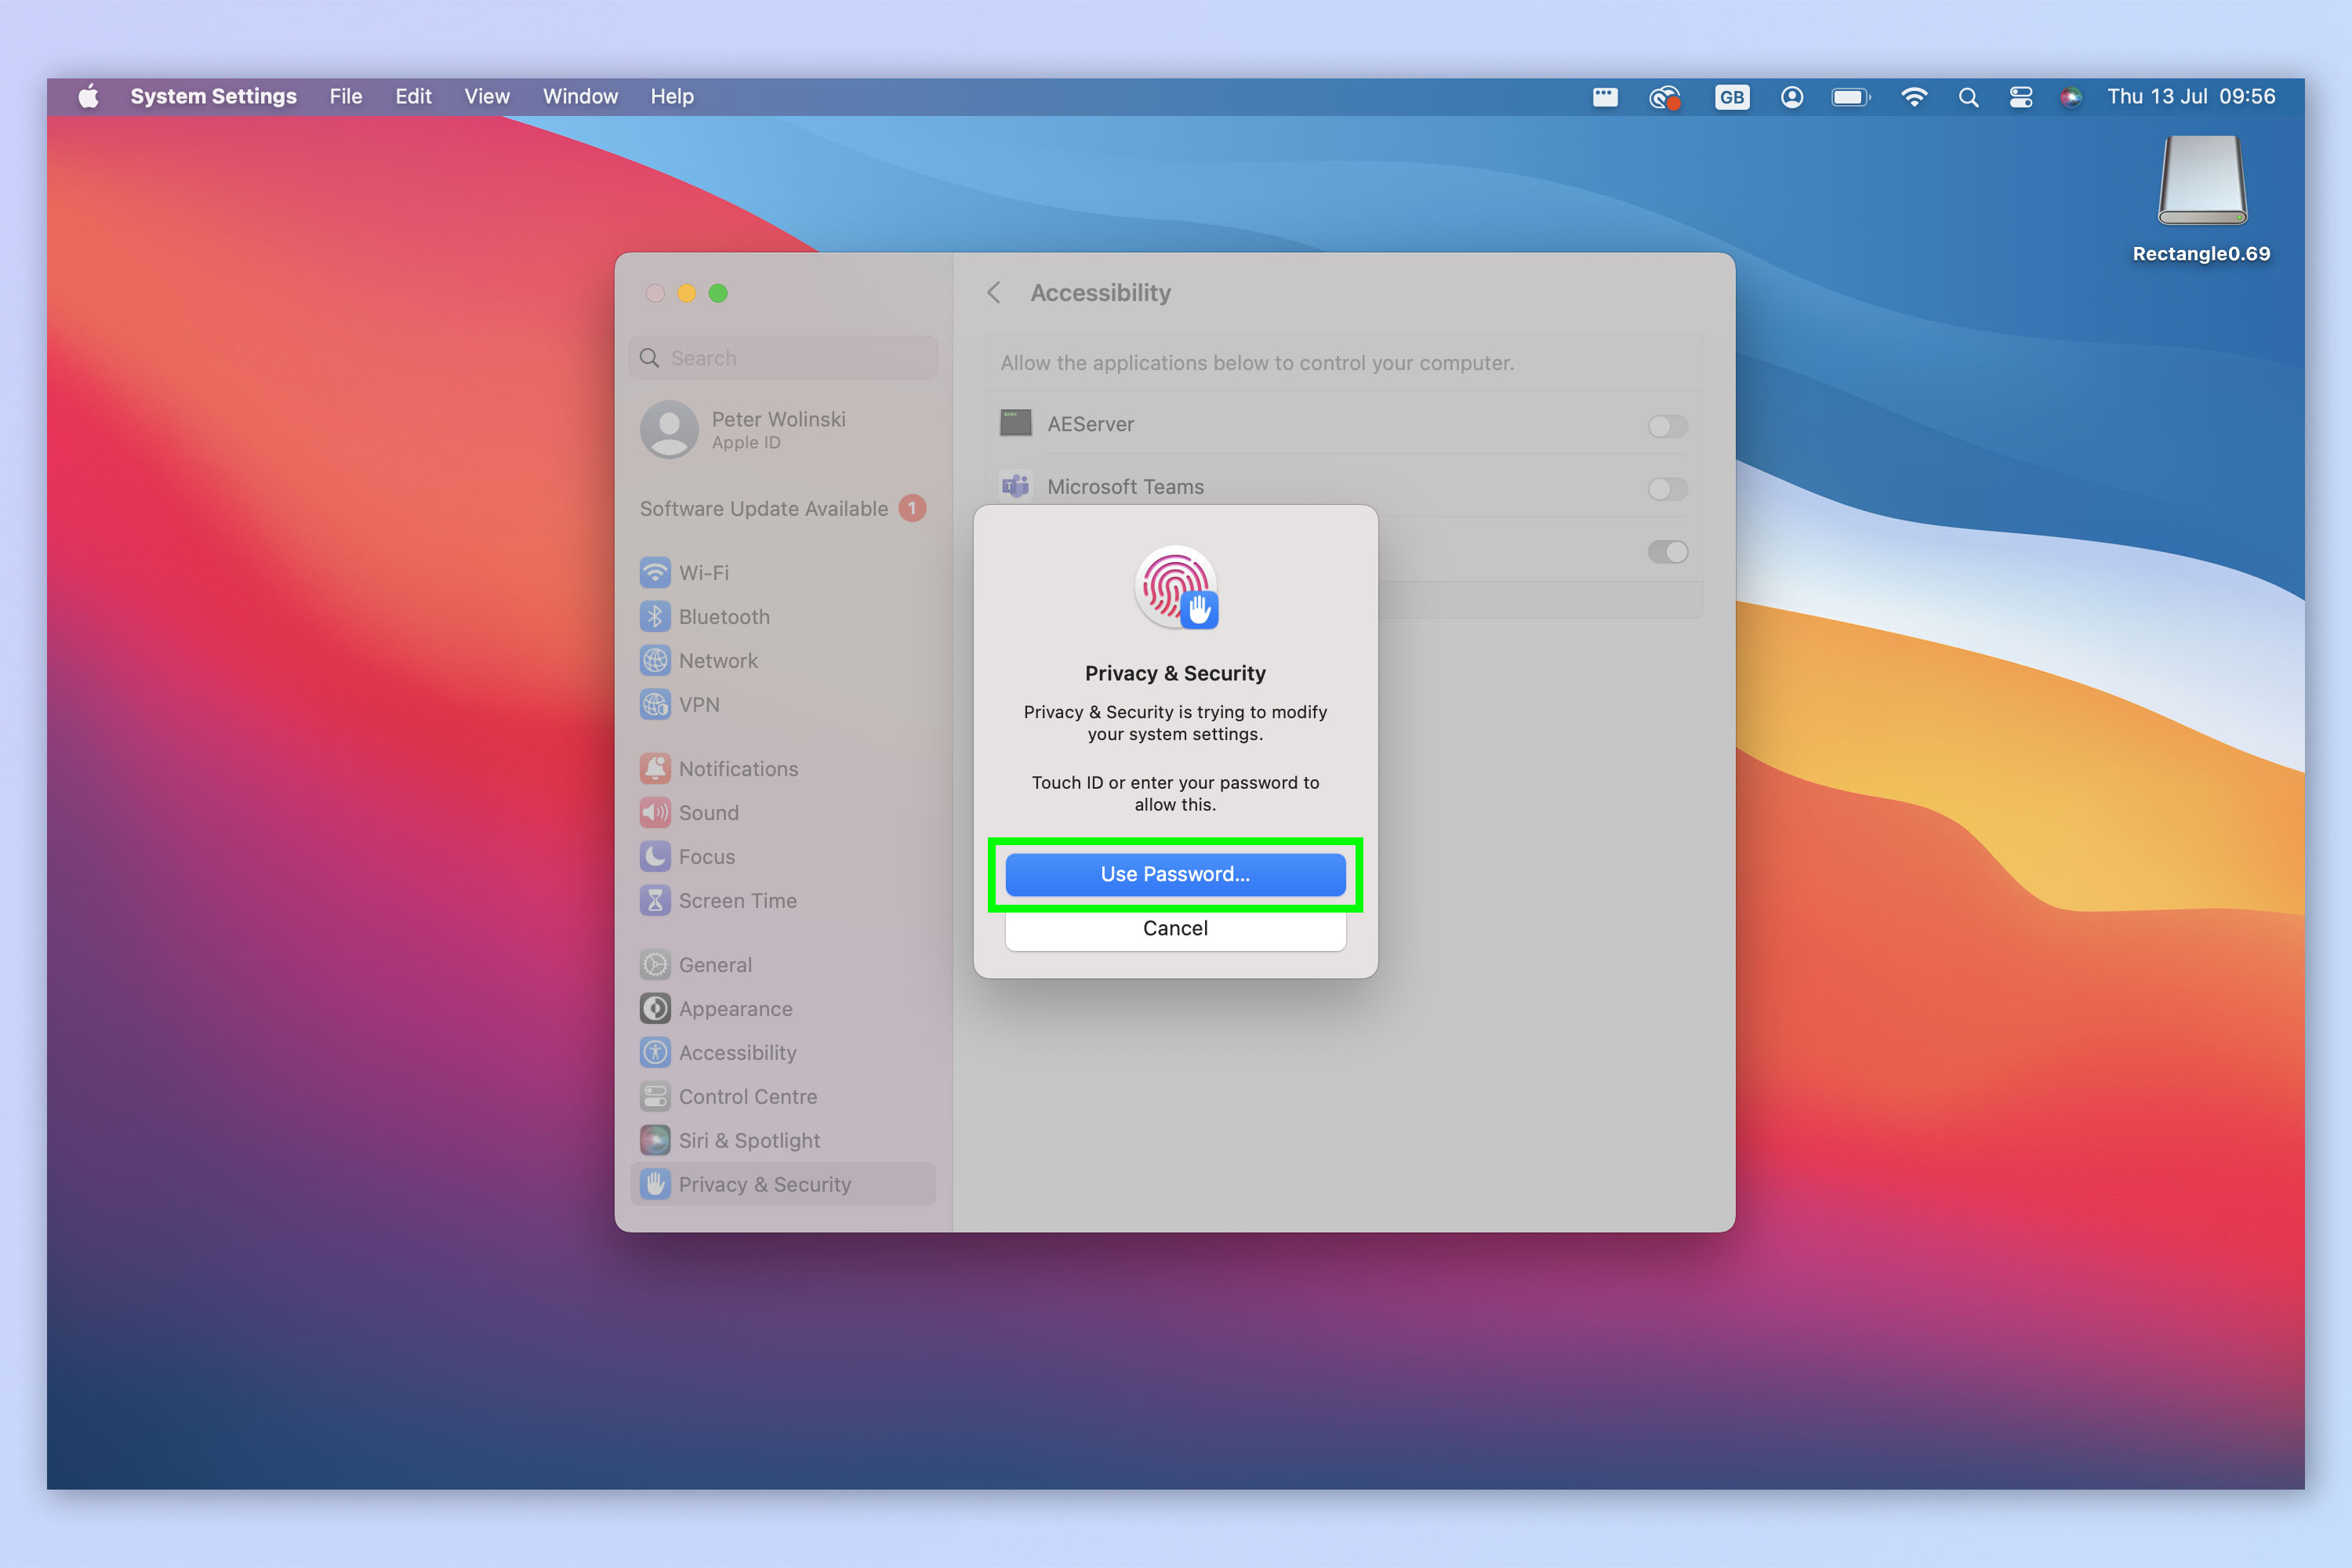
If you need to, enter your password or use your biometric password to authorize the changes.
8. Choose the app shortcuts and behavior
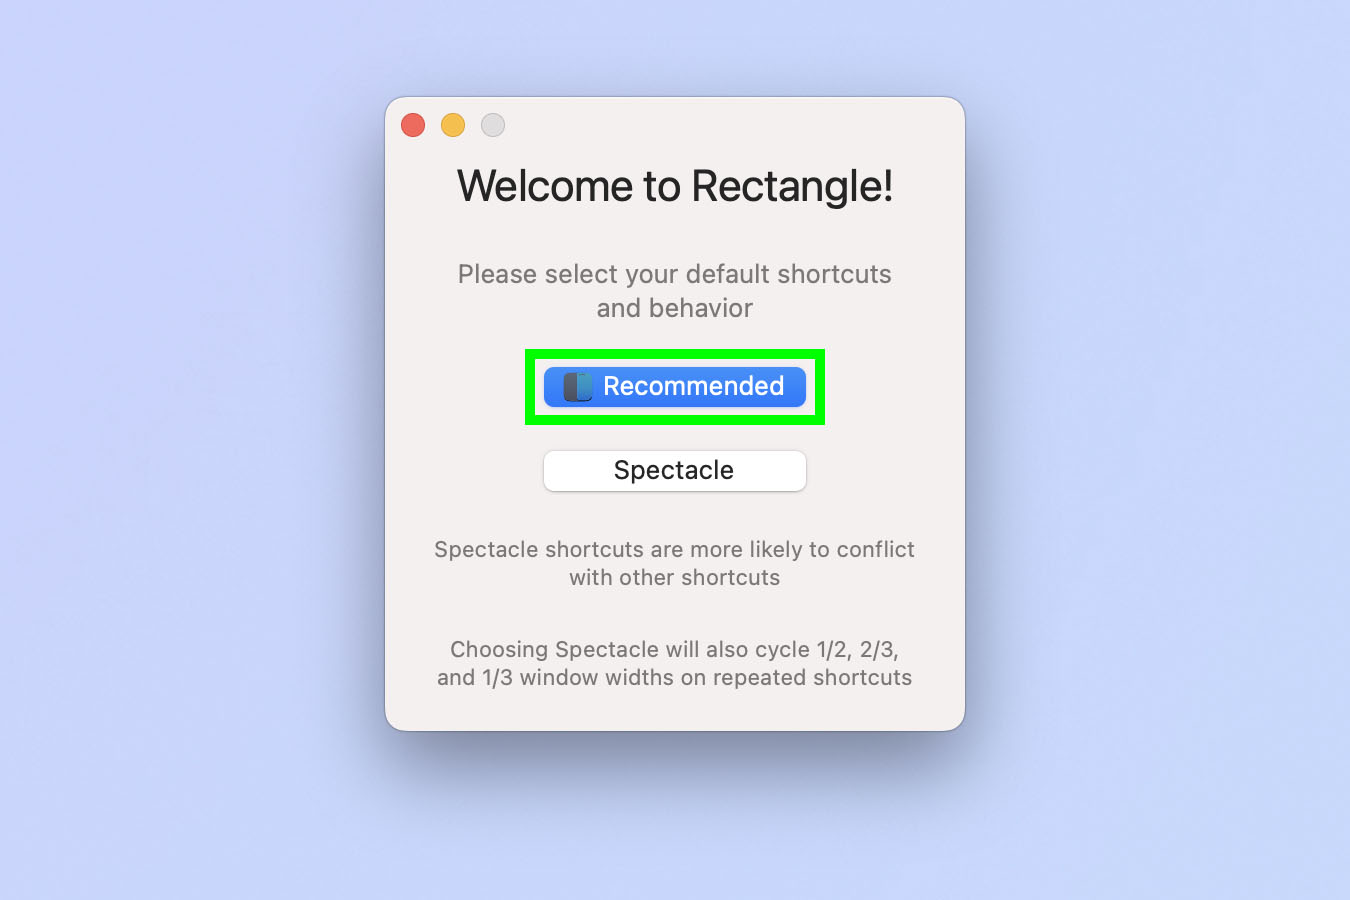
You can choose between different shortcuts and app behaviors. There are two sets — Spectacle is a legacy set of shortcuts and behavior from the predecessor to Rectangle. We'd suggest that you click Recommended, which is the most recent set of shortcuts and behaviors. The app will now open.
9. View and edit keyboard shortcuts
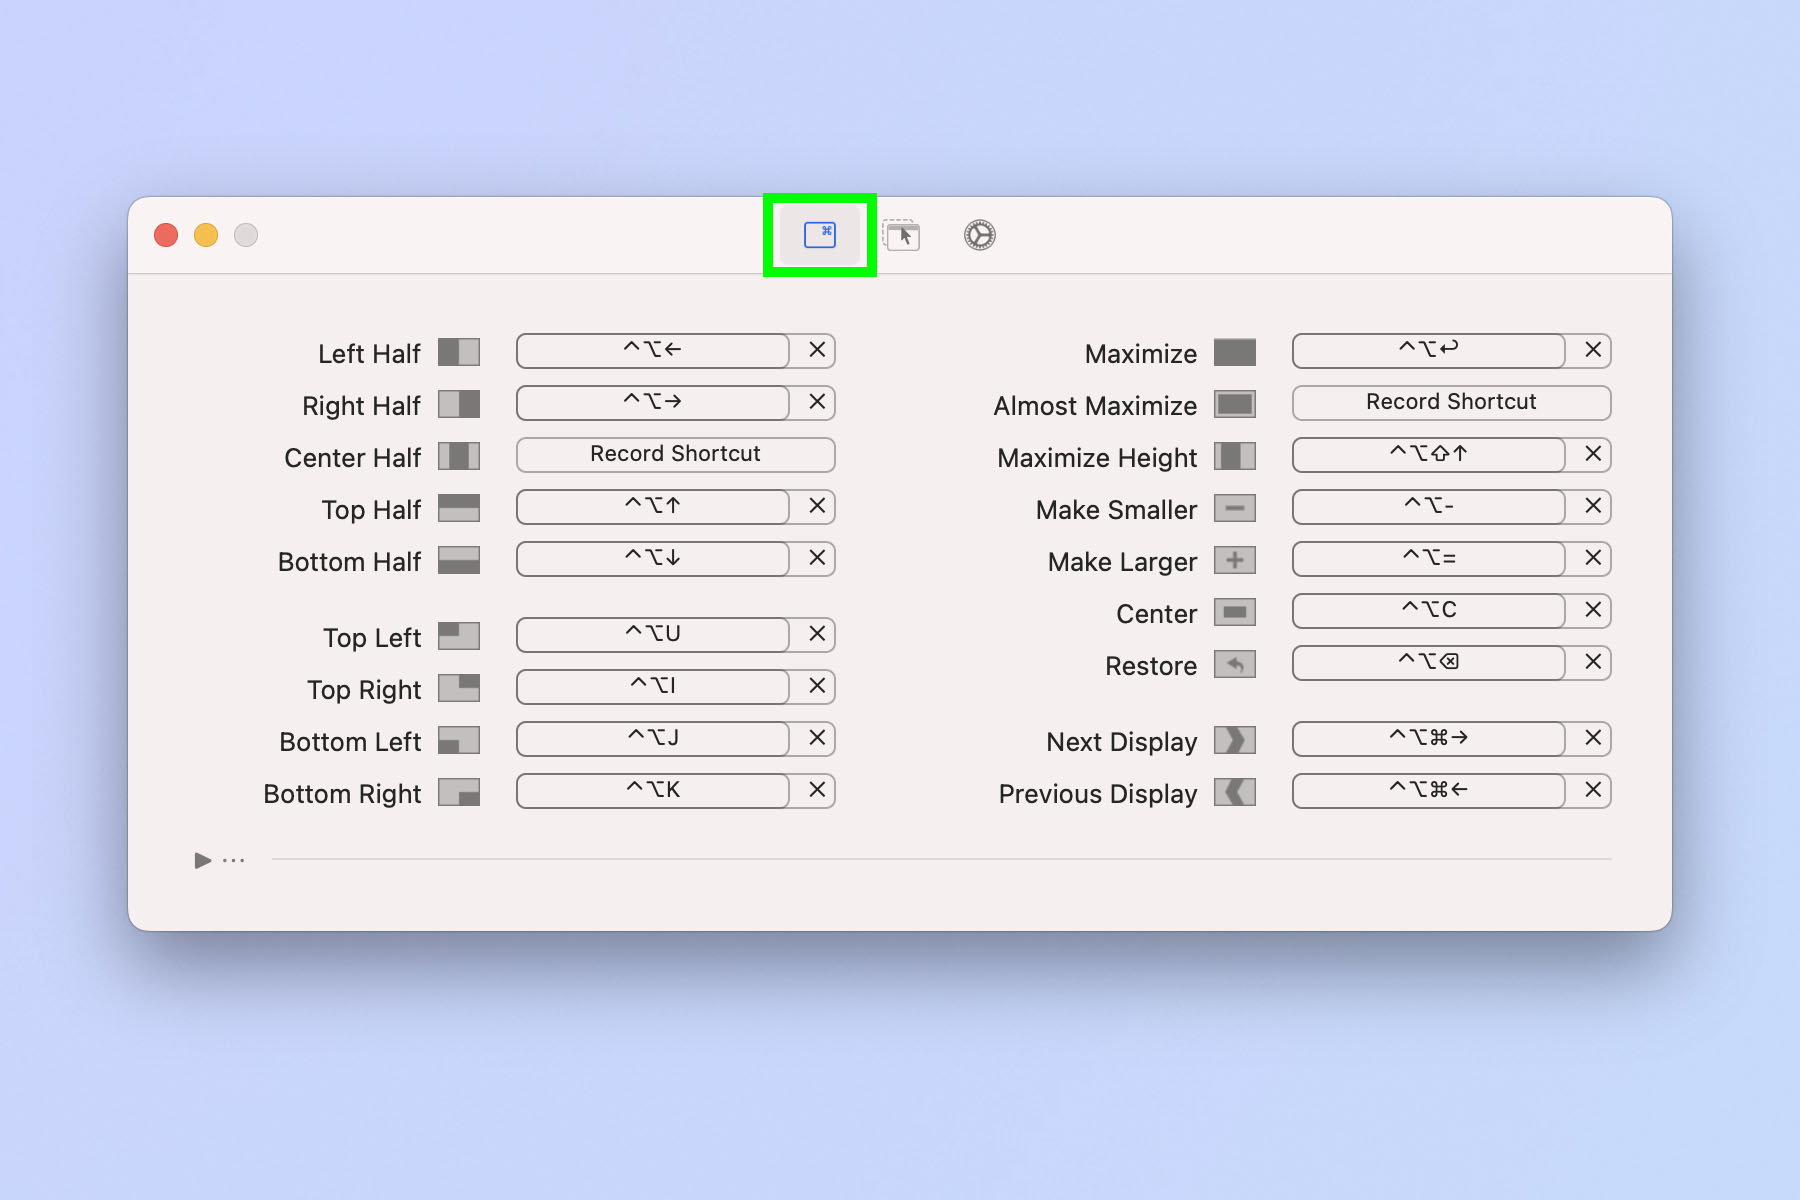
With the app open, click the shortcuts icon at the top of the app — it's the one on the left. You can now view, change and memorize the keyboard shortcuts that will quickly snap a window to a set position on screen.
10. View and edit behaviors
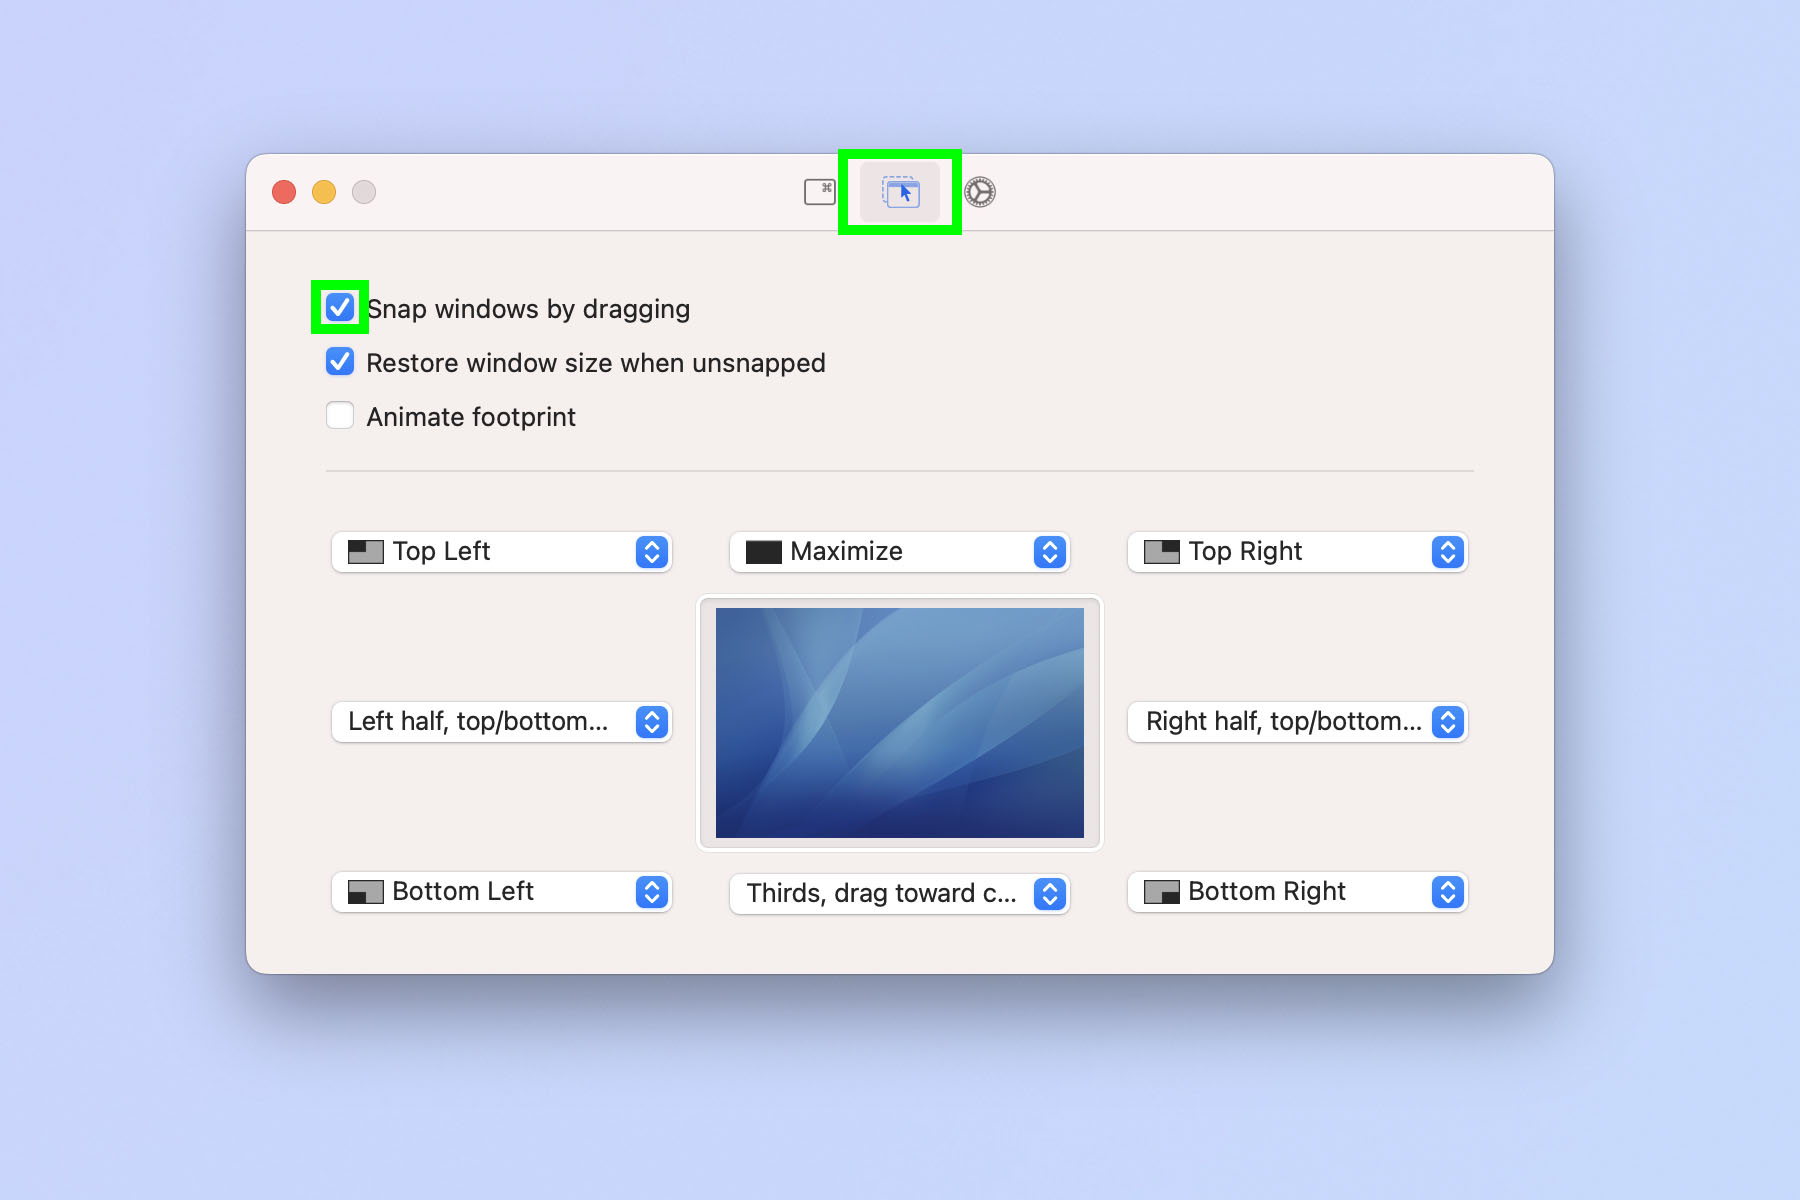
Now click the behaviors tab at the top of the app — it's the one in the middle. You can now view, edit and memorize the behaviors that will quickly snap a window to a position on screen. Make sure you toggle on Snap windows by dragging, which will allow you to snap windows using your cursor.
11. Snap away!
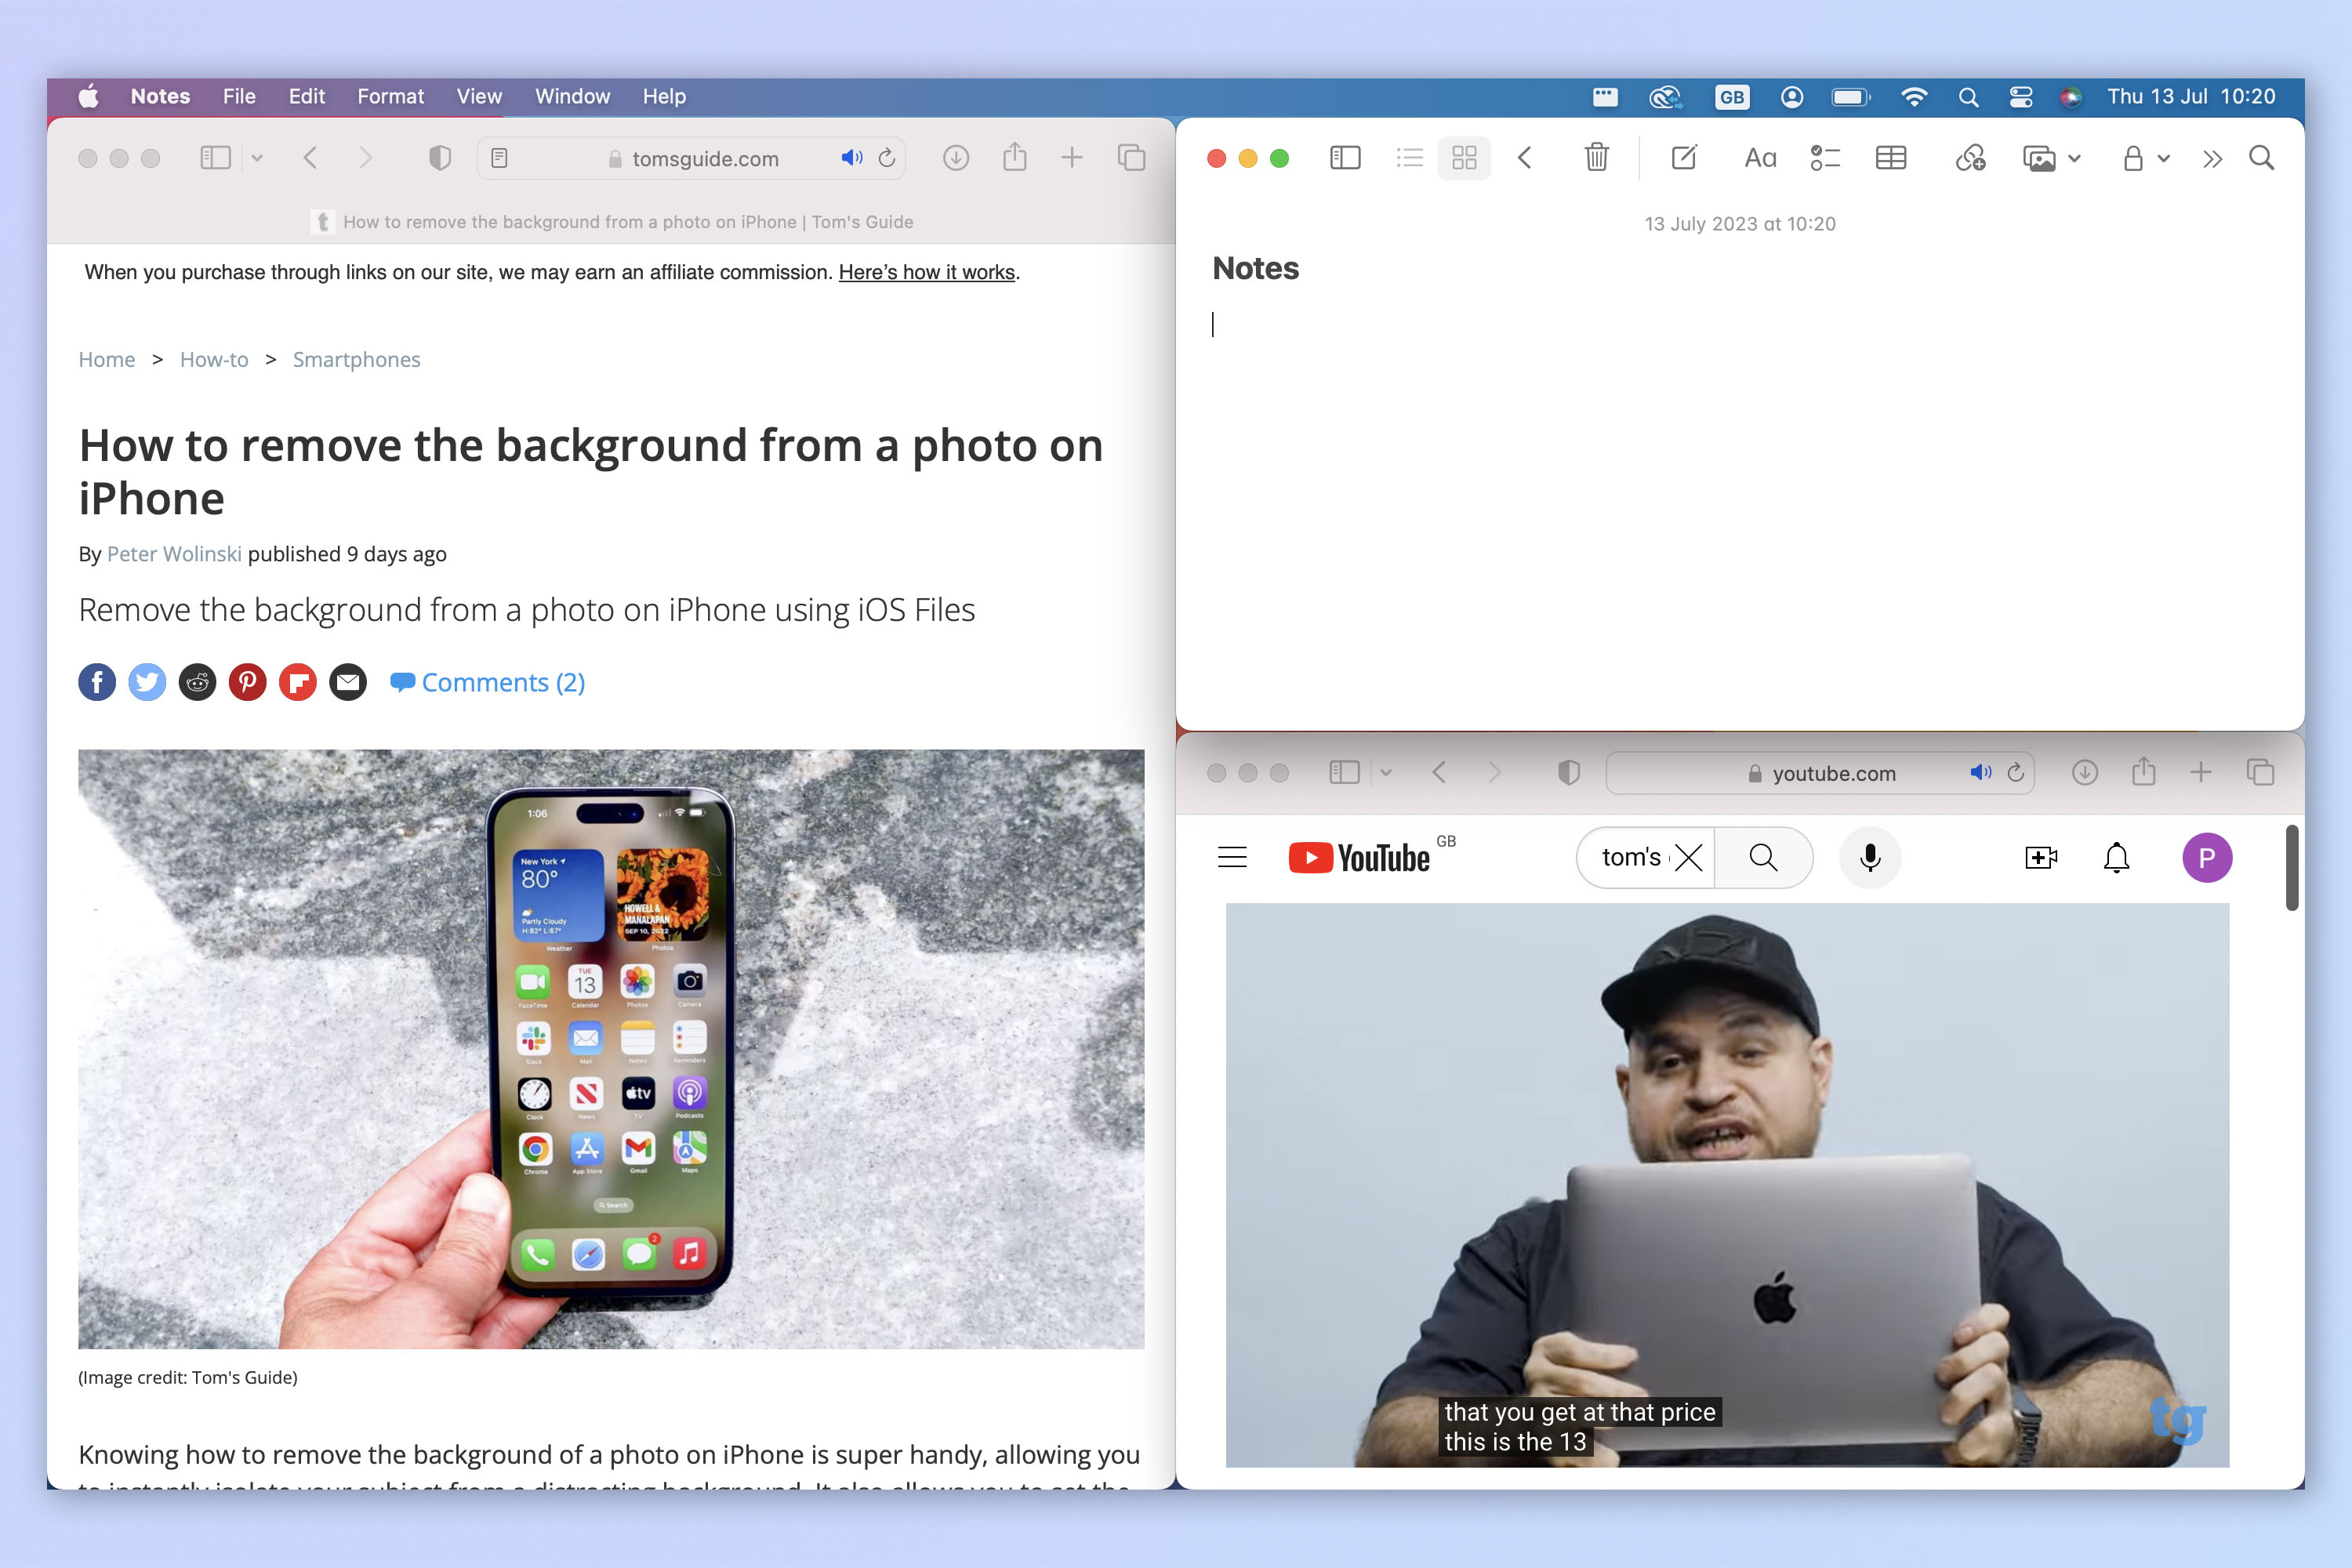
Now get on with the business of snapping your windows to the places on screen which are more useful!
We have plenty more guides to help you get the most out of your Mac. Learn how to clear the cache on Mac, which can help you speed your machine up a little. Check out how to change your MAC address on macOS if you'd rather keep your unique machine network address private. If you want to have the boring tasks done for you, learn how to use the Automator on Mac.
Get instant access to breaking news, the hottest reviews, great deals and helpful tips.

Peter is a Senior Editor at Tom's Guide, heading up the site's Reviews team and Cameras section. As a writer, he covers topics including tech, photography, gaming, hardware, motoring and food & drink. Outside of work, he's an avid photographer, specialising in architectural and portrait photography. When he's not snapping away on his beloved Fujifilm camera, he can usually be found telling everyone about his greyhounds, riding his motorcycle, squeezing as many FPS as possible out of PC games, and perfecting his espresso shots.
 Club Benefits


