How to install Linux
A step-by-step Guide on how to install Linux using a USB flash drive
Wondering how to install Linux? If you're looking to change your current operating system or simply want another option to choose from, this guide will take you through the Linux installation process step-by-step.
Installing "Linux" is actually a bit of a misnomer. When people say this, they're actually referring to installing a distribution (distro) that uses the Linux kernel (the core of an OS) as a base for a complete OS. Popular distros include Ubuntu, Fedora, and Debian.
If you’re new to Linux, then, as with any new system, it may take a bit of time to familiarize yourself. However, distros like Ubuntu ensure Linux is intuitive to use and not too dissimilar to what you may be used to on Windows or macOS.
Here, we're going to cover how to install Linux to help you get started on your journey. We're going to cover how to install Linux (using the popular Ubuntu distro) via a USB ISO drive — we'll show you how to create that too using a Windows machine.
Ready? Here's how to install Linux.
How to install Linux
There are several ways to install Linux. For all of them, we'll be booting from a USB flash drive, which is a straightforward option. You'll just need a machine with a USB port and a USB flash drive with at least 16GB of space.
Caution: Here, we've used well-known and reputable third-party software (e.g. bootloaders and distros). The steps in this guide can be applied to other software, but before you download anything, ensure it is from a reputable source.
Get instant access to breaking news, the hottest reviews, great deals and helpful tips.
How to create a bootable drive
Before we begin the installation process, we need to get our Linux distro onto a USB flash drive. There are other ways to install Linux, such as downloading installation files over the internet. However, network installations rely on a stable and fast internet connection; otherwise, the installation process could fail.
Installing Linux using a USB flash drive is quick and easy, so we've gone for that option here.
1. Download the UNetbootin executable file (but don't run it)
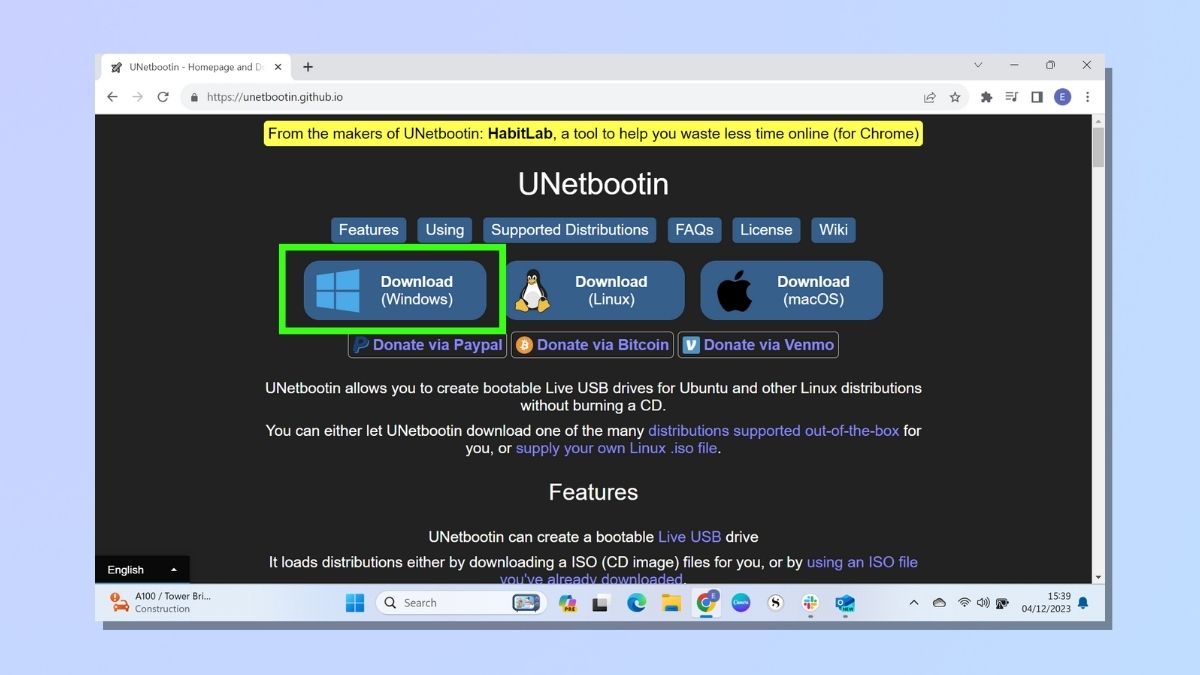
In order to run Linux from a USB, you'll need a piece of third-party software to create a bootable drive.
There are several bootloaders to choose from, but for this guide, we've gone with UNetbootin, which is easy to download and straightforward to install.
Download the executable file from unetbootin.github.io, but don't run it just yet, as we'll need to get an ISO image before we can install it. Save the .exe file somewhere you can find it.
2. Download the Ubuntu disk image (ISO)
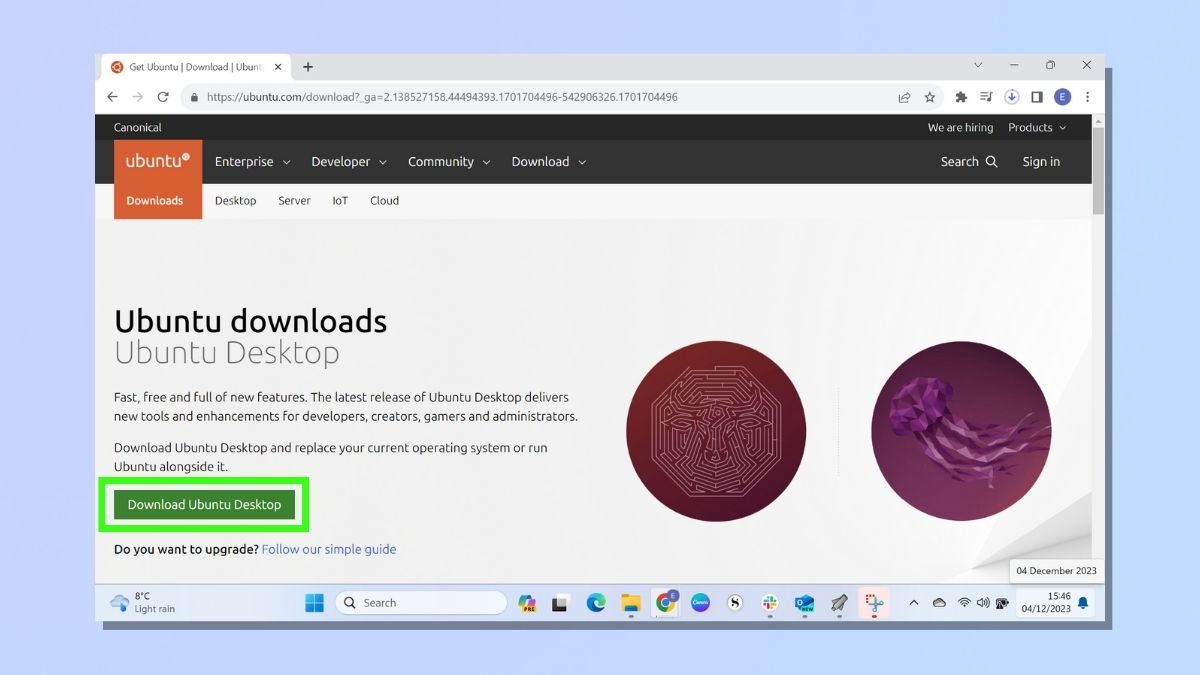
Now, you'll need an ISO image of the distribution you want to use. We are using Ubuntu, which is a popular choice for people running Linux on laptops and desktop computers. This is called a Desktop on Ubuntu, but can also be referred to as a disk image (as we'll see in the next step), a desktop image, or an ISO.
Download the Ubuntu disk image from ubuntu.com/download.
3. Install bootloader
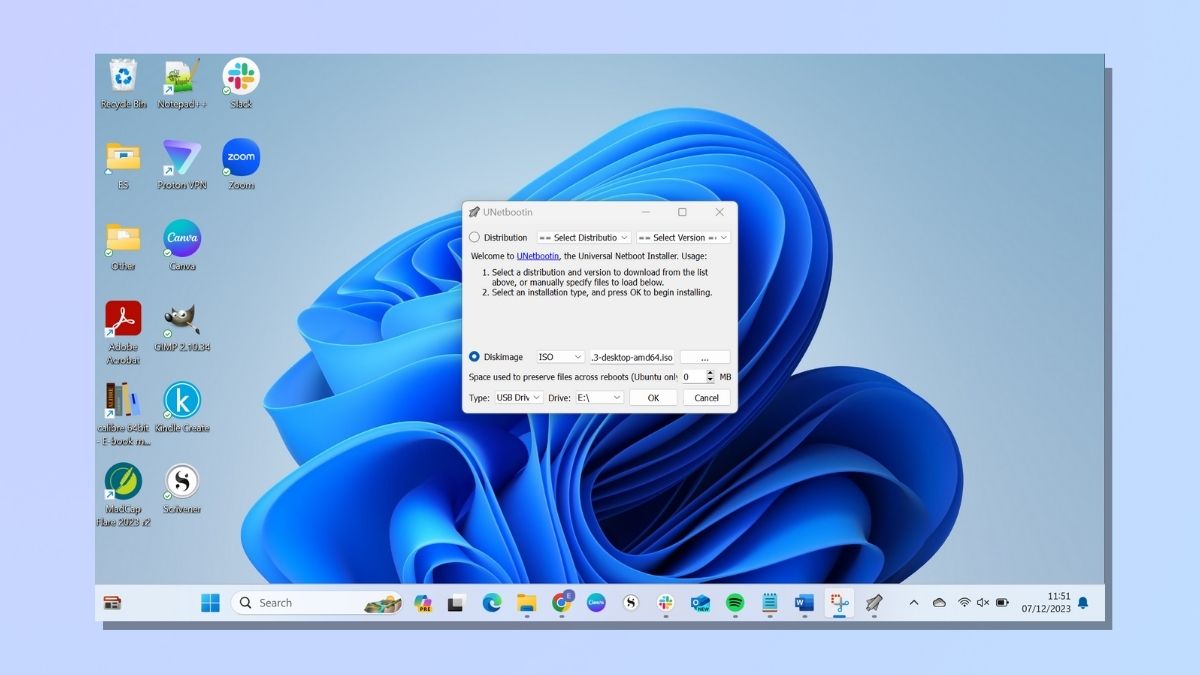
Insert your USB stick into the computer. Then, run your UNetbootin (or other bootloader) executable file. This opens up a pop-up window with several fields to complete before you can progress.
- DiskImage
You are given the option to either select a Distribution from a dropdown list or upload a DiskImage (which we downloaded from Ubuntu in the previous step). Select DiskImage and link to the ISO file that you saved in step 2.
If you select Distribution, ensure that you have chosen the most recent version of the software from the list.
- Type
You'll want to ensure USB Drive is selected.
- Drive
Ensure you point this at the drive that your USB is using. Double-check before you proceed to the next step that it is not pointing to another external drive, as the bootloader process could overwrite data.
When you are ready, select OK.
4. Wait for the bootloader installation to complete
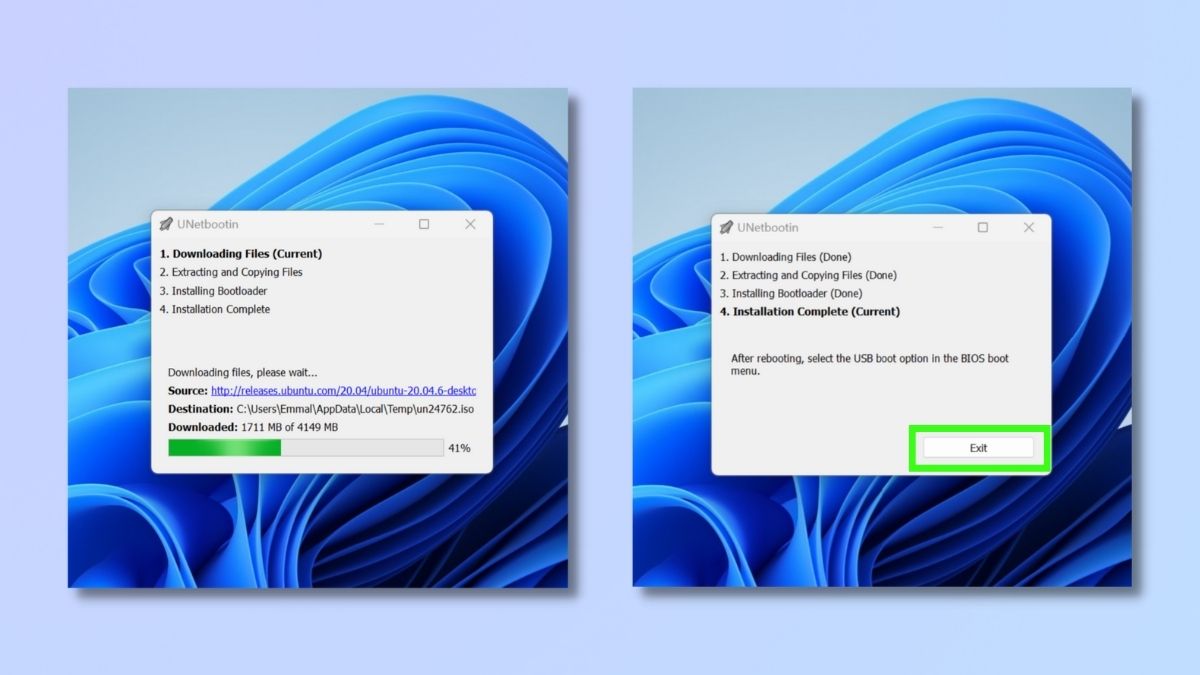
The installation process will now begin. The bootloader software needs to download, extract, and copy files, and install the bootloader, so this process can take a bit of time. When you get the message that the installation is complete, click Exit.
Your Linux Distro is now on your USB flash drive.
How to install Linux on a Windows computer (dual boot or erase Windows)
This section focuses on installing Linux on a Windows computer. You can choose to create a dual boot machine that runs both Windows and Linux, or erase the Windows operating system and replace it with Linux.
Most of the steps are the same. You just need to choose whether to dual-boot or replace during the Linux distro installation process, which is covered in step 4.
1. Open the Windows Boot Options Menu and select UEFI Removable Device
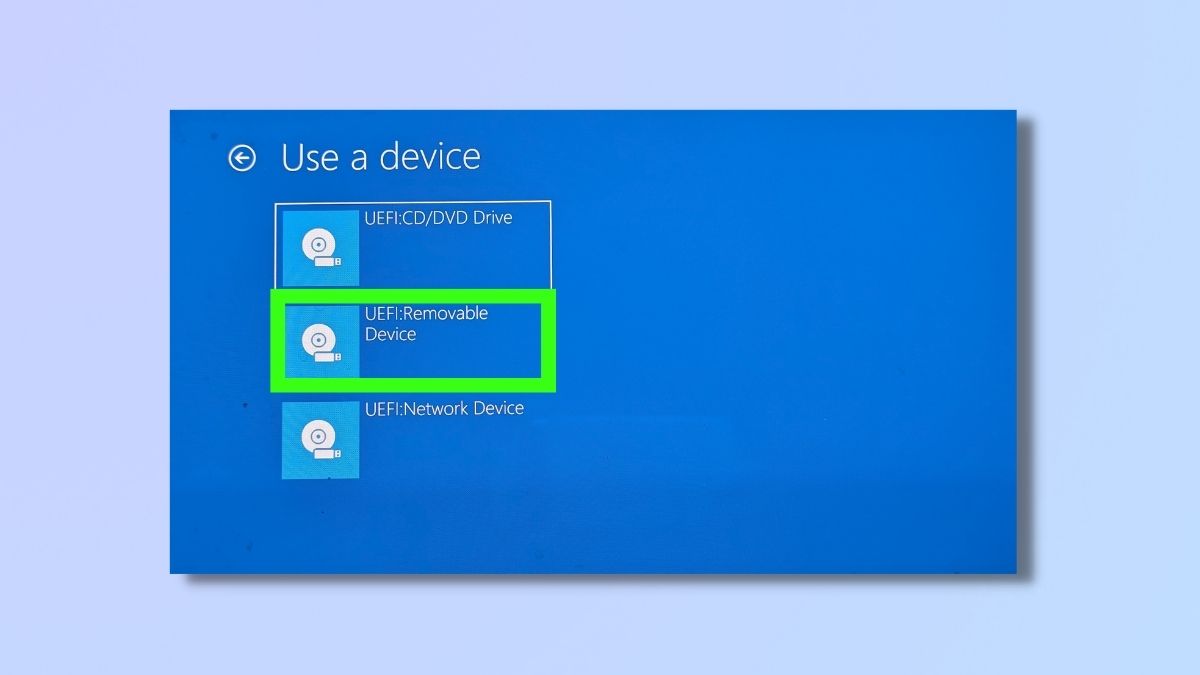
When this installation is complete, you will need to restart your computer and open the Windows boot options menu.
To do this, hold down Shift when you select Restart from the Power options. Select UEFI Removable Device.
2. Run the Ubuntu installation Wizard
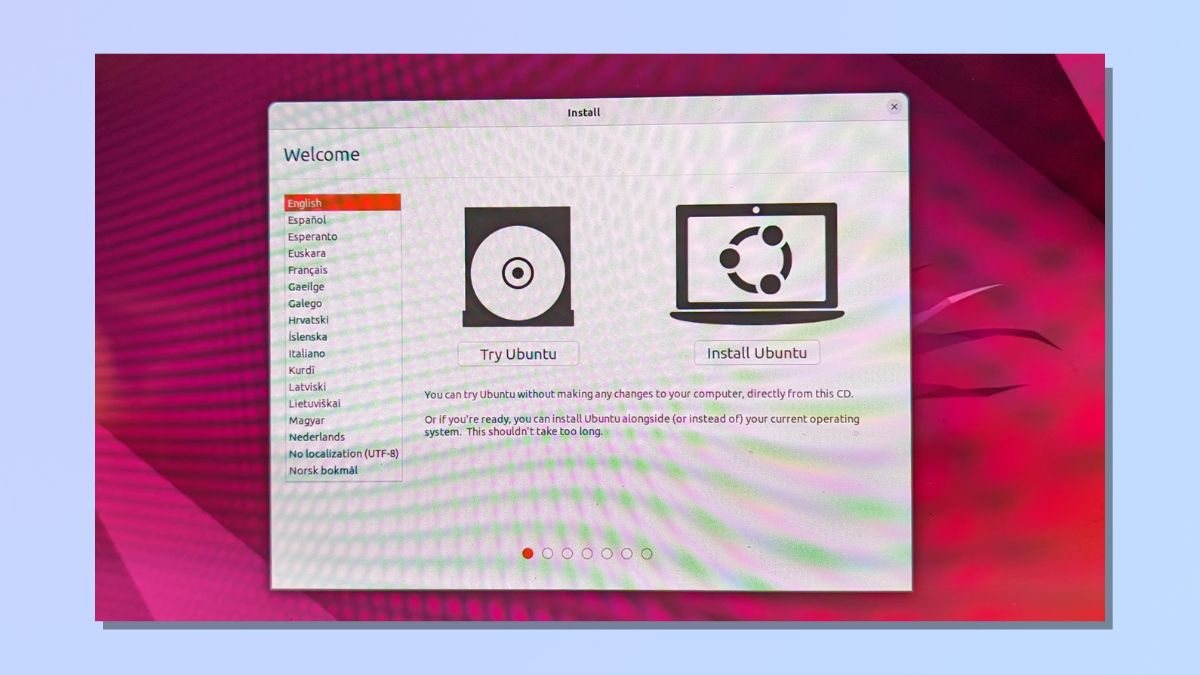
Now that you can open Linux from your USB, you need to install it onto your machine. If you are using Ubuntu, then the installation Wizard will take you through the process.
The next few steps are specific to Ubuntu, but other distros will work in a similar way.
The first of these steps are minor, obvious, and personal to you and include:
Keyboard Layout
Select US, UK, or other keyboard layouts. You can check your keyboard keys on this page to ensure that you have selected the right configuration.
Wireless
You can choose to enter your WiFi details or continue the installation without connecting to WiFi. Connecting to WiFi is the preferred option as it will automate many of the installation options, like updates, timezone detection, and language support. You'll need your WiFi network password.
Updates and other software
You can choose between Normal installation and Minimal Installation. Normal installation includes web browser, utilities, office software, games and media players. Minimal installation takes up much less space on your computer but only includes a web browser and basic utilities. You also have the option to download updates while installing and to install third-party software for graphics, WiFi hardware, and additional media features. To do this, you’ll need to configure a Secure Boot. We didn’t select this installation during this installation.
After you've completed these steps, you'll see the Installation Type option. This is where you choose whether to either install Ubuntu alongside Windows Boot Manager or replace your current operating system entirely by erasing your disk and installing Ubuntu instead. We'll cover this in detail in the next few steps.
3. Choose Installation type
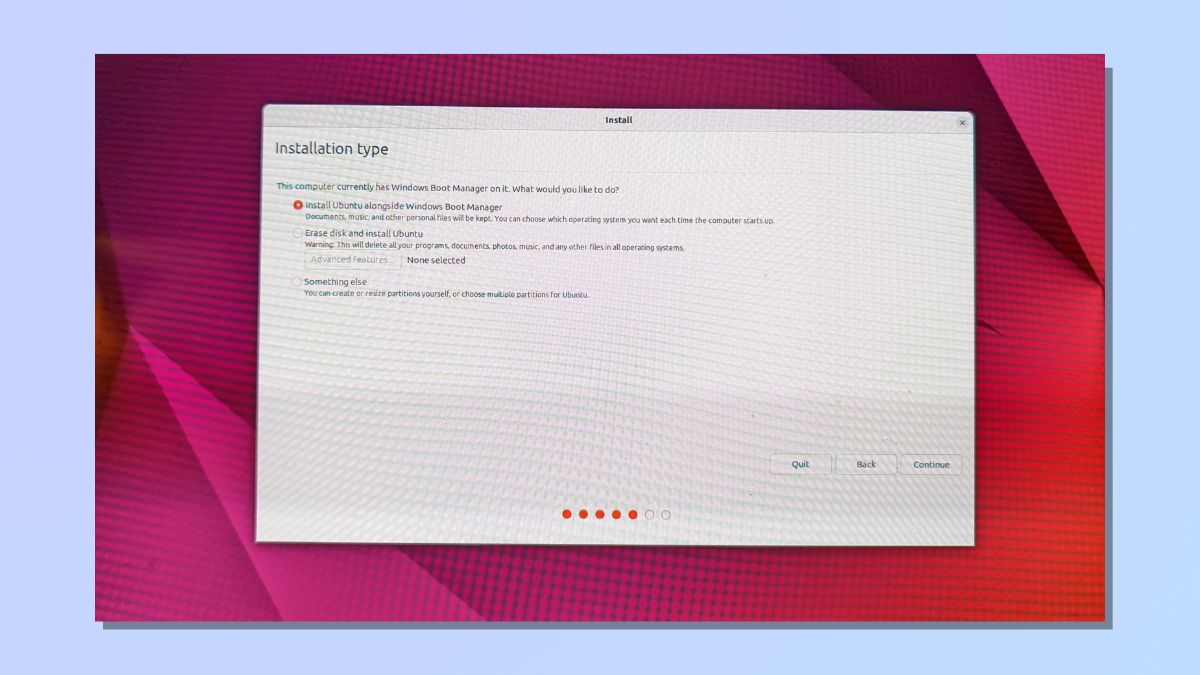
In the Ubuntu installation Wizard, there are three Installation type options: Install Ubuntu alongside Windows Boot Manager, Erase disk and install Ubuntu, and a third option (Something else) if you have specific requirements that you want to configure manually.
We'll cover the first two options in the following steps.
4a. Install Linux alongside Windows
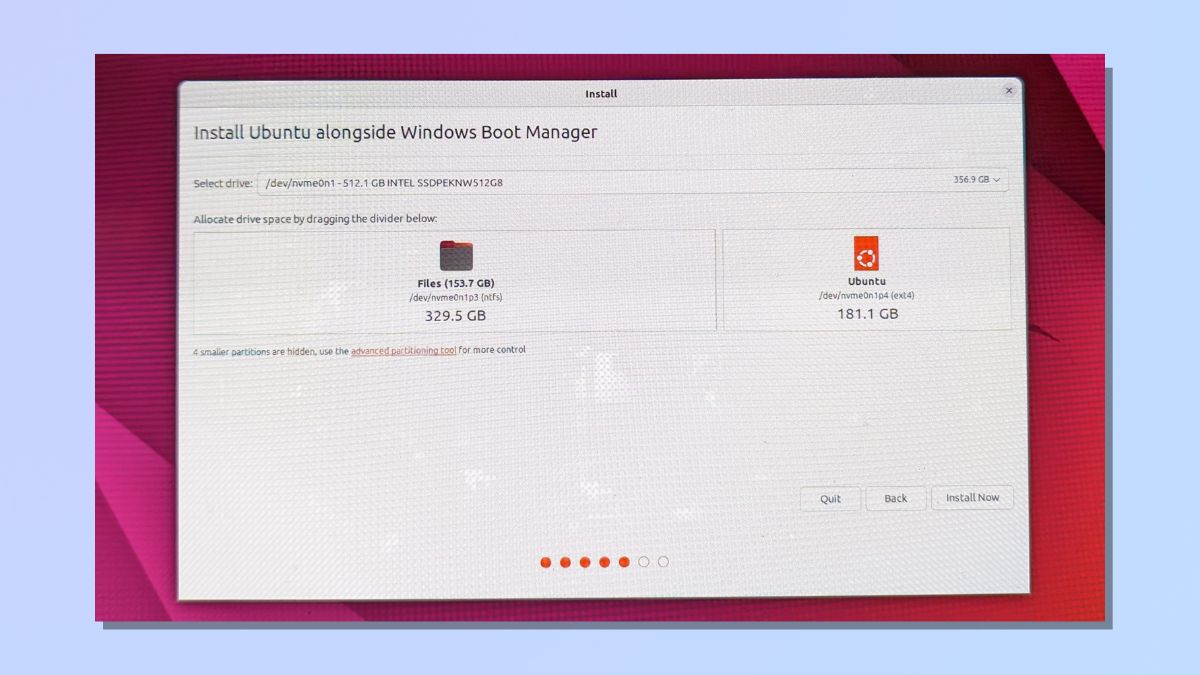
If you want to run both Windows and Linux on your computer, choose the first option on the Installation type screen and select Continue.
The Ubuntu Wizard shows you a suggested drive and allocation space, but you can make changes here if you need to.
Partition size selection
Before you can select a new partition size, any previous changes will need to be written to disk. The Wizard warns you that you cannot undo this operation and the resize operation may take a long time to complete, although we found that it only took a few minutes. The Wizard will show you the names of the partition tables that will be changed and the new partitions that will be formatted.
4b. Remove Windows and install Linux
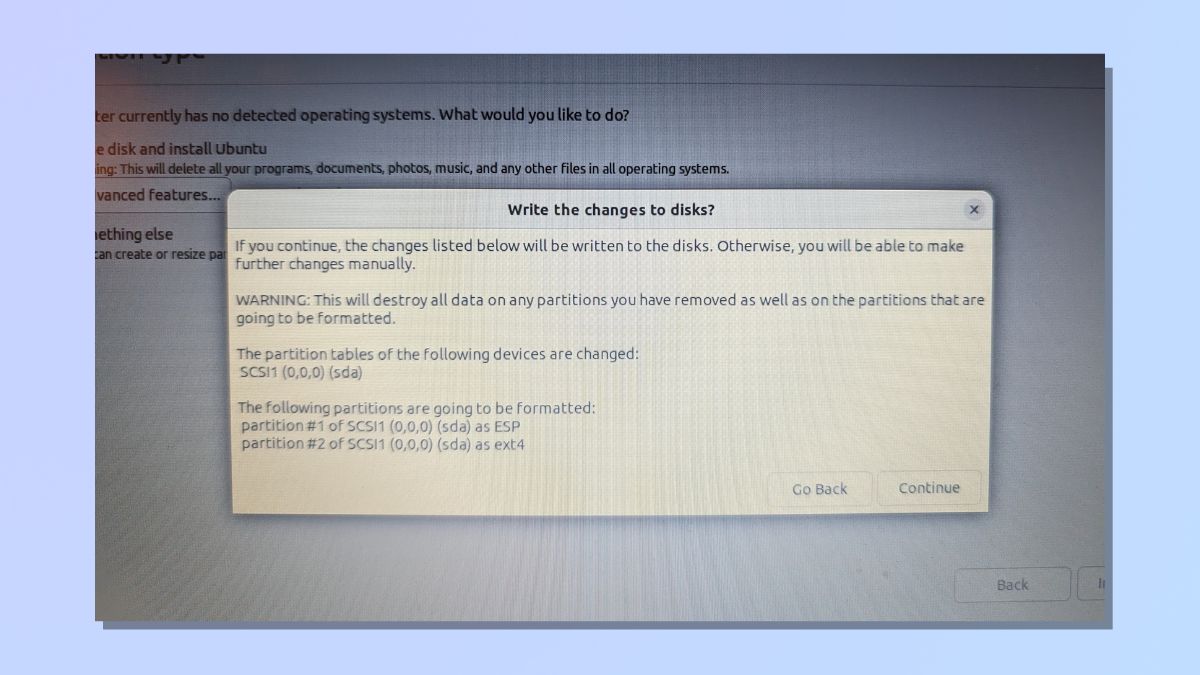
If you want to erase your existing Windows operating system and replace it with Linux, select "Erase disk and install Ubuntu" on the Installation type page. You'll receive a warning message, which you'll need to confirm you're happy with.
5. Complete the installation Wizard and restart your computer
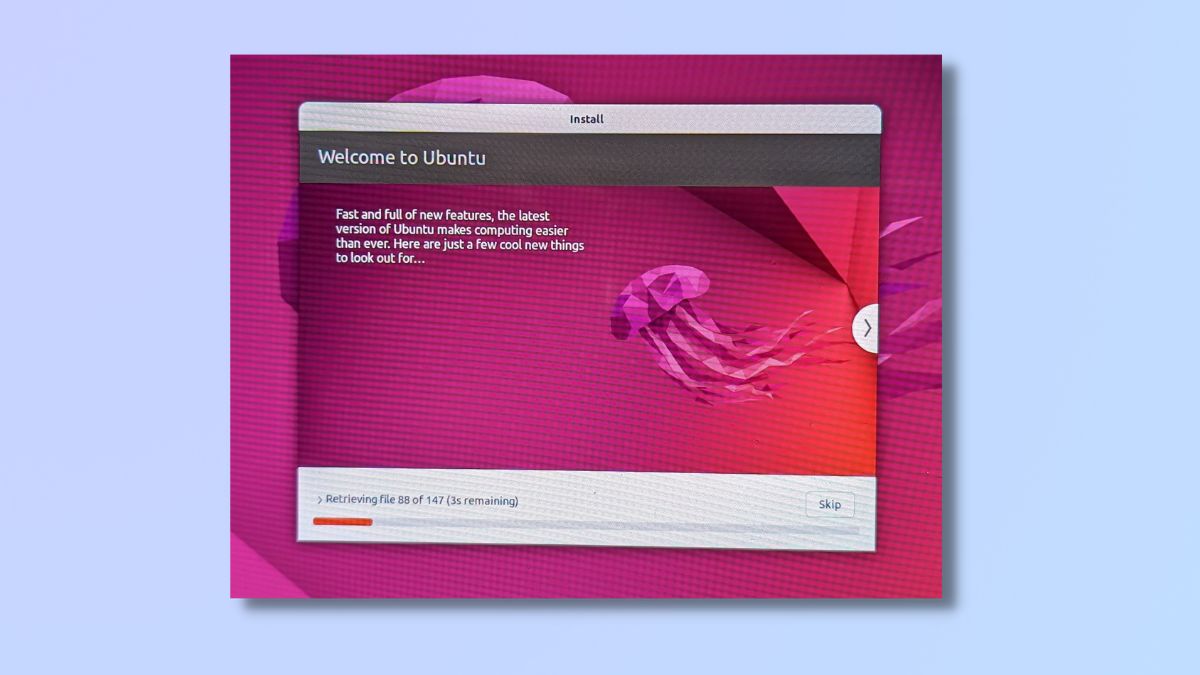
The rest of the installation Wizard is straightforward and includes the following:
Location
If you are connected to WiFi, your geographical location and timezone will be automatically completed for you.
Name and password
You’ll need to provide a name and password. If you want to enter your password whenever you log in, select “Require my password to log in”. Otherwise, choose “Log in automatically”.
Once these steps are completed, you can start the installation process. When the installation is complete, restart your computer.
6. Select Ubuntu from the BIOS menu at startup (if using dual boot)
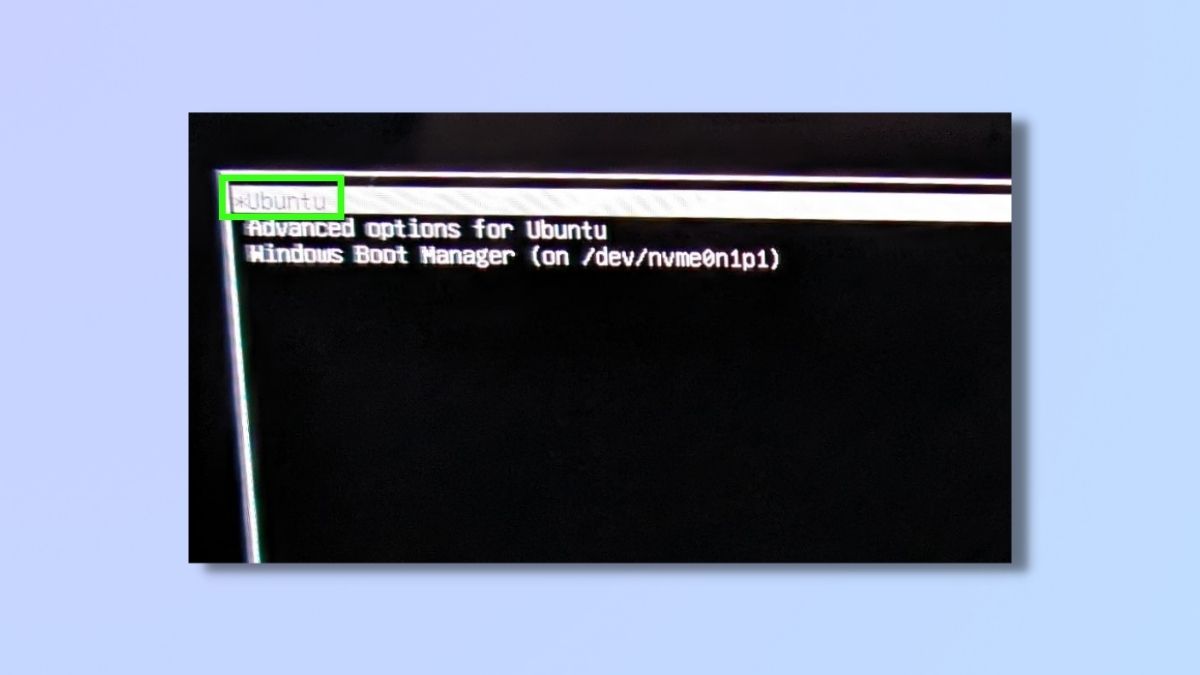
If you have set up a dual boot system, you will now see options on your BIOS Boot Window when your computer starts. You can select whether to open with Ubuntu or Windows by using your arrow keys and selecting Enter.
If you have erased Windows and installed Linux in its place, your Linux distro will boot immediately when your computer starts, and you don't need to do this step.
7. Accessing the Linux interface
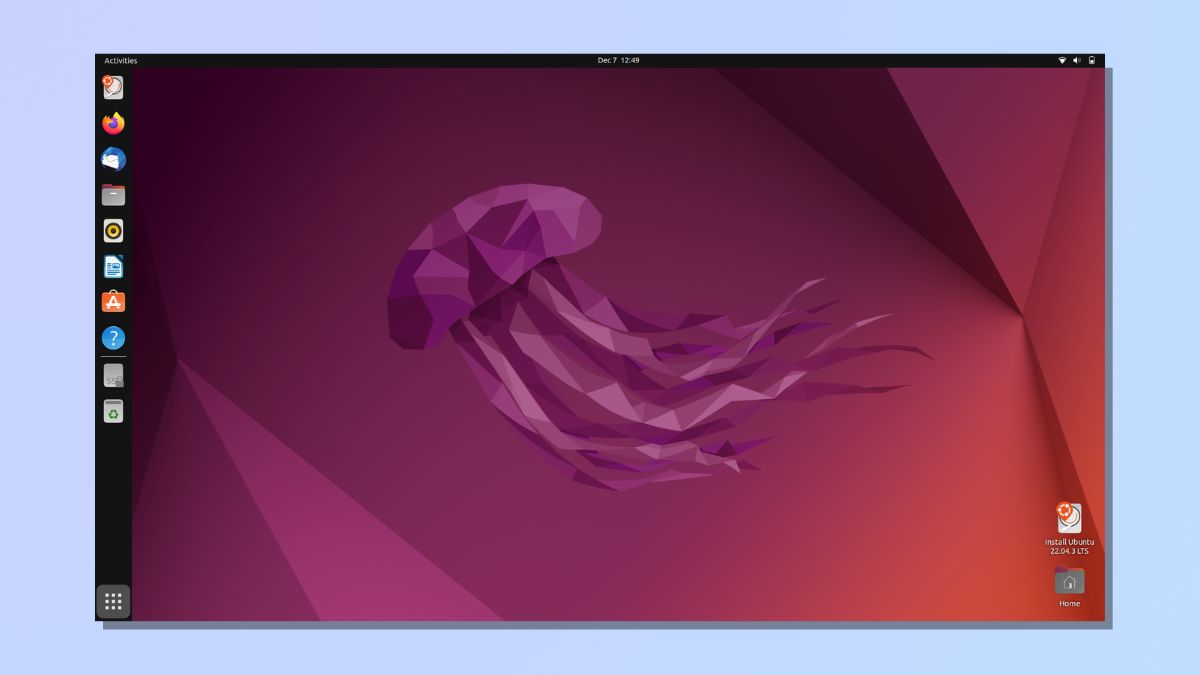
Your Linux operating setting is installed and ready to go. Because we've used a distro (in this case, Ubuntu), the user interface is all installed and ready to be explored.
Pre-installed applications include a calculator, calendar, webcam, and media player, as well as Thunderbird email and Firefox web browser. But, of course, all of this is fully customizable. There is plenty of online support for Linux users, and soon, you'll be navigating it like a pro.
How to install Linux (clean install)
Now, we're going to take a look at how to do a clean install of Linux. That means we aren't installing on a machine that already has Windows installed. This is useful if you have just built a PC from scratch, for example, or totally formatted your drives and wiped any existing OS from them.
To do this, you'll need a bootable drive containing a Linux distro, so follow the steps to creating a bootable drive at the top of this article if you haven't done so already.
1. Insert bootable USB and switch on your computer
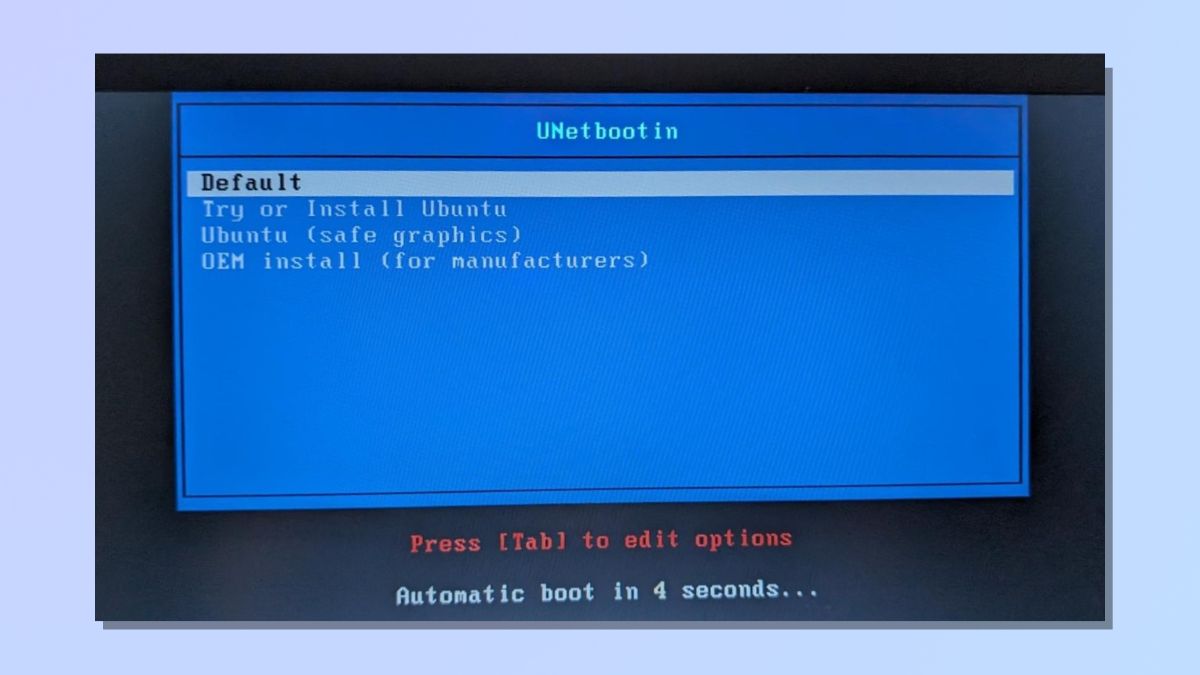
Insert the bootable USB and switch on your computer.
As there's no existing operating system, your computer should immediately open the bootloader menu page.
We used UNetbootin, and on startup, we were shown a menu page with Ubuntu install options.
If you don't see an install menu, select the USB option from the boot menu.
2. Run the Ubuntu installation Wizard

Now that you can open Linux from your USB, you need to install it onto your machine. If you are using Ubuntu, then the installation Wizard will take you through the process.
The next few steps are specific to Ubuntu, but other distros will work in a similar way.
The first of these steps are minor, obvious, and personal to you and include:
Keyboard Layout
Select US, UK, or other keyboard layouts. You can check your keyboard keys on this page to ensure that you have selected the right configuration.
Wireless
You can choose to enter your WiFi details or continue the installation without connecting to WiFi. Connecting to WiFi is the preferred option as it will automate many of the installation options, like updates, timezone detection, and language support. You'll need your WiFi network password.
Updates and other software
You can choose between Normal installation and Minimal Installation. Normal installation includes web browser, utilities, office software, games and media players. Minimal installation takes up much less space on your computer but only includes a web browser and basic utilities. You also have the option to download updates while installing and to install third-party software for graphics, WiFi hardware, and additional media features. To do this, you’ll need to configure a Secure Boot. We didn’t select this installation during this installation.
3. Installation Type
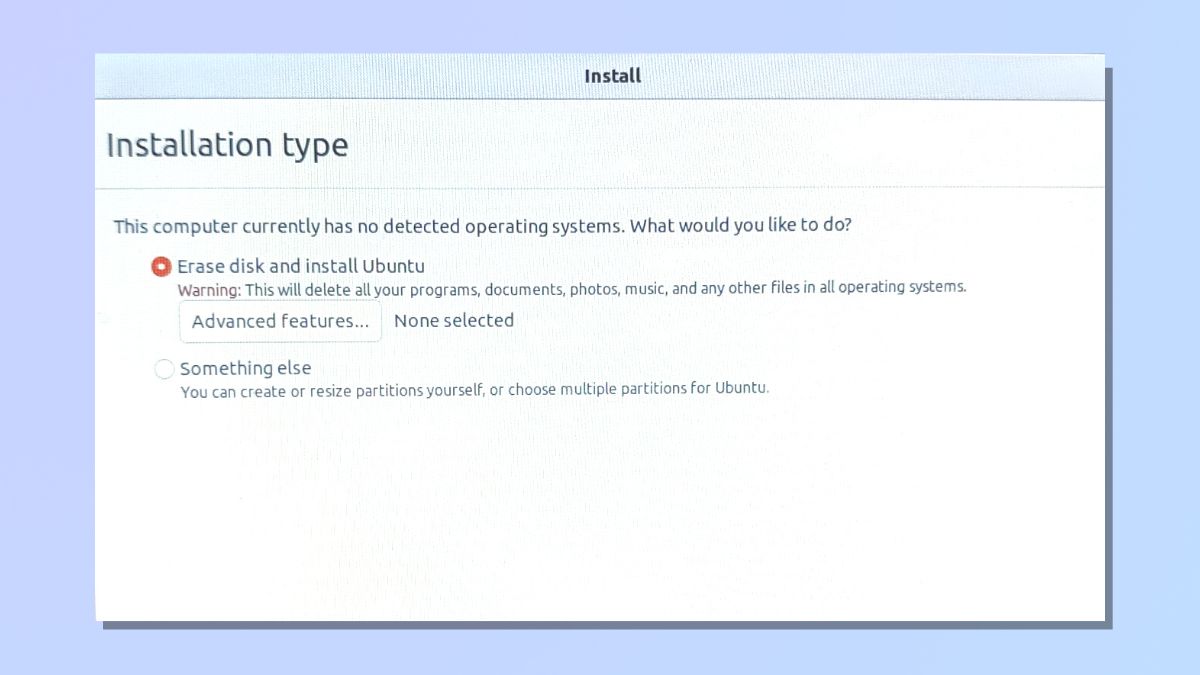
The Ubuntu installation Wizard looks for existing operating systems. As you are doing a clean install, you'll get a message saying that no operating systems have been detected.
You will be given two Installation type options: Erase disk and install Ubuntu, and Something else, which you can use if you have specific requirements that need to be configured manually.
Select Erase disk and install Ubuntu.
4. Complete the installation Wizard and restart your computer

The rest of the installation Wizard is straightforward and includes the following:
Location
If you are connected to WiFi, your geographical location and timezone will be automatically completed for you.
Name and password
You’ll need to provide a name and password. If you want to enter your password whenever you log in, select “Require my password to log in”. Otherwise, choose “Log in automatically”.
Once these steps are completed, you can start the installation process. When the installation is complete, restart your computer.
5. Accessing the Linux interface

Your Linux operating setting is installed and ready to go. Because we've used a distro (in this case, Ubuntu), the user interface is all installed and ready to be explored.
Pre-installed applications include a calculator, calendar, webcam, and media player, as well as Thunderbird email and Firefox web browser. But, of course, all of this is fully customizable. There is plenty of online support for Linux users, and soon, you'll be navigating it like a pro.
Now that you're a Linux user, it's time to decide what you want to do next with this open-source operating system. Linux allows for a high level of customization. Explore different desktop environments and themes to personalize your Linux experience.
Linux offers a wealth of open-source software. Explore alternatives to your favorite Windows or macOS applications. For example, LibreOffice is a great alternative to Microsoft Office.
And don't forget the command line, a powerful Linux tool. While not mandatory, understanding basic commands like ls (list files) and cd (change directory) can enhance your Linux experience.
What is Linux?
So, what is Linux? The Linux kernel is an open-source, Unix-like operating system kernel that serves as the core component of many different Unix-like operating systems.
While Linux itself is just the kernel, the term "Linux" is commonly used to refer to complete operating systems that use the Linux kernel along with a variety of other software components. These operating systems, known as Linux distributions (shortened to "distros"), include the Linux kernel, system libraries, utilities, and additional software. Some popular Linux distributions include Ubuntu, Fedora, and Debian.
Linux has a strong and committed fanbase. There are several reasons for this. Firstly, it’s open source, which means that its source code is freely available, allowing users to view, modify, and distribute it. This has led to a large and active community of developers and contributors who work collaboratively to improve and enhance the operating system.
It's also recognized for its stability, security, and performance. Its efficiency means that it still works well on older machines.
Check out our other Linux guides, including how to find CPU information in Linux, how to add users in Linux, how to find a file in Linux and how to remove a directory in Linux.

Emma Street is a freelance content writer who contributes technology and finance articles to a range of websites, including Tom's Guide, Top10.com, and BestMoney. She has over 15 years of experience working in technical development within the fintech industry. When not writing about tech, Emma can be found writing romantic fiction, reviewing films, and updating her tea blog.
 Club Benefits


