


Whether you have a tiny kitchen or you simply want to get more organized, finding ways to store baking sheets and get them out of sight can help you have more counter space and more room to do prep work or cook.
Before coming across these space-saving kitchen organizing ideas, I used to store my baking sheets in the oven, and then move them to the top of the toaster oven when I’d turn the oven on to cook. It’s a frustrating experience but luckily, an easily solvable one, particularly once you’ve nailed the 7 space-saving ways to organize pots and pans.
These ideas address how to store cookie sheets (those without a lip or a low lip around the edge) and baking sheets (which have a higher lip so they’re easier to pick up).
Here are smart ways to stash baking sheets and cookie sheets around your kitchen and tips on how to use them.
1. Store them on a rolling cart

Those of us who worked in restaurant kitchens at some point in our lives are no strangers to the heavy-duty metal kitchen cart. They’re great for storing food prep—and baking sheets. Look for ones that are large enough to accommodate your largest baking sheets and put each one on a different rack to avoid scratching the pans.
You can buy carts like this Finnhomy 3 Tier Heavy Duty Commercial Grade Utility Cart ($70, Amazon), if you have plenty of items . Just try not to pile tons of other kitchen supplies, junk or appliances on top of the pans because it’ll be annoying to remove all of that when you need to use the pan each time.
You could also store them on a shelf of your rolling kitchen island or kitchen cart for safekeeping.
2. Put them in the oven drawer

You may have neglected this space in your kitchen when you moved in and unpacked but you can store baking pans in the drawer under the oven. (Seriously, how many of us simply leave a broiler pan there and never open it again?)
As long as they are completely made of oven-safe material, stash those bulky sheet pans in this special cookware space. This could be a good spot for the baking sheet pans that are already a little more worn and scratched if you don’t mind stacking a few on top of each other.
Keeping the baking sheets in a place where they are easy to access makes it even more likely that you’ll use them regularly.
3. Place them inside a cabinet door

I just started utilizing door baskets this year and it seemed like a wasted space area that I forgot about for storage. You could hang one of these baskets on a cabinet door and put smaller baking pans on it.
Or, if you have large pantry doors or a hutch that would be a good size for door organizers, add a large basket to the door as part of organizing your pantry. Make sure the basket is wide enough and long enough to accommodate your baking sheets. We like this one that also has a towel holder. It’s a great space-saving way to organize your kitchen.
Alternatively, if you’re handy, you could also install hooks on large cabinet doors and hang cookie sheets that have holes in the handles on them like this Cabinet Door Organizer ($26, Amazon).
4. Use a lid organizer

Place a pot lid organizing tool in your cabinet and line baking sheets next to each other inside a roomy cabinet. You could also use clear shelf dividers like you might use for storing purses in a closet to get the job done in your kitchen cabinet.
You’ll be able to store large baking sheet pans and small baking pans or cookie sheets alongside one another in a neat space designated for this type of cookware. The more you can place sheet pans with some space between them, the longer you’ll be able to keep them in tip-top shape so they don’t get scratched. It’s particularly important to prevent scratches on nonstick baking pans and sheet pans.
Replace nonstick pans when the coating starts to break down, usually every three to five years. We can recommend this FLSEPAMB Lid Organizer ($9, Amazon)to keep your sheets tidy.
5. Install a pegboard

Don’t mind looking at your cookware? A pegboard is a great way to store pots, pans, and baking sheets (particularly ones with holes in the handles). Ensure it’s installed properly with wall anchors so it can handle the weight of all the kitchen supplies you plan to hang on it.
By making the most of wall space with this cookware show-and-tell area, you can use kitchen cabinet space for all of your other kitchen storage needs. This is a great solution if you have a smaller kitchen and very limited cabinet space–or small cabinets in general. Pegboards such as this Wall Control Kitchen Pegboard Organizer ($79, Amazon), could also hang on a wall in your dining room.
6. Stash them in a basket
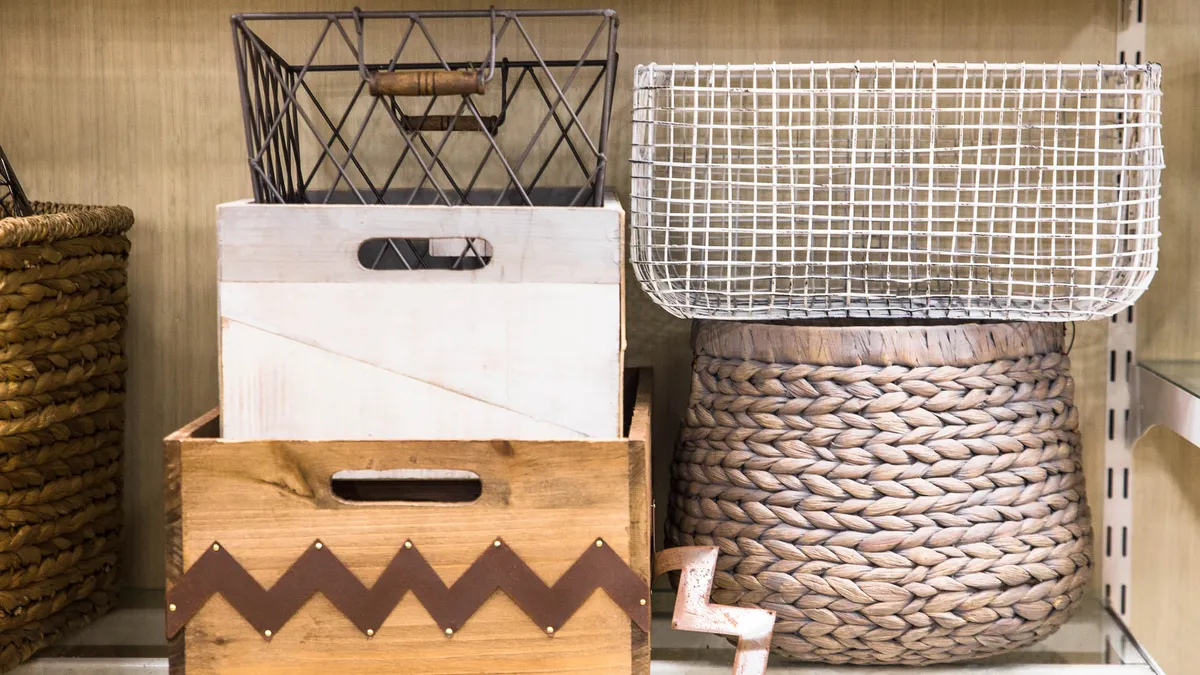
We love using woven baskets for storage throughout the home and a neatly-packed large basket like this Honey-Can-Do seagrass basket with handles ($29, Amazon), is perfect for keeping all of your baking sheets in one place in a corner of the kitchen. You could also place a basket in the bottom of your pantry for baking pans or put a low basket under a kitchen island or cart to put these pans out of sight.
Place towels, soft pot holders, aprons or cookbooks in between the pans so they don’t get scratched. Swap a basket for a wooden crate to add some charm to your organized kitchen.
7. Place them in cabinets

Store them in your largest cabinets by using sheet pan organizing racks or in a large rolling drawer that’s been fitted with separators.
Baking pan organizing racks made from wood, plastic or metal can be used to stash those bulky metal sheets out of the way while providing space between each so they don’t fall into each other and get scratched. You could also use cutting boards to separate the sheet pans or place cookbooks in between them to help them stay in place in your cabinets.
A pull-out shelf in the cabinet could be a good space for using one of these lid organizers or adding a divider that can accommodate things like sheet pans, muffin tins and even pizza pans. If you have a roomy lazy Susan cabinet, that’s a smart place to store these pans.
These kitchen organizing racks like this mDesign X-Large Steel Storage Tray Organizer Rack ($30, Amazon) can also be used for organizing some of the best cutting boards.
Get rid of all but a couple
If you’re a cook who uses sheet pans a few times a week and takes steps to maintain them, the sheet pans should last for four to five years. Some sheet pan materials include metal, aluminum, aluminized steel, ceramic, steel and chrome.
However, if you don't use them as often, you might want to ask yourself if you’d be better off with fewer, better quality sheet pans instead of holding on to a lot of cumbersome baking pans that you'll never use. After all, you can probably only fit about three or four in the oven at once!
More from Tom's Guide

