5 macOS tips to boost your productivity
Use these tips and tricks to make the most of your Mac
If you own a Mac there's a good chance it's running macOS, and an even better chance you're missing out on some simple but easily-overlooked shortcuts for getting more done with less effort.
I know because as the Computing Editor here at Tom's Guide it's my job to scrutinize macOS and I've been tooling around in the latest version, Ventura, since before it was released to the public. In our macOS Ventura review I called it a "smart upgrade that will make your Mac a more capable machine" and I stand by that. In this article I'll show you what I mean by walking you through some of my favorite tips for being more productive while using macOS.
Note that while the images and references in this article will feature macOS Ventura, many will work equally well on older or newer versions of macOS—they just might not be found in exactly the same place or be called exactly the same thing (System Preferences instead of System Settings, for example). If you're running an older version of macOS and something I describe here isn't working for you, I recommend upgrading to Ventura at your earliest convenience.
5 macOS tips to help you get more done
Harness a supercharged Spotlight
One of the big reasons I wanted to write this article after macOS Ventura was widely available is the way in which Apple supercharged the Spotlight search function. You've been able to use Spotlight to search for files on your Mac for ages, but with Ventura, Spotlight got a big upgrade that makes it a far more useful productivity tool.
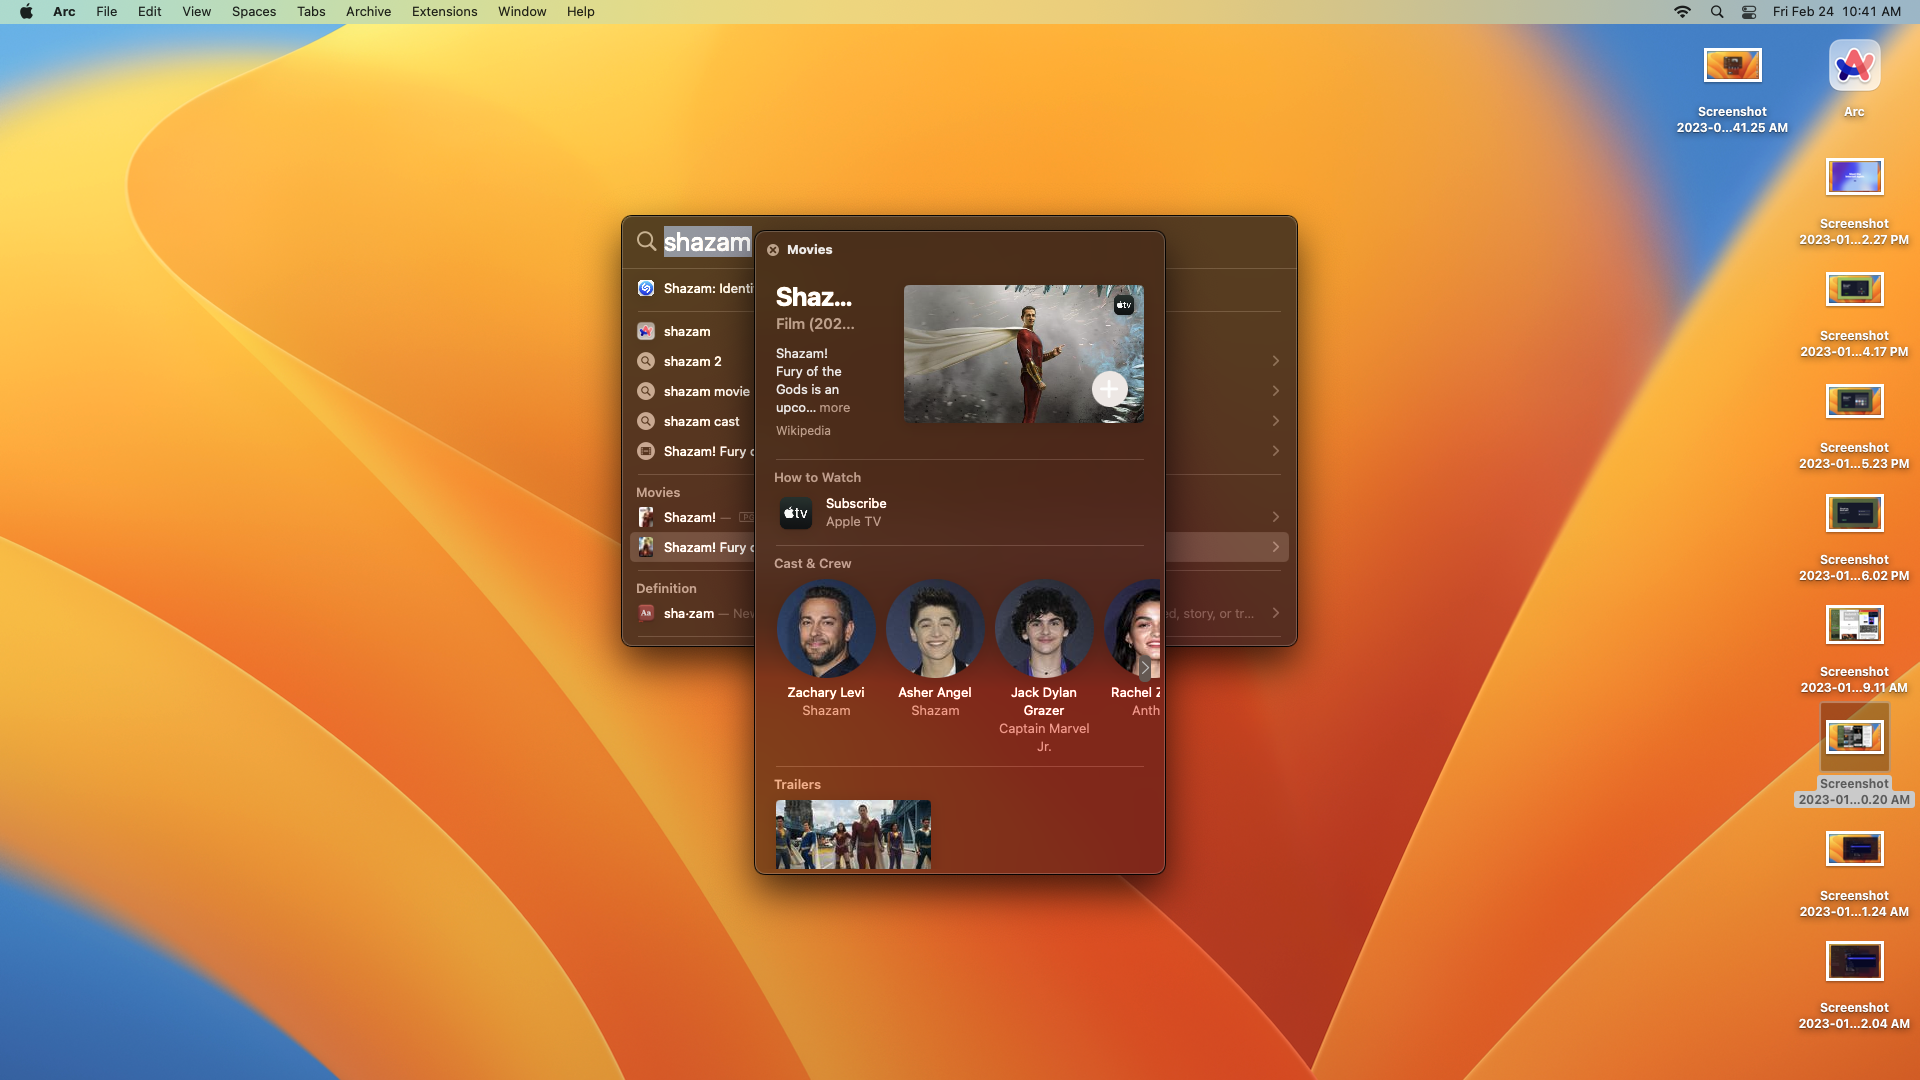
Now, you can use Spotlight to search not just for files themselves but for things like text within images, or locations where you shot photos. The results Spotlight gives you are richer than they were on earlier versions of macOS, too, as they can now include results like dictionary definitions, images from the web, and more. You can get a sneak peek of a given link or file by using the keyboard to highlight it in the search results and pressing the Spacebar to show a preview of where clicking that link will take you. It can even do math, if you type in the equation.
1. Open Spotlight by clicking the magnifying glass icon in your menu bar or pressing Cmd + Space.
2. Type what you're searching for and press Return. Spotlight should return a rich list of results that includes files, links, images and more. To get a preview of anything before you click it, use the keyboard to highlight it in the list of search results (make sure to use the keyboard, as clicking a link will automatically open it) and press Space to show a preview of whatever is highlighted.
Get instant access to breaking news, the hottest reviews, great deals and helpful tips.
Try Hot Corners
If you're not already using Hot Corners on your Mac, you should be. This useful macOS feature saves you time but isn't enabled by default, so it's easy to miss if you don't know it's there.
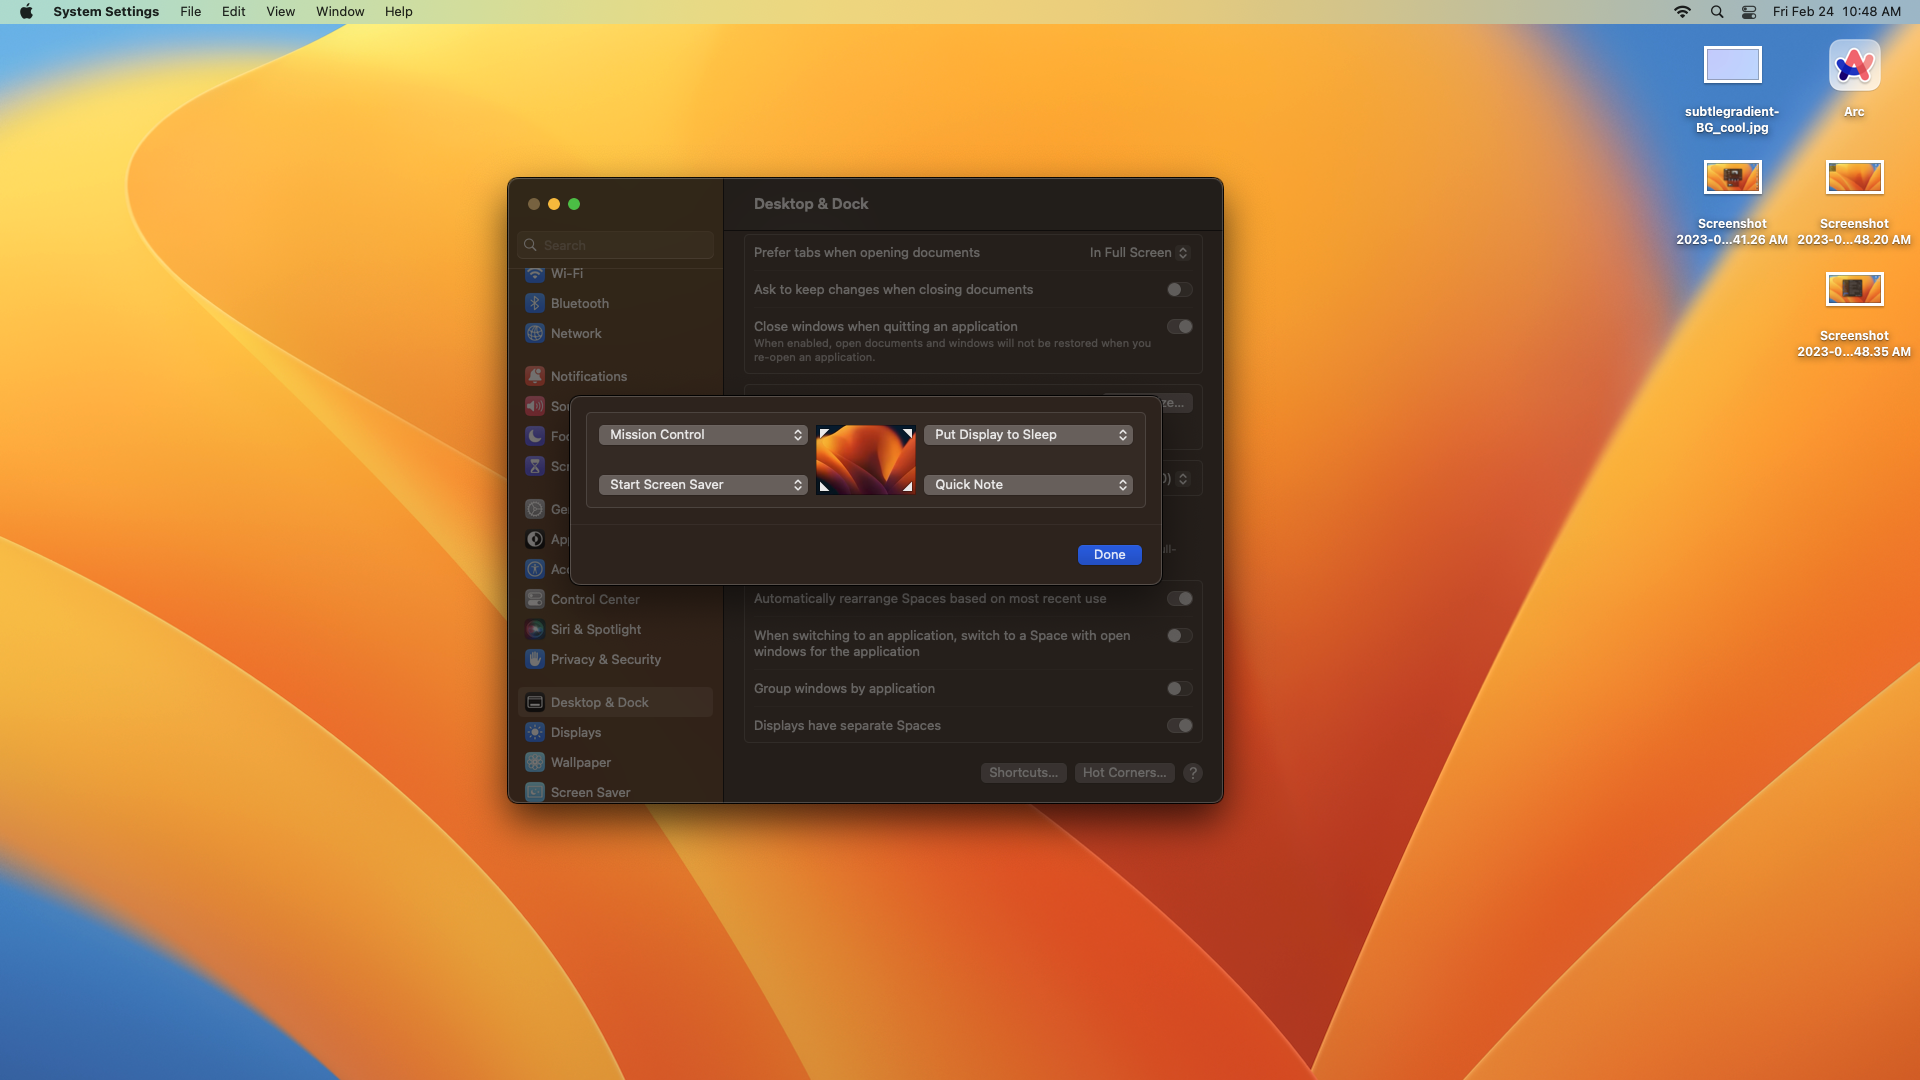
When you enable it, Hot Corners effectively turns the four corners of your Mac's display into shortcuts you can use to quickly launch apps. Once they're on, moving your mouse into a corner will trigger whatever action you've assigned to that corner. You could configure it so that moving your mouse into the lower-right corner locks the computer for example, while moving it into the upper-left corner to access the Launchpad.
Setting up and getting to grips with Hot Corners can take a bit of time, and it can sometimes be annoying to accidentally trigger one when you're trying to do something else. Here's a tip for that: If you hold one of the modifier keys (Option, Shift, Command or Control) when setting up a new Hot Corner, it should not activate in the future unless you are holding down the same modifier key while moving your mouse into the corner. So if you're tired of accidentally launching Quick Note whenever your mouse drifts into a certain corner, try re-assigning it in the Hot Corners menu while holding the Option key for a more controlled Hot Corners experience.
1. Access the Hot Corners menu by clicking the Apple icon in the top-left corner of your Mac desktop to open the Apple menu.
2. Select System Settings, then select Desktop & Dock.
3. Click Hot Corners. From here you can assign and modify what functions are assigned to each Hot Corner.
Learn keyboard shortcuts and make your own
I've been using computers since I was a kid, and I can remember when I would see PCs that didn't have a mouse attached—everything was done via the keyboard.
Times have changed, but I still think there's real value in knowing how to navigate around your Mac via the keyboard. Using keyboard shortcuts to flip between menus, launch apps and navigate the Web feels a lot faster and more efficient than taking your hands off the keyboard to use the mouse or touchpad. It's also a good skill to have if your mouse or trackpad breaks, and it looks cool to boot.
There are tons of useful ones to learn, and mastering just a few of the most useful Mac keyboard shortcuts will pay dividends in your day-to-day work. Command + Space to bring up Spotlight is a great one, for example, as is Command + Tab to quickly switch between apps.
But you can do more than just learn the best ones—you can create your own! Here's how.
1. Open the Apple menu by clicking the Apple icon in the top-left corner.
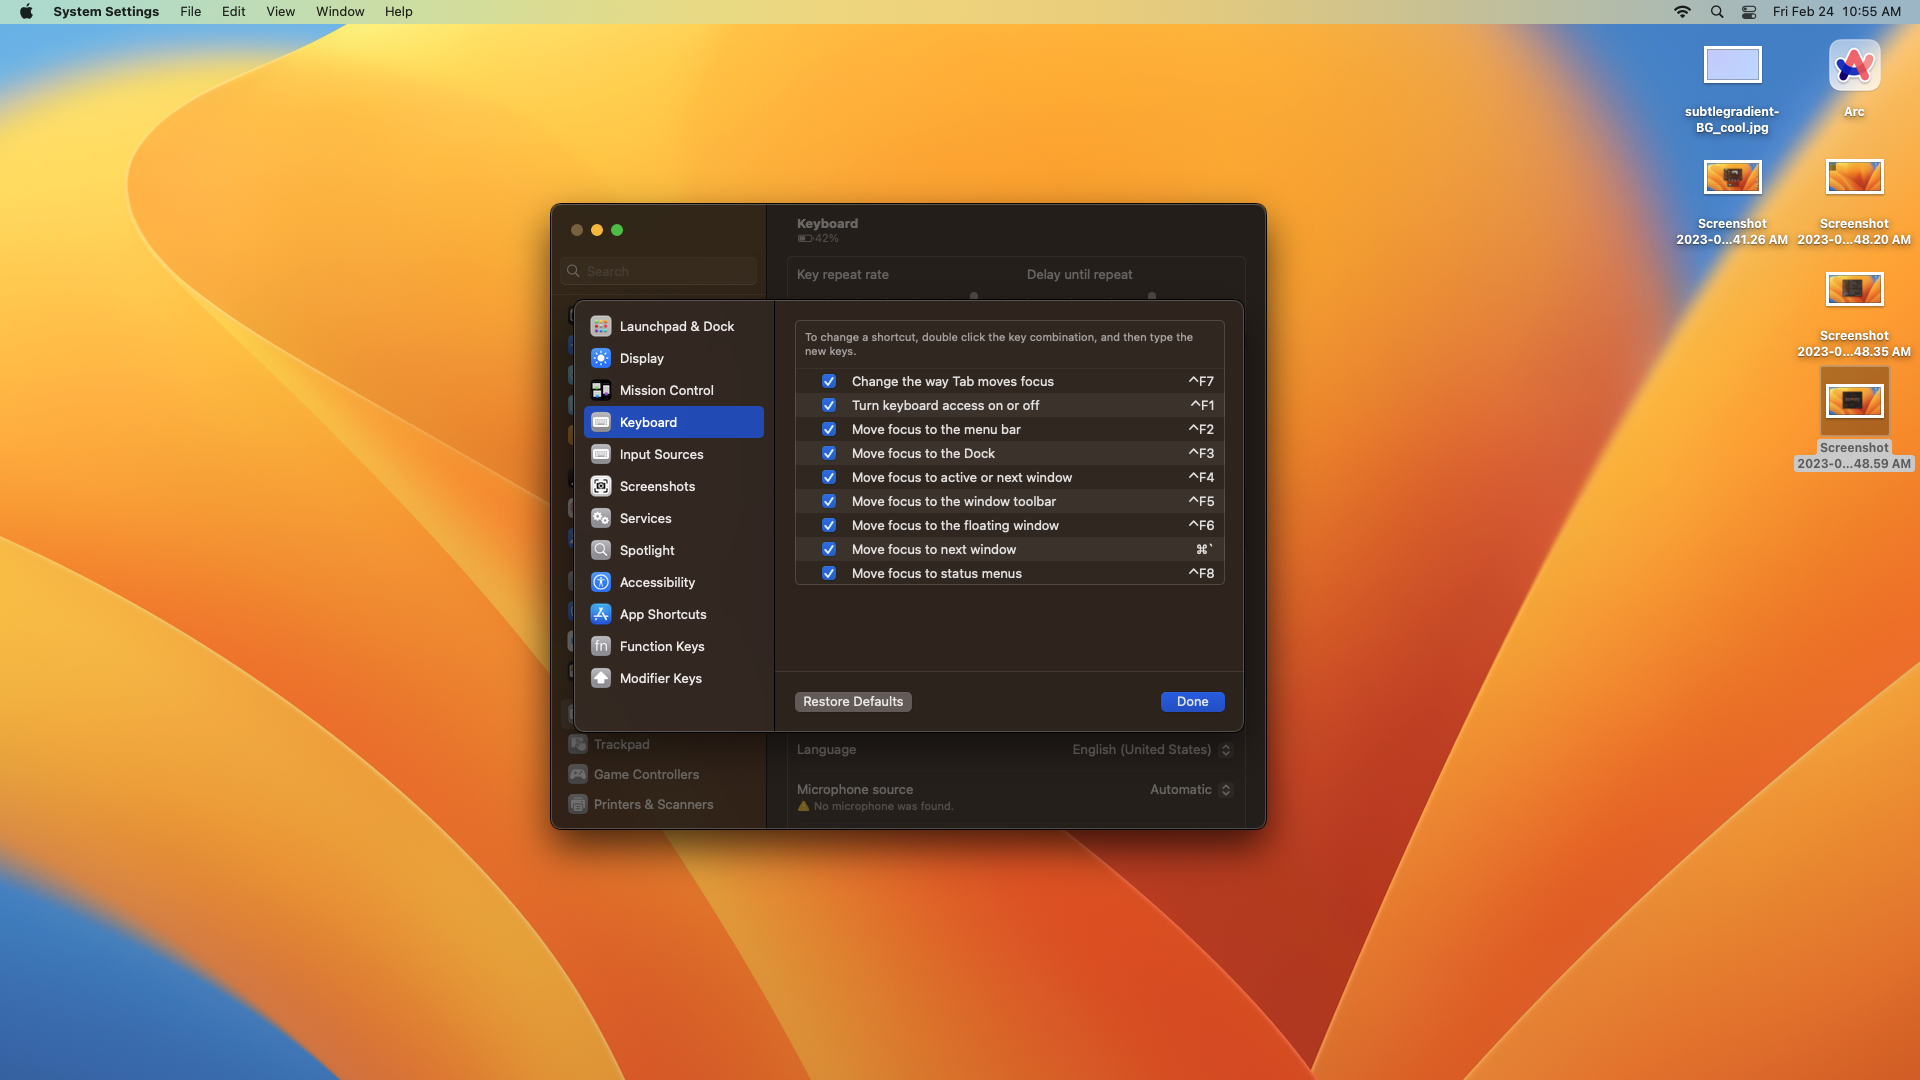
2. Select System Settings, then Keyboard, then Keyboard Shortcuts.
3. Click the + icon in the menu to create a new shortcut.
Use Split Screen
I love to use multiple monitors with a PC because all that extra screen real estate makes it much easier to look at many things at once. Simple, I know, but you save a surprising amount of time and irritation when you don't have to keep switching back and forth between windows or apps while working. Having everything you need right in front of you helps me feel a lot more productive at work, but unfortunately I miss out on this advantage when I'm using a MacBook or some other single-screened PC.
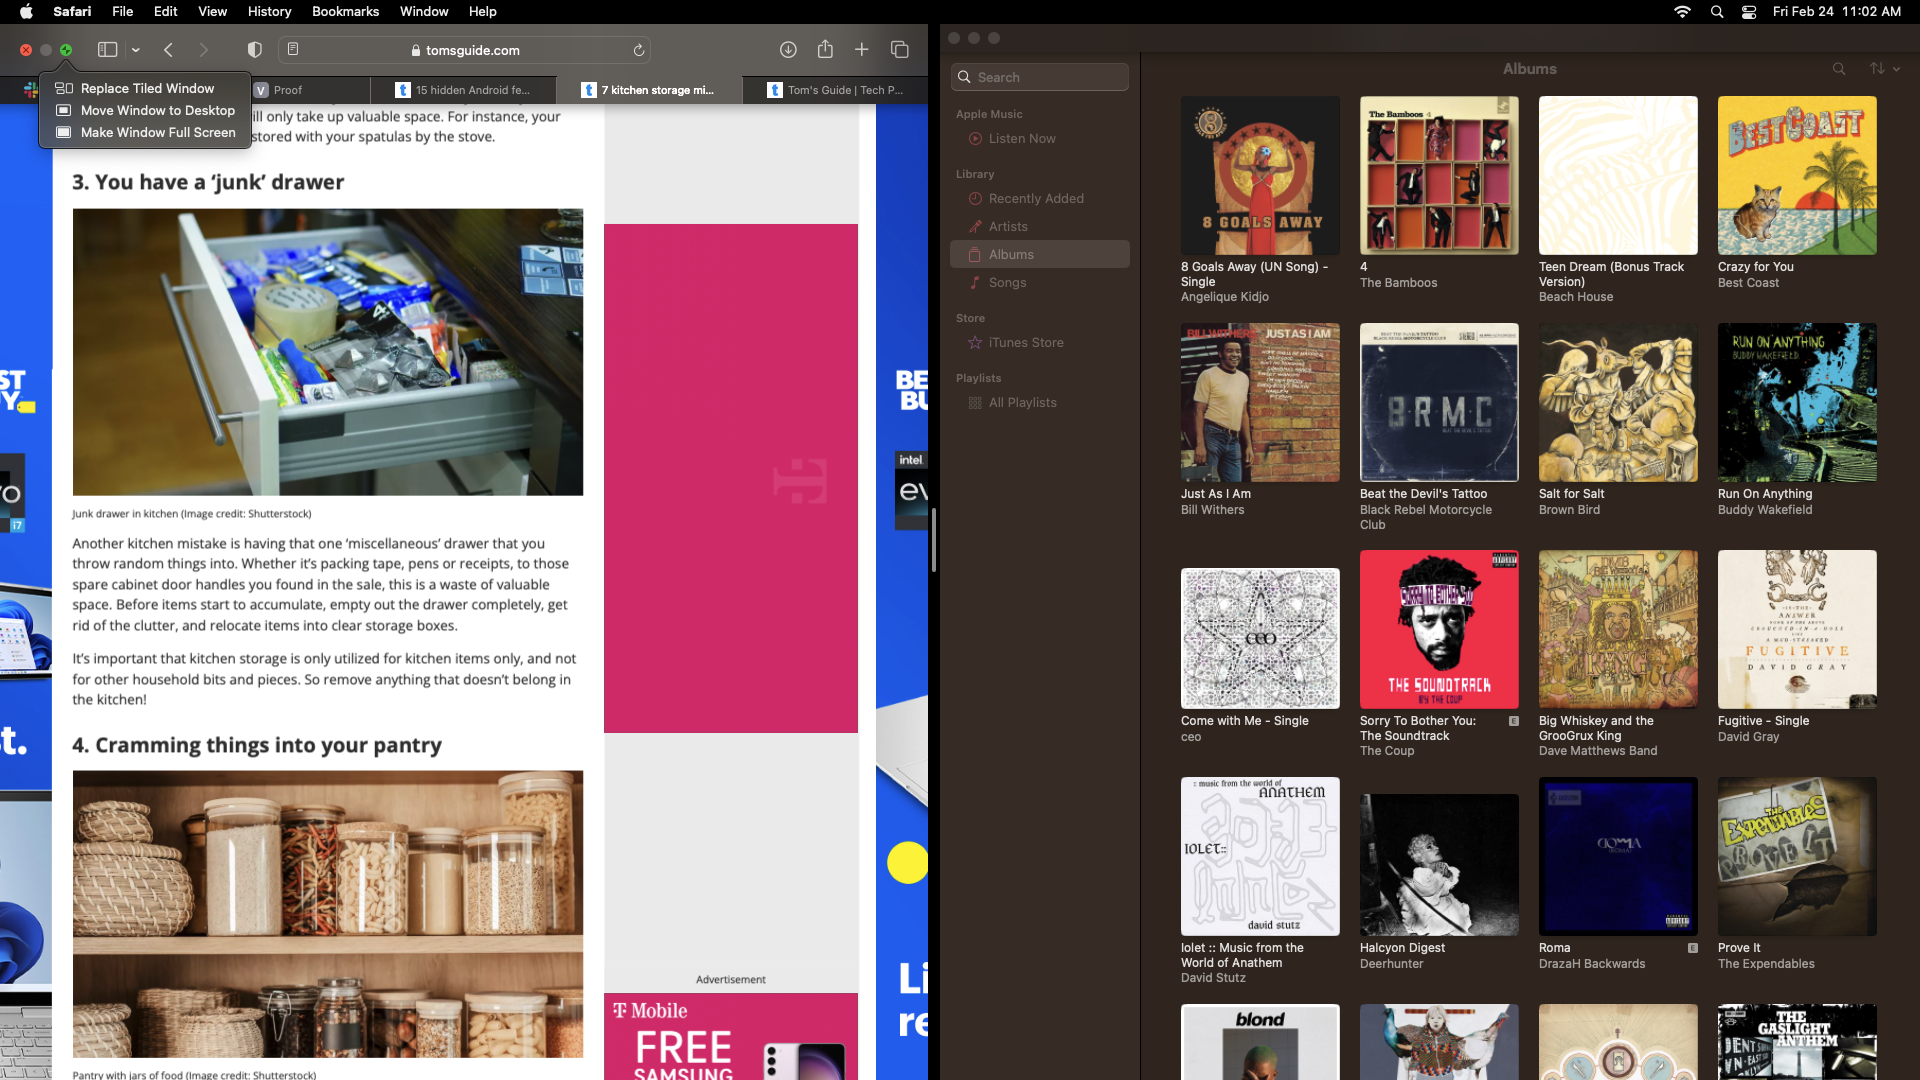
Luckily, macOS has an oft-overlooked Split Screen feature which helps you easily split your screen down the middle, so you can display two apps side-by-side. Here's how to use it.
1. With at least two apps opens, hover your cursor over the green Maximize button in the top-right corner of either.
2. Click "Tile Window to Left/Right of Screen"
3. Select the second app to display and do the same.
4. Click and drag the slider to change the relative size of each window.
5. Exit Split Screen by pressing Escape or clicking the green Maximize button again.
Embrace the Automator to make routines
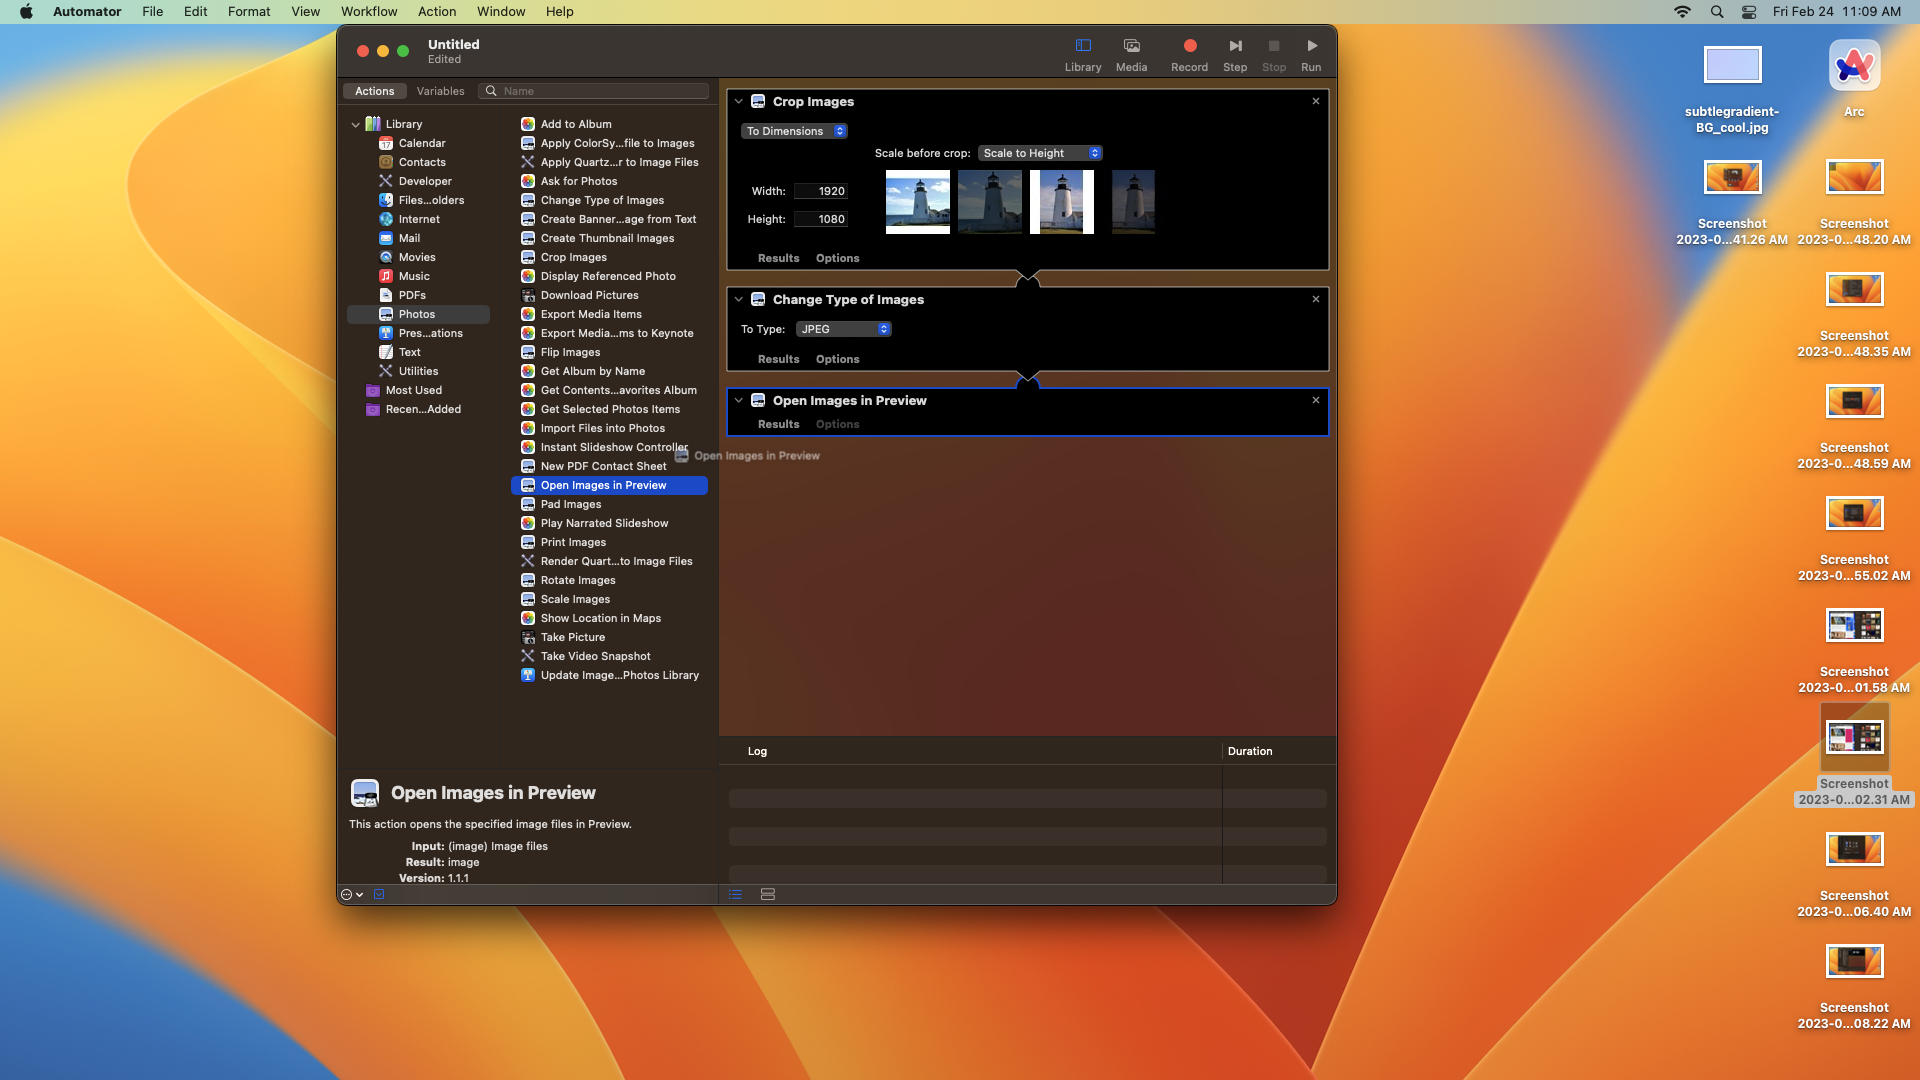
If you regularly do the same things over and over, why not save some time by automating them? Enter The Automator, an app in macOS designed to let you create your own little automated routines which can affect multiple files.
This comes in real handy when doing things like renaming every file in a folder or resizing multiple images at once, something I do regularly here at Tom's Guide. It's a hassle to do these repetitive tasks over and over, which is why learning to use the Automator is worth the effort.
However, be prepared: This is some truly advanced macOS wrangling, and Automator gives you loads of options for automating your work. Getting to grips with everything it can do for you will take some time and a fair bit of experimentation on your part.
Here's how to get started creating a Workflow, the simplest thing Automator can do.
1. Open Automator by either hitting Cmd + Space to open Spotlight Search and typing "Automator" and selecting it from the results, or opening Launchpad and launching it from there.
2. Choose what type of Automator function you want to create. You can use this tool to create everything from automated calendar alarm actions (so things will just happen based on your calendar, with no input from you) to applications you can drag and drop files onto in order to execute your function. If you're just starting out, the simplest place to start is to choose Workflow, which lets you create a set of automated actions you run within the Automator.
3. Drag and drop actions and variables to create a sequence of actions to automate. Within Automator you'll be presented with a cornucopia of potential actions and variables that can be overwhelming at first glance. Don't feel intimidated—most of the actions are pretty self-explanatory, and there's lots of useful help and tips within the app.
4. Experiment. Automator is so robust and customizable that it's impossible to know how it can streamline your workflow without tooling around in the app and seeing what options are available to you. Don't think you're limited to the options Apple provides, either; if you click the Record button in the top-right corner of the Automator you can tell it to record whatever actions you do on your Mac, then incorporate those actions into your Automator project.
These tips and tricks have helped me be far more productive on macOS, so I hope you find them to be similarly useful.
Of course, there's a lot more you can do with your Mac than I was able to cover here. Automator alone is worthy of a meaty deep dive, and there are loads of other useful tips and tricks that Mac owners should know. We can show you how to edit photos on Mac for free, for example, or guide you through the process of how to set default apps on Mac. And if it's been running slowly lately, you should check out our guide on how to clear the cache on Mac— a good cache-clearing can make a world of difference.
Next: learn how to use the Automator on Mac to simplify your processes.

Alex Wawro is a lifelong tech and games enthusiast with more than a decade of experience covering both for outlets like Game Developer, Black Hat, and PC World magazine. A lifelong PC builder, he currently serves as a senior editor at Tom's Guide covering all things computing, from laptops and desktops to keyboards and mice.
 Club Benefits


