Figure-4 stretch is a brilliant pigeon pose alternative you can use if you struggle with the latter for whatever reason (mobility or tightness, for example). Still, I've been swapping figure-4 out for another pigeon stretch lately — sleeping pigeon.
I adore sleeping pigeon, but it's not for everyone. It's a yoga posture that relieves pressure and tightness in your lower back, hips, glutes, and, for some people, your groin, but it can feel strong. If you'd like to learn how to do the sleeping pigeon, check out more below, where I go through it step by step and discuss the benefits.
And as a reminder, what works for my body might not work for yours. If you're unsure about anything, I strongly recommend speaking with a personal trainer, physician, or physical therapist before commencing a new exercise routine. If you're ready to get started, grab one of the best yoga mats and read on.

What is the 'sleeping pigeon' stretch?
Sleeping pigeon pose is a deep hip opener used in yoga to target the hips, glutes and deep piriformis muscle sat within the gluteus muscles. For some, you might find a stretch in your groin and lower back, too.
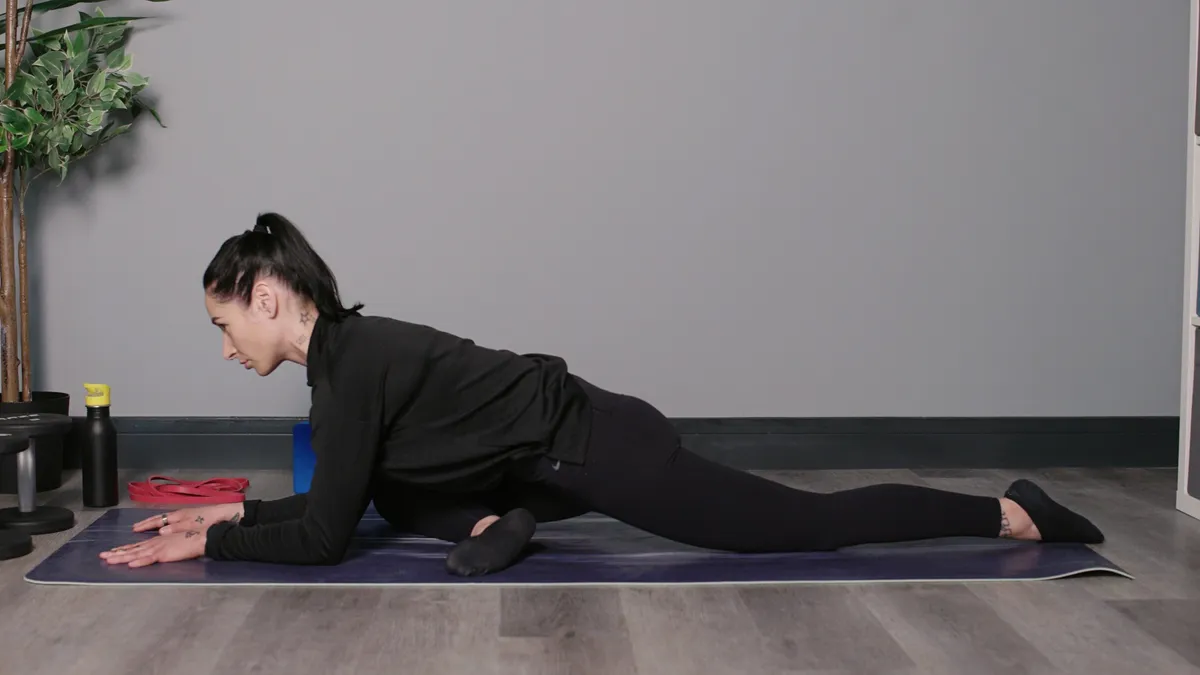
To perform sleeping pigeon, you'll fold over your front leg and rest your arms and head on the mat with your back leg extended and front leg bent. You can also use a block beneath your forehead and hips for better alignment and support.
It's not beneficial for everyone, even though it offers a deep release for lower-body tension and a temporary boost in flexibility. If you have knee or hip injuries or are pregnant, I wouldn't recommend this pose, especially without speaking with a relevant medical professional first.
How to perform sleeping pigeon pose
- Start on all fours with your shoulders stacked over your wrists
- Position your right knee behind your right wrist and right ankle behind your left wrist, then place the bent leg on the mat. For less intensity, draw your heel closer to the body; for more intensity, see if you can create a right angle with your leg so that your right shin is parallel to the front of the mat
- Extend your left leg behind you, resting on the thigh with toes untucked. Your hips should stay square and balanced so that you sit upright
- Place your fingertips down close to your hips and lift your chest tall, shoulders pulled back and down. You'll know the position is correct if you can take your hands away from the mat without falling over
- On your next exhale, slowly fold forward and walk your hands in front of you, allowing your chest to fall to your front thigh
- You can rest your arms or forehead on a block or cushion, or place one beneath your right hip for extra support and to help square your hips
- Focus on stretching your arms out in front of you as far as possible with your head, arms and chest lowered.
What are the benefits?
Breathe deeply and try to completely release your upper body to the mat, letting gravity do its work.
The goal is to avoid dumping your weight into one side of your body or turning to one side. If you find that you're resting your weight on the inner or outer back leg, resquare your hips and use blocks for support.
To get the most from this exercise, focus on alignment before intensity. It's no good moving your front ankle further away from your body just to get your shin parallel to the mat if the rest of your body must shift to one side to make it happen. Set yourself up first, then look for deeper intensity later.
On this point, if the front hip or glute feels far away from the mat, place a block or similar beneath. I like to lower my chest and forehead to the mat, then stretch my arms out for an arm, shoulder and upper back stretch, but again, you can use a cushion or blocks if it helps you settle better.
The stretch offers a deep release, which can feel uncomfortable and increase the likelihood of fidgeting; try to stay calm and still and use a long, relaxing inhale and exhale to help settle your mind and body and relax your muscles and joints.
That said, I mentioned anyone feeling knee or hip pain should avoid sleeping pigeon pose. If that's you, try the figure-4 stretch or 90/90 pose instead, which offers very similar benefits with a slightly different set-up and can feel more beginner-friendly for some.
Breathing is pretty crucial to our everyday life, but it's also very important during exercise for more than the obvious: it helps strengthen your diaphragm, activate your pelvic floor, improve posture and alignment and create space in the body.
As you inhale, lift tall through your spine, then, as you exhale, fold forward. Take your time reversing out of the sleeping pigeon step by step; there are a few ways, but my technique is to lift your chest first, walk your hands in, then shift your weight to one side and place your butt down, swinging your legs around to a seated position. From here, reset.
Over time, the movement will help increase external rotation of the hips and improve pelvic mobility and flexibility. The forward fold can also reduce tension in the lower back, relieving tension in the muscles associated with the spine and pelvis, and, therefore, posture, including the glutes and hip flexors.
Focused breathwork also helps create calmness and reduce anxiety. Notice how you feel in your body and mind afterward. I would aim for 30-60 seconds per side or longer if you can.
What happened when I tried it?
When I swapped in sleeping pigeon for one week, it felt much more relaxing and offered me a deeper stretch, which allowed me to find an even deeper release in the moment. It felt good to relax my upper body, enjoy a gentle stretch in my back, as well as stretch out my tight hips and glutes.
This variation also allowed me to soften into pigeon, which I find really difficult to do, and helped me focus more attention on breathing. I practiced sleeping pigeon for several minutes per side before bed each day for the week, and felt more peaceful getting into bed afterward with my lower body feeling considerably more open and tension-free.
The toughest part for me was trying not to fidget (darn neuro-spicy brain) and hold the position without shuffling around. My right side is much tighter than my left, so where my right hip and glute stayed lifted, I popped a block beneath my hip and let my chest and forehead melt into the mat, stretching my fingertips in front of me as far as I could.
Not only did this better support my pelvis and spine, but also kept my hips square and allowed a deeper, more satisfying stretch, so I highly recommend it, especially if you lack flexibility.
Follow Tom's Guide fitness on Instagram for more workouts, routines, tips, and tricks.

Follow Tom's Guide on Google News and add us as a preferred source to get our up-to-date news, analysis, and reviews in your feeds.
More from Tom's Guide
- Not sit-ups, planks, or crunches: I do this simple Pilates exercise every single day to build a strong and stable core and work on my hip flexor mobility
- Child's pose is fine, but here are the 4 mobility exercises I use when my spine and shoulders get stiff from desk sitting
- I ran the London Marathon with the Garmin Forerunner 970 vs Coros Pace 4 — which was more accurate?