How to fix a runtime error in Windows 11
Troubleshoot and fix Windows 11 runtime errors
Here at Tom’s Guide our expert editors are committed to bringing you the best news, reviews and guides to help you stay informed and ahead of the curve!
You are now subscribed
Your newsletter sign-up was successful
Want to add more newsletters?
Daily (Mon-Sun)
Tom's Guide Daily
Sign up to get the latest updates on all of your favorite content! From cutting-edge tech news and the hottest streaming buzz to unbeatable deals on the best products and in-depth reviews, we’ve got you covered.

Weekly on Thursday
Tom's AI Guide
Be AI savvy with your weekly newsletter summing up all the biggest AI news you need to know. Plus, analysis from our AI editor and tips on how to use the latest AI tools!

Weekly on Friday
Tom's iGuide
Unlock the vast world of Apple news straight to your inbox. With coverage on everything from exciting product launches to essential software updates, this is your go-to source for the latest updates on all the best Apple content.

Weekly on Monday
Tom's Streaming Guide
Our weekly newsletter is expertly crafted to immerse you in the world of streaming. Stay updated on the latest releases and our top recommendations across your favorite streaming platforms.
Join the club
Get full access to premium articles, exclusive features and a growing list of member rewards.
Knowing how to fix a runtime error on Windows 11 is crucial for sorting out software issues yourself. Encountering a disruptive runtime error can be frustrating, which is why it’s essential to know how to fix one.
But what is a runtime error? While they may sound scary, runtime errors are commonplace and are simply software bugs. Runtime errors occur when a program encounters unexpected issues during its execution. These errors can result from various factors, including incompatible software, incorrect installations, missing system files, or issues with third-party applications. There are lots of causes and therefore potentially lots of fixes. We’ll walk you through some of those fixes in this guide.
And if you’re keen on getting familiar with Windows 11, check out these 5 Windows 11 hacks for more productivity.
How to fix a runtime error in Windows 11
Note: This is a non-exhaustive list of methods to fix runtime errors in Windows 11.
1. Restart the system
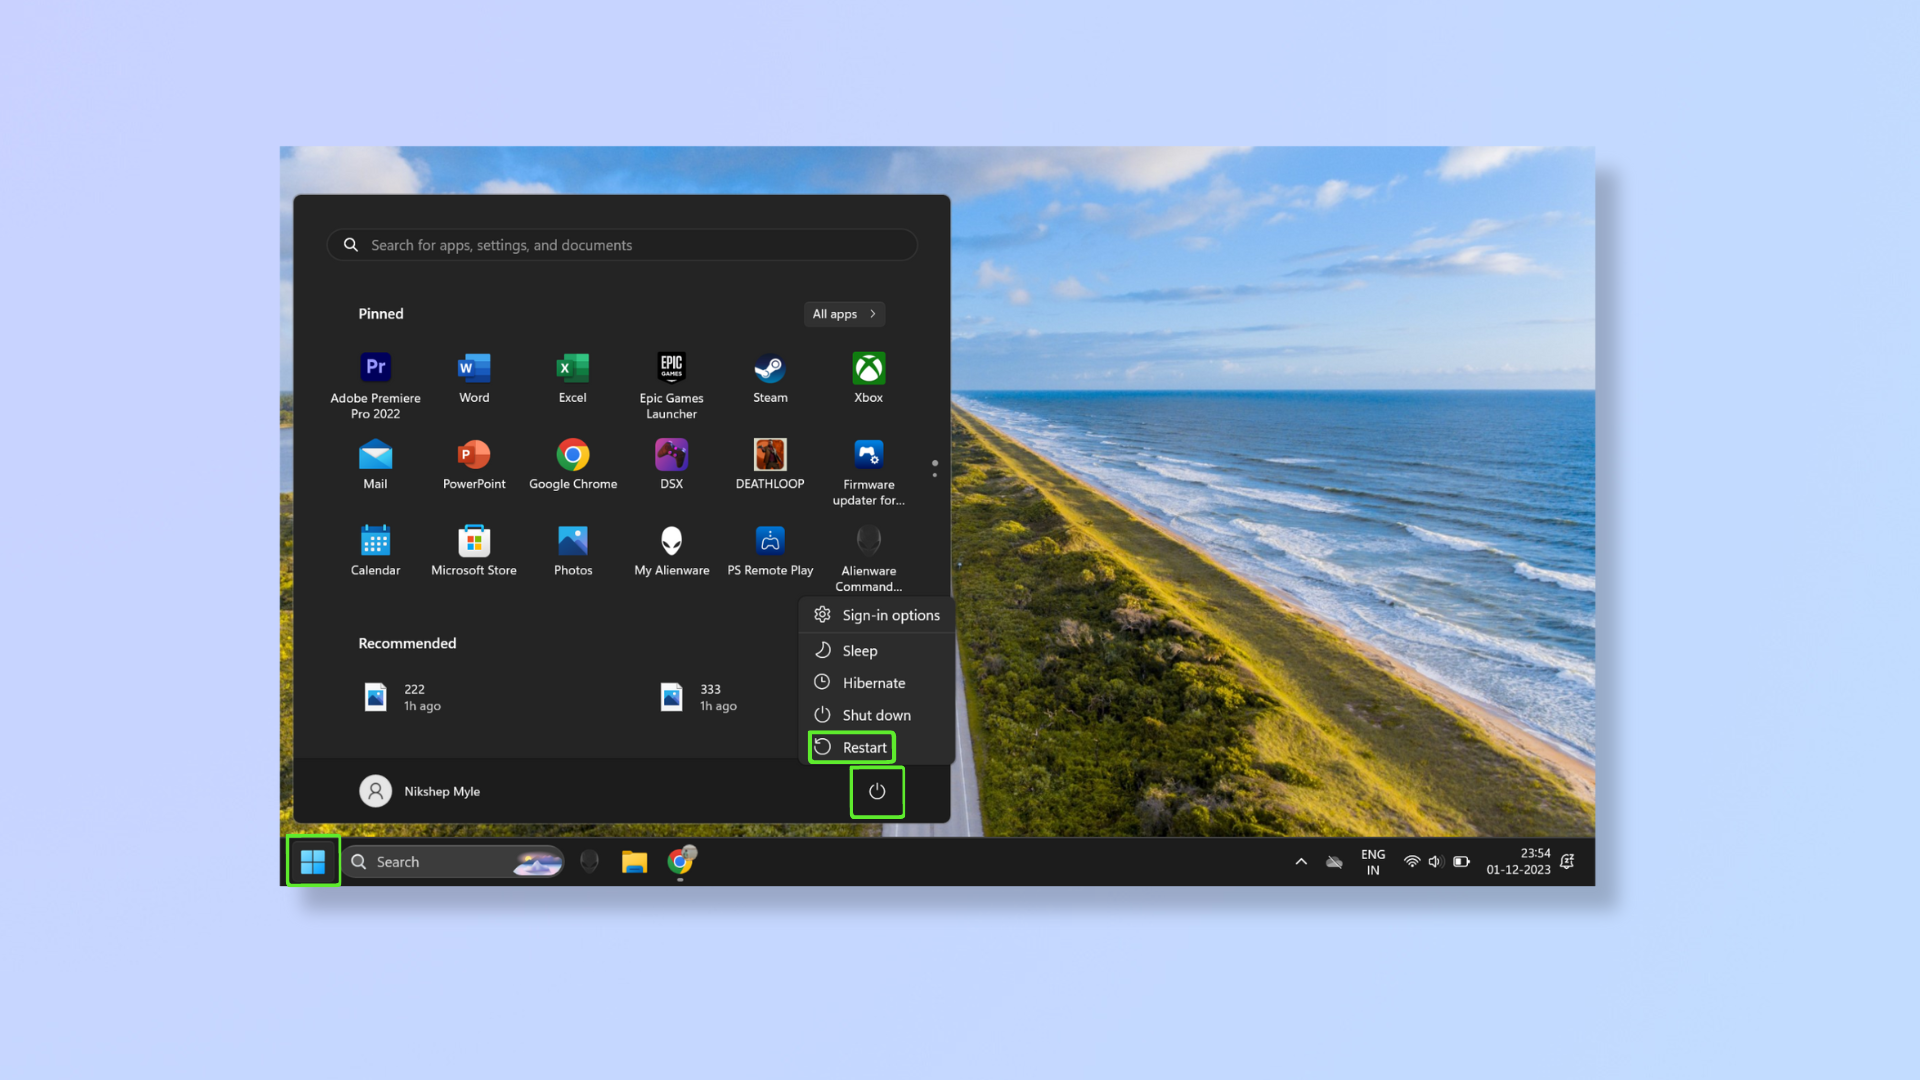
Before attempting any of the other methods, try restarting your system because it evens out issues that may have spawned because of an incorrect shutdown or an improperly closed application:
Press the Windows key, click the power button in the bottom-right, and click Restart.
2. Update Windows 11
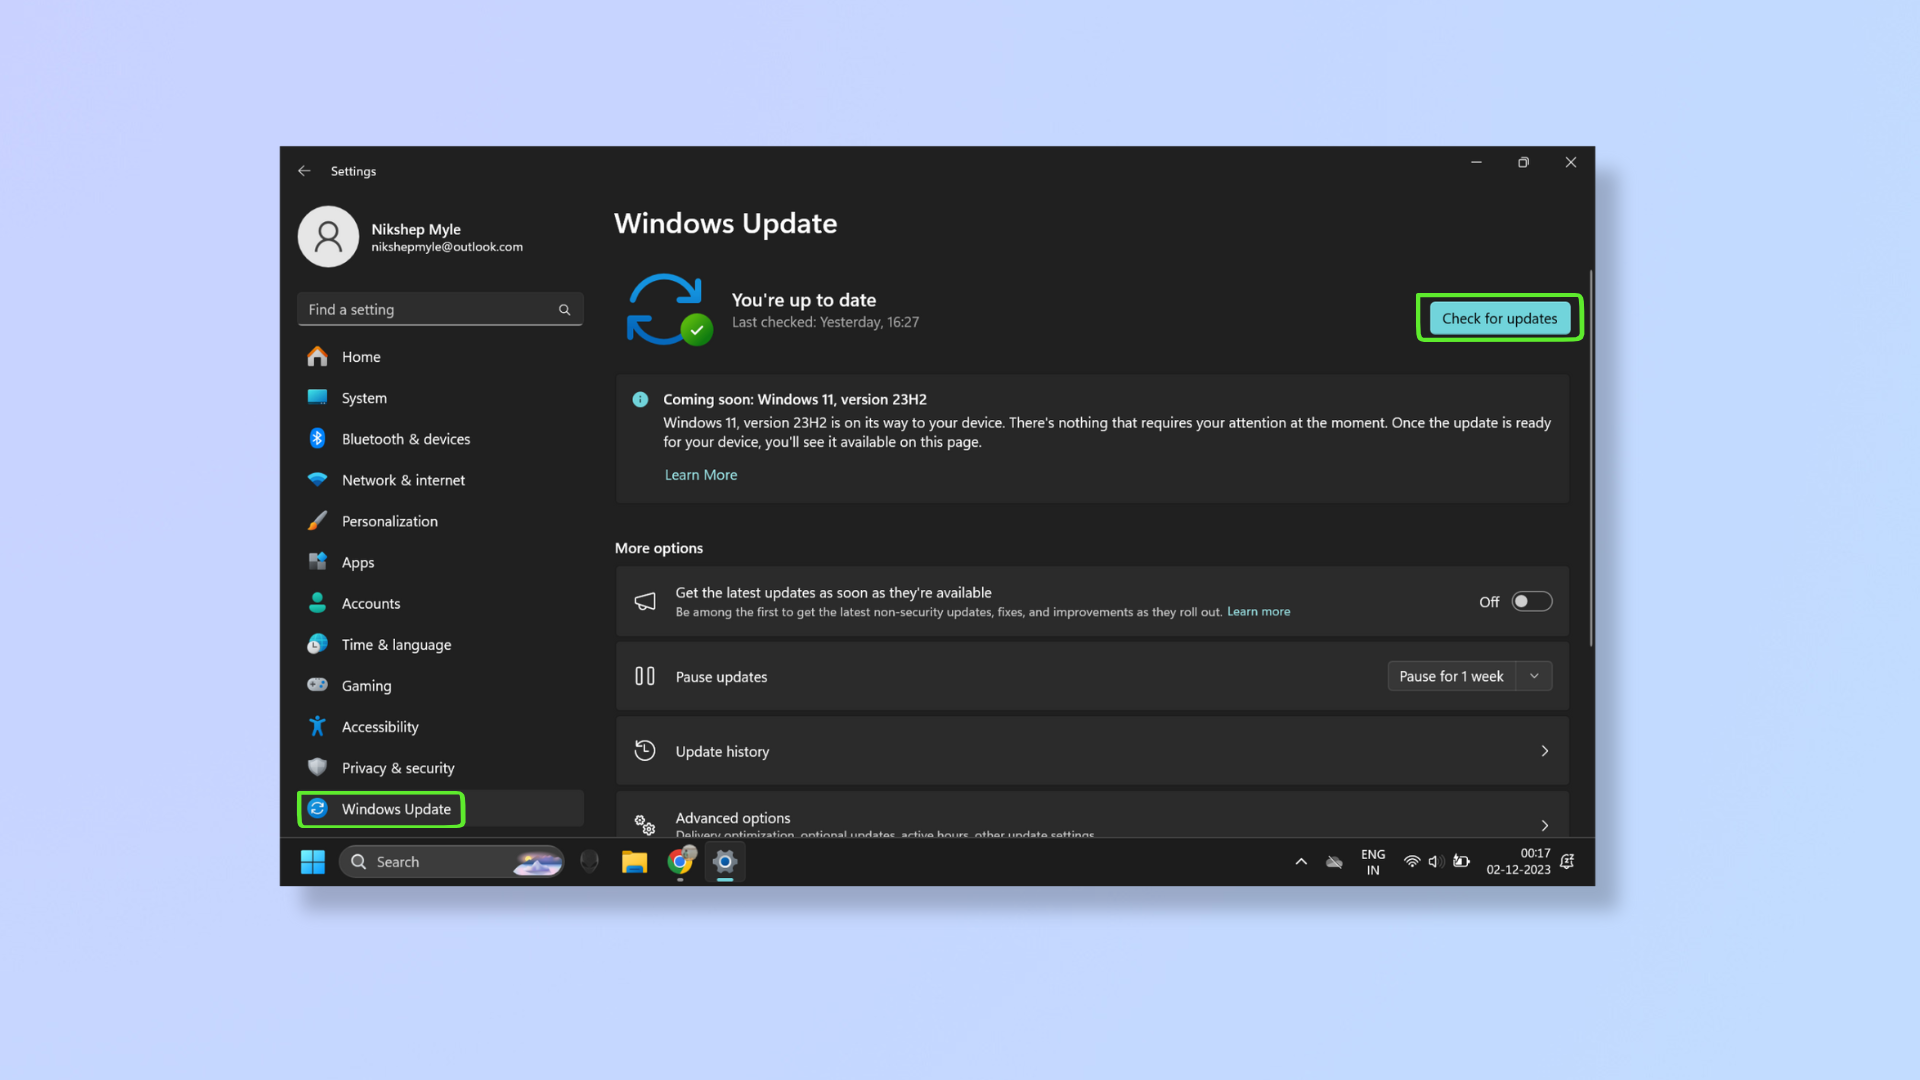
Microsoft releases software updates for Windows 11 to address bugs, compatibility issues, security vulnerabilities, etc. Oftentimes, updating your system can fix bugs and system errors:
Press Windows key + I to open Settings. At the bottom of the left pane, find and click Windows Update. Now click Check for updates, which is at the top-right. Pending updates will download automatically.
3. Reinstall apps
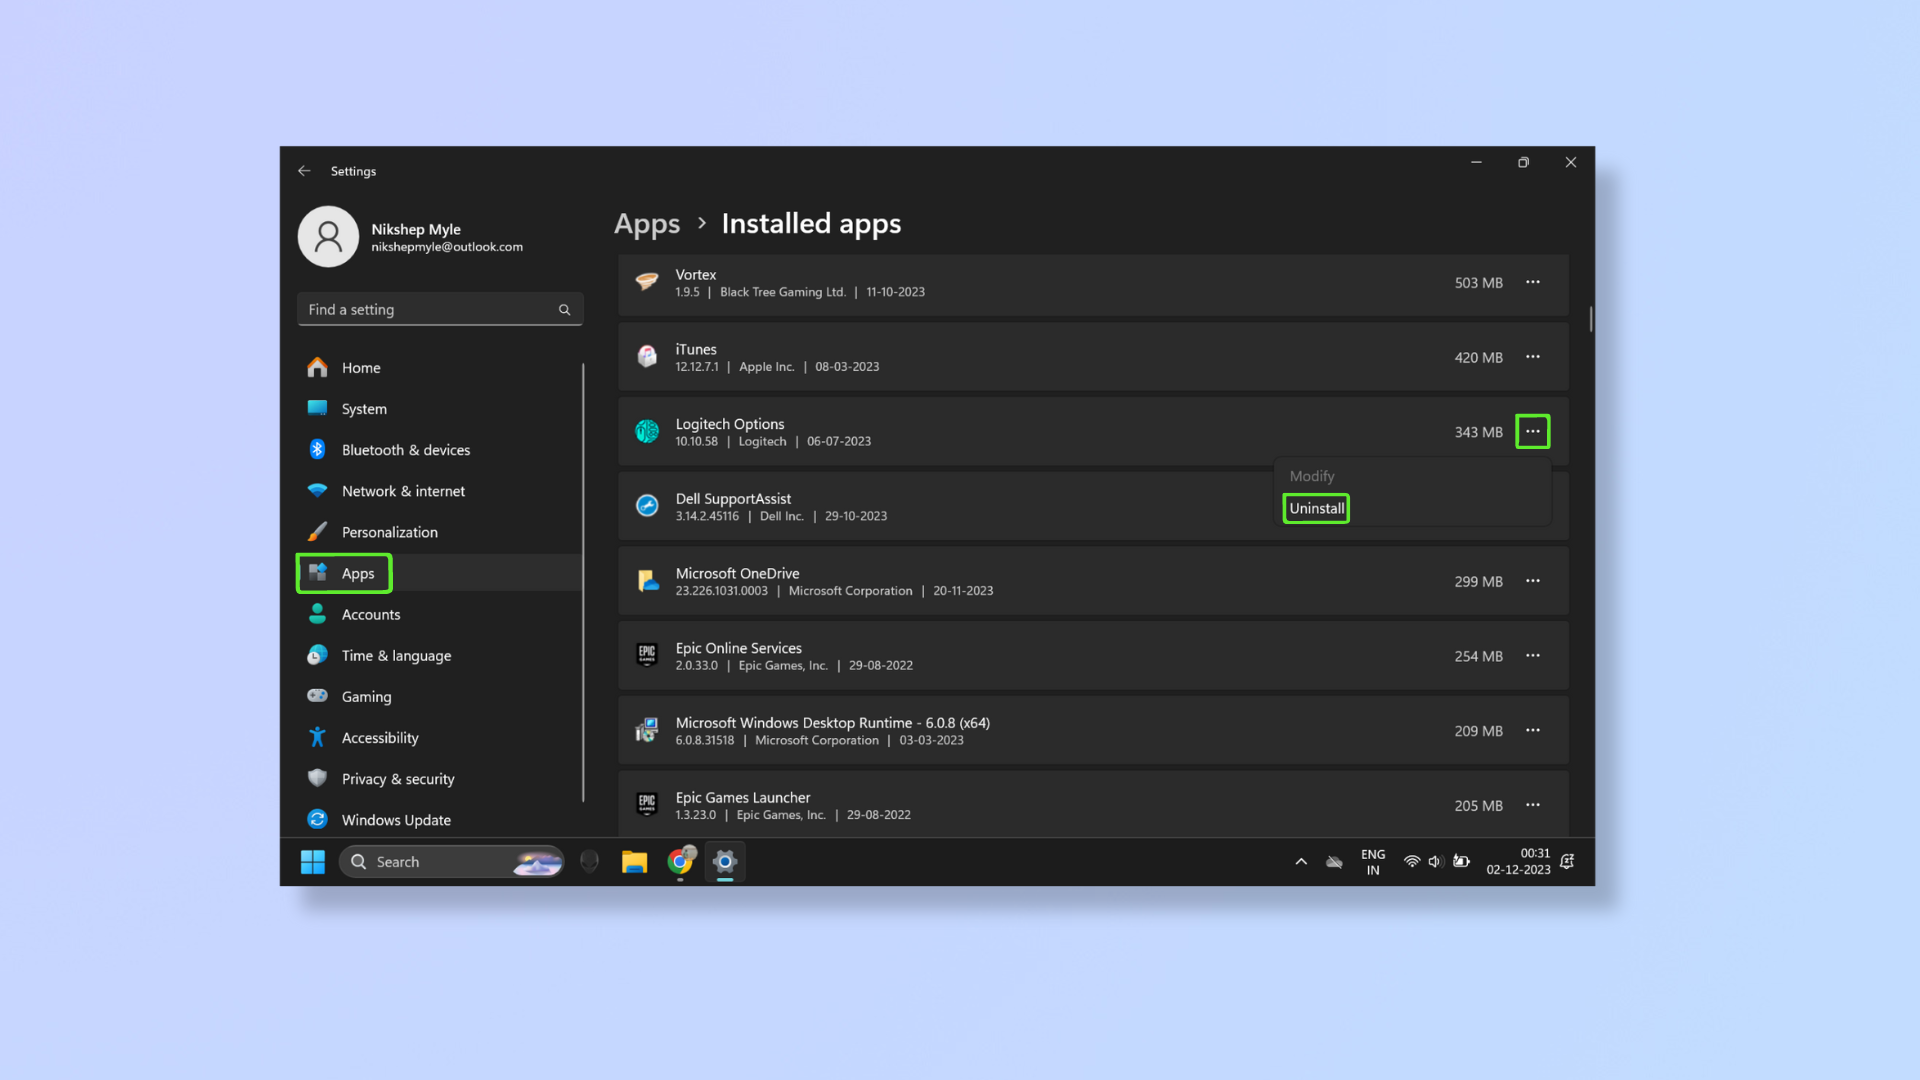
An application can cause runtime errors if it’s not installed properly. Uninstalling and reinstalling it can help:
Press Windows key + I to open Settings. In the left pane, find and click Apps, and then click Installed apps.
Find the problematic app and click the More Options icon (three horizontal dots) beside its file size. Now click Uninstall on the dropdown. You’ll get a notification to confirm the uninstallation. Click Uninstall again.
Sometimes, after clicking Uninstall, you’ll get a User Account Control notification asking you to confirm whether you want the app to make changes to your device. Click Yes to proceed. Depending on the app, there may be a few additional steps the uninstallation wizard will ask you to take. Once the app is uninstalled, go to the app’s official website or Microsoft Store page to reinstall it.
4. Repair Visual C++ Redistributable Packages
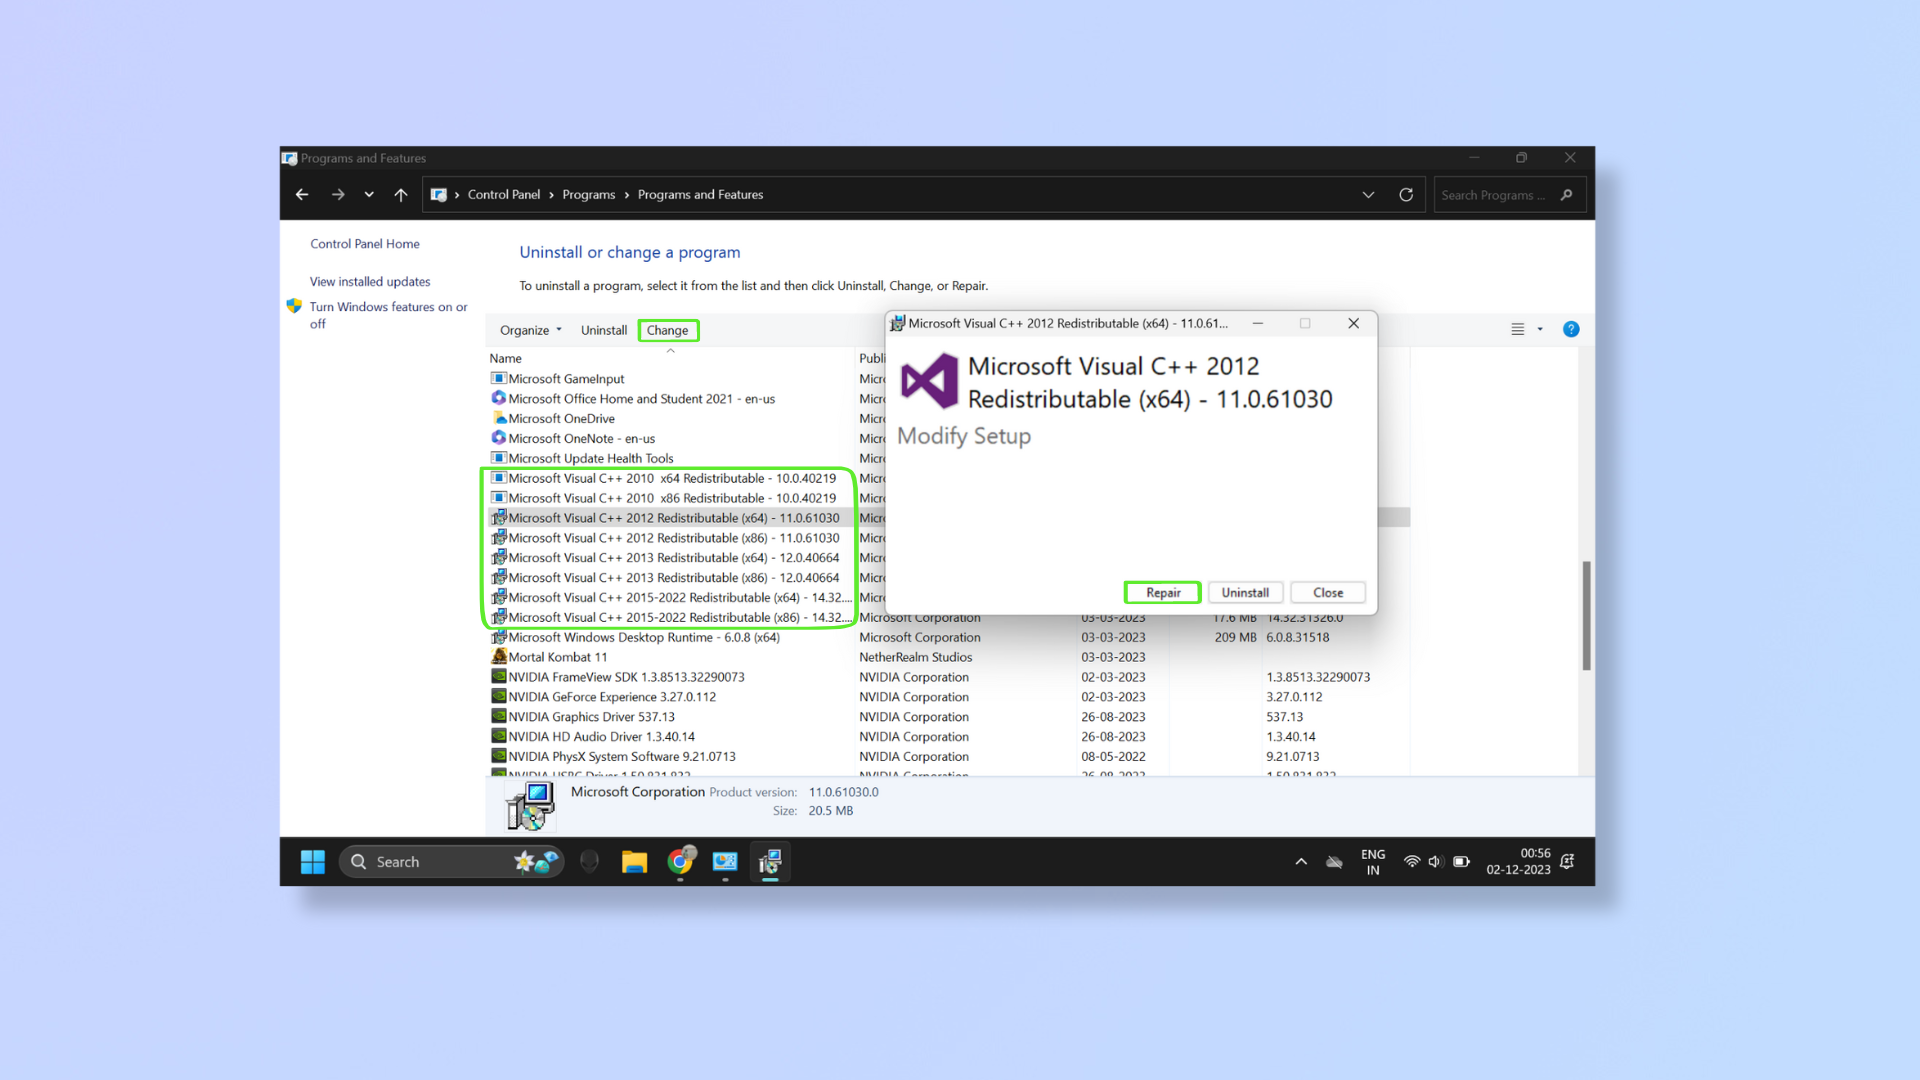
Fixing issues with the Microsoft Visual C++ Redistributable packages can address runtime errors:
Hit Windows key + R to open the Run dialog box. Type “control” in the text box and click OK or hit Enter.
Under Programs, click Uninstall a program. Find the Microsoft Visual C++ Redistributable files and click one of them. Click Change, which appears in the toolbar at the top. Now click Repair and you’ll get a User Account Control notification asking you to confirm whether you want the app to make changes to your device. Click Yes. You’ll have to do this for each Visual C++ Redistributable individually. Once done repairing the files, restart your PC.
5. Uninstall and reinstall Visual C++ Redistributable Packages
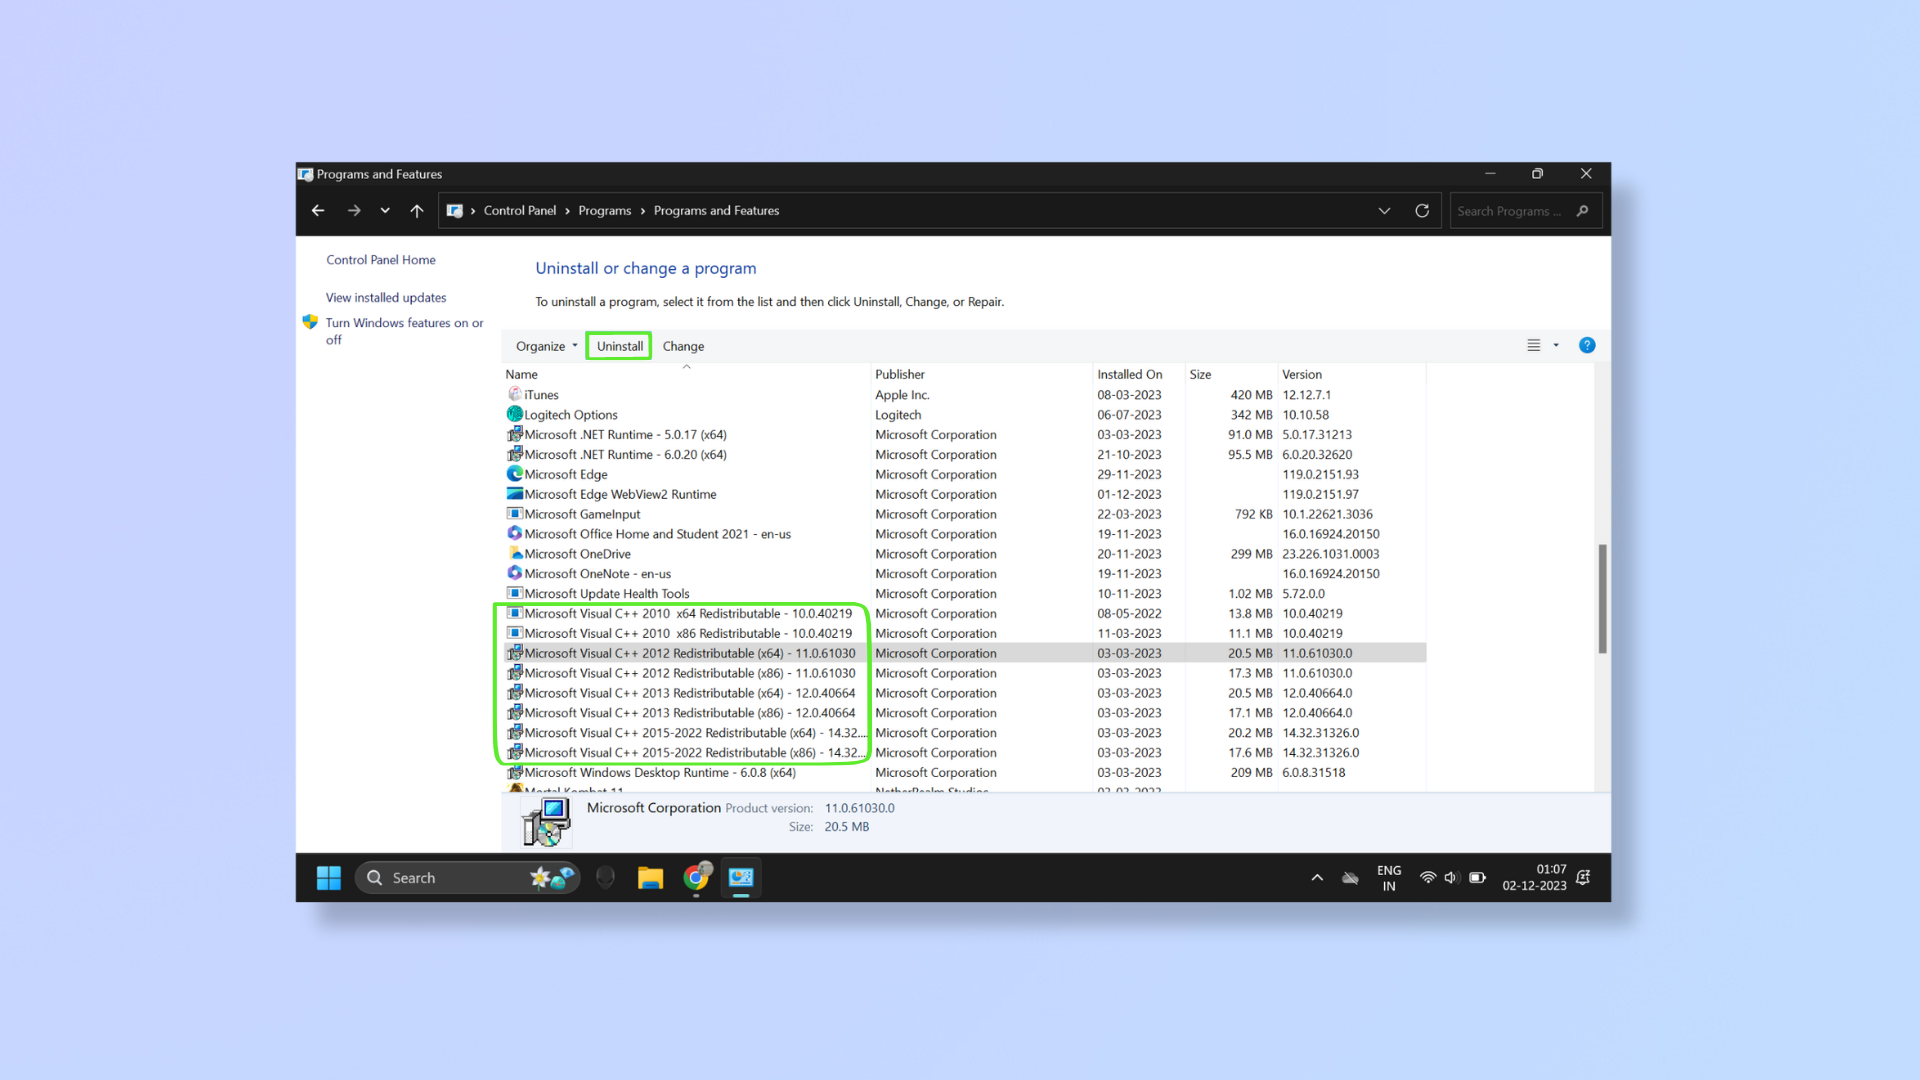
If repairing the Microsoft Visual C++ Redistributable packages doesn’t help, try uninstalling and reinstalling them:
Follow the same steps as above (Repair Visual C++ Redistributable Packages) until you’ve found and selected one of the Microsoft Visual C++ Redistributable files.
In the toolbar at the top, click Uninstall (beside Change).
You’ll get a User Account Control notification asking you to confirm whether you want the app to make changes to your device. Click Yes and complete the uninstallation.
After uninstalling all the files individually, head to the official Visual C++ Redistributable download page and scroll down to the latest Visual Studio version (which will show up first, followed by the older versions). In the table with links, click the link apt for your system’s architecture (ARM64, X86, or X64) and download the right file.
Open the downloaded file to begin the installation.
6. Update Display Drivers
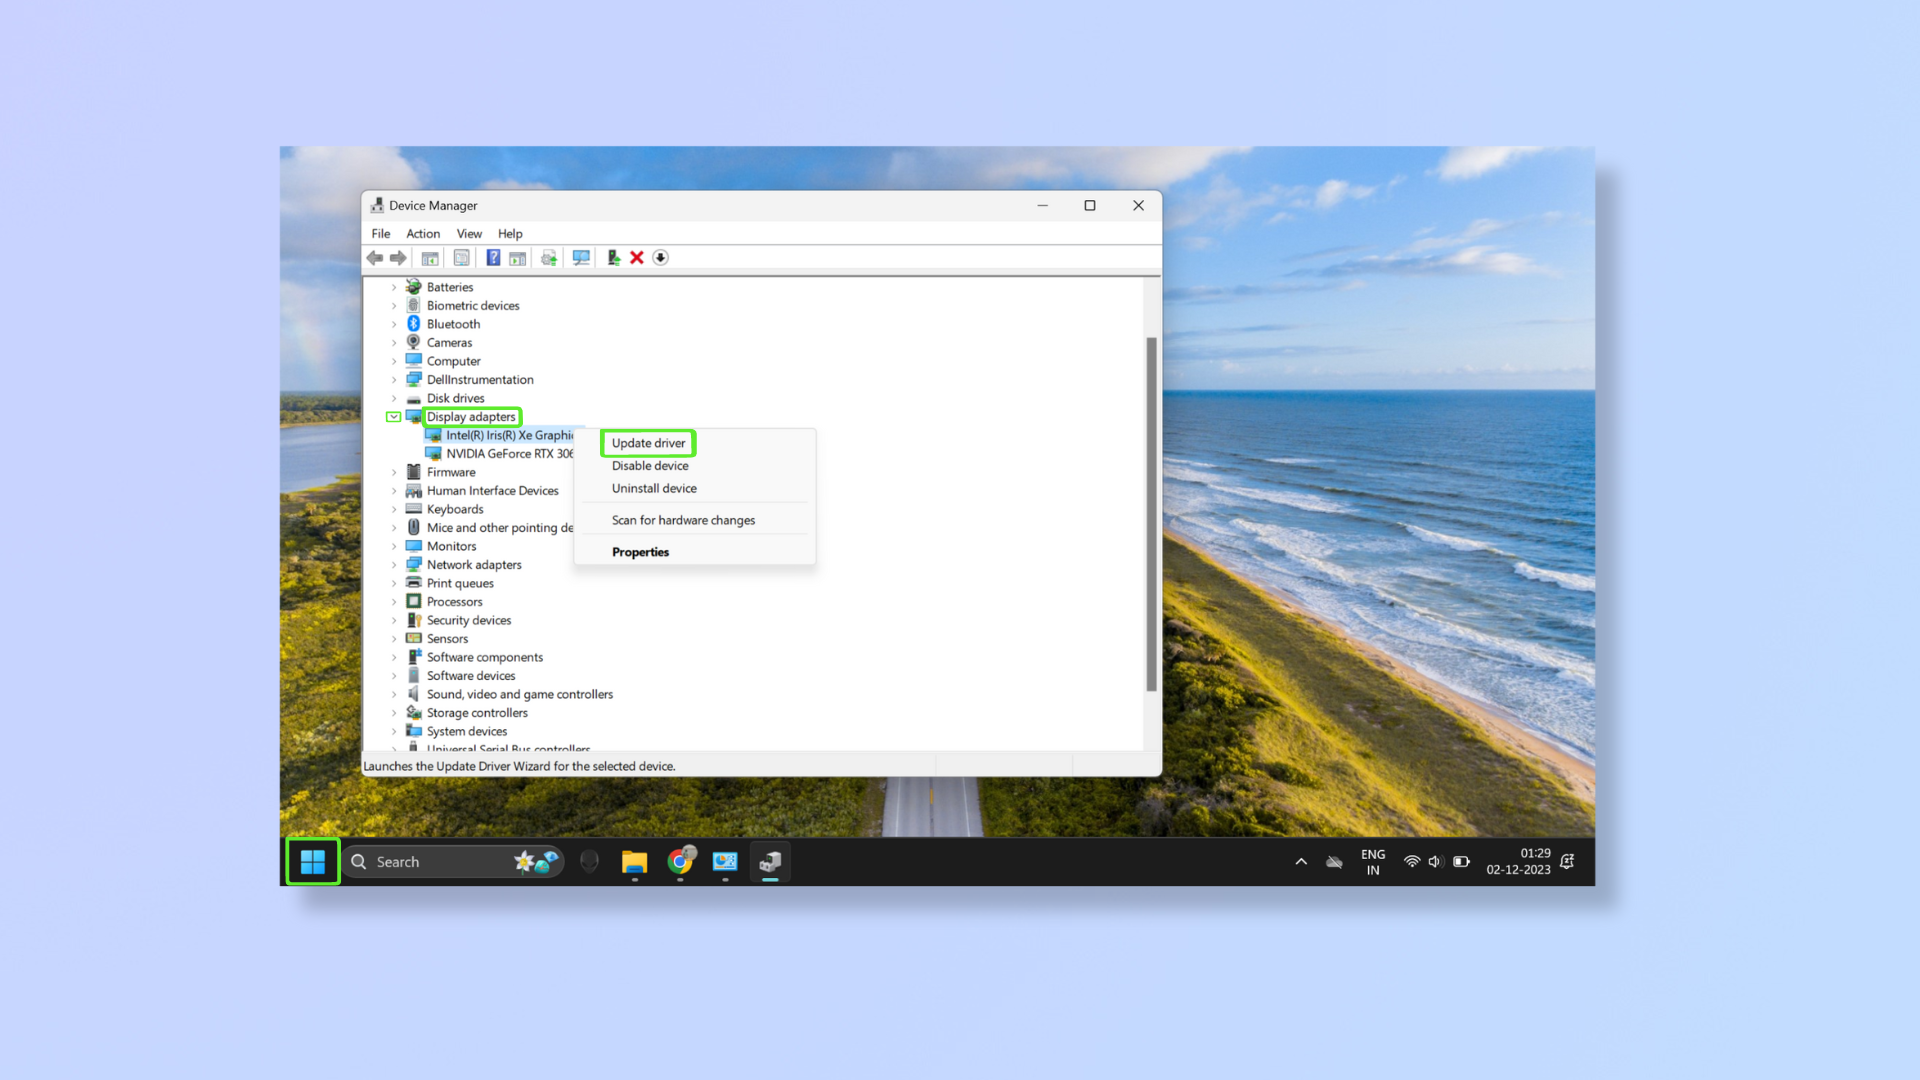
Outdated display drivers are to blame for some runtime errors, but updating them is quite easy:
Right-click the Windows icon at the bottom left of your screen. Click Device Manager. Now click the arrow beside Display adapters to expand it. Right-click the adapter and click Update driver. Now click Search automatically for drivers, and Windows will automatically find and install the best drivers.
If the best driver is already installed, you’ll get a notification saying this and an option to Search for updated drivers on Windows Update. Clicking this will take you to the Windows 11 Update section in Settings, where you can check and install updates.
Note that to update some display drivers (like Nvidia’s), you’ll have to use the GPU manufacturer’s website.
Following these steps will help you resolve runtime errors on your computer. We’ve also prepared more guides for you on how to update Nvidia drivers, how to factory reset Windows 11, and how to boot into Windows 11 safe mode.
Get instant access to breaking news, the hottest reviews, great deals and helpful tips.

Nikshep Myle is a freelance writer covering tech, health, and wellbeing. He has written for popular tech blogs like TechRadar, GadgetReview, SlashGear, and Creative Bloq, and has extensively reviewed consumer gadgets. When he’s not writing, you’ll find him meditating, gaming, discovering new music, and indulging in adventurous and creative pursuits.
 Club Benefits


