What's New in iOS Notes
Over the past few years, Apple has transformed its Notes app from a cheesy Marker Felt-laden simulacrum of a notepad into a powerful note-taking app. iOS 11 — which is now available to download — continues that evolution, especially if you're running it on an iPad. The updated version of Notes brings even more features that turn this built-in app from a mere afterthought into a tool that handles text, drawings, and even scanned documents.

Here's a look at what's new in iOS 11's Notes app.
Drawings
Notes first incorporated drawing capabilities back in iOS 9 and shortly thereafter also gained support for the Apple Pencil (at least for iPad users). But in earlier versions of iOS, you had to specifically toggle into drawing mode; otherwise, using the Apple Pencil on the screen would act more like a traditional stylus, mimicking the navigational capabilities of your fingers.
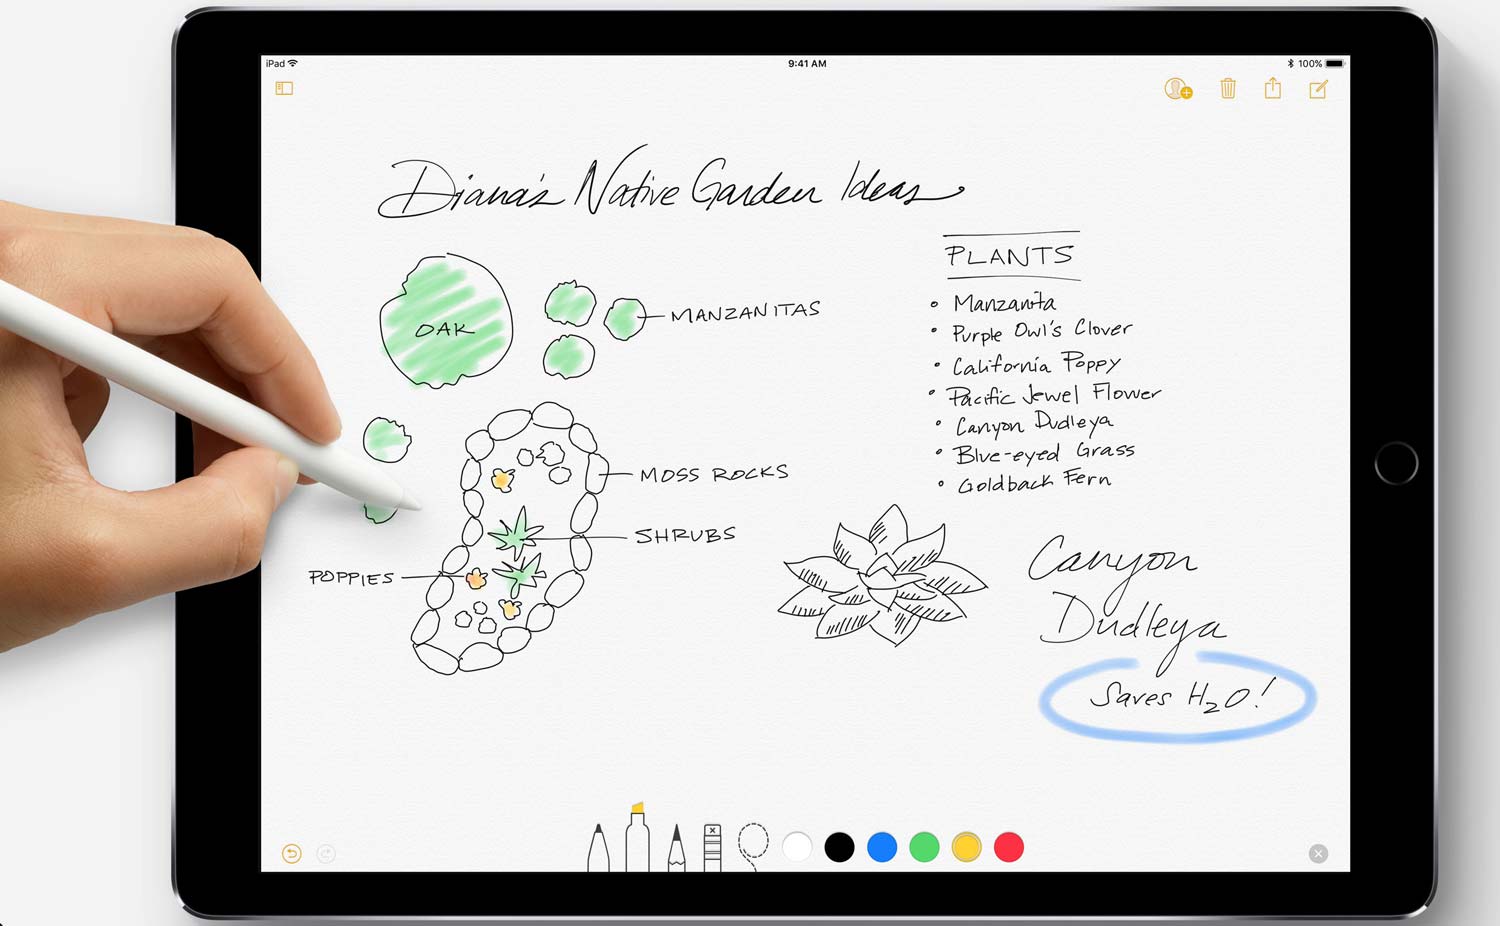
In iOS 11, drawings are a full-fledged part of the Notes experience. While you can still use your finger to toggle into drawing mode and then sketch things, Apple has greatly improved integration with the Pencil for iPad users. Touching the Pencil to a note instantly engages drawing mode (as long as you're not trying to draw over already typed text). You can still access the full suite of drawing tools by tapping the Markup icon in the bottom right corner.
Improved text formatting & tables
Previous versions of Notes offered some barebones formatting: you could apply Title, Heading or Body styles by pressing the Formatting button. Or, if you tapped and held the popover menus, you could summon Bold, Italics, or Underline.
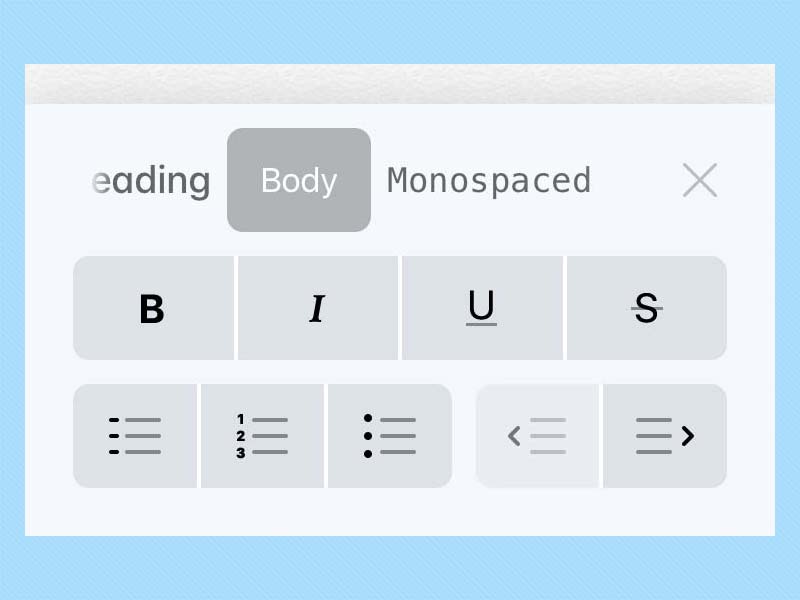
In iOS 11, Notes gets much improved text formatting. Those Bold, Italics, and Underline options are now accessible via the Formatting button when you tap the Aa icon. You also have options for Strikethrough and Monospaced. And, in addition to existing dashed, bulleted, and numbered lists, you can now also increase or decrease the indent of text. If you indent within a list, Notes will even automatically change the list item markings, providing some basic outlining features.
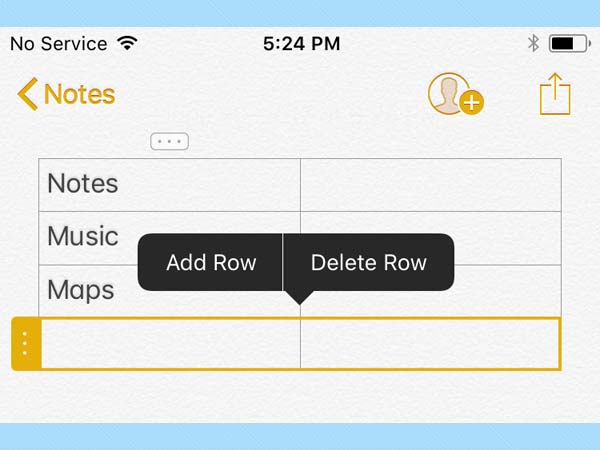
Finally, iOS 11 also adds support for tables in Notes. Tapping the Table button on the top left of the keyboard inserts a 2-by-2 table. When you tap any cell, you'll see small "handles" appear next to the column and row; tapping one of those will give options to add or delete a column or row or respectively, as well as cut, copy, and style the text in them.
Get instant access to breaking news, the hottest reviews, great deals and helpful tips.
Lines and Grids
Notebooks come in all sorts of formats, but Notes has always been a simple blank canvas — until iOS 11. If you prefer lines or grids for your note-taking, the new version of Notes will happily oblige. You have your choice of simple ruled lines in single-spaced, double-spaced, or triple-spaced configurations, as well as large, medium, or small grids.

You'll have to visit Settings to choose your option, and it applies to all new notes you create, though existing notes will retain whatever option was selected when they were created. It's also important to note that the lines and grids only work with sketches/handwriting; any text you type will be inserted before the lines or grid.
MORE: Awesome Hidden iOS 11 Features
Handwriting
Speaking of handwriting, Apple has begun to take steps to support it in Notes as well. With the improved Pencil integration you can just start writing by hand in any note instantly. However, the only real accommodation Apple offers in iOS 11 is searching of handwritten notes. So if you write something in a note, you should be able to search for that text and get the note in which you wrote it. Assuming, of course, that your handwriting isn’t totally illegible.
Pinned Notes

iOS 11 expands your organizational abilities by letting you pin notes so that they'll appear at the top of your list for easy access. Just swipe to the right, tap the pin icon, and your note will grab a permanent spot at the top. You're not limited to one pin either, as you can designate multiple notes to top off your list.
Instant Notes
With the improved Pencil support, Apple has also made it easier to start writing notes even when your iPad is locked. If you enable the Instant Notes features in iOS 11 (found in Settings > Notes), you can have your iPad immediately open a new note when you touch the Pencil to the lock screen. (You can also add a “New Note” widget to iOS 11’s customizable Control Center, which is available from the lock screen as well — a feature that also works on the iPhone.)
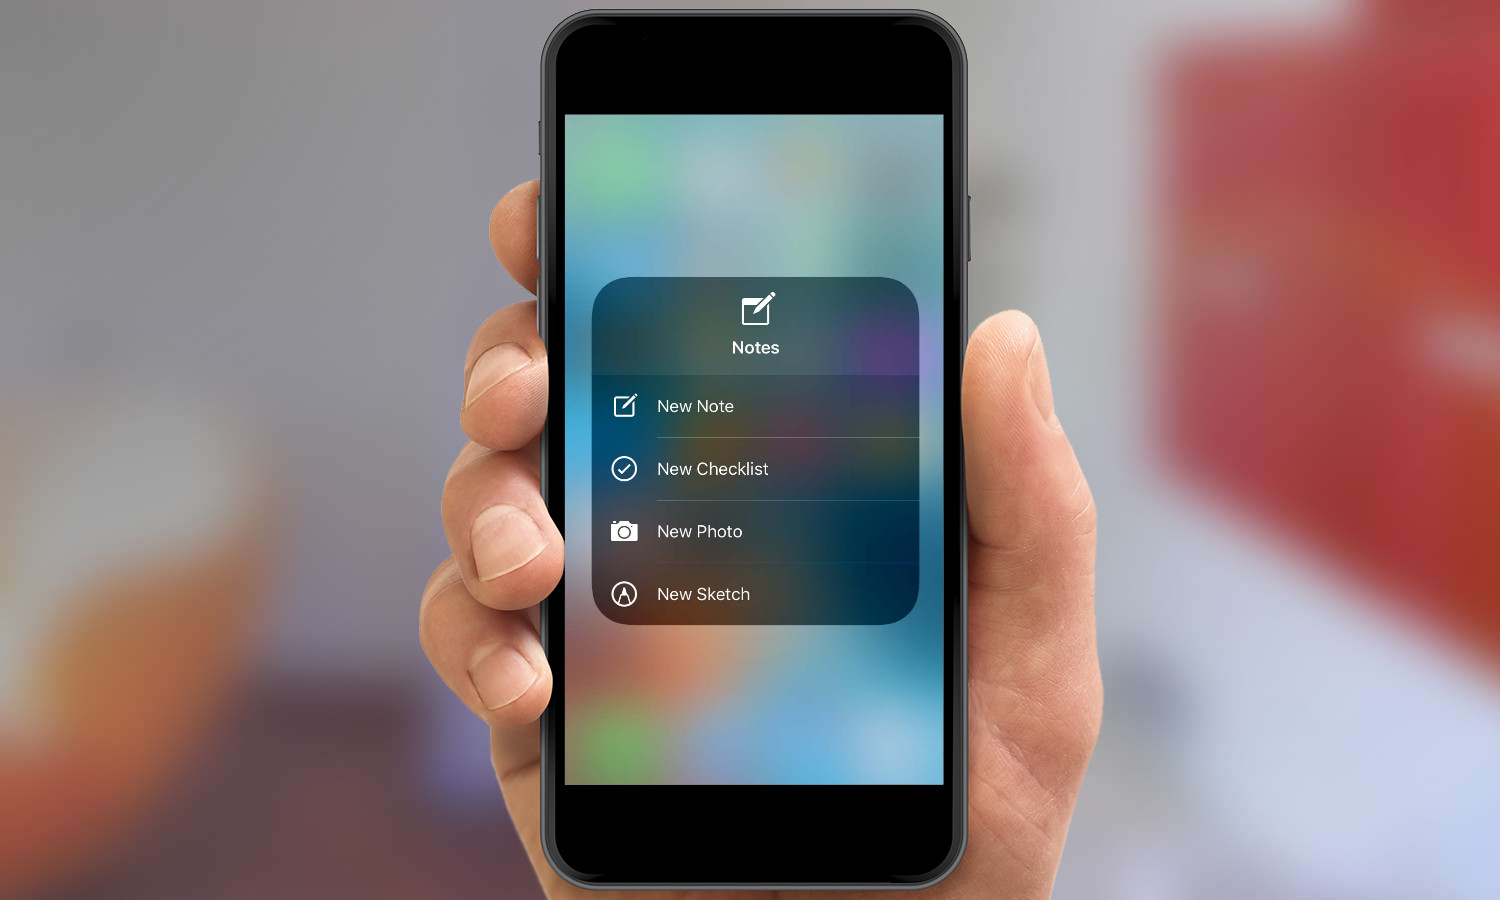
And lest you worry about creating a new note every single time you tap the iPad's lock screen, you can also set a time limit for how long you can resume that note, anywhere from Never to Always.
Scanned Documents
Scanning documents with an iPhone or iPad camera has become a popular feature on mobile, from Dropbox to dedicated scanning apps. Apple’s now taken a shot at those features by building document scanning directly into iOS 11’s Notes apps.
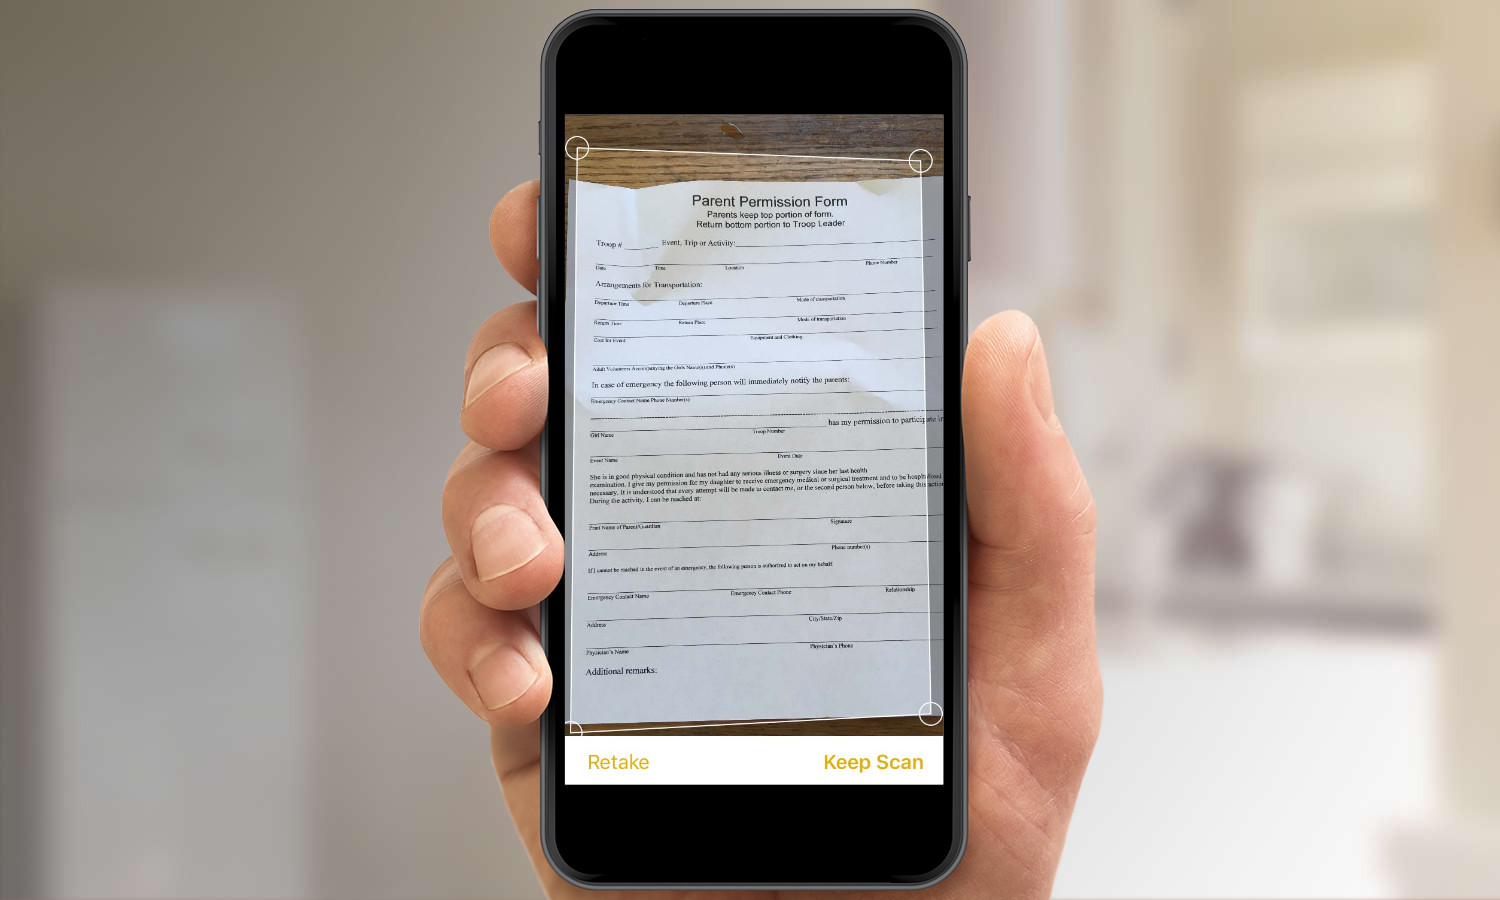
Notes’s scanning tools, which are accessed from the same button that lets you take or insert a photo, offer the ability to display the document in color, grayscale, black & white, or as a raw photo. Documents support multiple pages and you can also rotate a scan or manually crop its edges after you’ve scanned it. Like other scanning apps, Notes attempts to remove tilt and glare and other artifacts, as well as automatically detecting edges, to make the document look as good as possible with the least amount of effort.
Scanned documents appear embedded in the note in which you inserted them, though you can use iOS’s Share menu to send them to other apps or people. You can also use the Markup tools in the Share menu to sign scanned documents and then save them as PDFs.
How to Create a Table in Notes
The Notes app has gone from merely a place to enter text to a veritable multimedia smorgasbord of pictures, drawings, and even checklists. In iOS 11, Apple added the ability to insert simple tables into notes as well.
MORE: Best New iOS 11 Features
Here's how to create and edit those tables in Notes.
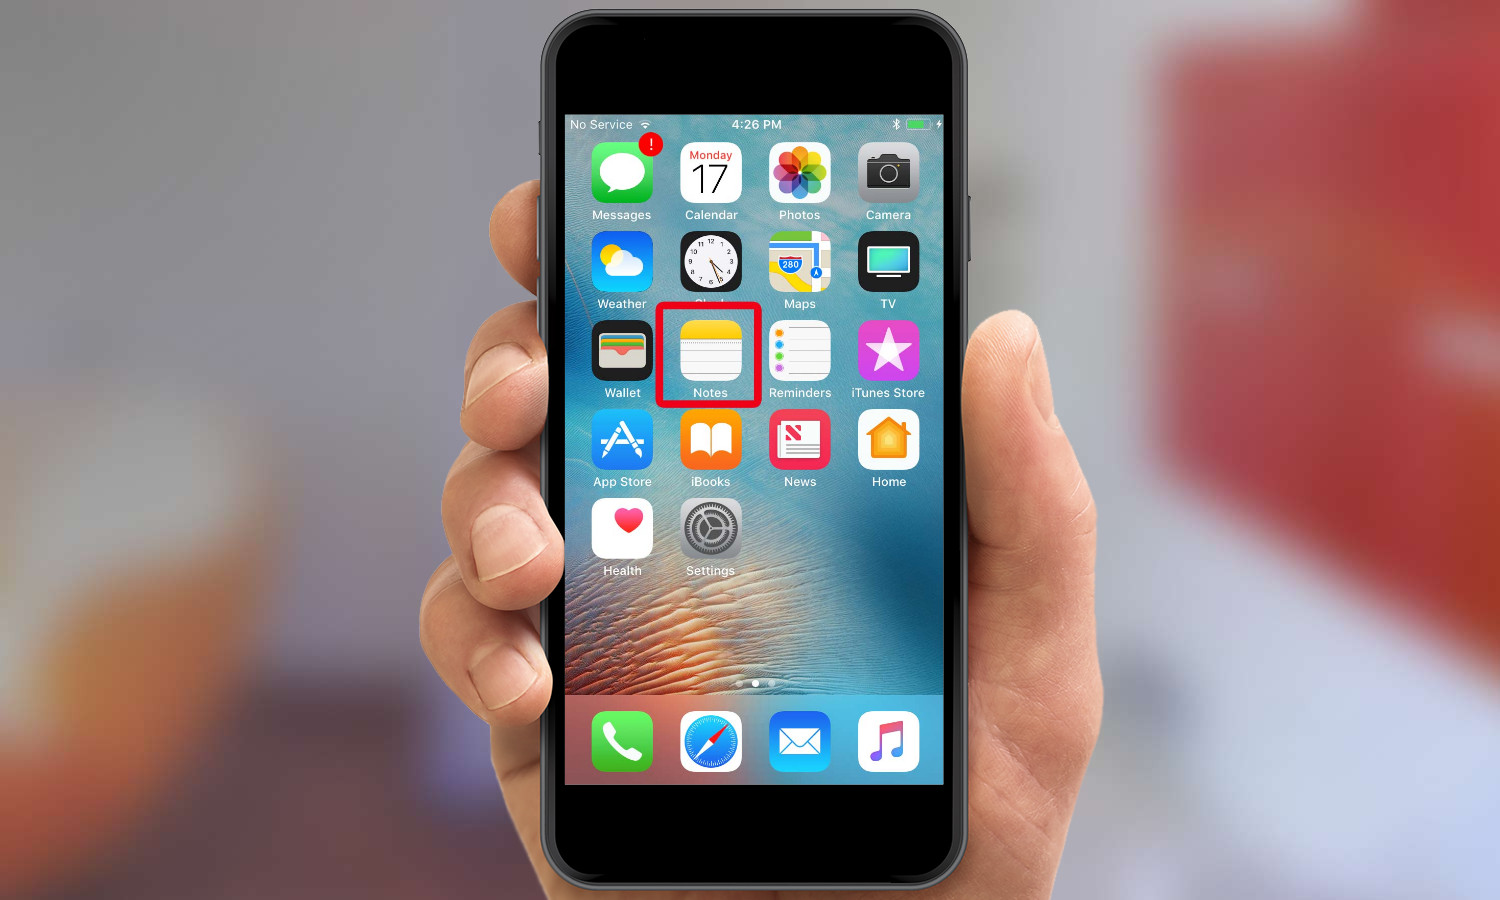
1. Open the Notes app.
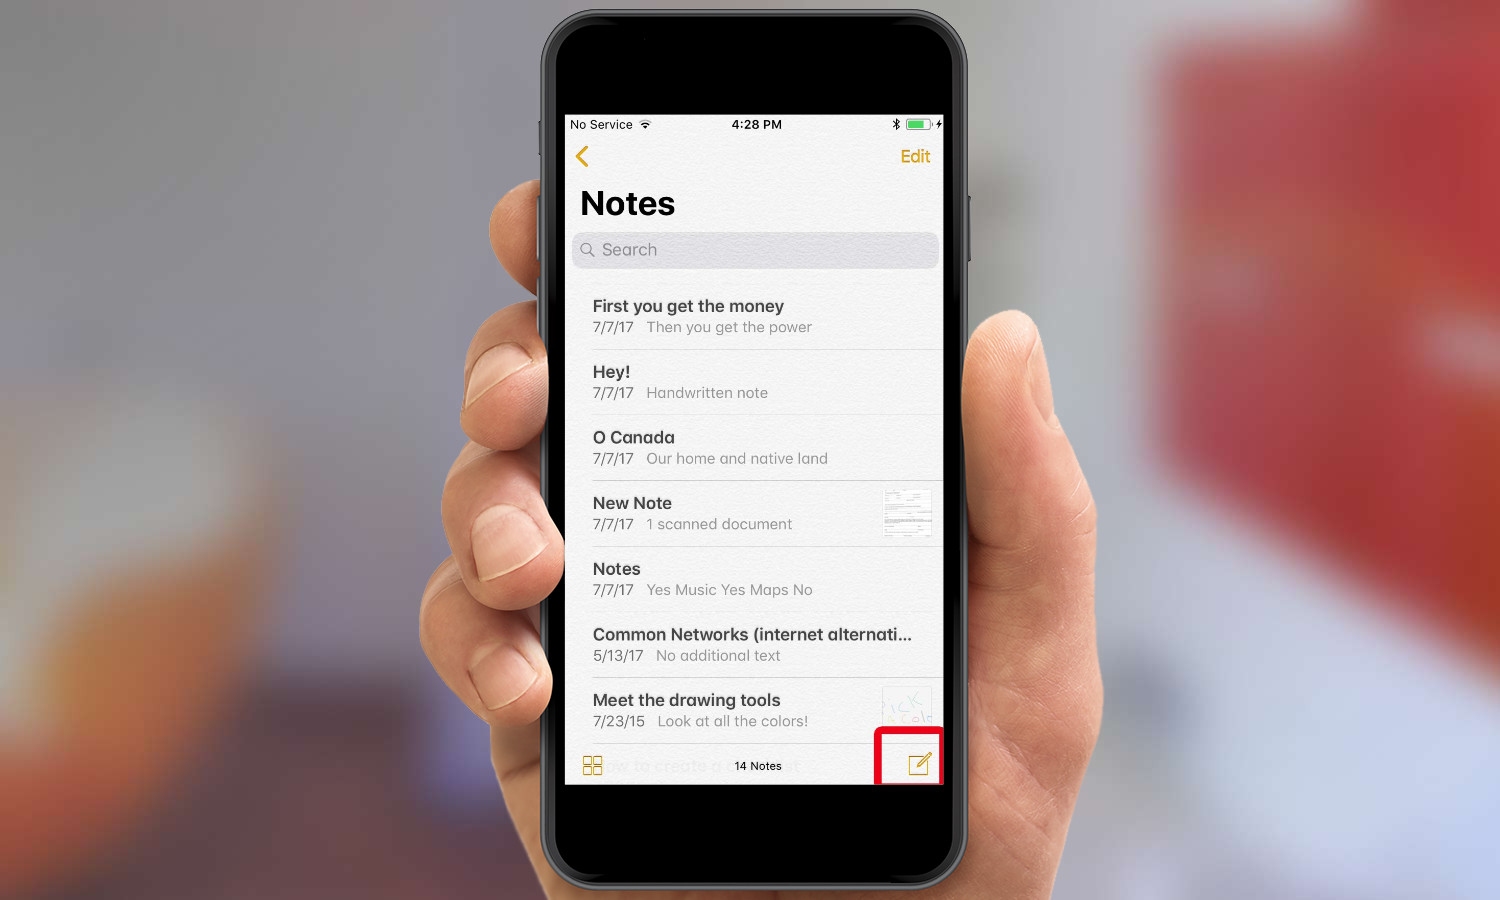
2. Create a new note or select an existing one. Within the note, tap wherever you'd like to insert the table.
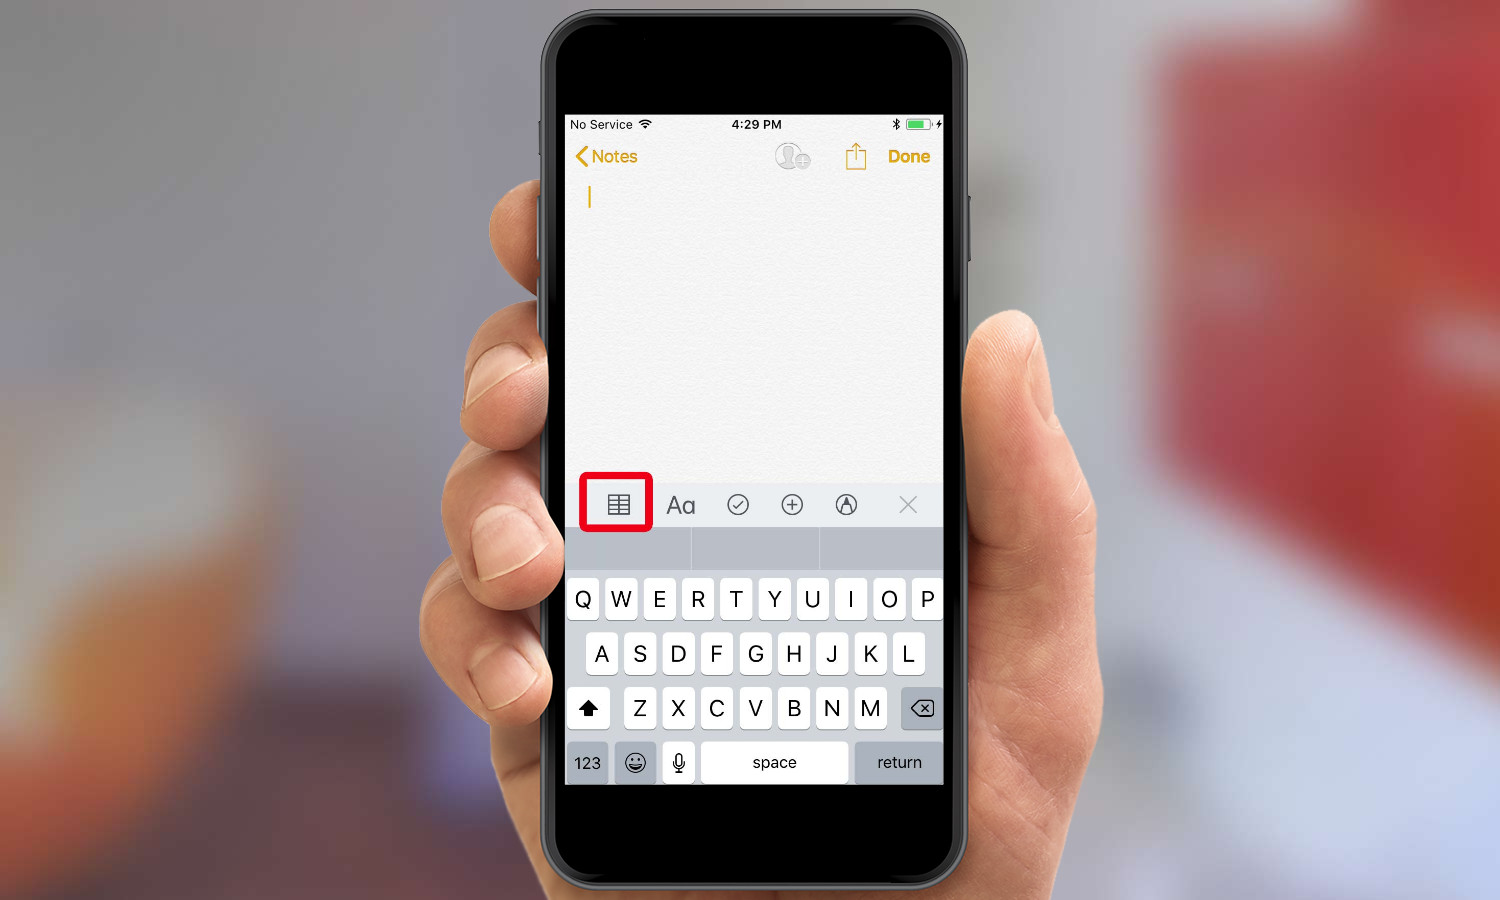
3. On the top left of the keyboard, tap the New Table button. (It looks like a four-by-two grid.) If that option doesn't appear, tapping the plus button (+) will bring up those formatting options.
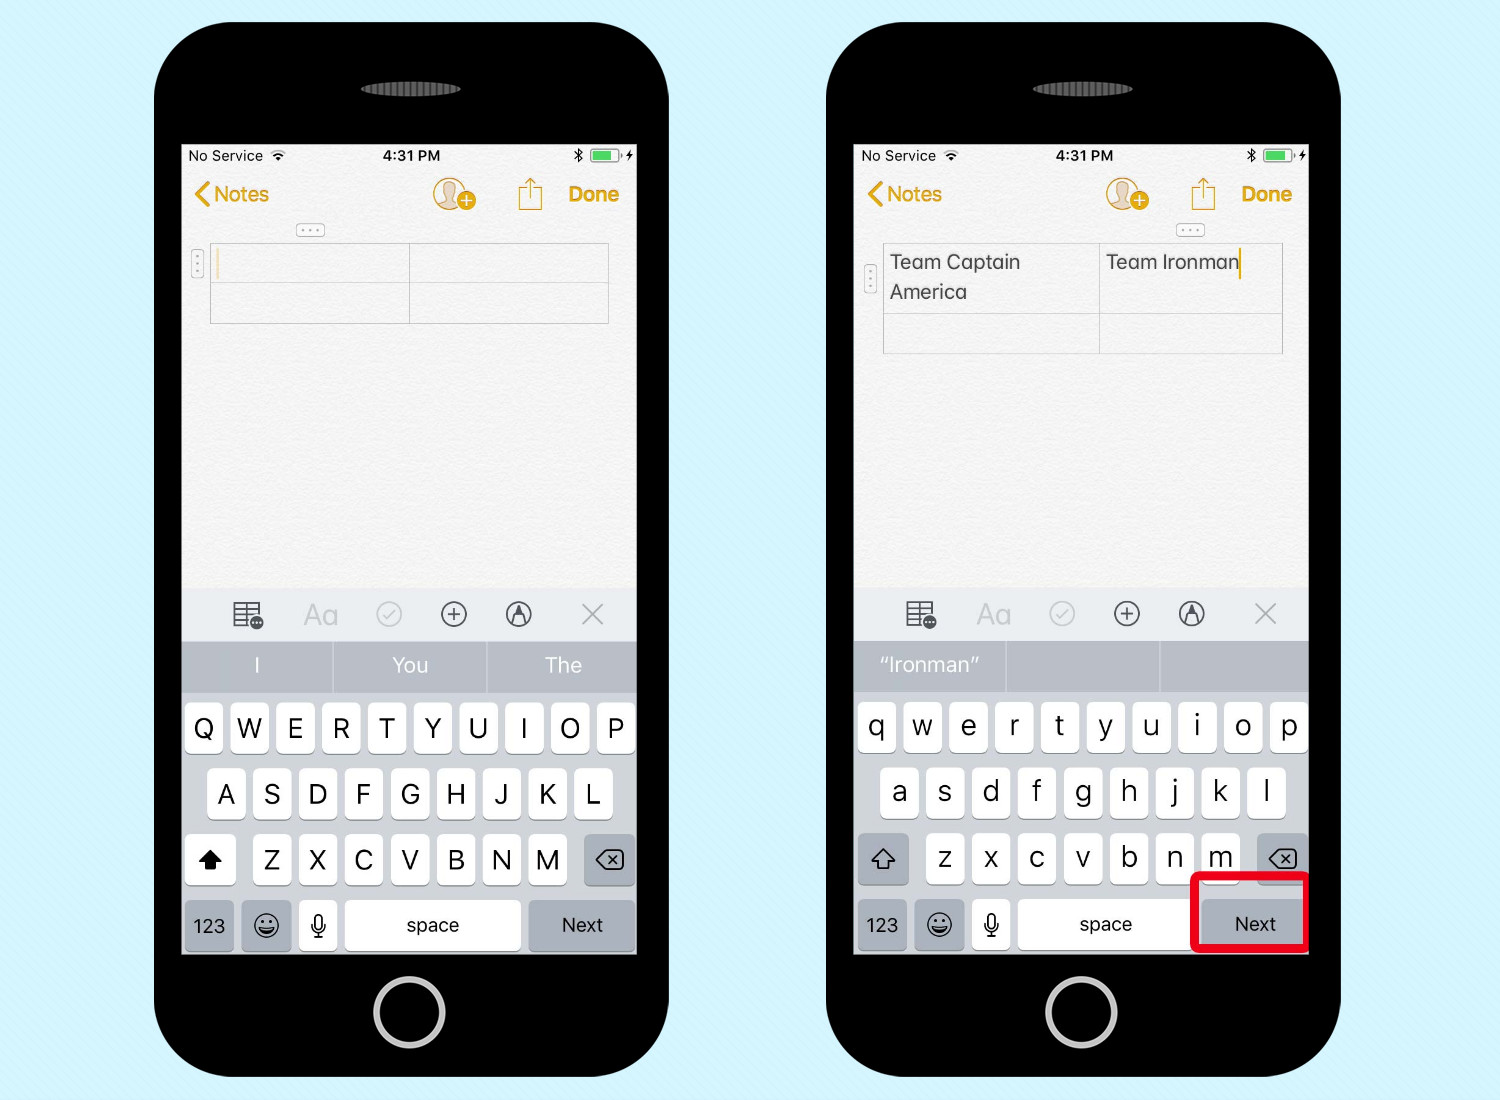
4. Type to enter text in the grid; you can advance to the next cell by tapping the "Next" key on the keyboard. (It's where the Return key usually is.) If you hit Next and there are no more cells, Notes will automatically add a new blank row at the bottom.
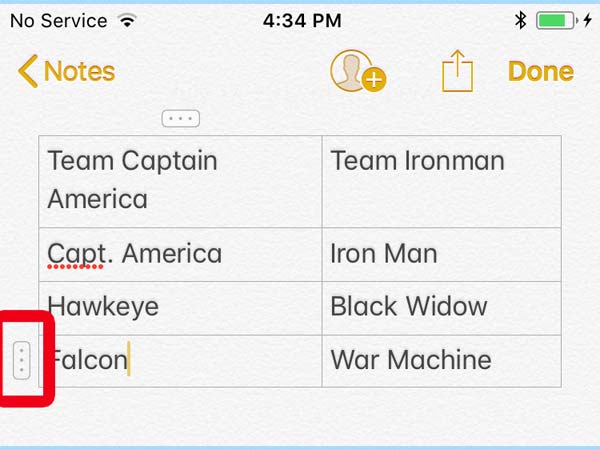
5. To add a new row somewhere else in the table, select text in the row above where you want to create the new row, and tap the handle (it looks like three vertical dots in a rectangle) to the left of that row. The row will now be selected and a popover will appear.
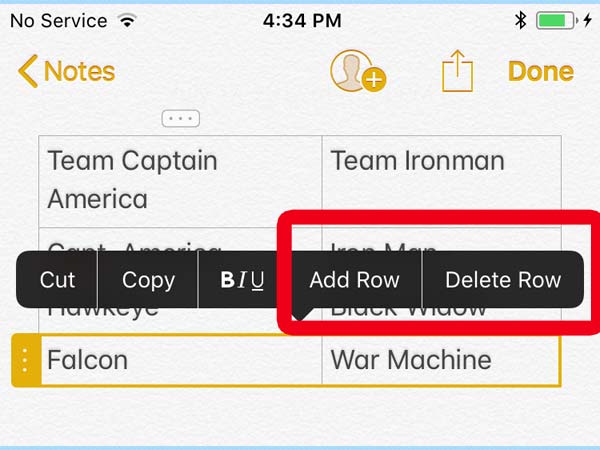
Tap Add Row and a new row will appear below it. You can also tap Delete Row to delete the currently selected row.
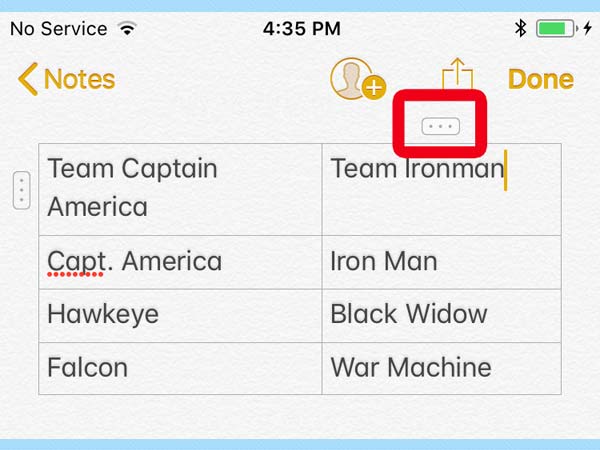
6. To create a new column, tap a cell in the row to the left of where you want the new column to appear, then tap the handle above that column.
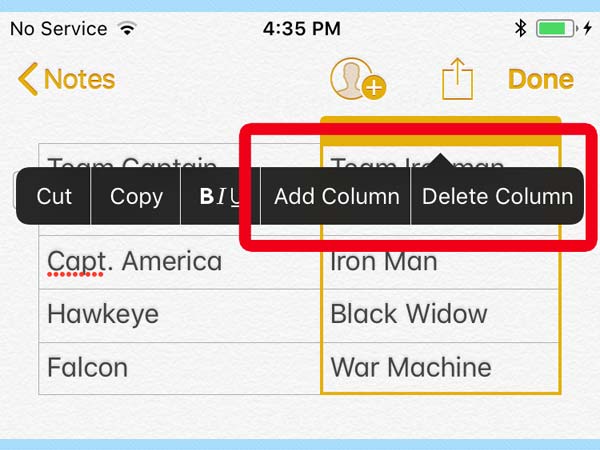
In the popover menu that appears, tap Add Column and a new column will appear to the right. You can also tap Delete Column to delete the currently selected column.

7. To select text in a column, tap and hold on a cell until the popover menu appears, then tap Select. Drag the handles of the selection over the cells you want to select; you can cut, copy, style, or delete the contents of those cells.

8. To delete an entire table, tap so that the insertion point is directly after the table. Then press the Delete key on the keyboard. (You can also select the table as if it were text by tapping and holding on the insertion point, then dragging to select the table.)
How to Scan Documents in Notes
Perhaps the most prominent new feature in iOS 11's Notes app is its newfound ability to scan documents using the camera on your iPhone. Scans can be embedded into notes, as well as shared to other apps or contacts, and you can also use iOS's built-in tools to mark them up. That latter feature comes in especially handy should you need to sign a document.
Here's how to turn the Notes app into your own personal scanner on your iPhone.
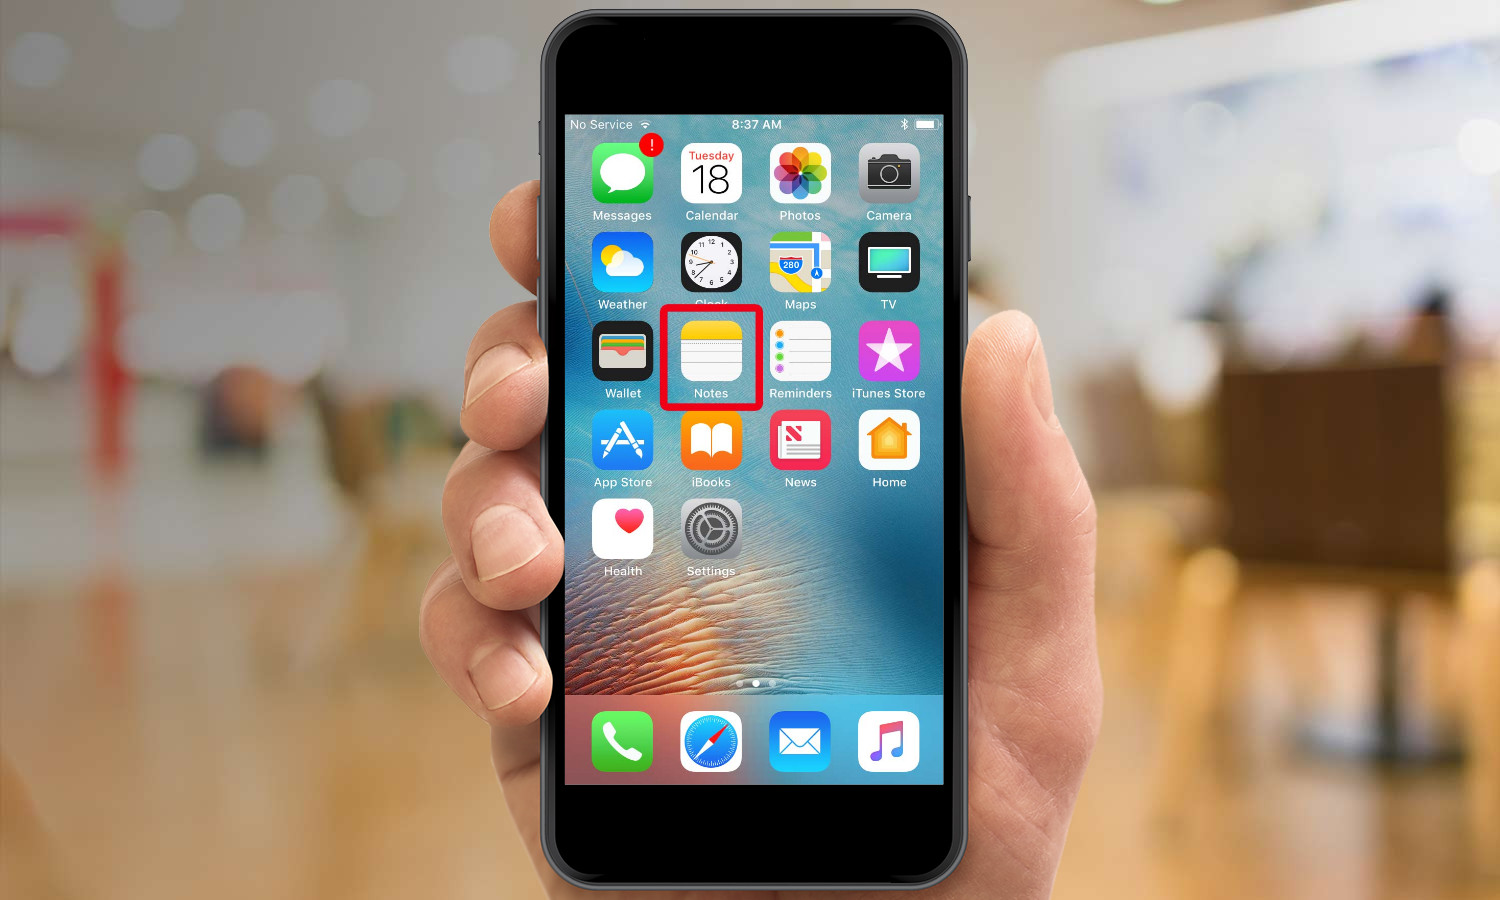
1. Open Notes.
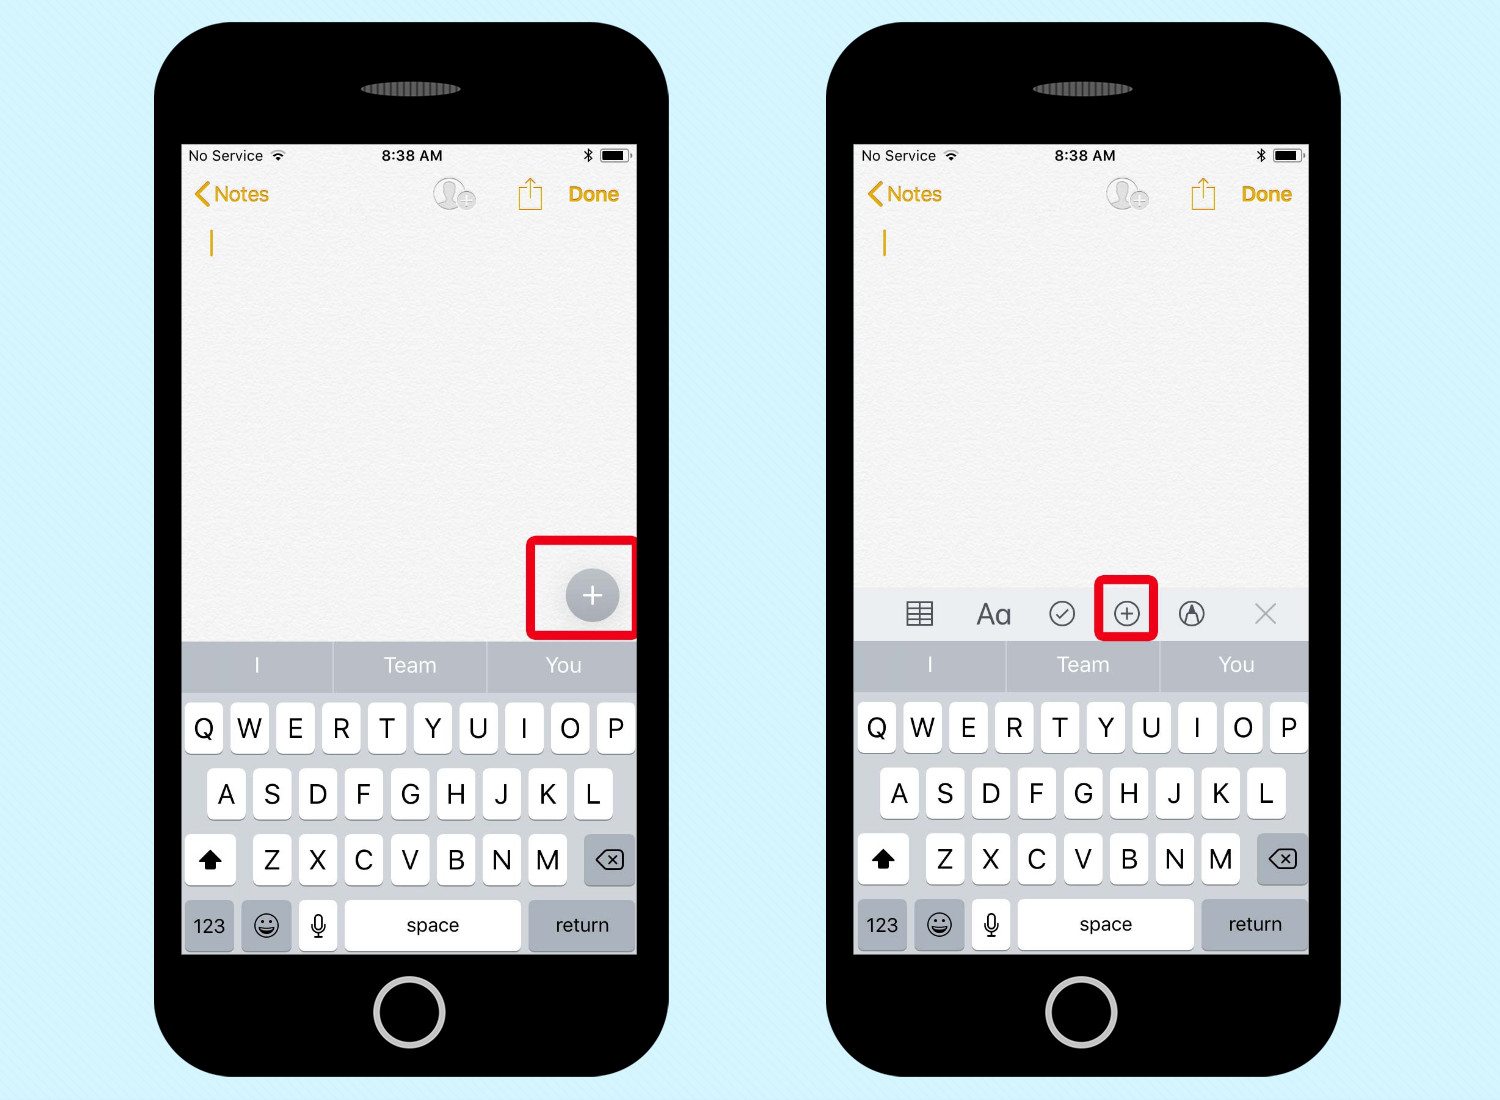
2. In a new or existing note, tap the big Plus (+) button to bring up the formatting menu. On the strip of icons that appears above the keyboard, tap the Plus icon.
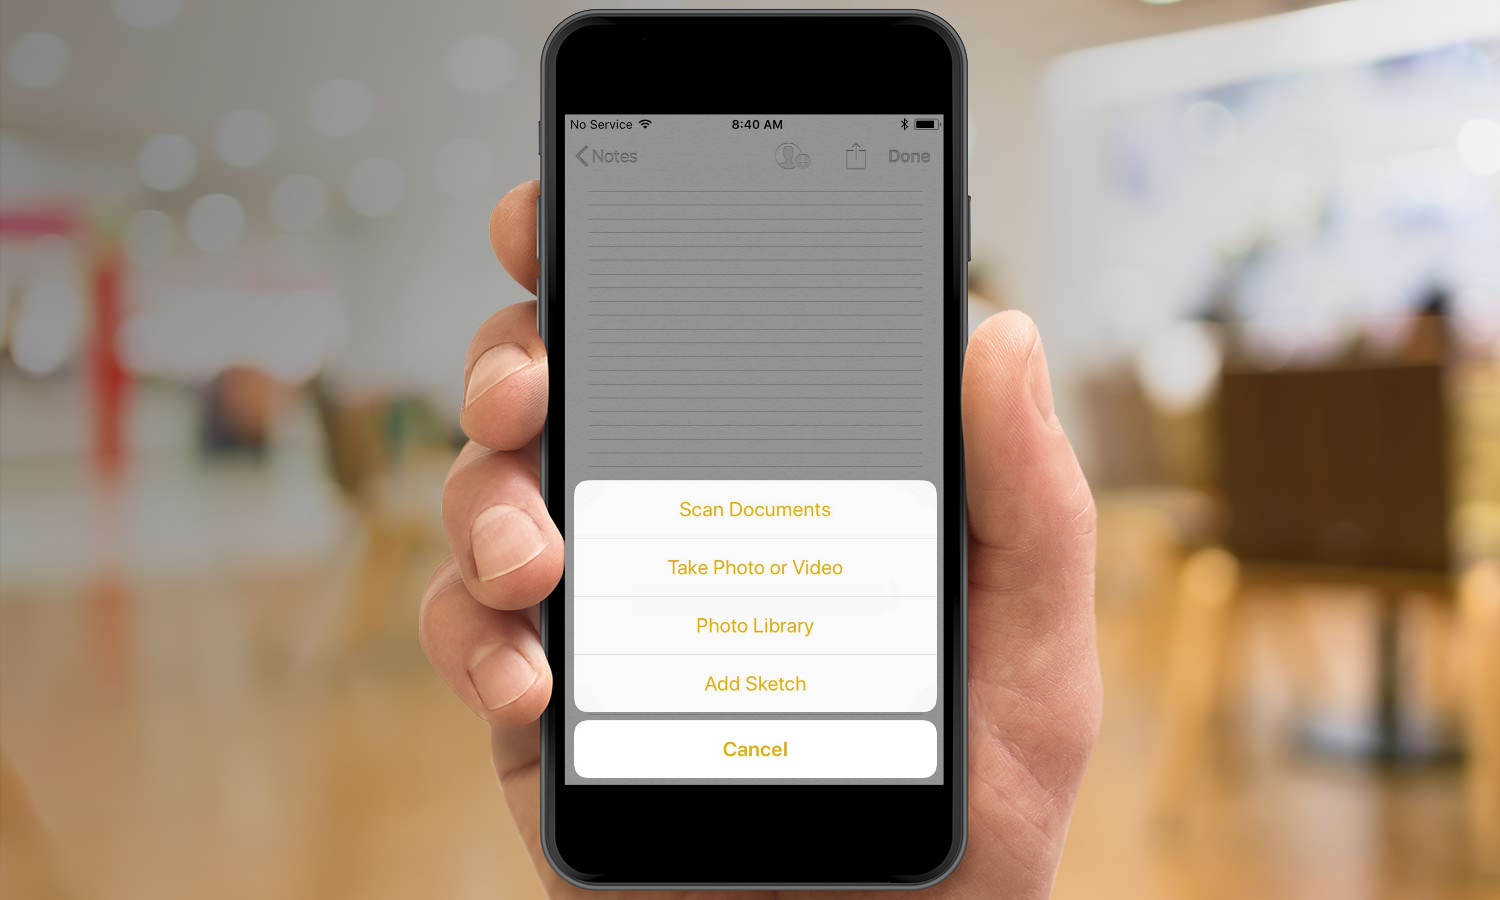
3. In the menu that appears, tap Scan Documents. When you do, the camera interface will appear.
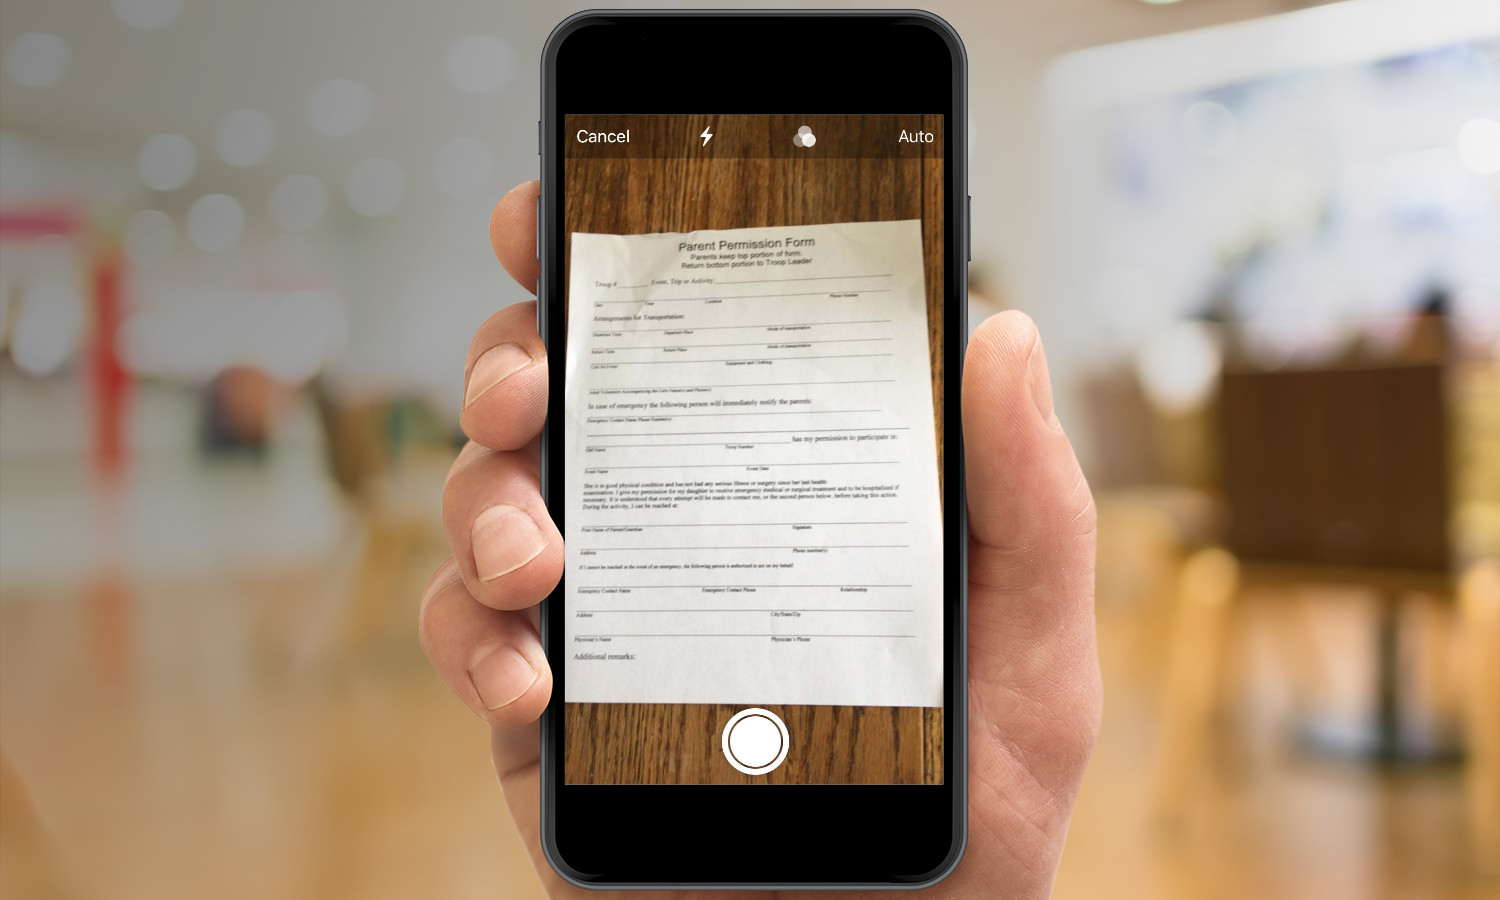
4. Snap a photo of the document you wish to scan by tapping the shutter button.
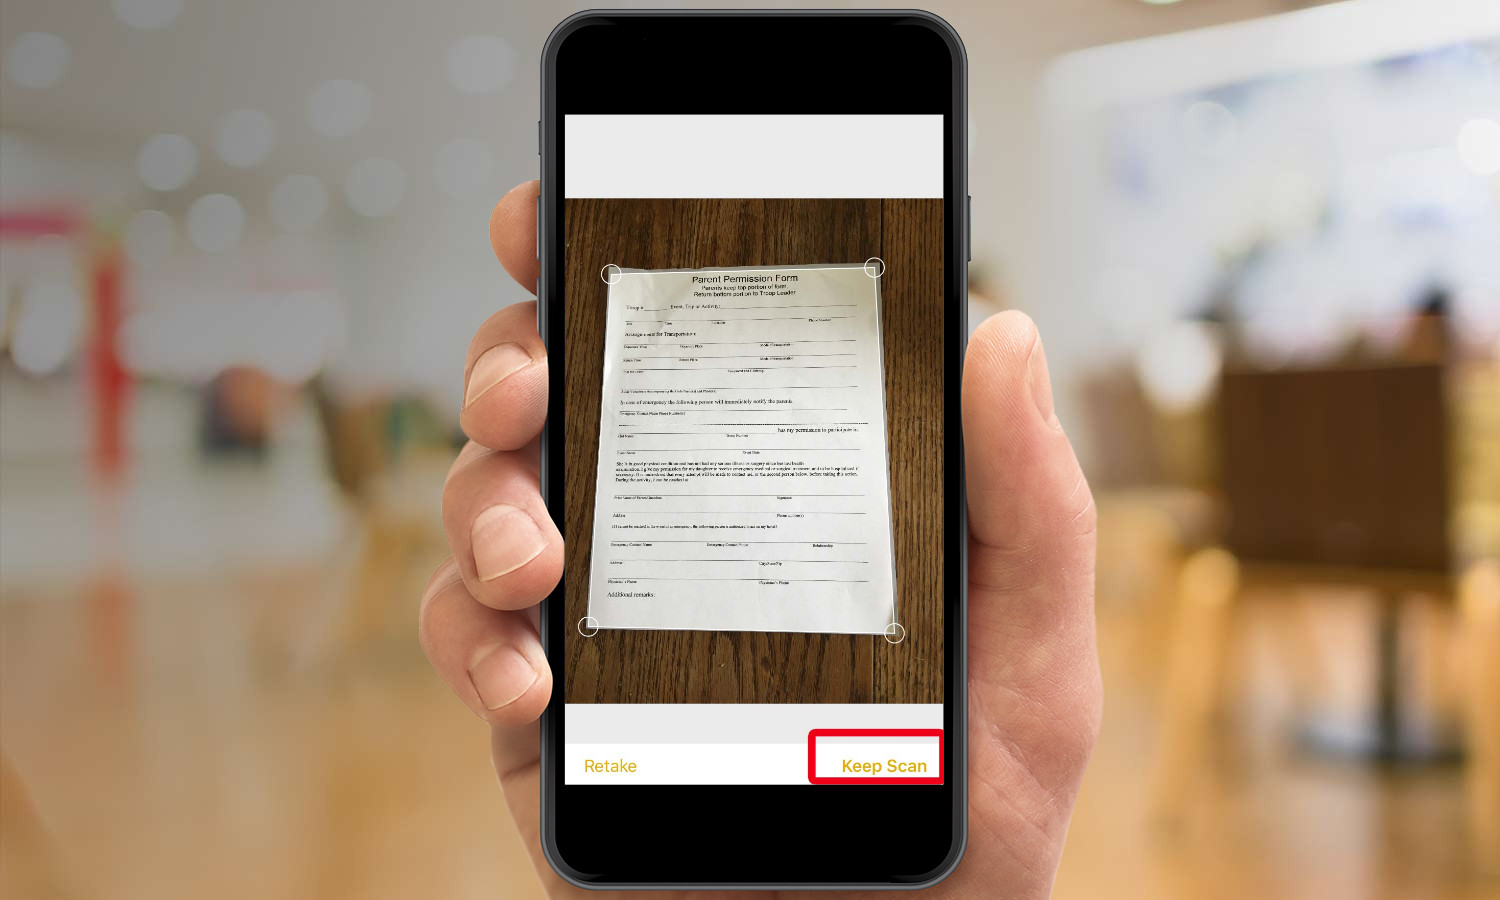
5. Once you've taken the scan, you can retake the scan or adjust what's been scanned by dragging the corners of the white box around to capture more of the document. Tap the Keep Scan button at the bottom of the screen if you're done.

6. You have the option of taking another scan as you did in Step 5, if you're working with a multipage document. Otherwise, tap Save to complete the scanning.
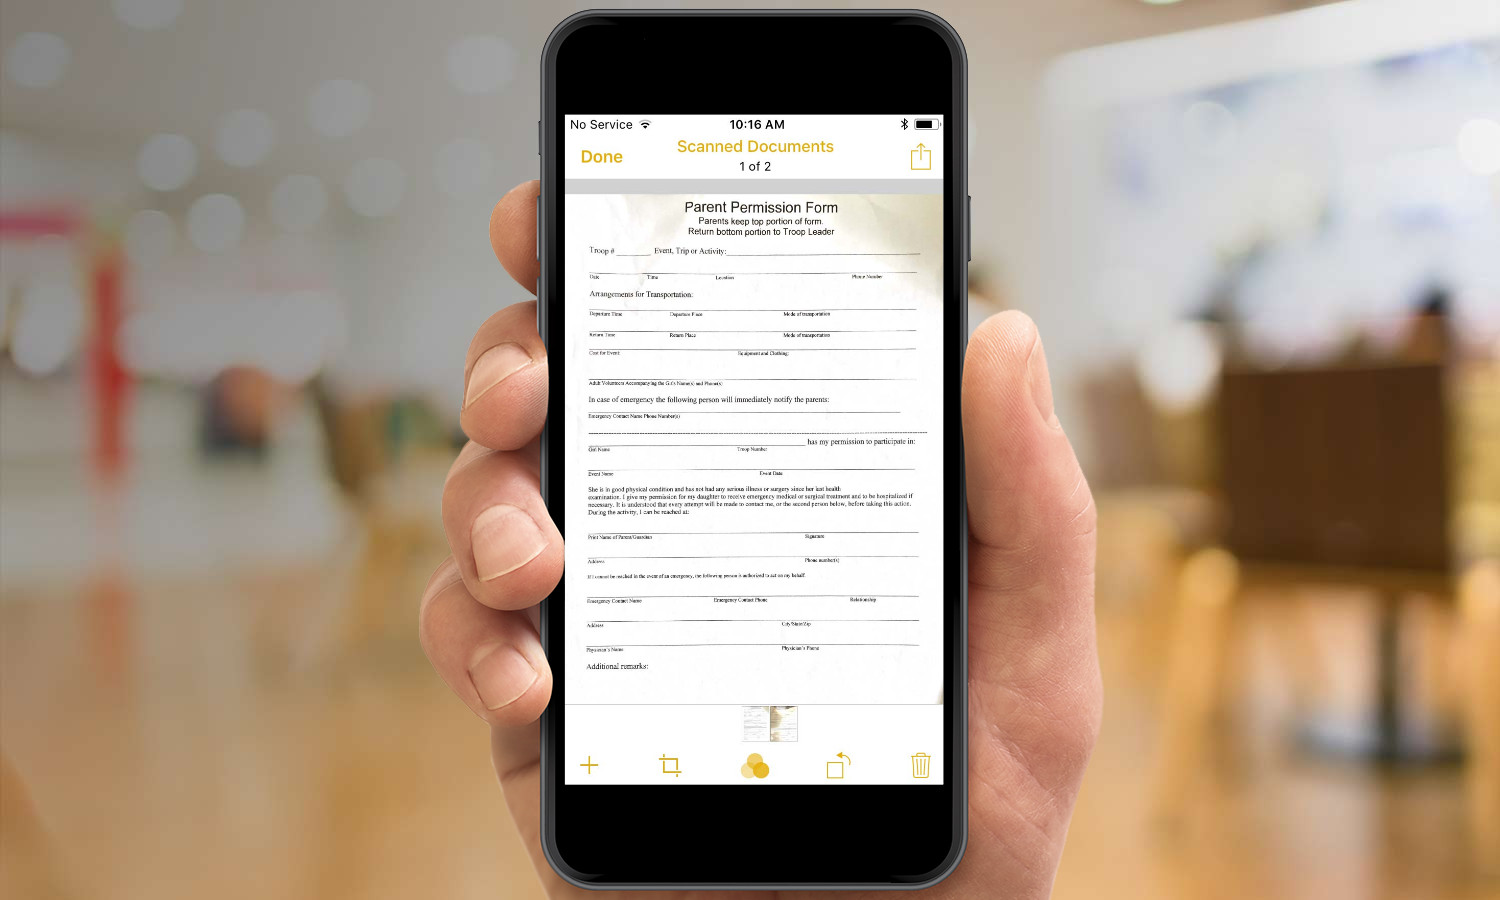
Your scan will now appear in a note. Tapping on the scan takes you to an editing screen, which displays the resulting image, along with several editing tools. You can Delete the scan by tapping the trash icon or use the other icons at the bottom of the screen to adjust and edit your scanned document.

Moving from left to right, the Plus button lets you take more scans; the Crop button lets you readjust the area captured by your scan; the Filters button lets choose between Color, Grayscale, Black & White, and Photo; and the Rotate button changes the rotation of the scan in 90-degree increments.
How to Sign a Scanned Document
One of the big benefits to scanning documents into your phone is you turn them into signable PDFs. Here's how that works in the iOS 11 version of Notes.
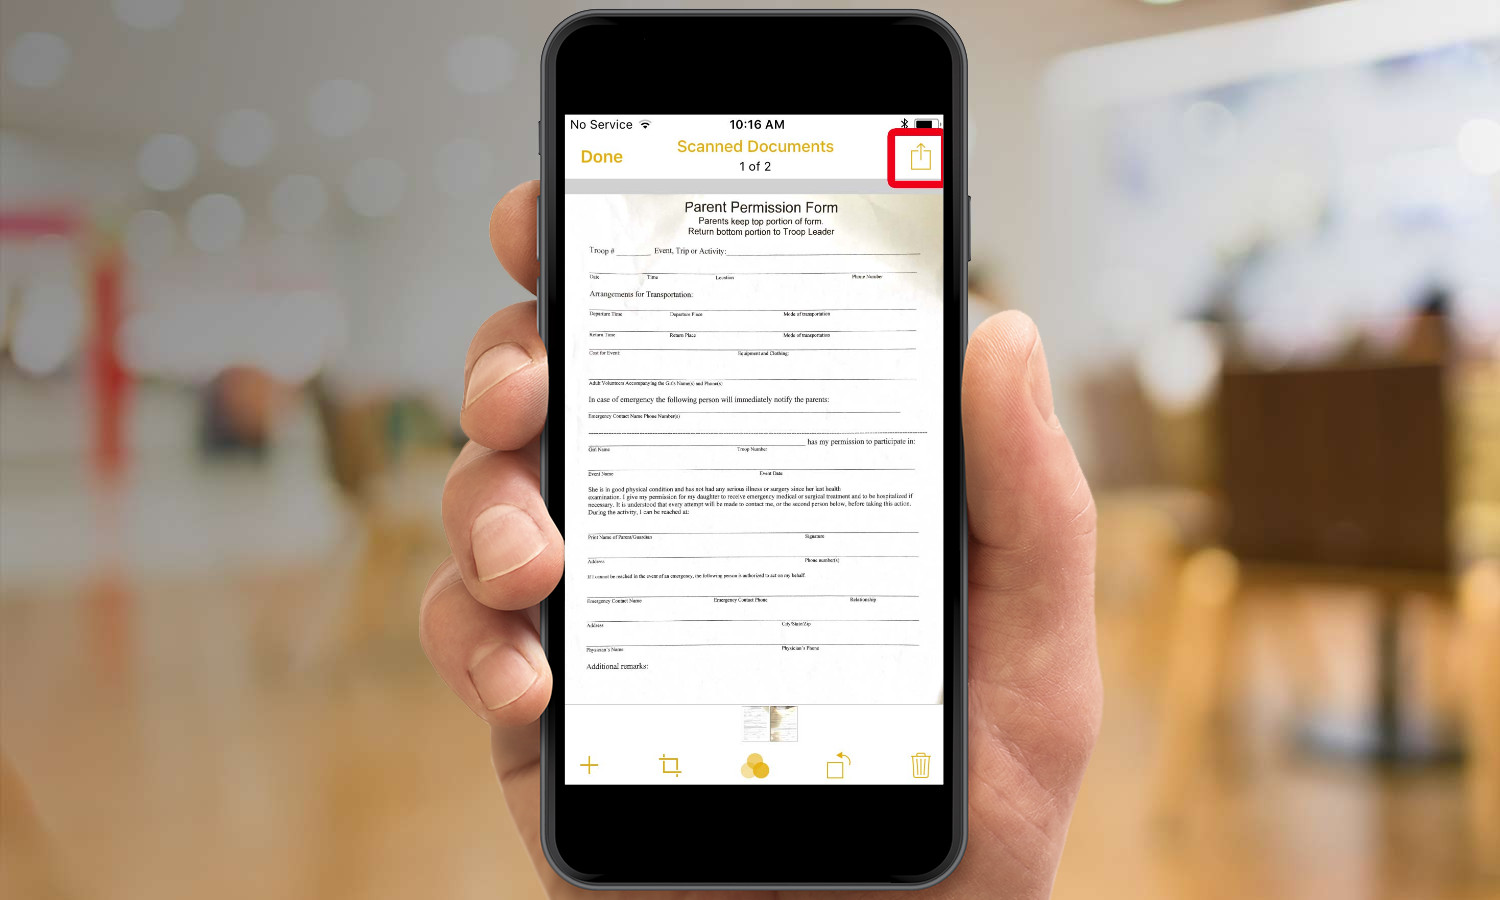
1. Select the scanned document in your note and tap the Share button in the upper right corner.
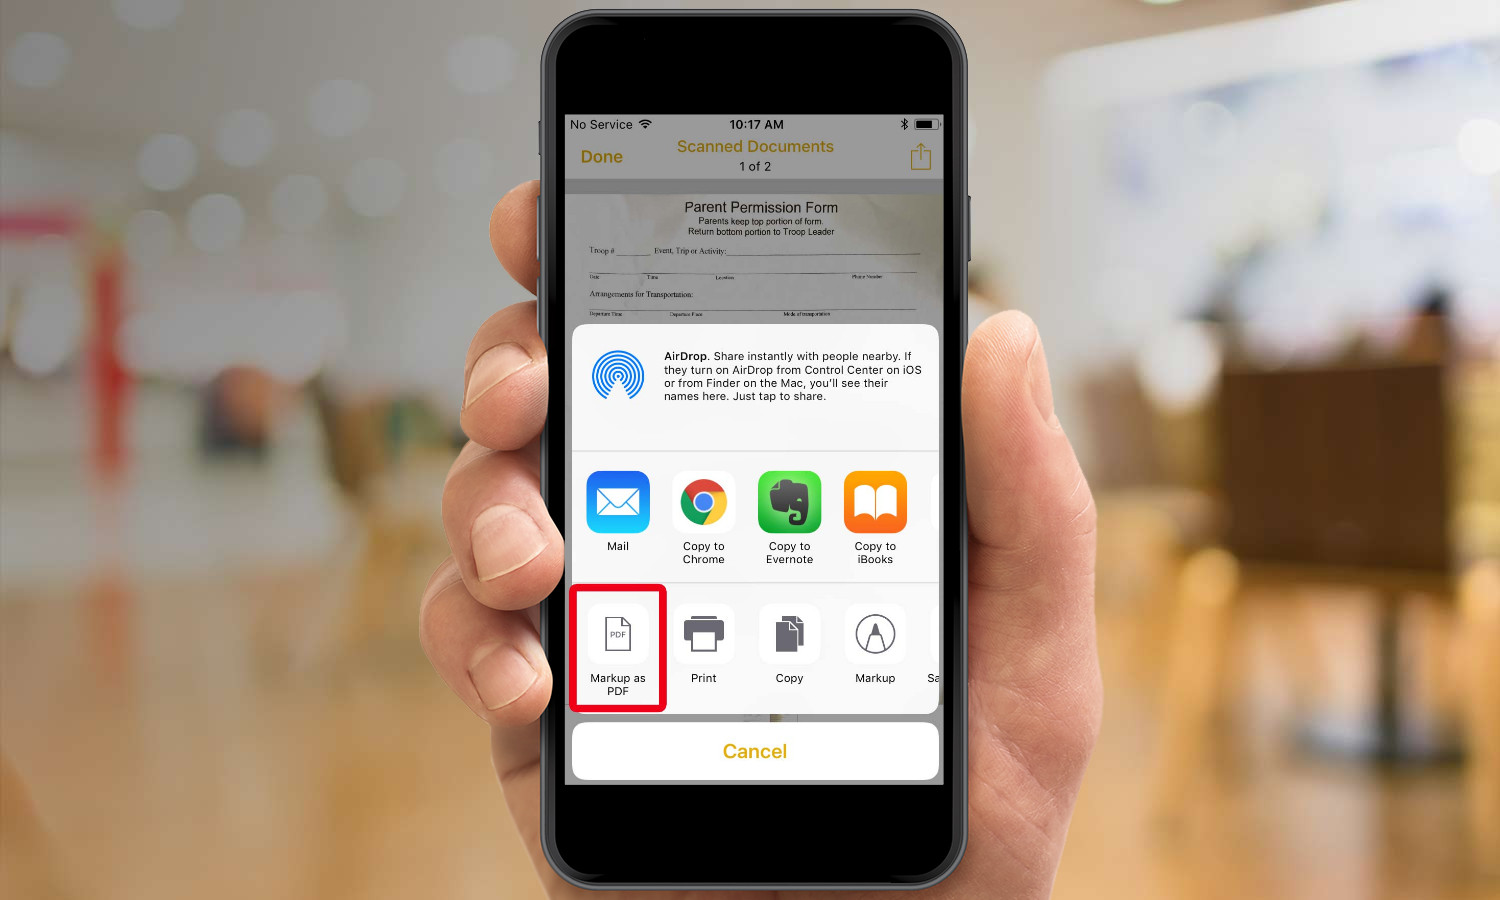
2. Select Markup as PDF.
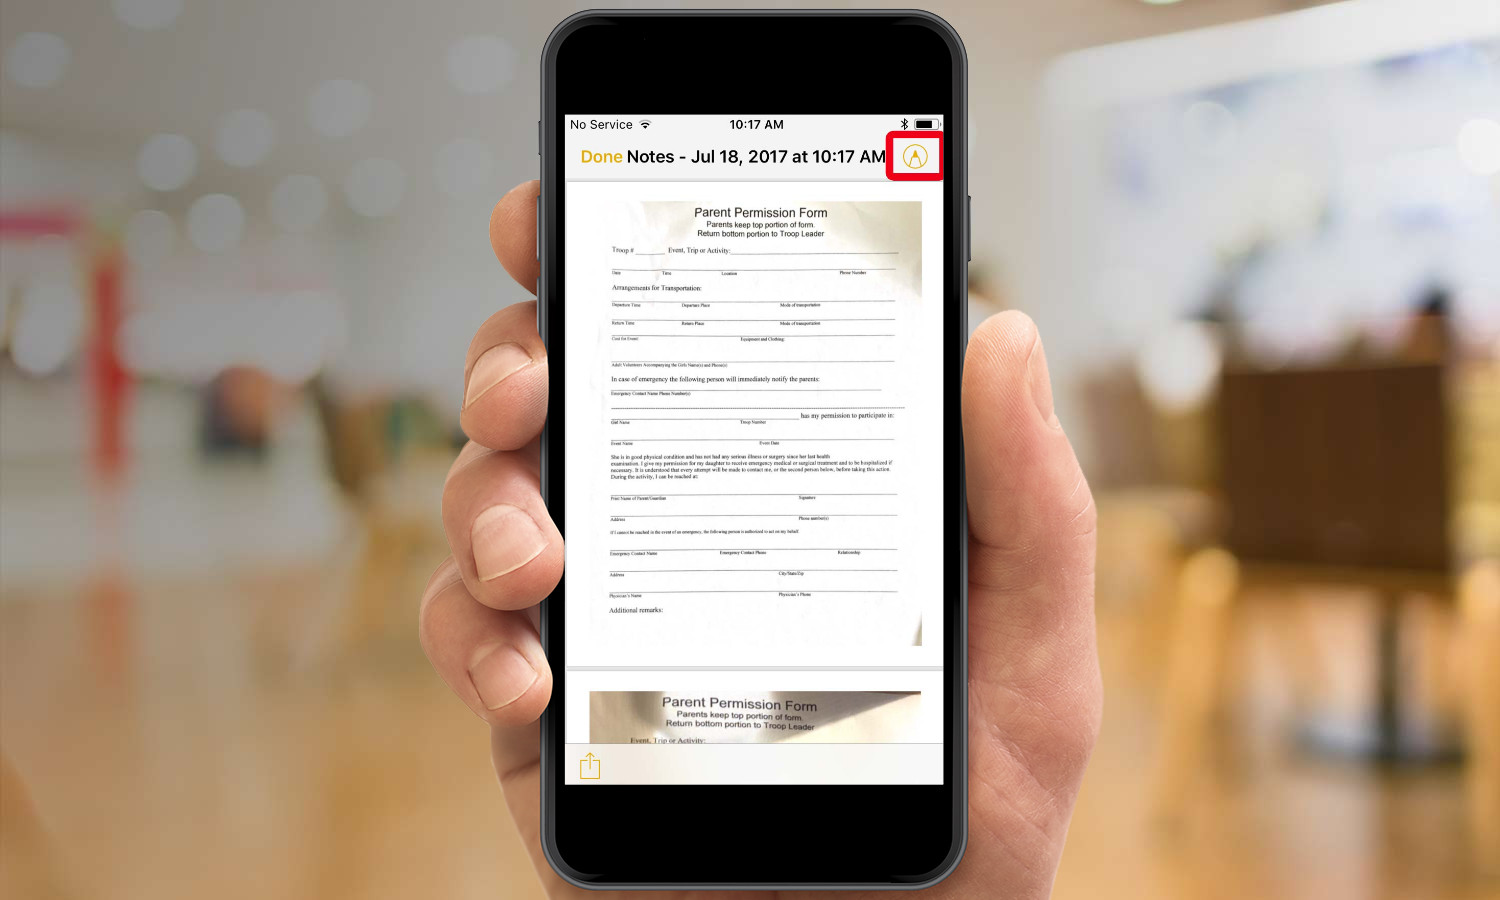
3. Tap the markup icon in the upper right corner of the screen. A row of markup tools will appear on the bottom.
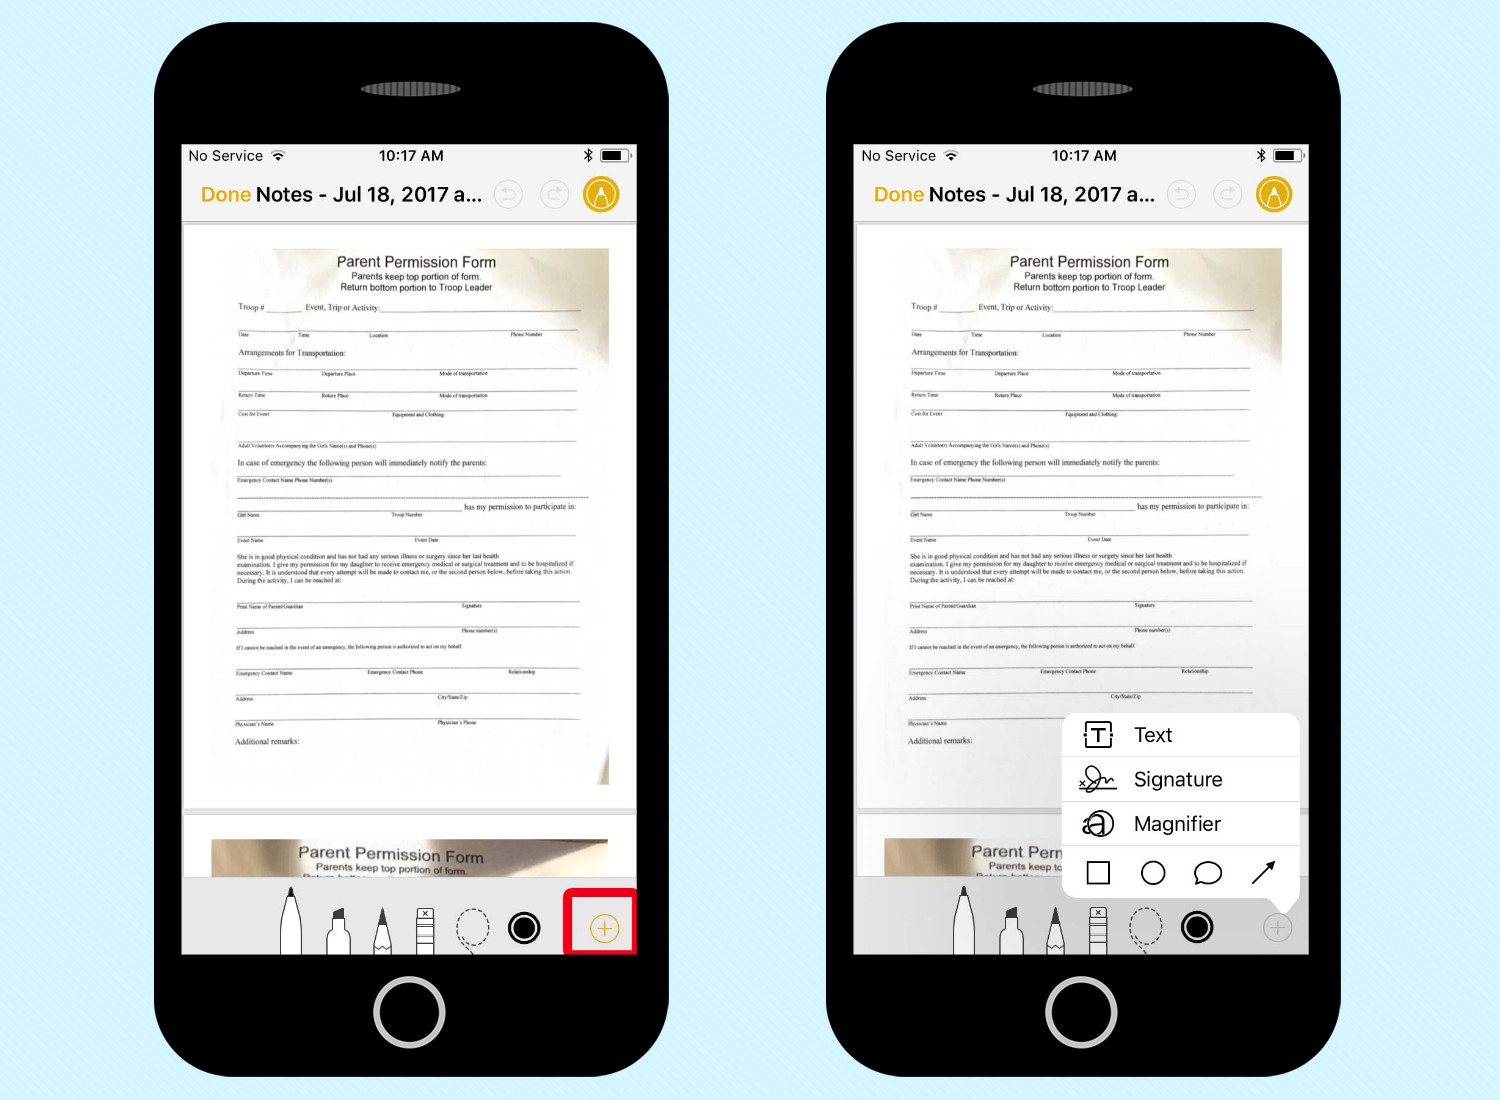
4. Tap the Plus icon on the far right of those markup tools; on the ensuing pop-up menu, select Signature.
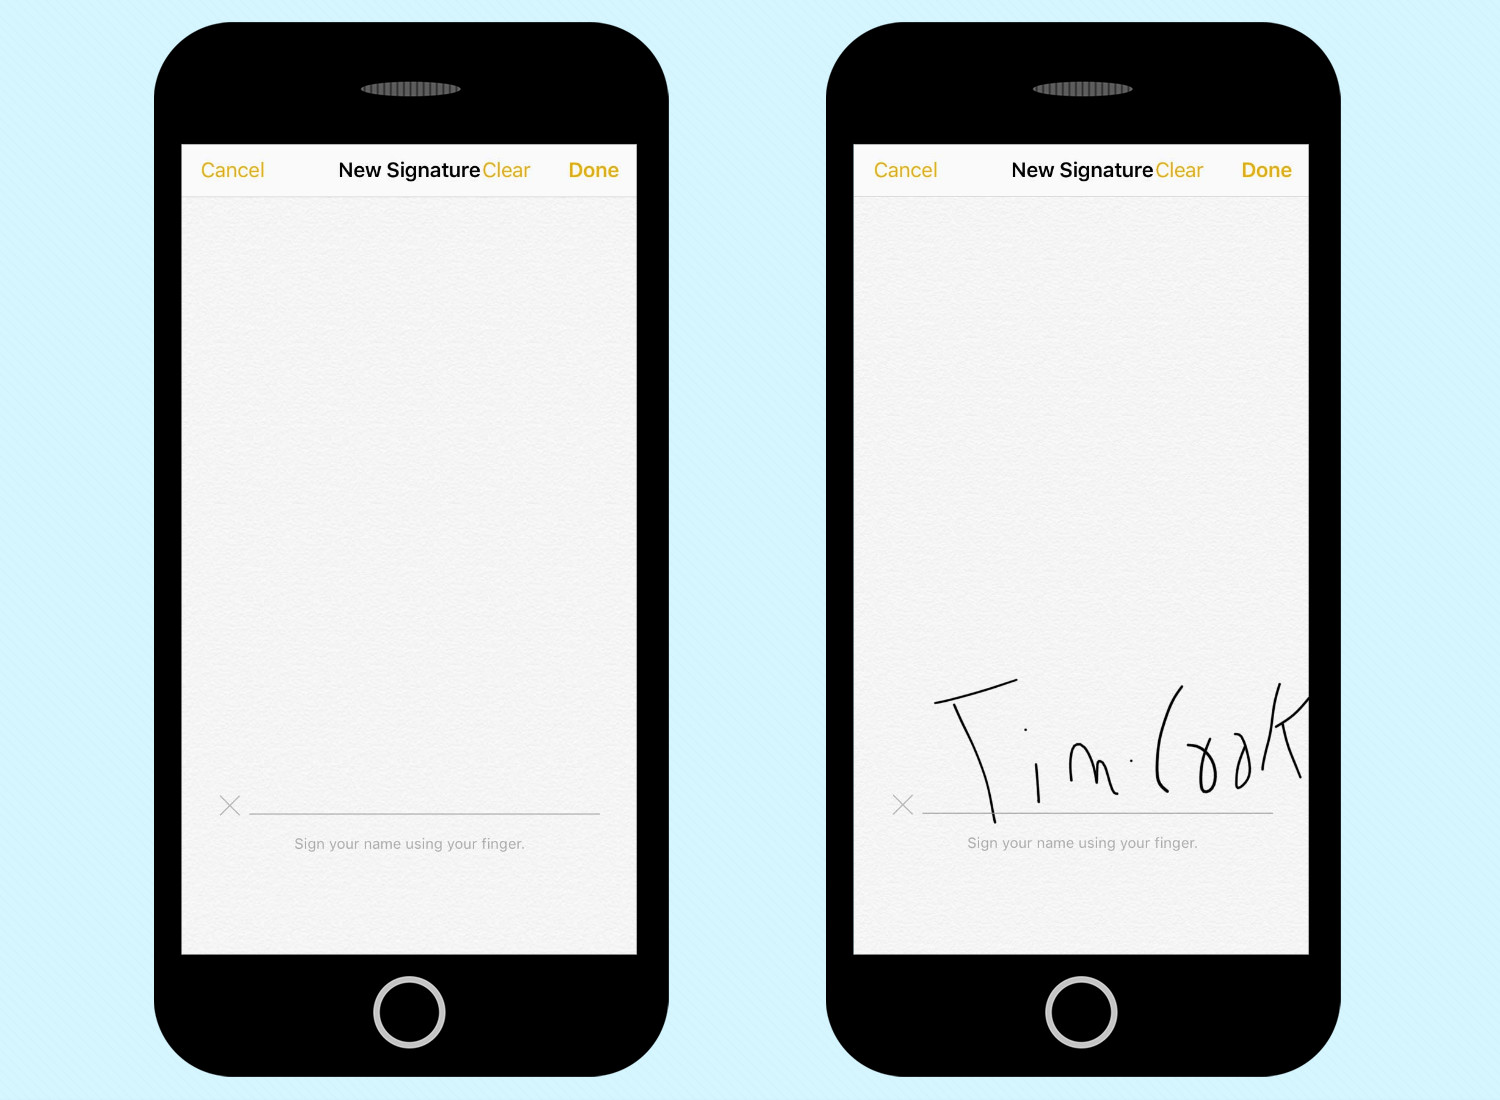
5. Use your finger to sign your name in the space provided and hit Done. (Once you save a signature, it's stored for future use.)

6. After you hit Done, your signature will appear on the scanned document. Drag it to where you want to place it on the document, and use the four handles to resize the signature to your liking.
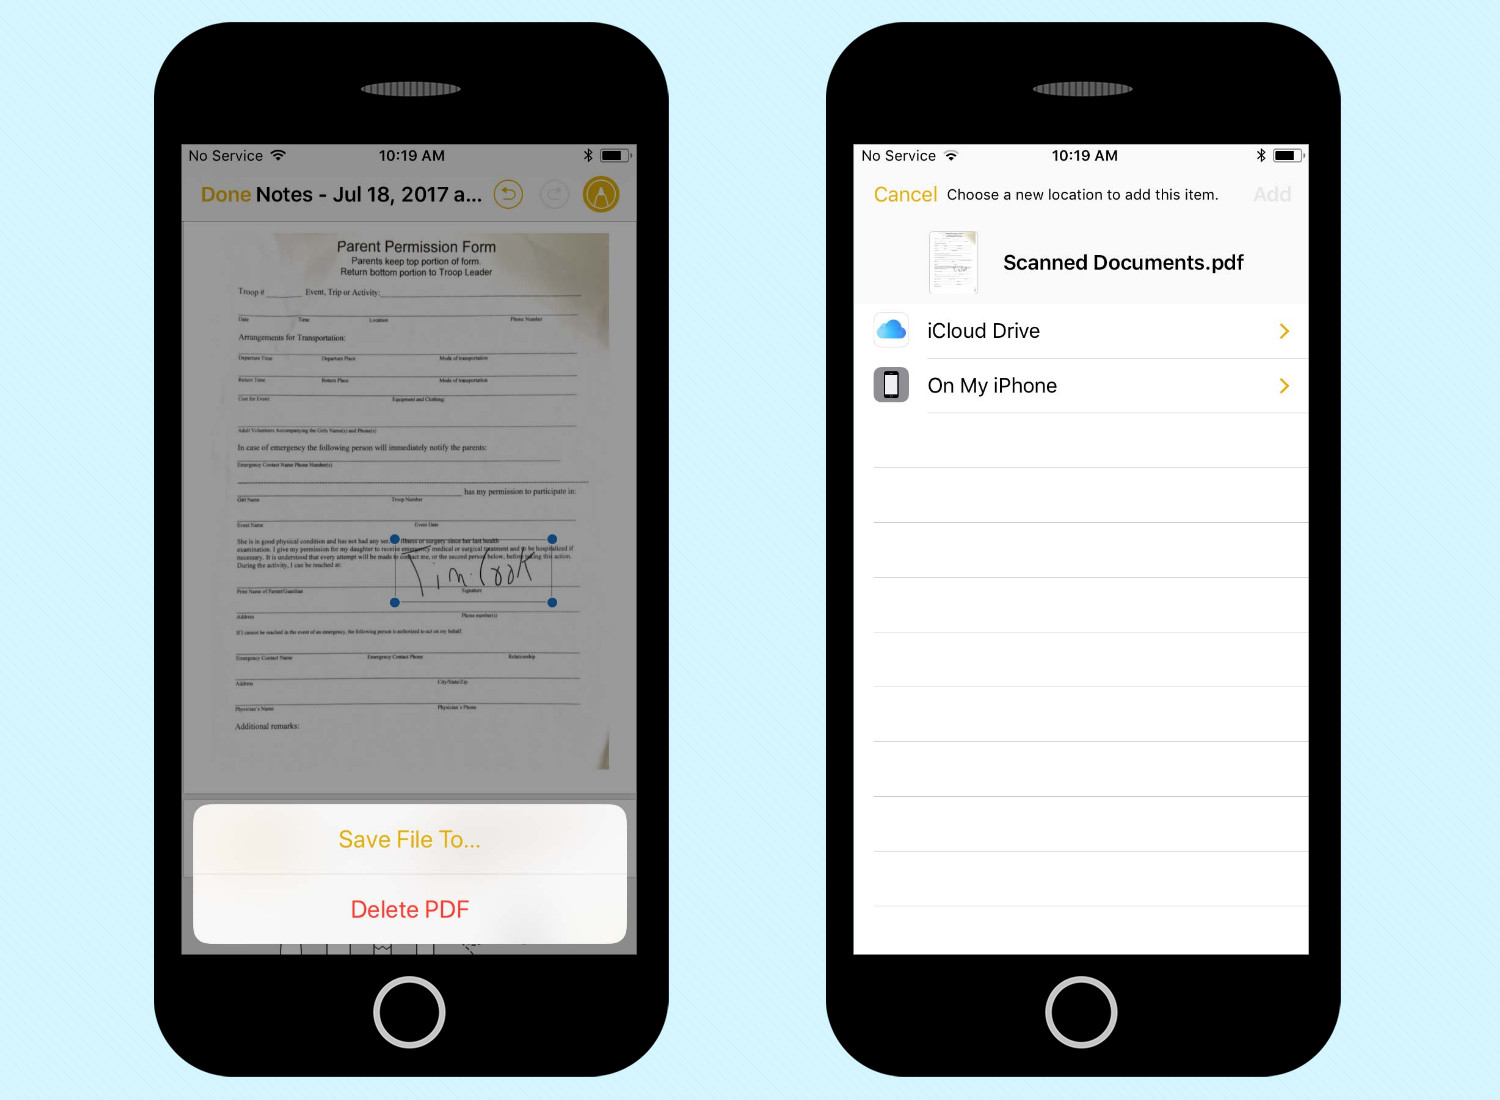
7. Tap Done, and then tap Save File To... so that you can save the new PDF containing your signature to either your iPhone or your iCloud Drive.
How to Enable Lines and Grids in Notes
You used to be able to set Notes to any background you want, as long as it was paper-themed and off-white. But now, in iOS 11, Apple has added the ability to add ruled backgrounds for handwriting and drawing.
Here's how to enable the Lines & Grids feature for Notes.
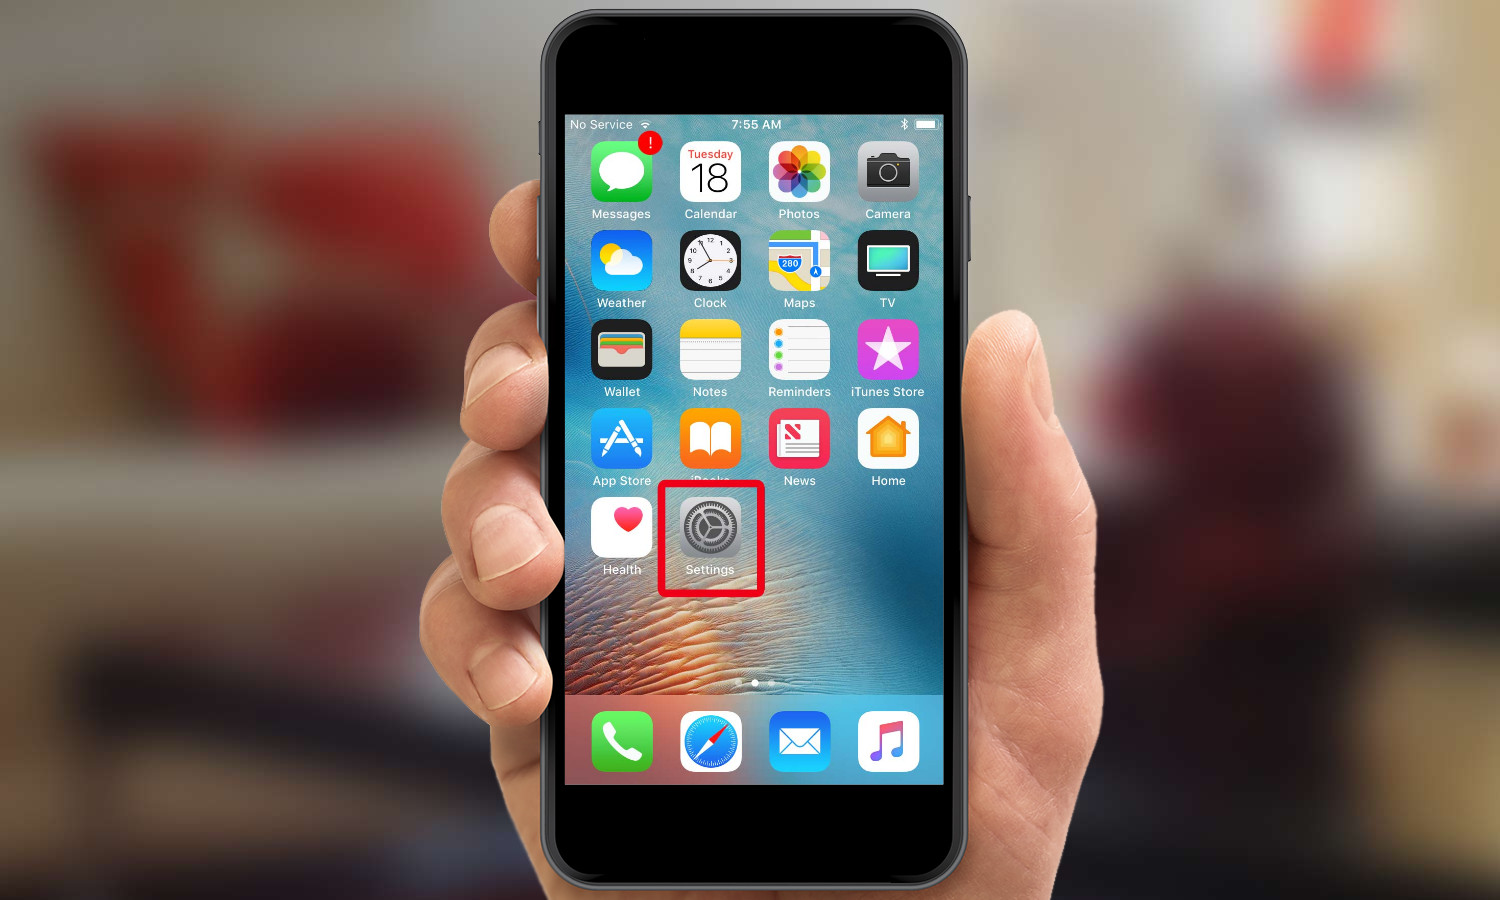
1. Open Settings.
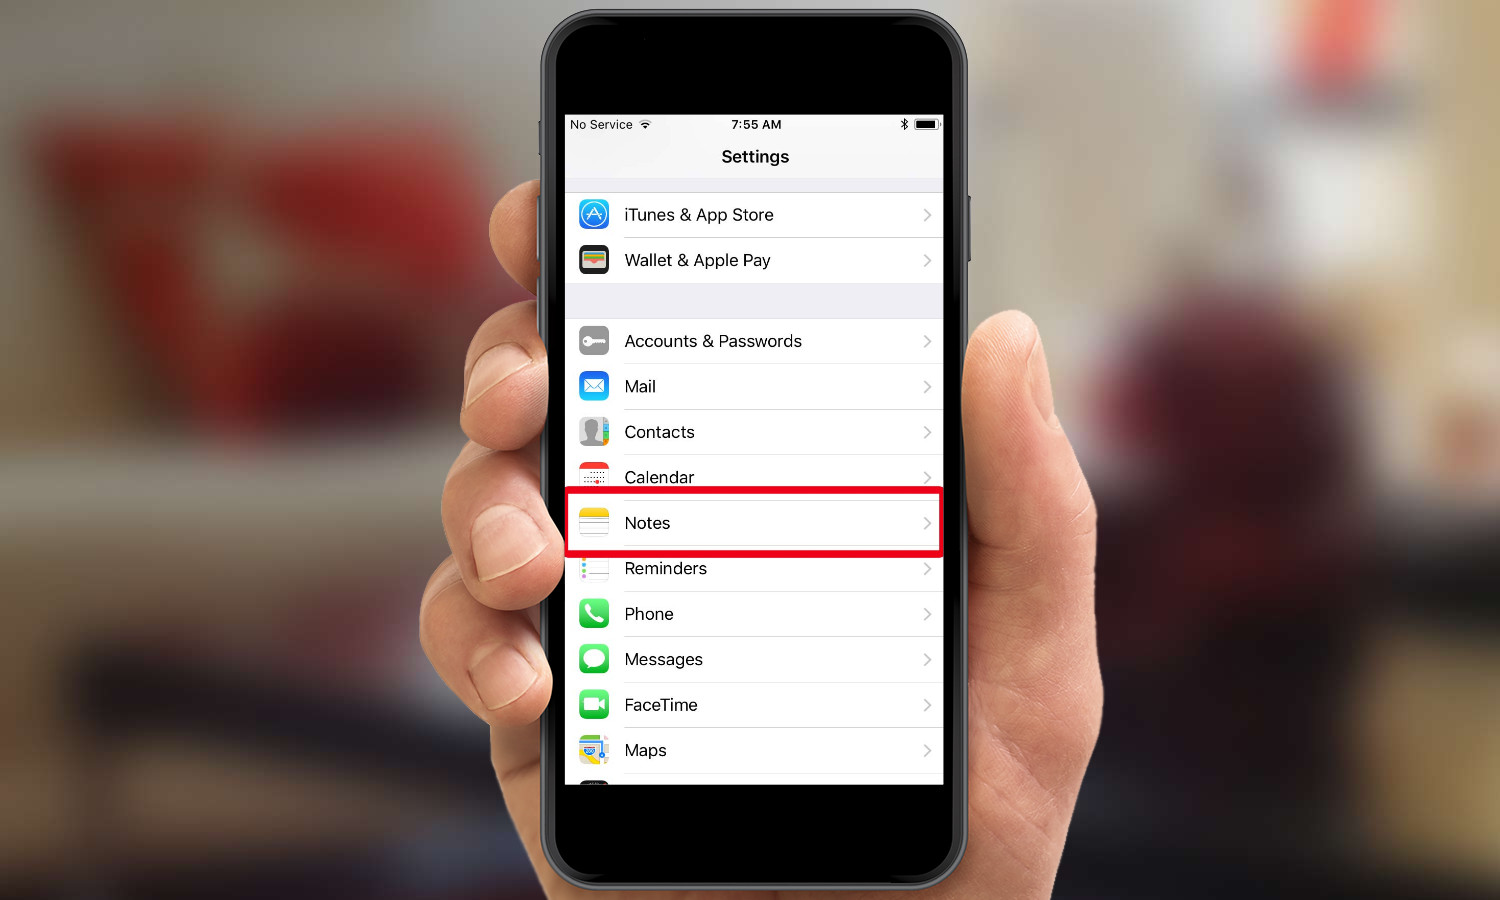
2. Select Notes.

3. Tap Lines & Grids under the Viewing Heading.
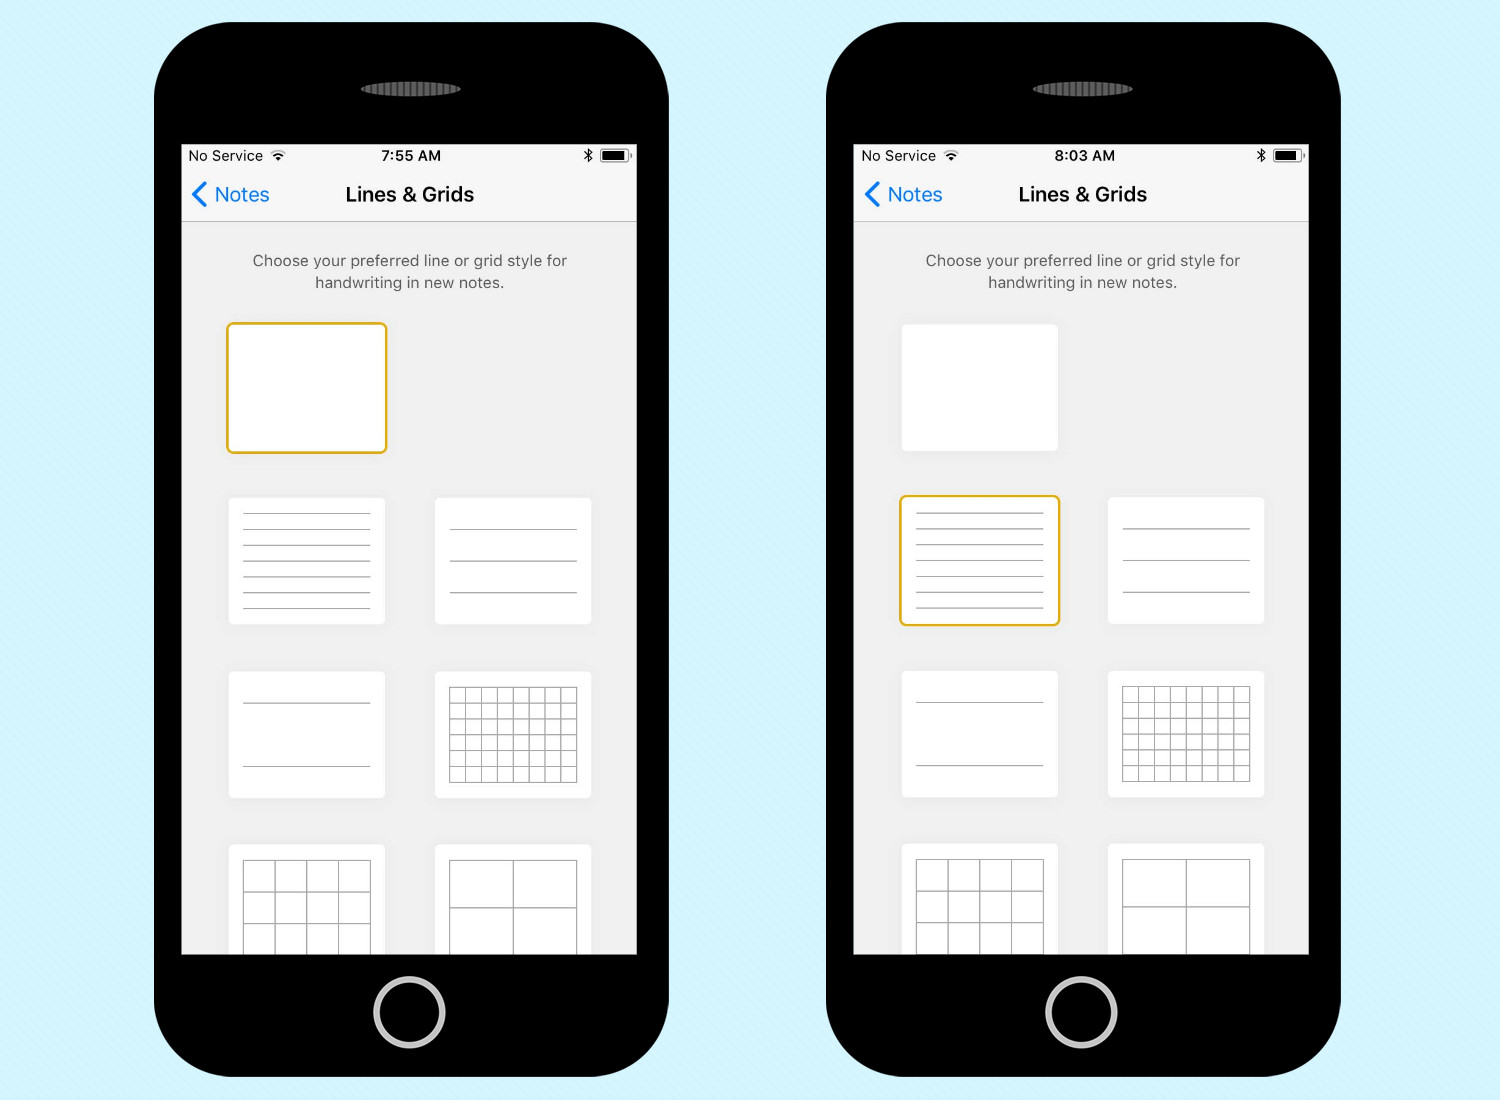
4. Select the line or grid style that you'd like to use. You have your choice of single-, double-, or triple-spaced rules, as well as small, medium, or large grids.

5. Return to the home screen and open Notes. When you create a new note, it will have the line or grid background that you chose.
To turn off the lines or grids for new notes, repeat the steps above but choose the blank pattern in step 4.
How to Pin a Note in Notes
Pinning something in the Notes app isn't difficult at all, so long as you know where to swipe. Here's how to make sure your most frequently accessed apps are right at the top so that you can frequently access them in Notes.
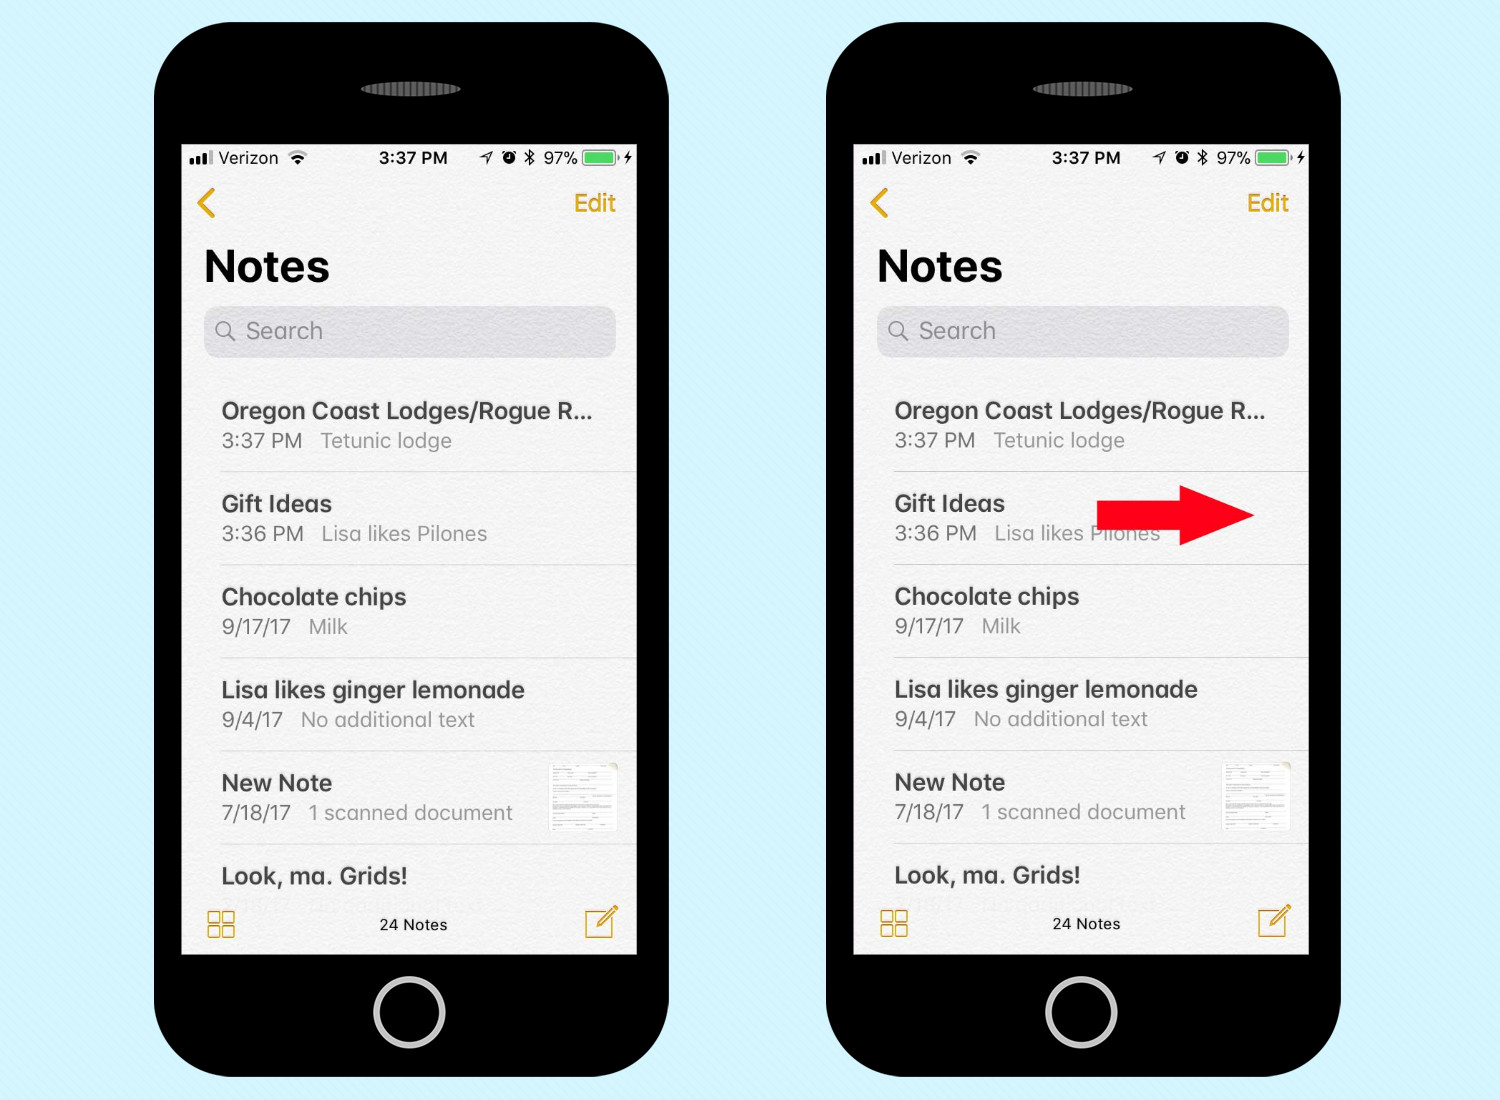
1. Go to your list of notes to find the one you want to pin, and swipe right.

2. Tap the Pin icon that appears.
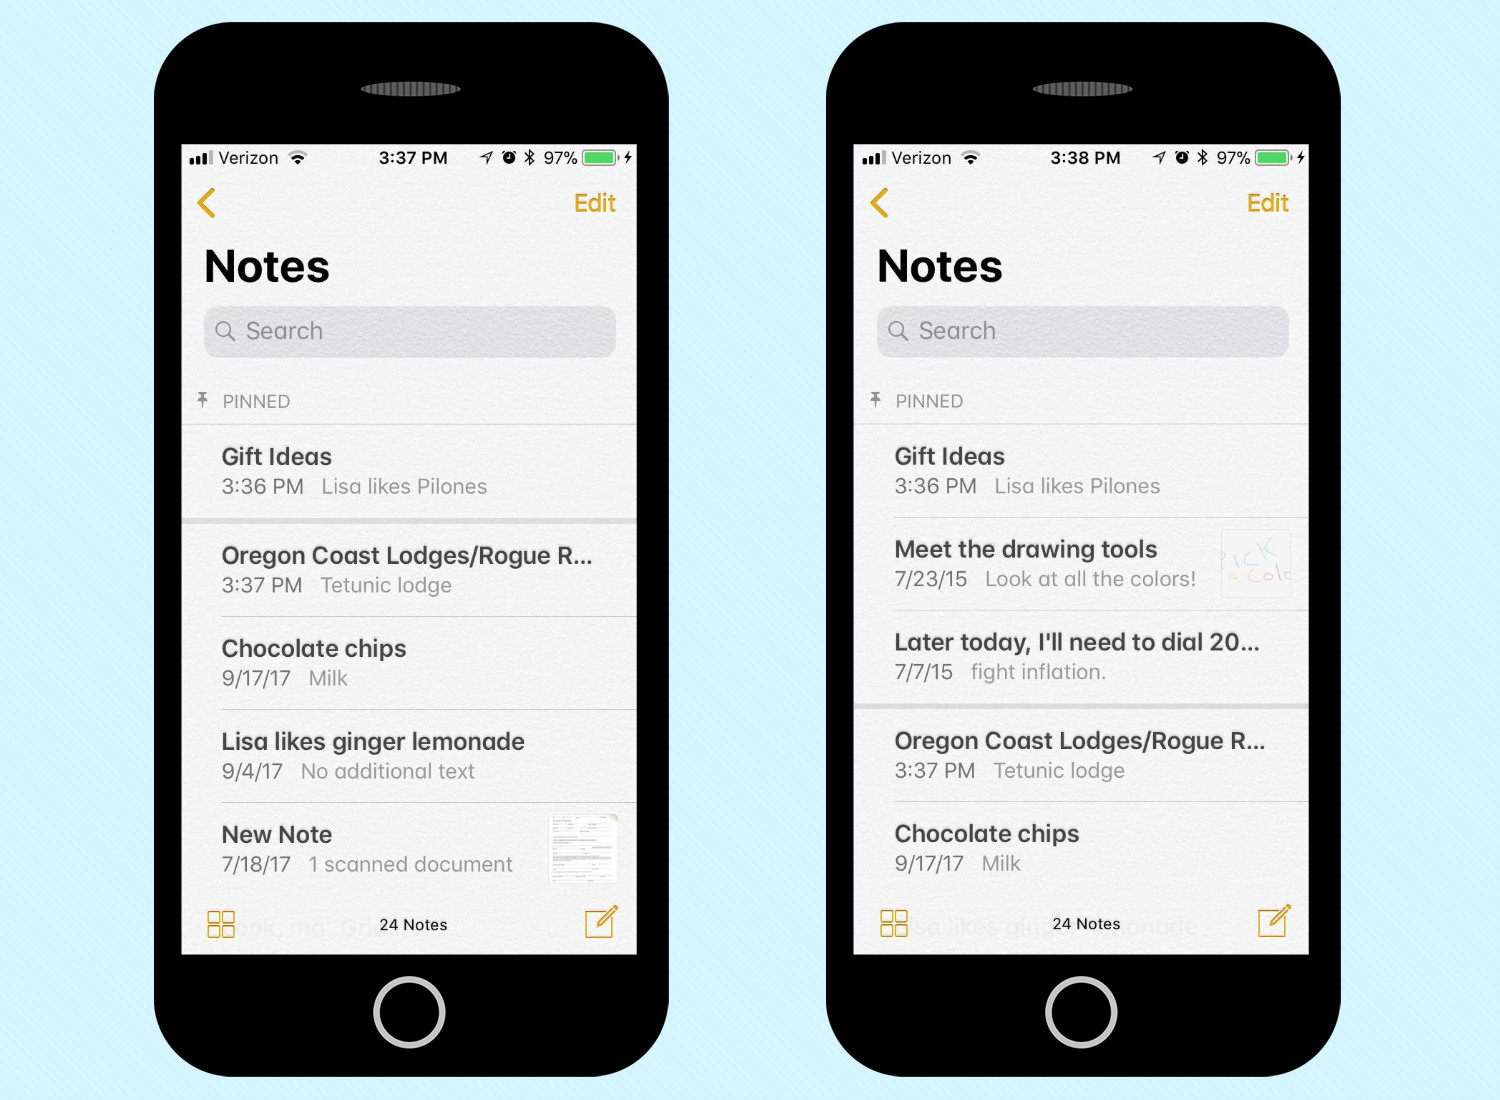
3. Your note will note will now appear ahead of all other notes under a Pinned header. Pinning other notes will add them to that section.

4. To unpin a note, swipe right again and tap on the icon of a pin with a slash through it
How to Share a Note in Notes
The ability to share a note with other people, allowing them to make their own additions and changes, has been around since iOS 10. But that doesn't make the feature any less useful. Here's how to give other people access to the notes you've created.

1. Select the note you want to share by tapping it.
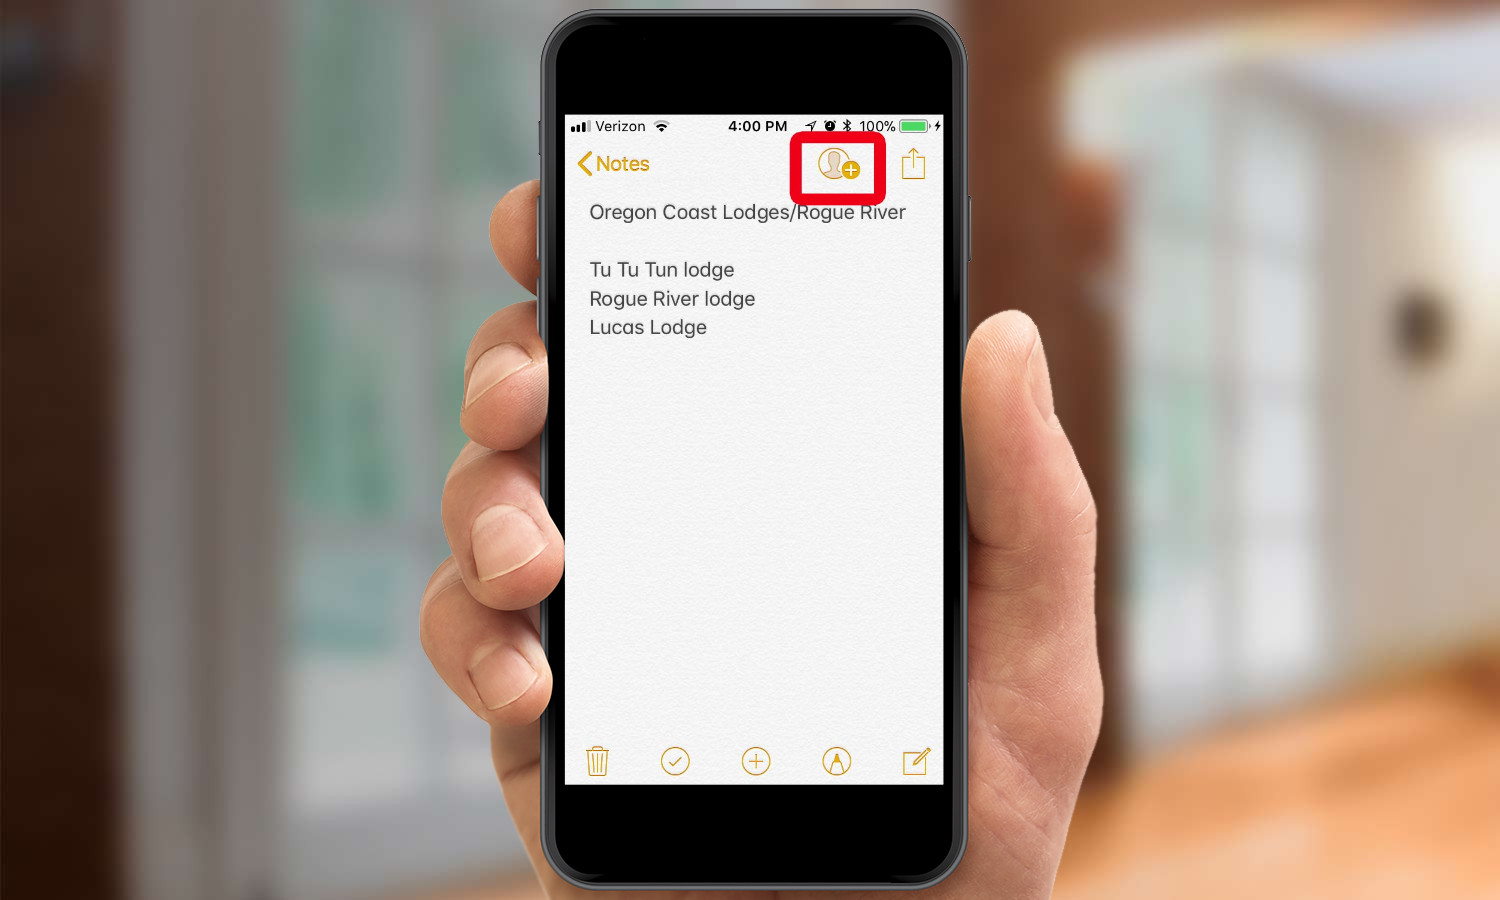
2. Once you're in the note, tap the share icon at the top of the screen.
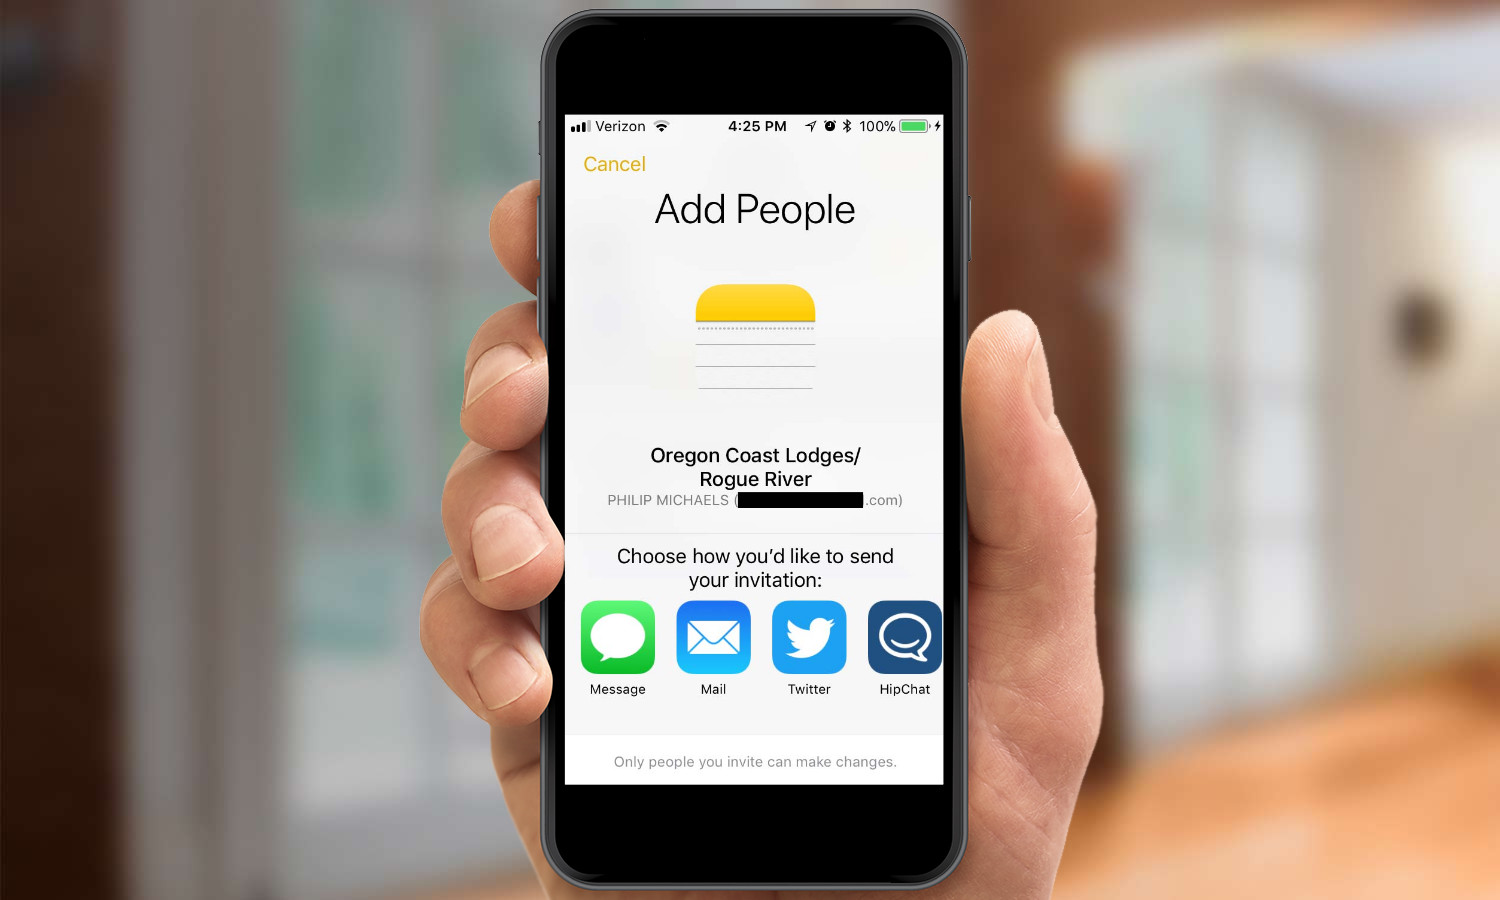
3. Select the app you want to use to share the Note. Your choices will include built-in apps likes Messages and Mail in addition to third-party options. (For this tip, we'll use Messages.)

4. Enter the name of the person you want to share the note with. They'll appear as you type the name if they're in your Contacts.

5. Follow the on-screen instructions to share the note. Since we're using Messages, we'll tap to send our note. The recipient will now be able to make changes to it.
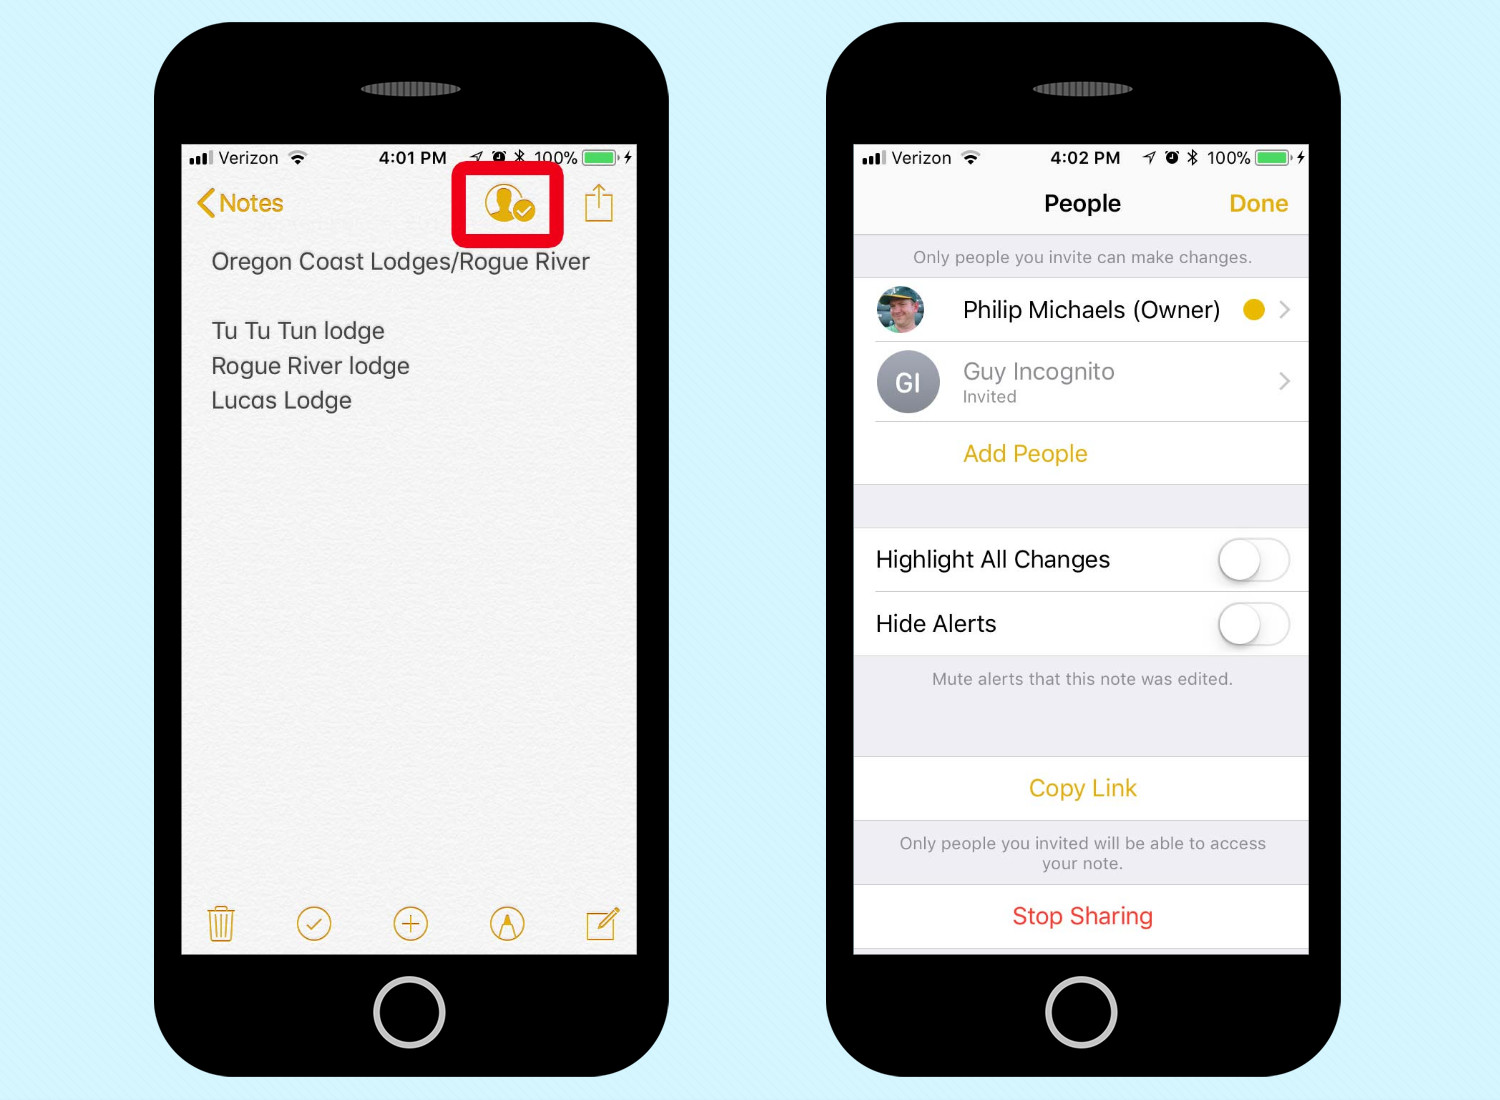
6. Since the note is shared, the Sharing icon will now be highlighted. You can manage who's seeing the note or add other people by tapping that icon. On the subsequent screen, you can also manage alerts for changes or even stop sharing the note.
Dan Moren is the author of multiple sci-fi books including The Caledonian Gamibt and The Aleph Extraction. He's also a long-time Mac writer, having worked for Macworld and contributed to the Six Colors blog, where he writes about all things Apple. His work has also appeared in Popular Science, Fast Company, and more
 Club Benefits


