
 Club Benefits


If you thought AI was getting creepy already, then this one might tip you over the edge. Your iPhone can now learn and re-create your voice with an iOS 17 feature called Personal Voice, which "uses on-device machine learning," according to Apple.
Now, this feature actually has a really awesome intended use: to help people at risk of losing their voice completely. In a press release, Apple says this feature is "for users at risk of losing their ability to speak — such as those with a recent diagnosis of ALS (amyotrophic lateral sclerosis) or other conditions that can progressively impact speaking ability — Personal Voice is a simple and secure way to create a voice that sounds like them."
While I remain skeptical of AI in general, this is a really cool use case that — so long it's as secure as Apple claims — may really benefit people who face losing an integral part of themselves due to illness. Personal Voice in iOS 17 can enable people to keep communicating with their loved ones.

Here's how to set up Personal Voice on iPhone.
Personal Voice on iPhone: Important prep, timing and issues to be aware of
Before we get started, to create your Personal Voice you'll need to make sure you're in a quiet area with low background noise, otherwise it won't work. There's a microphone test section to begin with which will tell you whether conditions are correct.
You'll then need to read out 150 phrases. Bear in mind that this section takes about 15 minutes. After that, your iPhone will need some time to create your Personal Voice using your recordings — this theoretically takes place overnight as your iPhone will only process your voice from recordings when locked and on charge.
However, for me processing took over 24 hours to create. It was a real pain, as I couldn't use my phone for that whole time — I'm lucky as my job means I have other phones to use, but for most people the processing time will simply knock their phone out of use for a day, which sucks.
I'd like to say that you could keep using your phone and allow it to process your Personal Voice piecemeal, but when I tried doing so, I found that several times throughout the process my iPhone had simply quit and started again. It needs a solid block of time.
What's worse is that even when my phone was locked and on charge (with the screen facing down to avoid FaceID unlocking it), I kept getting messages saying my phone was unlocked and that I needed to lock it to continue. My phone also got incredibly hot during the process, presumably from the combination of being on charge plus the phone experiencing a high processing load.
Still, these could just be teething problems that will be ironed out with updates over time.
How to set up a Personal Voice on iPhone
Personal Voice is part of iOS 17. We can show you how to download and install iOS 17 if you're not sure how.
1. Go to Settings > Accessibility

Open the Settings app and tap Accessibility.
2. Tap Personal Voice

Scroll down and tap Personal Voice.
3. Tap Create Personal Voice

Tap Create Personal Voice.
4. Read the messages and tap Continue

Tap Continue twice through the next two message pages, reading through them before you do — these pages give you some information about the recording process.
5. Name your Personal Voice

You will be able to create multiple Personal Voices if you choose, so you may want to name your different voices accordingly. Give this voice a name or leave the default name as is, then tap Continue.
6. Check your sound quality

Tap the red record button and read the message shown on screen ("I'm creating a Personal Voice with my iPhone.") to check your sound quality. If the room you're in is noisy, you're too far from the microphone or you aren't speaking clearly enough, you'll get a warning and will need to rerecord under better conditions. Once you've passed the sound quality test, tap Continue.
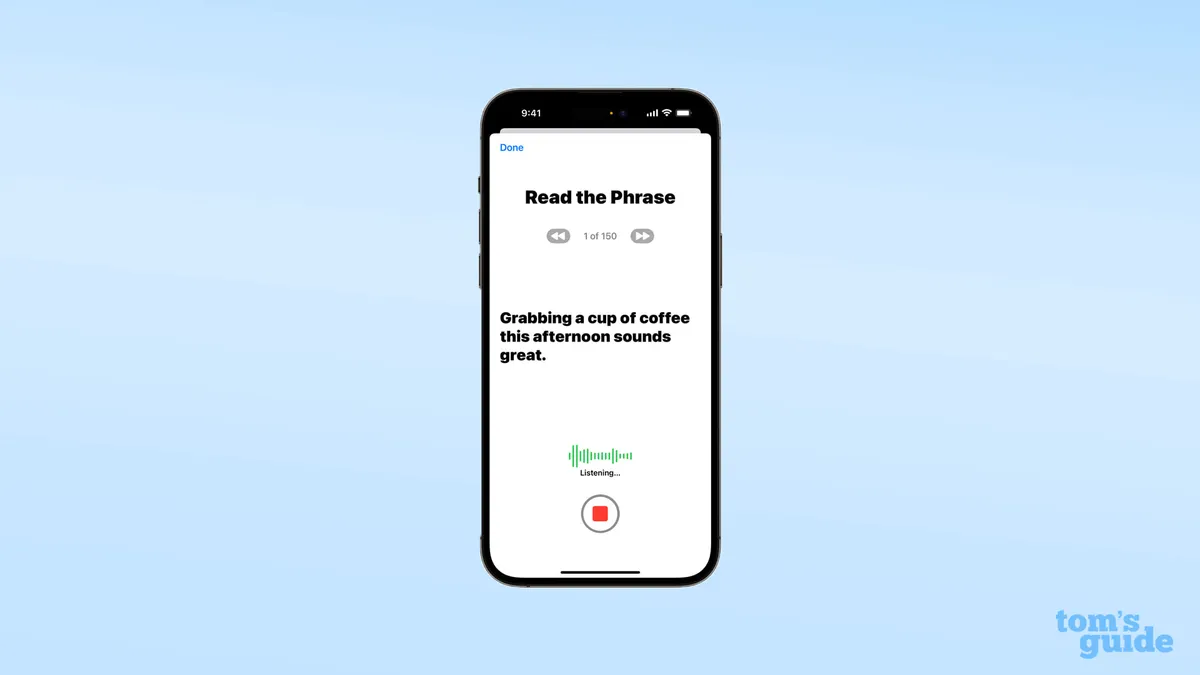
7. Record yourself reading the 150 on-screen phrases

Now make your way through the 150 phrases. Tap the red record button and record yourself saying the on-screen phrases. You'll be taken to the next one automatically, but if you want to go back (and then forward again) tap the forward/back buttons at the top.
To re-record, either go back to a phrase or tap the stop button of a phrase you're currently recording and then tap the re-record button.
This bit takes a while — about 15 minutes.
8. Tap Continue once done

Once you've done all the recordings, tap Continue.
9. Allow Notifications

You'll likely receive a pop-up asking you to allow notifications. Tap either Allow or Don't Allow. It doesn't really matter which you choose, and this can align with your normal notifications preferences without any serious consequences. However, you may find it useful to allow notifications at least for the moment, so you can be alerted when your Personal Voice is ready (because as you'll see next, it isn't ready yet).
10. Tap OK and wait

Tap OK to begin preparing your Personal Voice, then wait. This takes a while as your device must analyze your recordings in order to generate your Personal Voice. Put your iPhone on charge and lock the screen to allow it to get on with doing its thing.
You can head back to the Personal Voice Settings page (steps 1 & 2) to see your Personal Voice's progress.
Depending on what you chose in the last step, you'll receive notifications telling you when your Personal Voice creation has paused. This happened quite a lot for me, despite putting my iPhone on charge and locking it — I think perhaps because FaceID kept catching my face and unlocking the phone.
11. Wait until your Personal Voice is complete

Now you need to wait a long time for your iPhone to process your recordings into a Personal Voice. As spelled out in the intro, this took over 24 hours for me and was strewn with processing restarts and random instances of the phone telling me it wasn't locked or on charge (when it was). If you want this done as quick as possible, you'll probably need to go a day without your phone.
Check back on the Personal Voice menu periodically (Settings > Accessibility > Personal Voice) and when you see no more status updates under your voice, you're good to proceed to the next step.
12. Go to Settings > Accessibility > Live Speech

Now to test and use your Personal Voice! Open the Settings app, tap Accessibility, then tap Live Speech.
13. Toggle on Live Speech, then tap Voices

Toggle on Live Speech, then tap Voices.
14. Tap Personal Voice and enable yours

Now tap Personal Voice at the top and tap the Personal Voice you just made (or another if you've made more than one).
If you can't see Personal Voice at the top of the Voices menu yet, restart your iPhone. This worked for me.
15. Triple tap the Lock button

Now we need to enter Live Speech mode. Triple tap the Lock button.
16. Type your message and tap Send

Now type what you want your Personal Voice to say and tap Send for your message to be read out loud in the AI version of your voice!
Now that you've got your Personal Voice set up, why not try out some other cool iOS features. We can show you how to automatically delete 2FA code messages on iPhone, if you have loads of old ones clogging up your Messages and Mail inboxes. We could teach you how to quick reply in iOS Messages, if you're a furious texter. You might also be interested in learning how to set up StandBy Mode on iPhone, to turn your device into a smart home display.

