Club Benefits


If your heating bill keeps climbing, a ten-dollar trick could make a bigger difference than you think. For less than the price of lunch, a roll of weatherstripping or a tube of caulk can help you lock in the warmth by sealing up those sneaky drafts around doors and windows.
As Ethan Heine, President and CEO of Suntrek Solar, puts it, “spending ten to fifteen dollars for materials can seal a home’s largest air leakage paths in one weekend.”
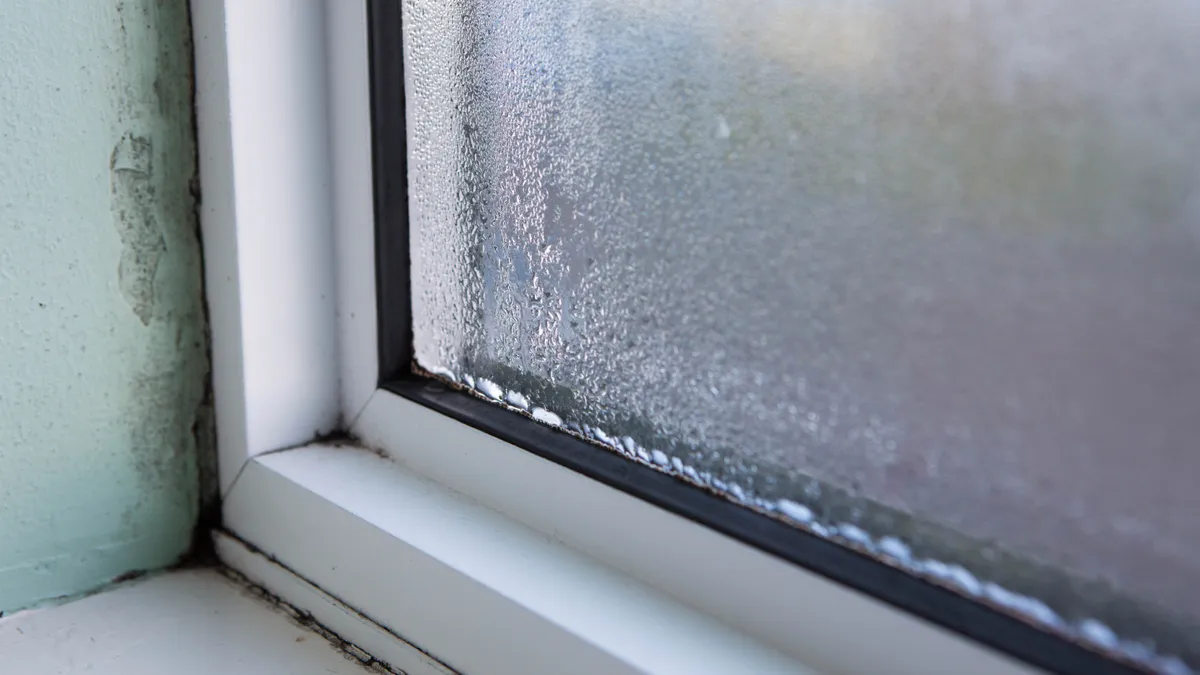
Those little cracks around your door jamb or window sash work like invisible conveyor belts, whisking away your heat—and over the course of a season, that can drain your wallet.

The best part? You can hunt down the biggest culprits and patch them up in less than an hour, all with just a few simple tools.
The cost of unsealed gaps
You don’t need a strong draft to make it costly. Even hairline gaps add up along a home’s “envelope,” especially at doors, openable windows, and where trim meets walls.
Denny Denker, Chief Scientist at HomeBoost, adds that infiltration “can make up a fifth or more of the annual heating load,” and in drafty homes it can be “30% or more”.
Energy auditors often point out that uncontrolled air leaks are the most common and affordable problem to solve in older properties. Homes built before modern building codes, places with original door seals, and houses that see big seasonal expansion and contraction are particularly susceptible.
Rentals and busy family homes also suffer because door sweeps wear down and adhesive foam flattens with years of use.
How to find drafts, and fix them
Before you stock up on supplies, take a moment to play home detective. Hunt for hidden drafts around exterior door edges, window sashes, spots where trim meets walls, utility cutouts, attic hatches, and even electrical outlets on outside walls.
To sniff out leaks, try the dollar bill test: close a door or window on a bill, and if it slips out without resistance, your seal needs work. Or, for a bit of drama, wave a lit incense stick near suspicious spots on a breezy day. If the smoke dances or gets pulled in, you have found a draft.
Heine’s no-tool routine is straightforward as well. “The dampness of your hand, or a thin piece of tissue, placed near a door frame or window sash will react immediately to any air movement.”
He notes trouble spots repeatedly show up “at the top corners of doors, the meeting rails of double-hung windows, and the hinge side of old doors”.
Denker suggests slightly depressurizing the home. Turn on bath fans, your range hood, and a vented dryer, then hold toilet paper or your hand at windows, exterior doors, baseboards, and attic hatches.
Fluttering paper indicates a leak, but skip this method if you have natural-draft gas appliances inside the building envelope, as it could backdraft exhaust gases. In that case, contact a home performance pro to test safely.
Another clever shortcut from Denker is to “look for cobwebs,” since spiders build where air moves.
Take action this weekend

Apply weatherstripping to moving parts and caulk to stationary areas. If you treat every gap the same, you risk making costly errors.

Weatherstripping basics
- Best spots to seal: door jambs, window sashes, and those drafty attic hatches.
- What you’ll need: adhesive-backed foam or rubber weatherstrip for tight jambs and sashes. For bigger, uneven gaps, grab a V-strip for a snug fit. To keep out chilly drafts at the bottom of your door, a door sweep does the trick.
- How to install:
- Wipe surfaces clean and dry, making sure to clear away any old weatherstripping before you start.
- Try out a small piece to check the thickness. If a dollar bill slips out without resistance, the seal is too loose. If it rips or gets stuck, the strip is too thick. Aim for just enough friction for a snug, effective seal.
- Press the strip down in one smooth, straight line. When installing a door sweep, position it so it gently brushes the threshold for the best seal.
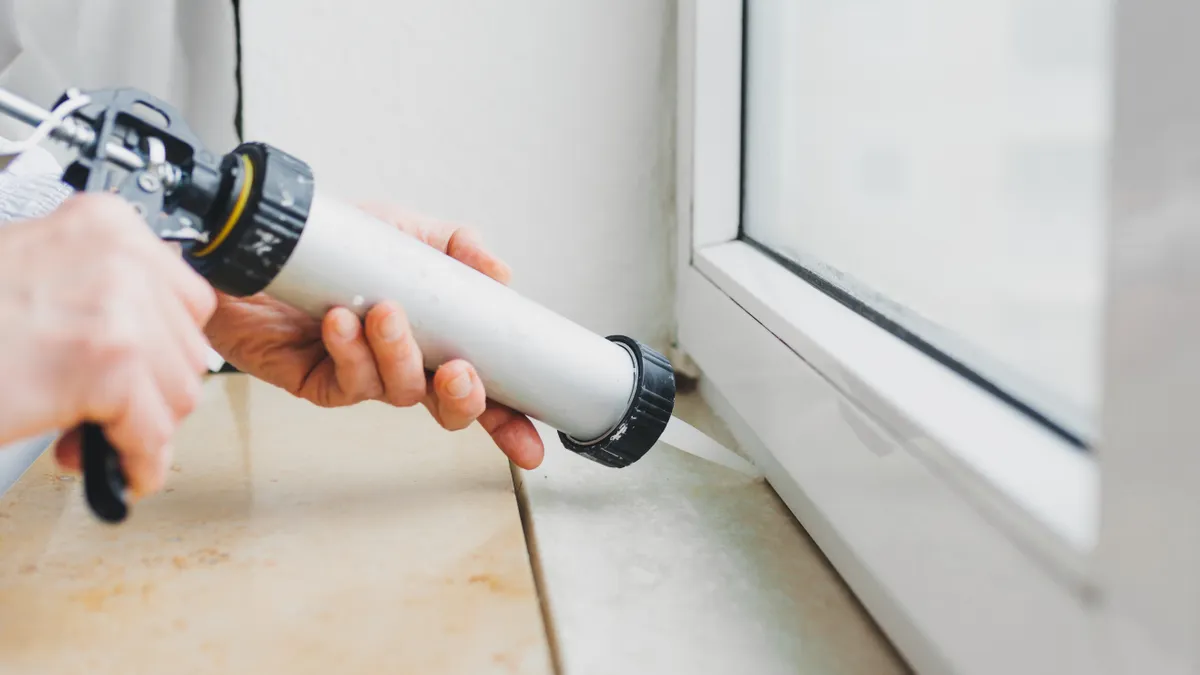
Caulking basics
- Best spots to use it: Along stationary joints like where trim meets the wall, around windows and doors, and to seal up small gaps.
- What to pick up: For inside trim, go with paintable acrylic latex caulk. For outdoor jobs, choose 100% silicone or a top-notch exterior window and door sealant that stays flexible through any weather. If you spot a gap wider than a quarter inch, tuck in a foam backer rod first to give the caulk a solid base.
- How to apply:
- Remove any old caulk, sweep away dust with a vacuum, and double-check that the joint is completely dry.
- Snip a small opening in the nozzle and run a neat, thin bead of caulk along the joint.
- Smooth the caulk with a damp finger or a caulk tool for a clean finish. Skip caulking if the area is cold, dirty, or damp, as the seal may not hold.
Common mistakes to avoid
- Choosing a weatherstrip that is the wrong thickness can leave you with stubborn drafts or doors and windows that refuse to close as they should.
- Sealing moving joints with caulk can set the stage for cracks and sticky spots to form over time.
- Blocking window weep holes traps water inside, preventing it from escaping as it should.
- A door sweep set too high invites chilly drafts, while one set too low scrapes the floor and wears out before its time.
- If you see signs of lead paint, find moisture around your windows or doors, or have a gas appliance that could let fumes back in after sealing your home, reach out to a professional for advice.
For just $10 and a single weekend hour, you can tackle the worst heat leaks in your home. Stroll from room to room, hunt down sneaky drafts, seal up moving parts with weatherstripping, and fill stubborn gaps with caulk.
Your rooms will warm up faster, your furnace will get a well-deserved break, and your next energy bill should bring a pleasant surprise.

Follow Tom's Guide on Google News and add us as a preferred source to get our up-to-date news, analysis, and reviews in your feeds.
More from Tom's Guide
- Experts are advising homeowners to pour vinegar down their drains this October — here's why
- Kitchen sink smell bad? Try this 3-step hack to fix it instantly
- I used to literally pull my hair out when cleaning my shower drain — but this 3-step routine has saved me from the worst bathroom cleaning job