


 Club Benefits


Tom's Guide Verdict
The Printrbot Simple Maker is a straightforward introductory 3D printer offering good performance for the price. Just don't expect miracles.
Pros
- +
Cheap, simple intro to 3D printing
- +
good documentation and support
- +
respectable quality for basic print jobs.
Cons
- -
Small build area
- -
construction is not robust
- -
requires some tweaking for best results.
Why you can trust Tom's Guide Our writers and editors spend hours analyzing and reviewing products, services, and apps to help find what's best for you. Find out more about how we test, analyze, and rate.
NOTE: This review was for the pre-assembled wooden version of the printer, which Printrbot no longer sells. For beginners, we recommend upgrading to the $599 pre-assembled Printrbot Metal. , which also has a larger 6 x 6 x 6 build area. If you feel up to the challenge, you can still buy the kit version of the wooden model for $349.
There is something of a race to the bottom in 3D printing: Who can make the cheapest 3D printer out there? Kickstarter is full of projects pursuing that goal, but they often fail to deliver. The least-expensive 3D printer you can actually buy right now is the Printrbot Simple Maker. And it's one you might want to buy, too.
Priced at $349 for the kit (or $449 for the assembled version we evaluated), this low-cost 3D printer offers decent, no-frills performance and a user-friendly design that make it a great introduction to 3D printing.

Design: Barebones and Petit

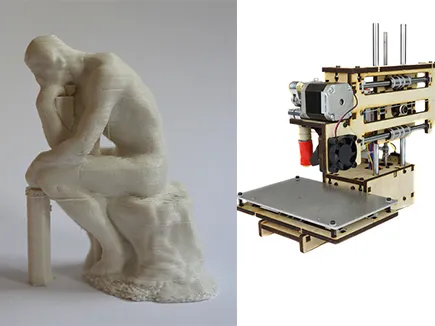
When I first unpacked the Printrbot Simple Maker, my wife declared, "That's adorable! We have cats bigger than that!" She’s right: At just 11 x 10 x 8 inches and 9.3 pounds, this is a diminutive printer compared to models like the Lulzbot TAZ 3 (about 27 x 21 x 21 inches) or even the new MakerBot Replicator Mini (15 x 12 x 11 inches).
Printrbot kept costs down on the Simple Maker by using materials such as plywood rather than metal for the frame, and string instead of rubber for the drive belt. The electronics and motors are fully exposed, as well. The Simple Maker has a single extruder and, because it lacks a heated print bed, it prints in organic PLA plastic only.
The build volume is just 4 x 4 x 4 inches. That is big enough for things like figurines, cogs and gears, and a lot of household objects. However, we were unable to print an iPhone case that we use as one of our test-print projects. It was too big.
MORE: Best 3D Printers
Setup: A Simple 30 Minutes

We tested the pre-built version of the Printrbot Simple Maker, but it is also available as a cheaper ($349) kit version. The kit takes a little time to assemble, but it isn't complex. Anyone who has used Legos and knows one end of a screwdriver from the other should have the skills to complete the assembly with the building instructions.
On our pre-built model, installation required just four steps: 1) remove a piece of wood that stops the printer mechanism from moving while the kit is being shipped to you; 2) plug the Simple Maker in; 3) install the open-source Repetier software on a computer, and 4) plug in the USB cable. We were up and printing within 30 minutes, including the time to replace a spring that had come loose in shipping.
Controls: Minimal but Effective

There are no controls on the Printrbot Simple itself. Instead, you operate the device through a computer connected over USB. Printrbot does not supply any software of its own, instead recommending the free Repetier Host open-source software, which is available for PC, Mac and Linux systems. Repetier Host is quite easy to use, but does require some configuration to work with the Printrbot Simple. This process is covered in the well-written and illustrated setup guide.
Once the printer is connected, you load a 3D model into the software, which shows a preview of the model and then creates the pattern that the printer will follow — a process called slicing). Repetier uses the open-source Slic3r slicing program by default, and installs it automatically for you.
Repetier also controls the printer and monitors the printing process, allowing you to stop or pause a print to add more filament, or kill the print if it fails. This does mean that you have to have the computer turned on and connected while printing, though.
The Printrbot Simple Maker can print directly from a micro SD Card (it will print from a file called auto0.g when turned on). But with no controls on the device itself, that's not a very practical option, as there is no way to stop the print except by pulling the plug.
Printing Process: Limited but Fast
The Printrbot Simple Maker is a fairly fast printer: Building a test print of The Thinker statue (which is just over 3 inches high) took about 3 hours and 50 minutes. Printing the star sculpture that we also use in our tests took just under 2:28, which is also quite fast for a 3D printer.
The device has limitations, though. It can print only with polylactic acid (PLA), a light, plastic-like material made from cornstarch. Other, more-expensive printers can use ABS plastic (the stuff Legos are made of), which is stronger and more resilient.
PLA is a good starter material, though, as it is easier to work with than ABS. For one thing, it doesn't need a heated print bed; the molten material sticks to blue painter's tape that you apply to the print bed. We had no issues with prints peeling or lifting off this surface during the print. The easiest way to remove larger objects was to peel off the blue painter's tape with the print still attached. Fortunately, this is cheap to replace: A roll of tape costs less than $5.
Printing Quality: Fine for Basic Projects

Overall, the 3D prints produced by the Printrbot Simple looked good, but not great. Our first test model, based on a scan of The Thinker by Rodin, came out clean, with only a few minor glitches. The printer deposited the filament incorrectly on a couple of layers in the body of the print, producing an obvious gap in the model. The 0.3-mm layer height resulted in a lot of stair-stepping, in which the layers of the print are obvious in the final product, appearing as jagged ridges on the surface.

The Printrbot struggled with a sculpture of a star, producing a print with several edges missing and several spots where the filament didn't stick together. To be fair, this is a very difficult print that we use to test the limits of a printer's capabilities. The sharp edges and overhangs of this model challenge the printer to keep a very tight control over the flow of the printing material, and the Printrbot Simple failed occasionally, producing rough edges and loose fringes of filament on parts of the print. .
We had to manually tweak the settings in the slicer software to get the model to print at all. Specifically, we had to add more support material to the design that holds the project in place during the printing process. (The supports are easy to trim off afterwards.)
MORE: 3D Printer Buyer's Guide

The Printrbot Simple did a better job printing our third test model, a small set of gears. The cogs came out fairly clean, though we did have to lightly sand them in areas to remove some excess plastic before they would fit together. However, the PLA material the printer uses proved to be too brittle for the gears to work well. The small supports that hold the gears in place broke under moderate pressure.
We also had issues with the extruder becoming clogged on occasion. The mechanism got too warm on long prints, causing the filament to kink and jam on occasion. To clear these jams, we had to remove part of the feed mechanism, which was a hassle.
Bottom Line: A Great Deal for Beginners
The Printrbot Simple shows how much 3D printing has advanced over the past few years. Until recently, the idea of a 3D printer that costs $350 producing anything decent would have been laughable. Now it is a reality, though you'll have to live with compromises — such as the lack of a display or controls on the device, the small build area, the limitation of only one printing material, and the device's tendency to jam. But the Printrbot Simple achieves its goal of providing respectable performance and an introduction to the world of 3D printing without costing a fortune.
Key specs
Dimensions: 11 x 8 x 10 inches
Weight : 9.3 pounds
Print Material: PLA
Print Area: 4 x 4 x 4 inches
Print Surface: Unheated Aluminum
Layer Size: 0.3 to 0.1mm
Print Speed: 500 mm/sec
Extruder: Single
Filament Size: 1.75mm
Interface: USB 2
Card Slot: micro SD
- Sense Handheld 3D Scanner Makes Real Objects Virtual
- Users Rate Highest-Quality 3D Printers
- Make Your Barbie Battle-Ready with 3D-Printed Armor
