Club Benefits


Nothing better represents smart-home devices--gadgets that let you control appliances in your home via the Internet--better than the Nest Learning Thermostat. The next generation in home heating and cooling, the Nest not only lets you control the temperature via a smartphone app, but also learns your patterns, and will adjust the temperature accordingly. In doing so, Nest claims its device will save you money, as it won't heat or cool your home when you're not there.
But installing the Nest isn't as simple as screwing in a light bulb. It's not too hard, though, and we've created a step-by-step guide to help you through the process.
What you’ll need:
A Philips head screwdriver. Nest thoughtfully provides one with the thermostat, though you may need a smaller screwdriver to remove the wires from your old thermostat.

Total project time: About 30 minutes.
1. Turn off power to your thermostat.

Locate the appropriate circuit breaker, and switch it to the Off position.
2. Label the wires leading into your old thermostat.

Each wire coming out of the wall should go into a specific labeled port on your old thermostat (R, Y, W or G, for example). Attach the blue stickers in the Nest installation guide to the corresponding wire. If you're lucky, the wires themselves will be color-coded.
If your thermostat is labeled 120 or 240v, or has thick wires, you have a high-voltage system—do not connect these wires to the Nest.
MORE: Best Smart Home Devices
3. Remove your old thermostat.
Carefully remove the wires leading from the wall into the thermostat, and then unscrew the device from the wall.
4. Mark the position of the Nest.

Thread the wires through the center of the Nest base plate and, using the tiny bubble level, make sure the Nest is level. Use a pencil to mark the two screw holes.
5. Install the trim plate (optional).

If you want to cover over the screw holes from the old thermostat, attach the trim plate in the bottom of the Nest box to the base plate.
6. Attach the Nest base to the wall.

Use the included screws and screwdriver to secure the base to the wall. Screw in the top screw first, but before tightening it, use the level to make sure the base is even.
7. Connect the wires to the Nest.

Insert the labeled wires into the corresponding ports on the Nest. A small tab will depress once the wire has been properly inserted.
MORE: Best Home Security Cameras
8. Attach the Nest display.

Line up the small rectangular connector on the back of the display with the port on the base plate.
9. Turn the power back on.

Switch the circuit breaker to the On position.
10. Connect the Nest to your Wi-Fi network.
Follow the instructions on the Nest's display to find your wireless network and enter the password to connect.
11. Follow on-screen setup instructions.

These additional steps will make sure that the Nest’s firmware is up to date, you connected the wires properly, and lets the Nest know the type of power used for your heating system, and where in your house the Nest is located.
11. Set the temperature.

Turn the Nest to set your desired temperature for when you're home and away.
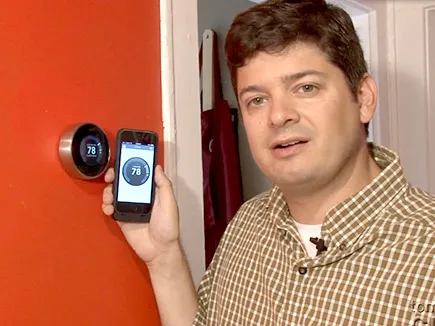
12. Download the Nest mobile app.
This smartphone app, available for Android and iOS devices, will let you monitor and control the Nest remotely.
After a week or so, the Nest will learn your behavior - when you're home and when you're not--and should automatically adjust the temperature in your home. However, you can still turn it on and off remotely using a smartphone, or locally by turning the Nest's dial.
13. Connect Your Nest to Other Smart Home Devices
The Nest will work with a wide range of smart home products and systems, from smart hubs such as the Wink and Samsung SmartThings, to the Logitech Harmony remote control, to Amazon Alexa and Google Home, even to smart locks. Here's a link to all of the Nest-compatible devices and services.
- Best Robot Vacuums for cleaning
- Best Bluetooth Speaker options now