9 macOS tips that every new Mac owner needs to know
Have no fear, n00b
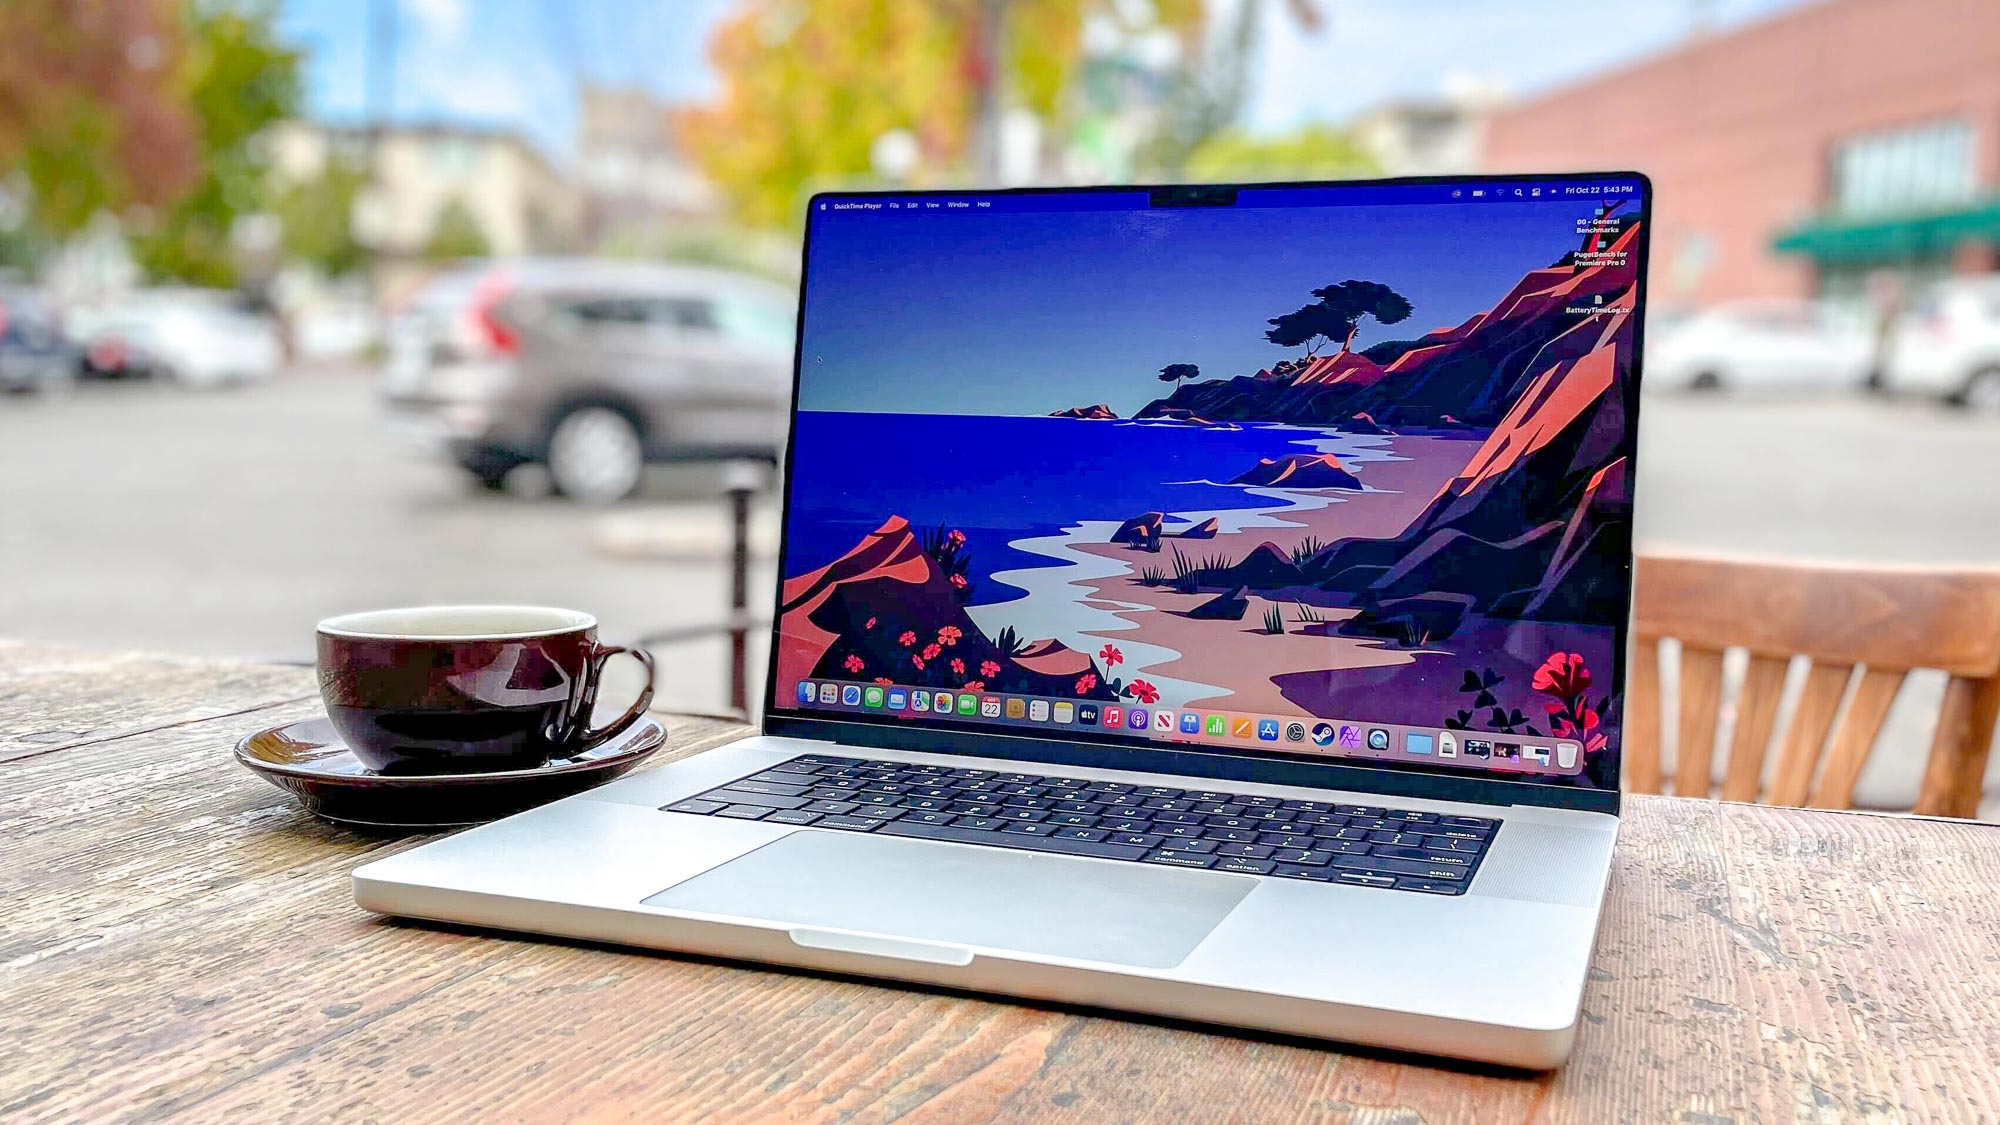
Just bought your first Mac? Whether it's a MacBook Air, a MacBook Pro or a Mac Mini, your first time using macOS can be a little bit daunting, and more than a little frustrating. I know, because I've been there too, many years ago when I used my first iMac.
If you're coming from only using Windows — which many users will be given the ubiquity of Windows in homes and educational institutions worldwide — you'll find yourself wanting to do things that you feel a computer should naturally do, but without the means to do them. We're talking things like right clicking or scrolling in the direction you're used to. It's pretty baffling at first, and you might feel a little dumb not knowing how to do stuff, or because you find your Mac difficult to use.
But don't! Macs are difficult to use if you're a newbie, and many simple things aren't exactly made obvious to you at first. What's more, in my opinion at least, Macs are set up kinda weirdly and counter-intuitively out of the box. As a new Mac user, you'll probably also be unaware of the really cool things you can do on or with macOS. There's a treasure trove of nerdy hacks and tips that can benefit productivity, workflow and general UI. Thankfully, on all counts, these problems are easily solvable.
So, with all that said, I've rounded up 9 macOS tips and tricks which I think every new Mac user needs to know. Some of these are features you might not be aware of, others are settings that I tweak every single time I start up a fresh Mac. See this as a beginner's guide to using your shiny new Mac or MacBook.
9 macOS tips every new Mac user needs to know
Note: to make sure we're all on the same page, learn how to update a Mac so that you're running the latest version of macOS.
1. Set up right click
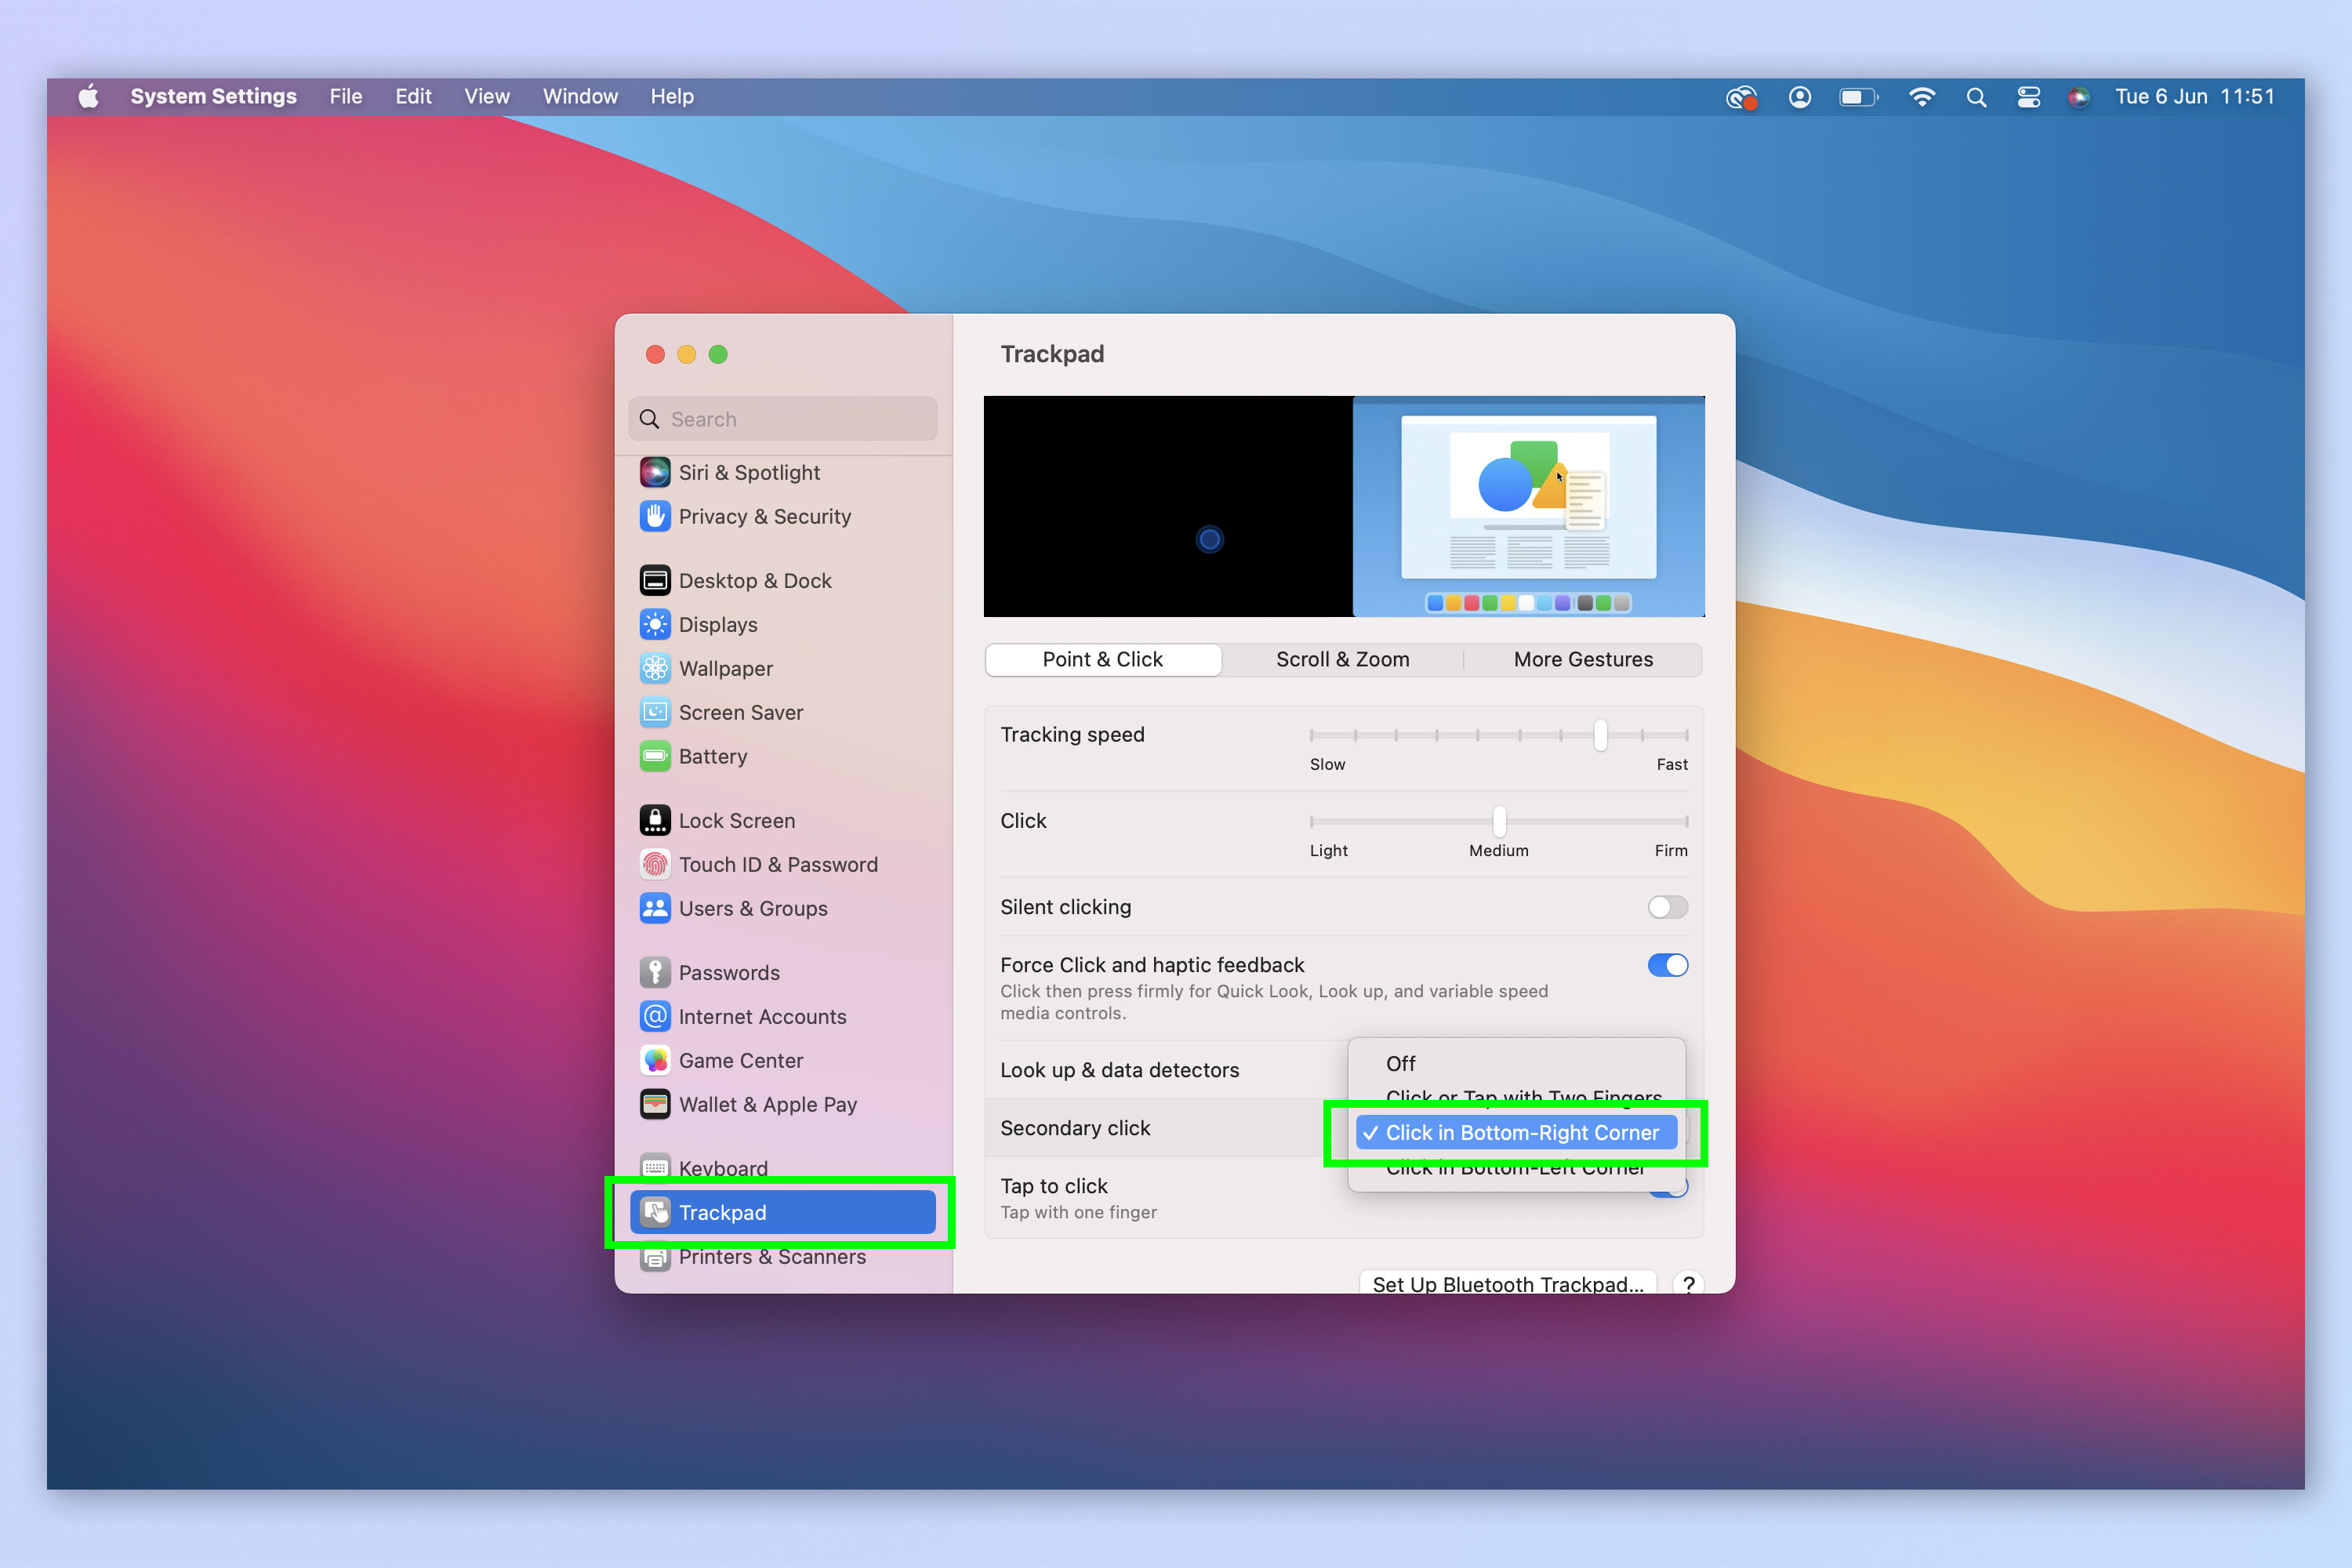
When you first get a MacBook, you might be pretty astounded to find out that you can't right click as you would on other types of laptop. Well, technically you can: you can secondary click (called Control-click by Apple) by holding down Control and clicking — but this is really counter intuitive and involves one more hand than it needs to. Similarly, you can secondary click by clicking the trackpad with two fingers, but again this also involves one more finger than necessary.
Luckily, though, setting up right click as you'd find it on other laptop is easy. Click the Apple logo, top left and select System Preferences. Now select Trackpad and next to Secondary click, select Click in Bottom-Right Corner.
Note: if you're using a mouse, right click should already function as you'd expect.
Full guide: how to right click on Mac
2. Change your scroll direction
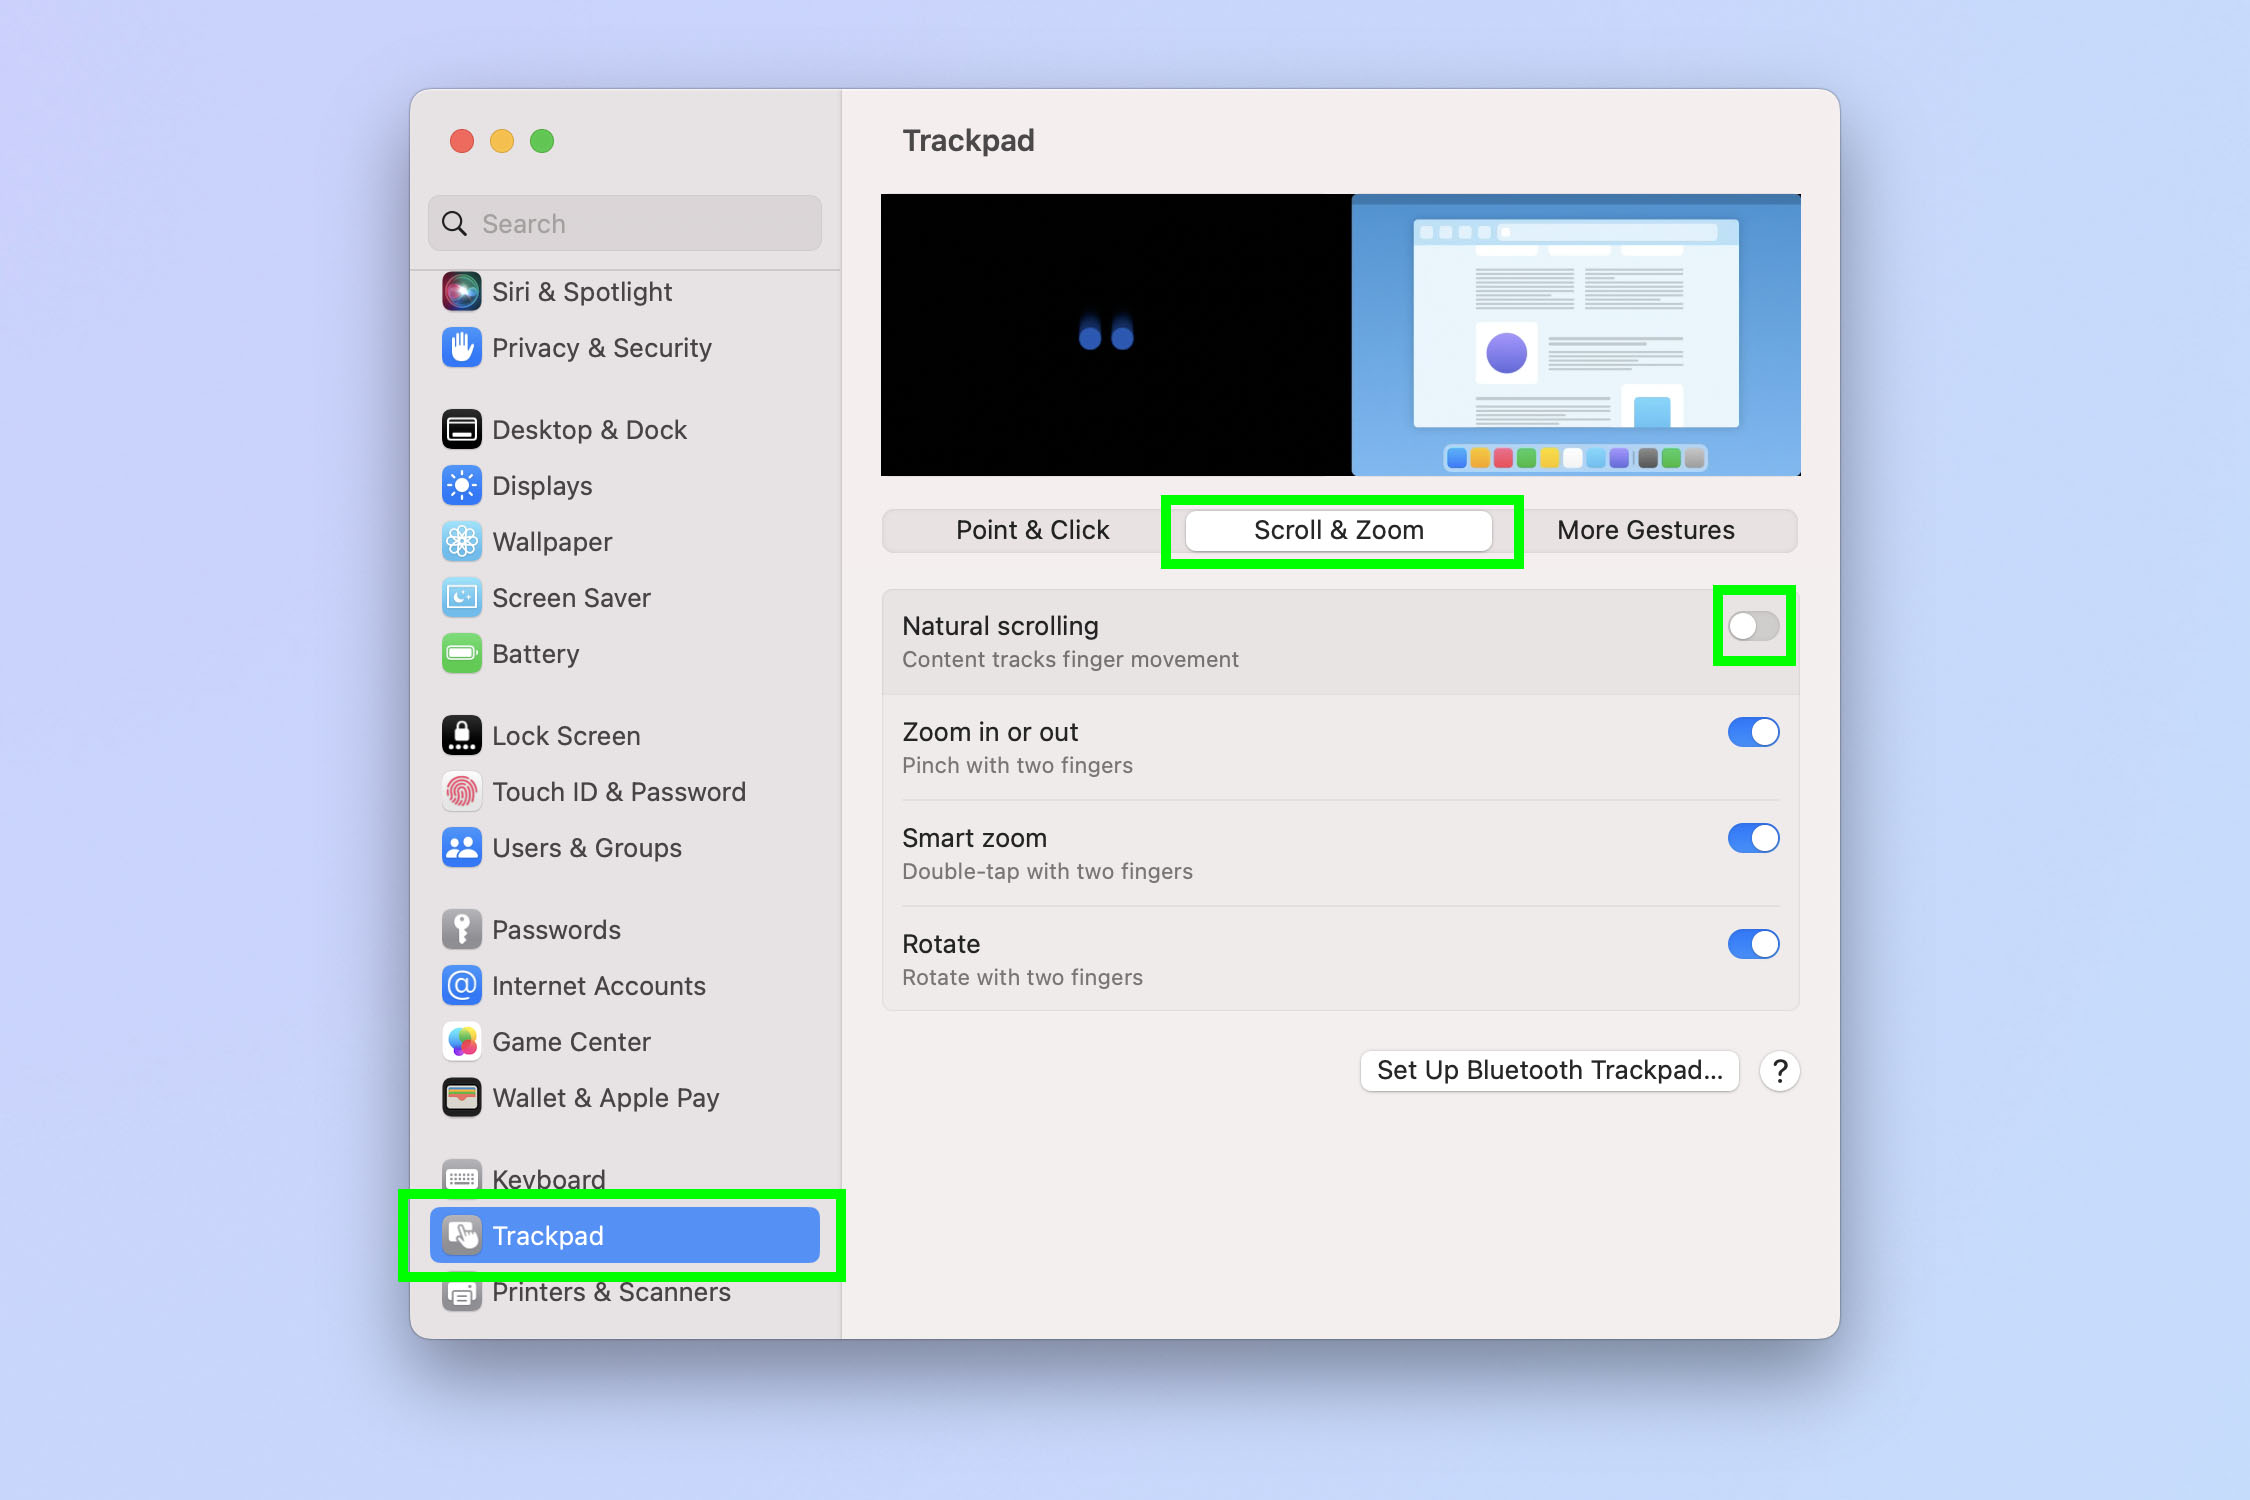
By default, macOS sets up its scroll direction to follow your finger movements. They call this Natural scrolling, even though to me it feels totally unnatural. As you move your fingers up, content moves upwards, so you scroll down the page. I prefer my scrolling set up as you'd find on virtually every other computer, whereby when I move my fingers or mouse wheel downwards, content on screen moves upwards, meaning I scroll down the page — basically down to go down, not down to go up.
To fix this, open System Preferences and click either Trackpad or Mouse. Now, click Scroll & Zoom and unselect Natural scrolling.
Full guide: how to scroll on Mac
Get instant access to breaking news, the hottest reviews, great deals and helpful tips.
3. Automatically hide and show the Dock
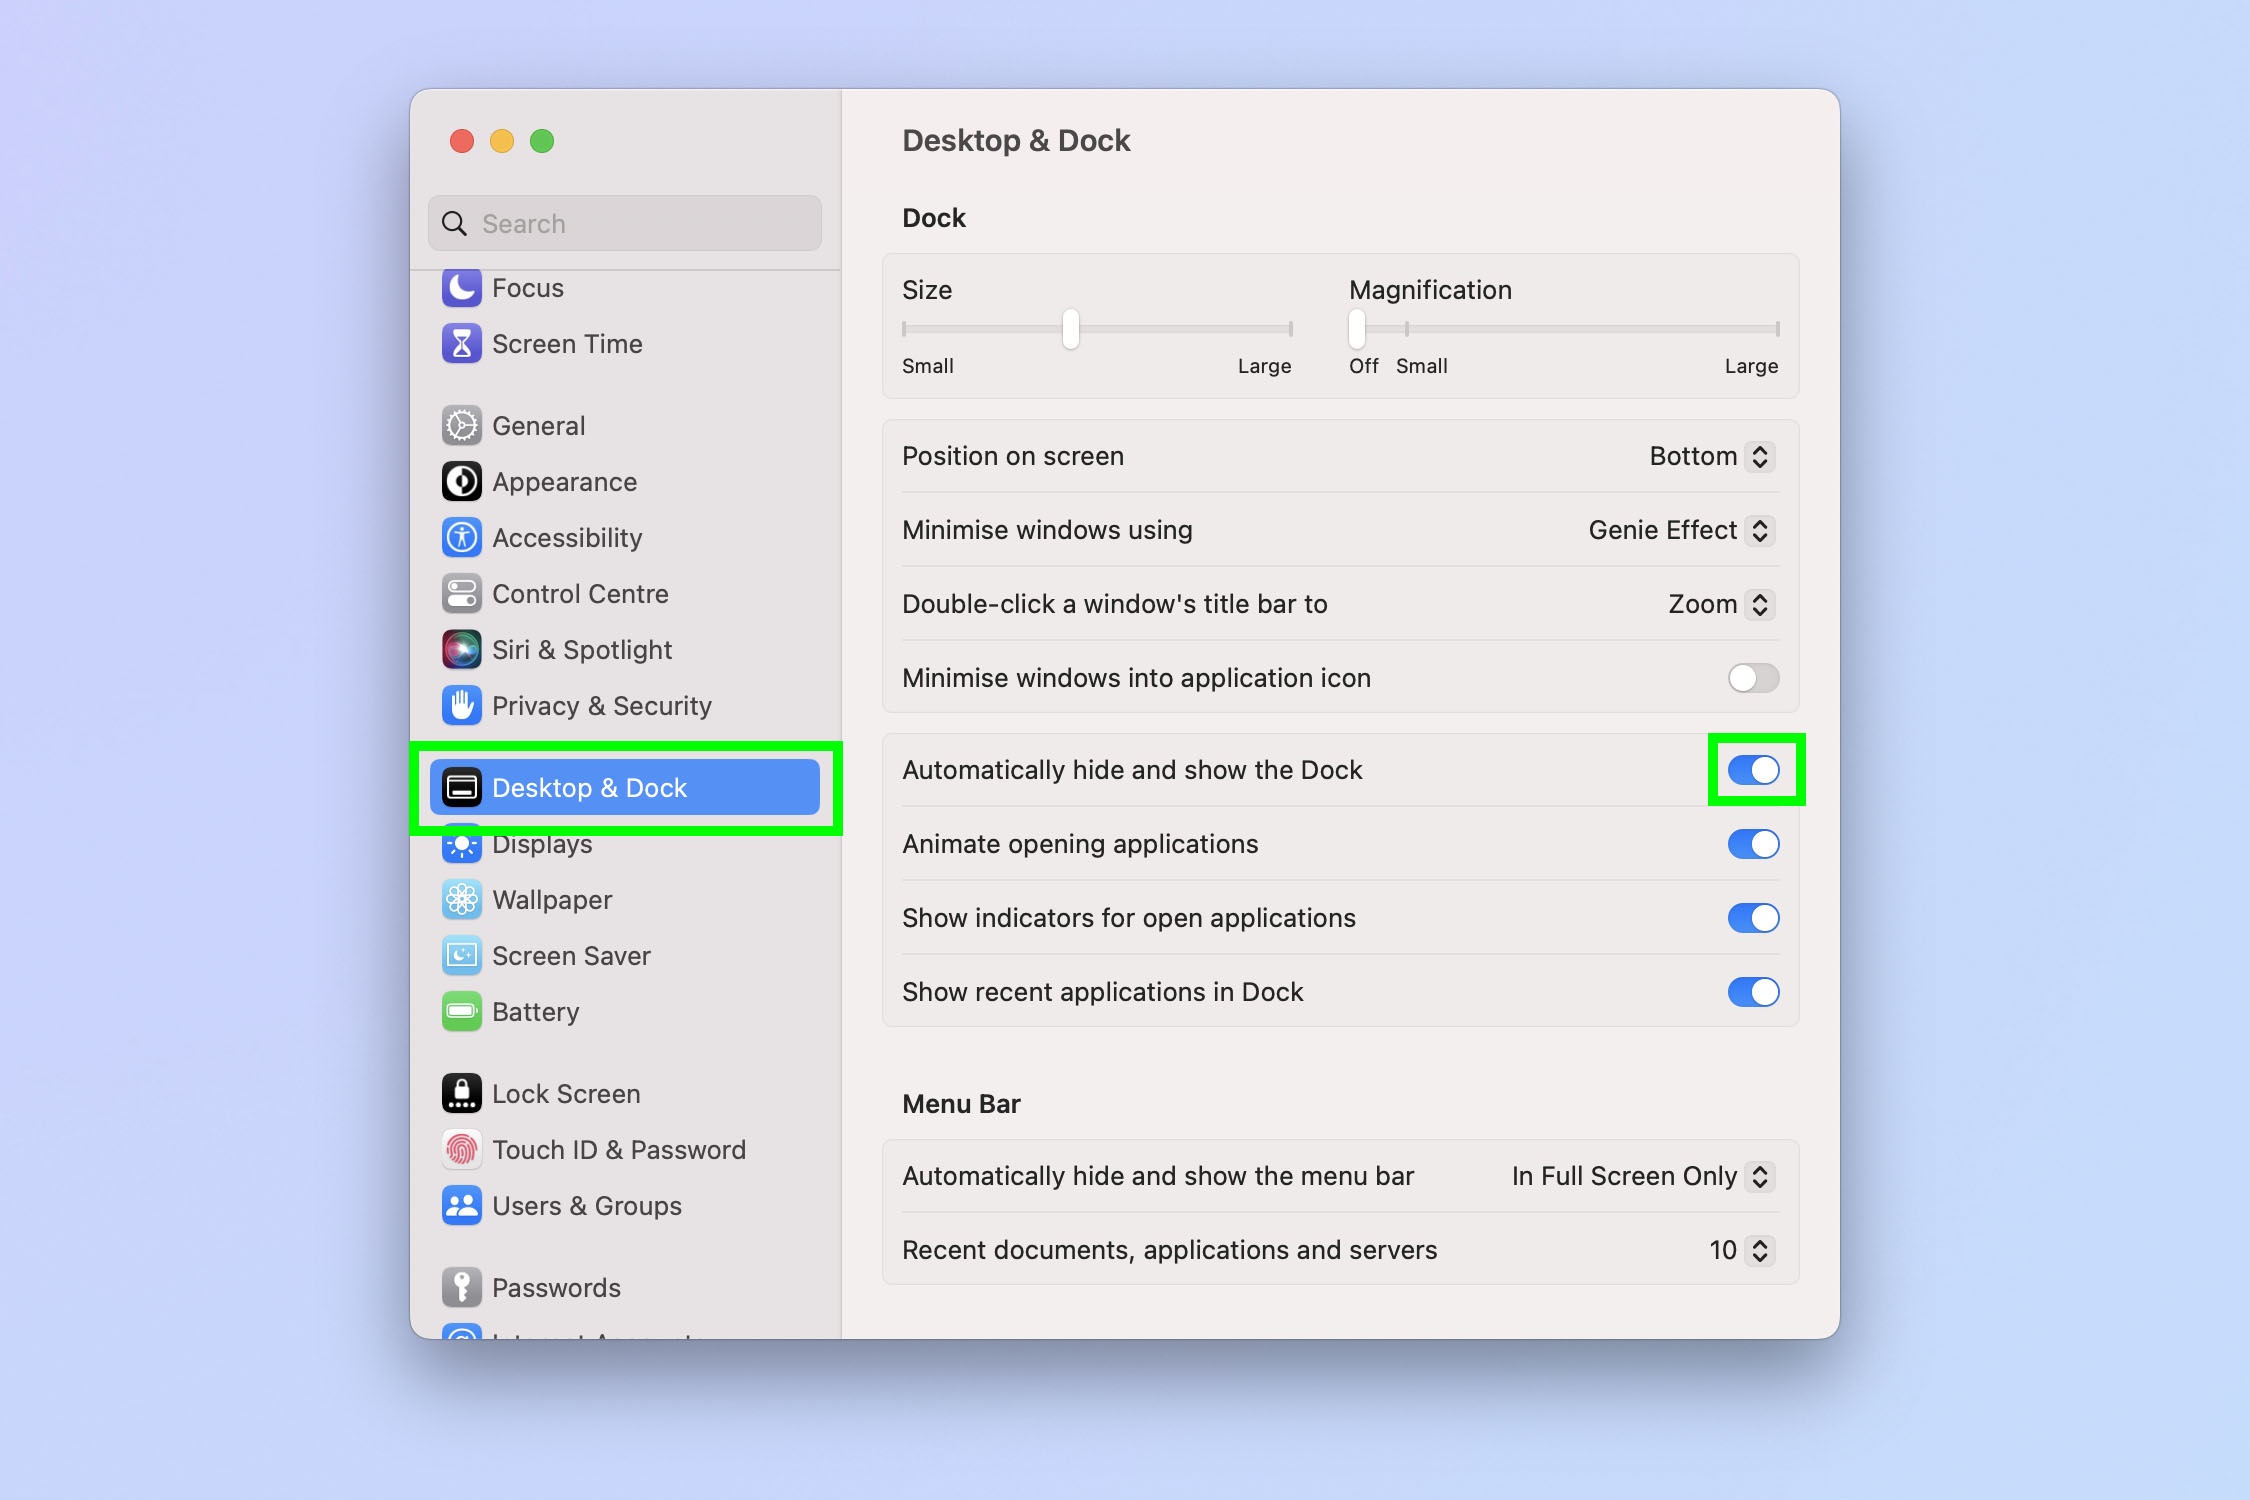
The Dock is fixed (by default) horizontally along the bottom of your Mac's screen. It shows you your pinned and open apps, among other things, and is pivotal to using your machine quickly and effectively. However, it really takes up space, occupying around a half inch of beautiful display and getting in the way of open apps (or forcing you to reduce them from full screen). Thankfully, you can set the Dock to automatically disappear when you aren't using it, and reappear when you move your cursor to the Dock's location.
To do this, open System Preferences and click Desktop & Dock. Now, toggle on Automatically hide and show the Dock.
4. Add or remove apps from the Dock
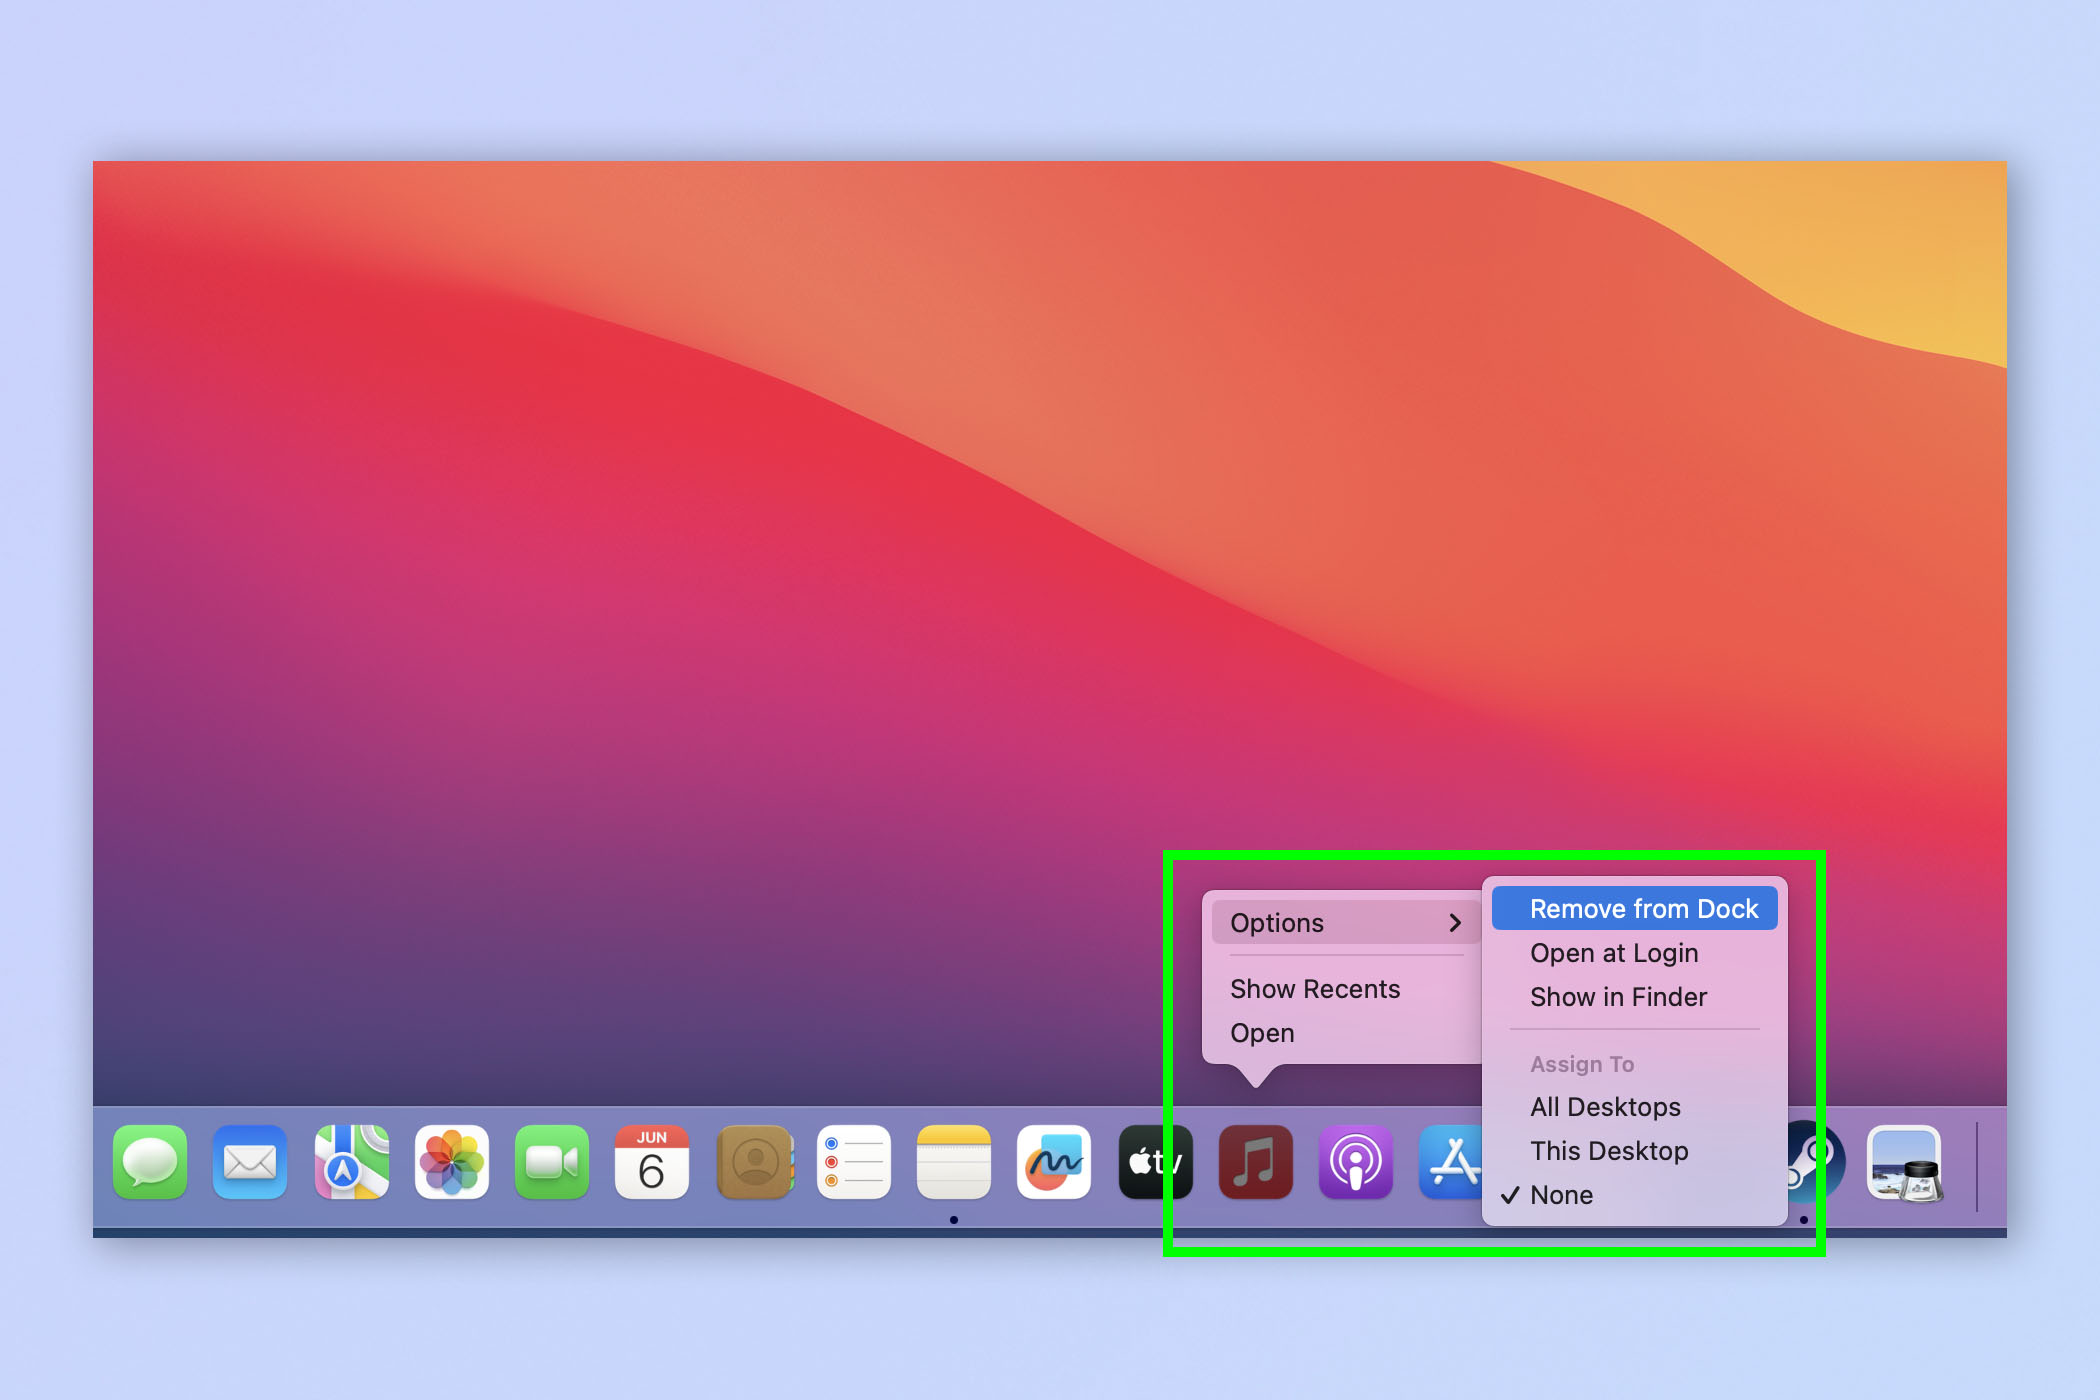
When you do bring up your Dock, you'll want it to show the apps that you use and have open, but you won't want it clogged up with apps you don't use or want. It's important then to curate your Dock, but to do that, you'll need to know how to add and remove apps from it. Note: apps that are opened appear in Dock when open, but won't stay pinned to the Dock unless told to. By default there are a range of apps pinned to the Dock (the Apple pre-installed apps).
Right click an App in the Dock. If it's not in the Dock unless opened, click Keep in Dock. If it is already pinned to the Dock and you want to remove it, click Remove from Dock.
5. Screenshot (like a pro)
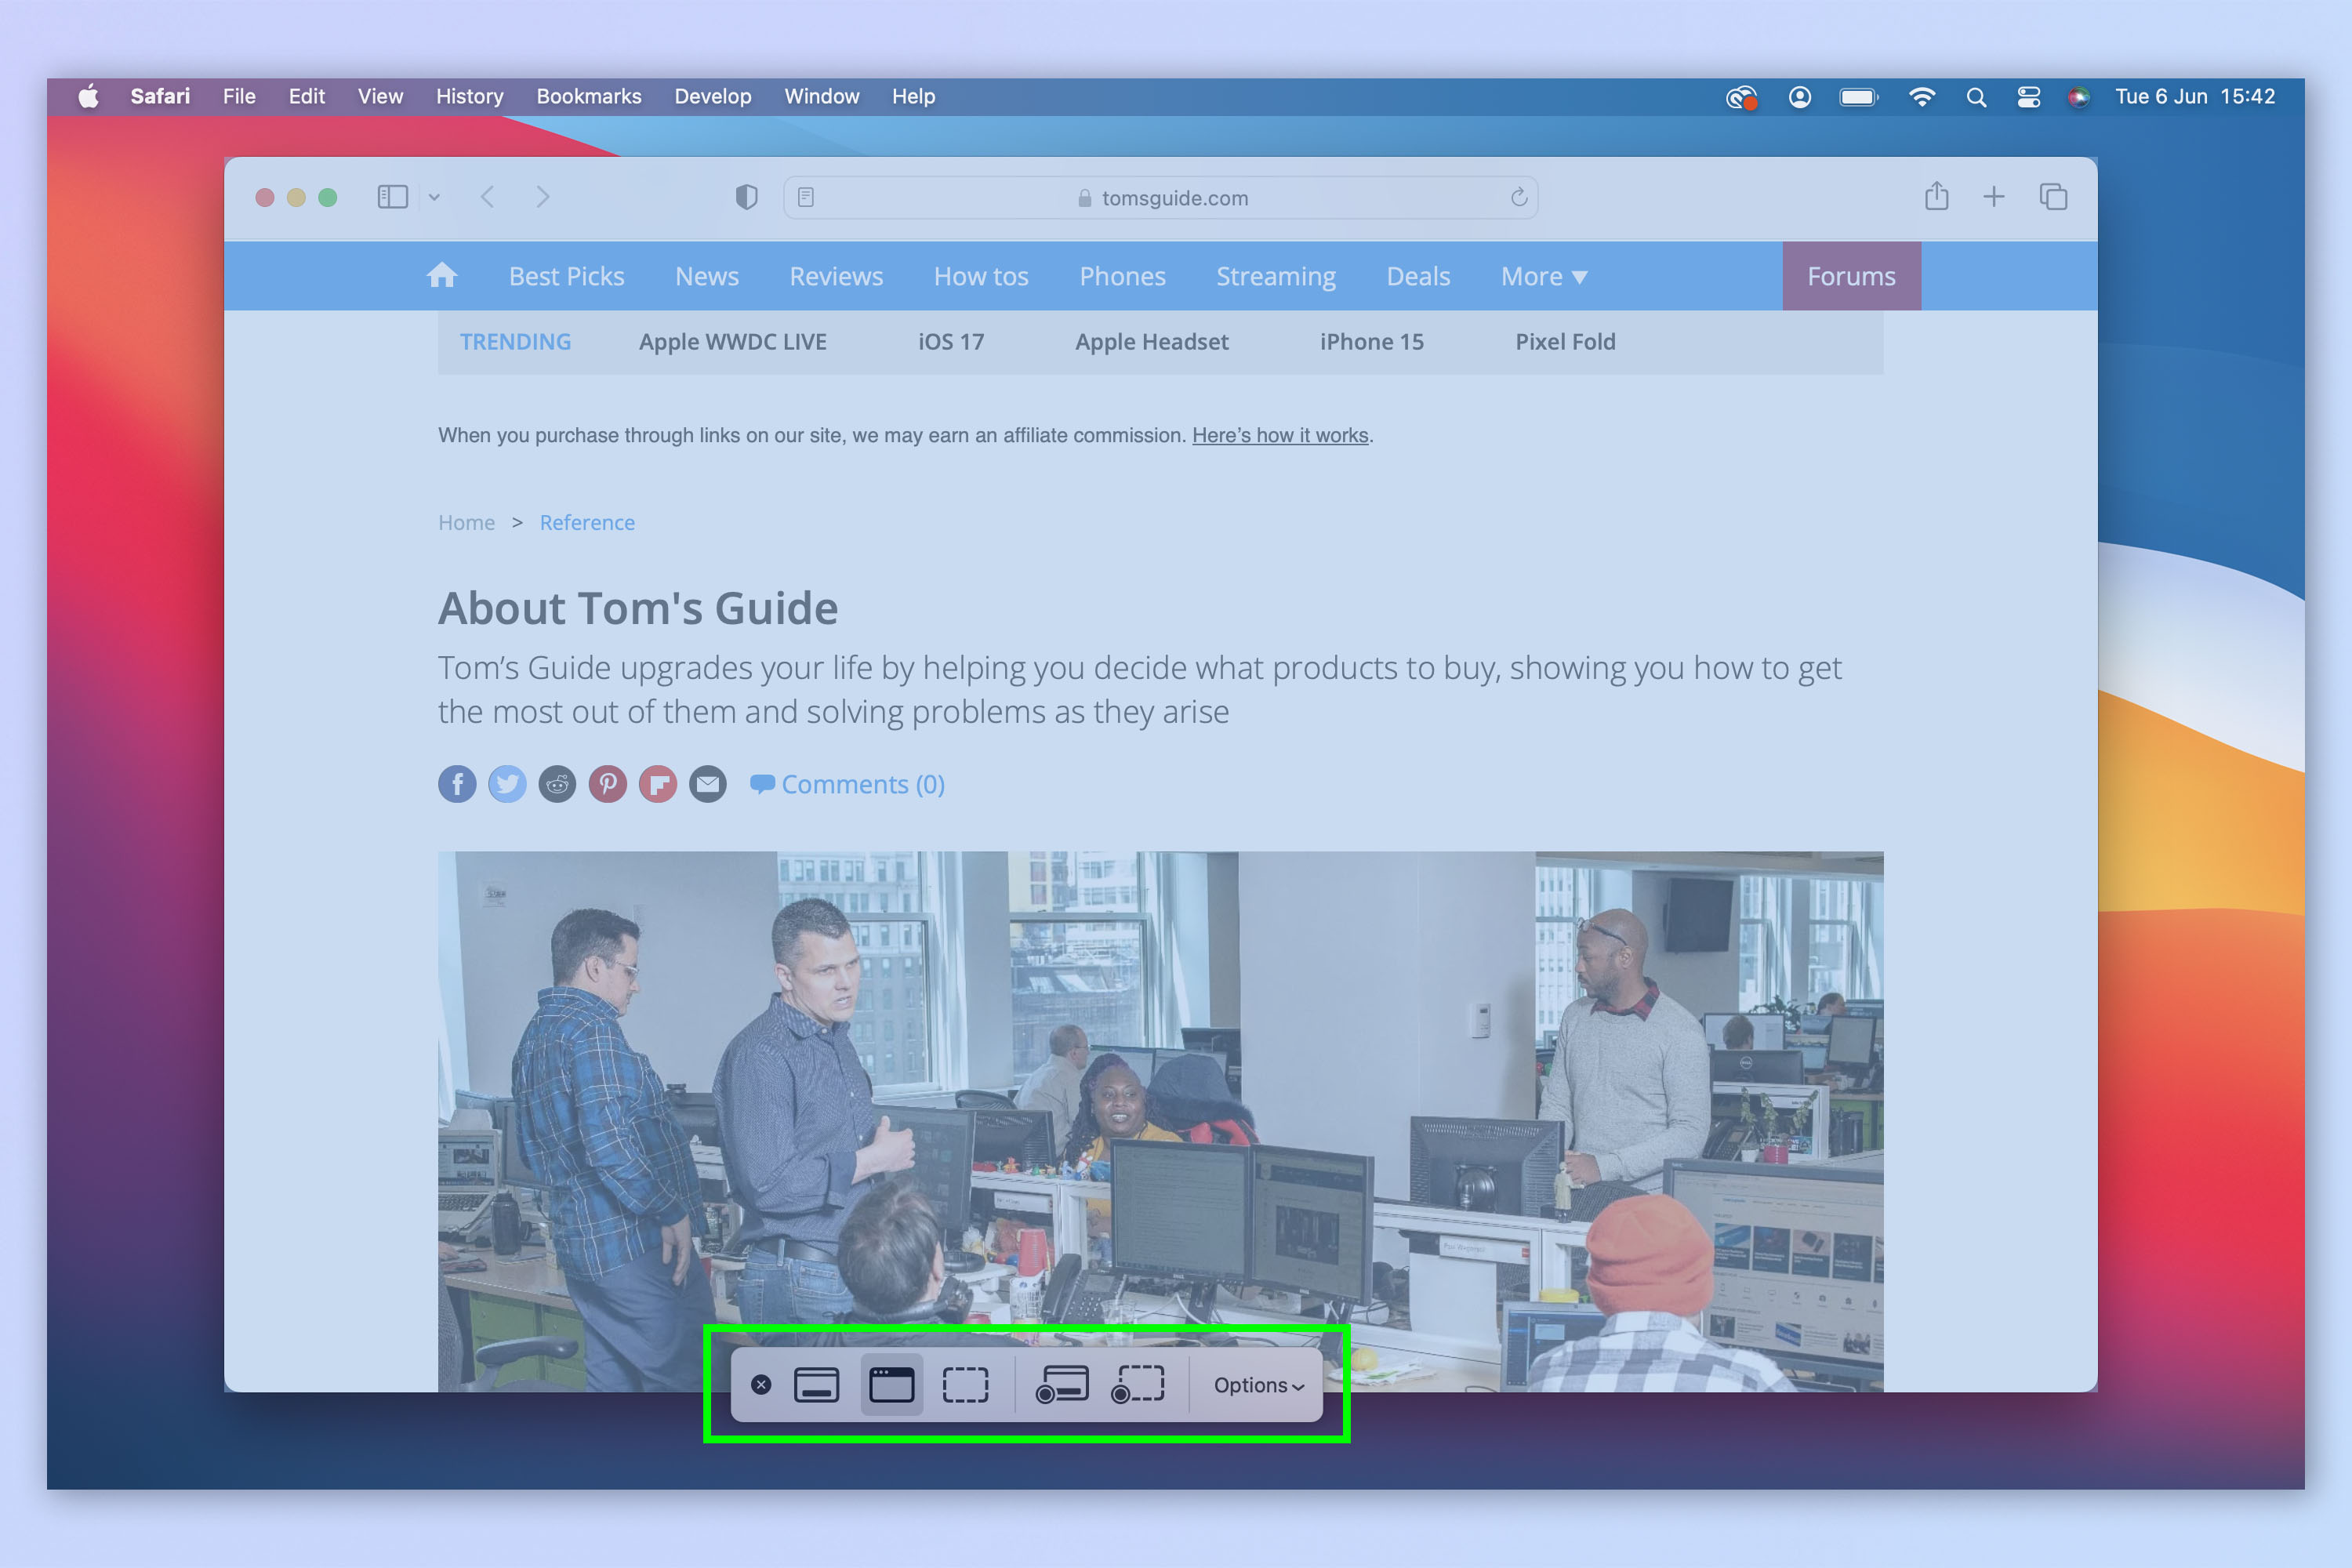
To take a basic screenshot on a Mac, you press Shift + Cmd + 3. This screenshots everything open on your screen (or screens — if you have more than one window, this does the lot). However, as you get more familiar with your Mac, you'll become adept at using the more advanced screenshot tools as and when you need them.
Press Shift + Cmd + 4 to access the Snipping tool, which allows you to capture selected sections of screen. Press Shift + Cmd + 5 to access the full screenshot menu, where you can select between full screen, individual windows or snipping, as well as video recording and other options.
Full guide: how to screenshot on Mac
6. Use Mission Control
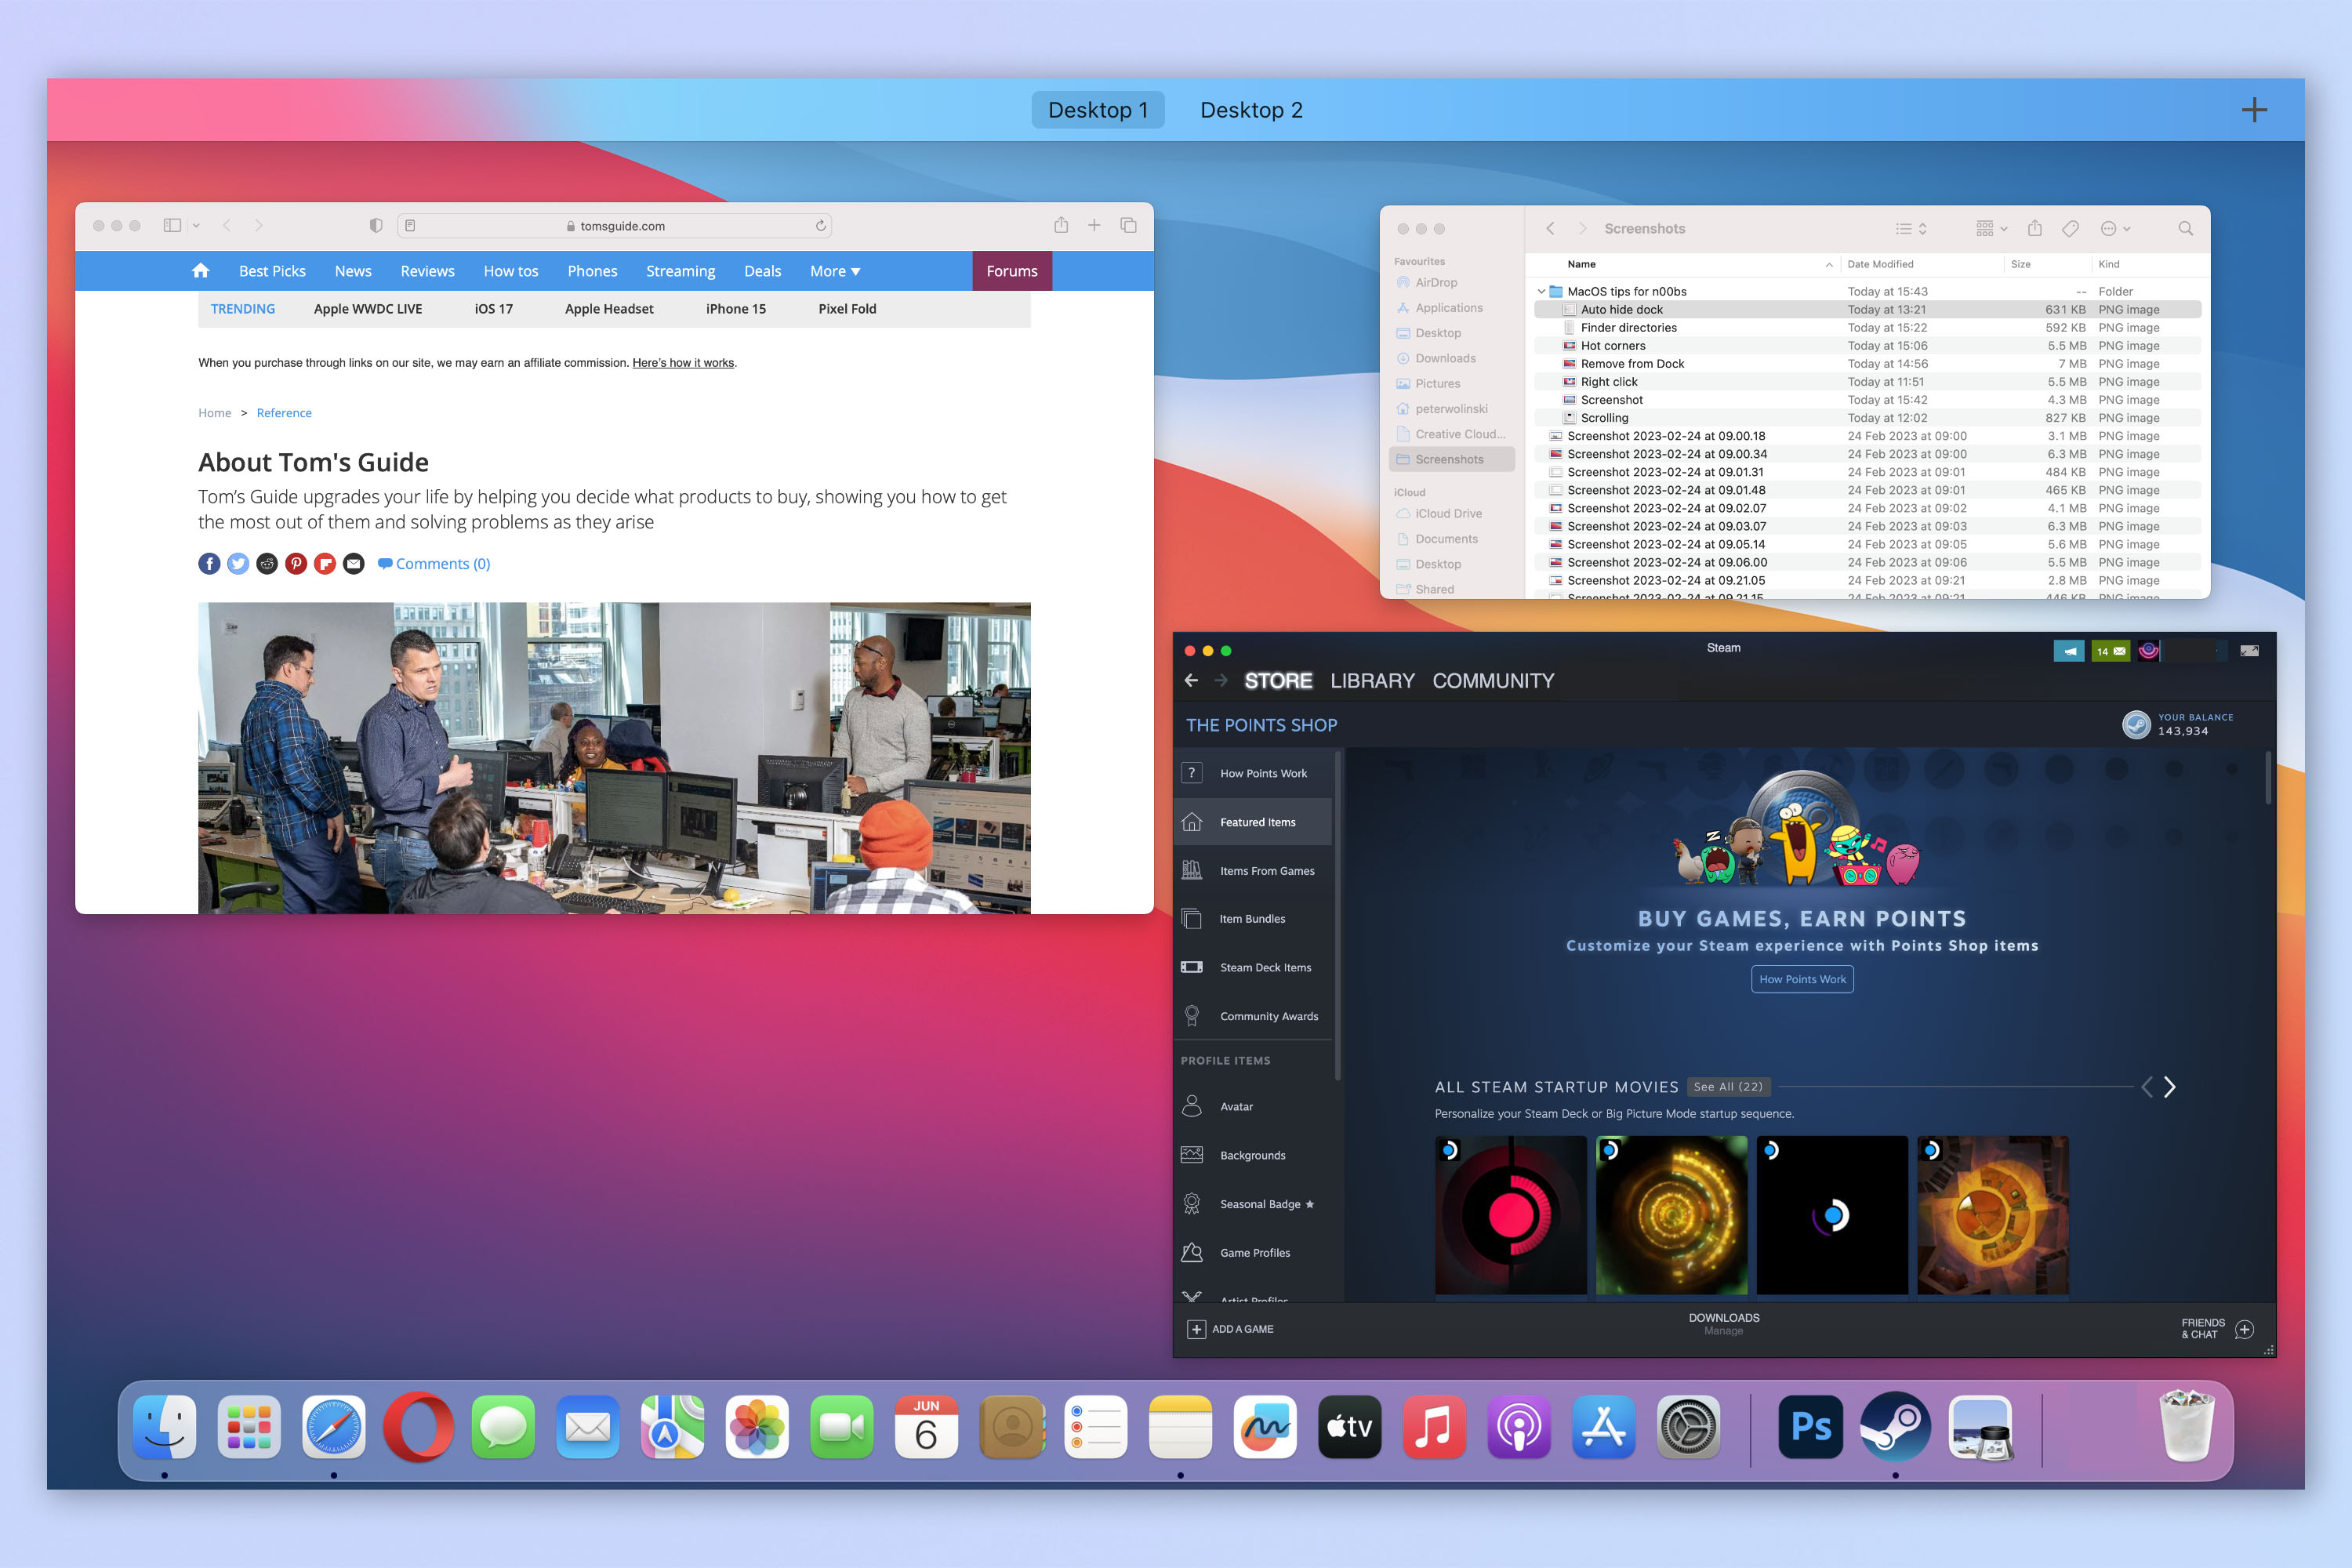
One of my favorite things about macOS is how intuitive it is to operate and how easy it is to get around. This helps with productivity and makes working on a Mac an enjoyable and fluid experience (in my opinion at least). One of the best features for multi-tasking is Mission Control, which shows you instantly all open apps and lets you flick between them. This saves you having to go to and open your Dock to switch between apps or windows. If you're not already using it, once you start, you probably won't stop — using Mission Control has effectively become muscle memory to me now.
To access Mission Control, swipe with three fingers on your MacBook's Trackpad or Magic Trackpad. Alternatively, press F3 on your keyboard (the icon with three different sized rectangles).
7. Use Hot Corners
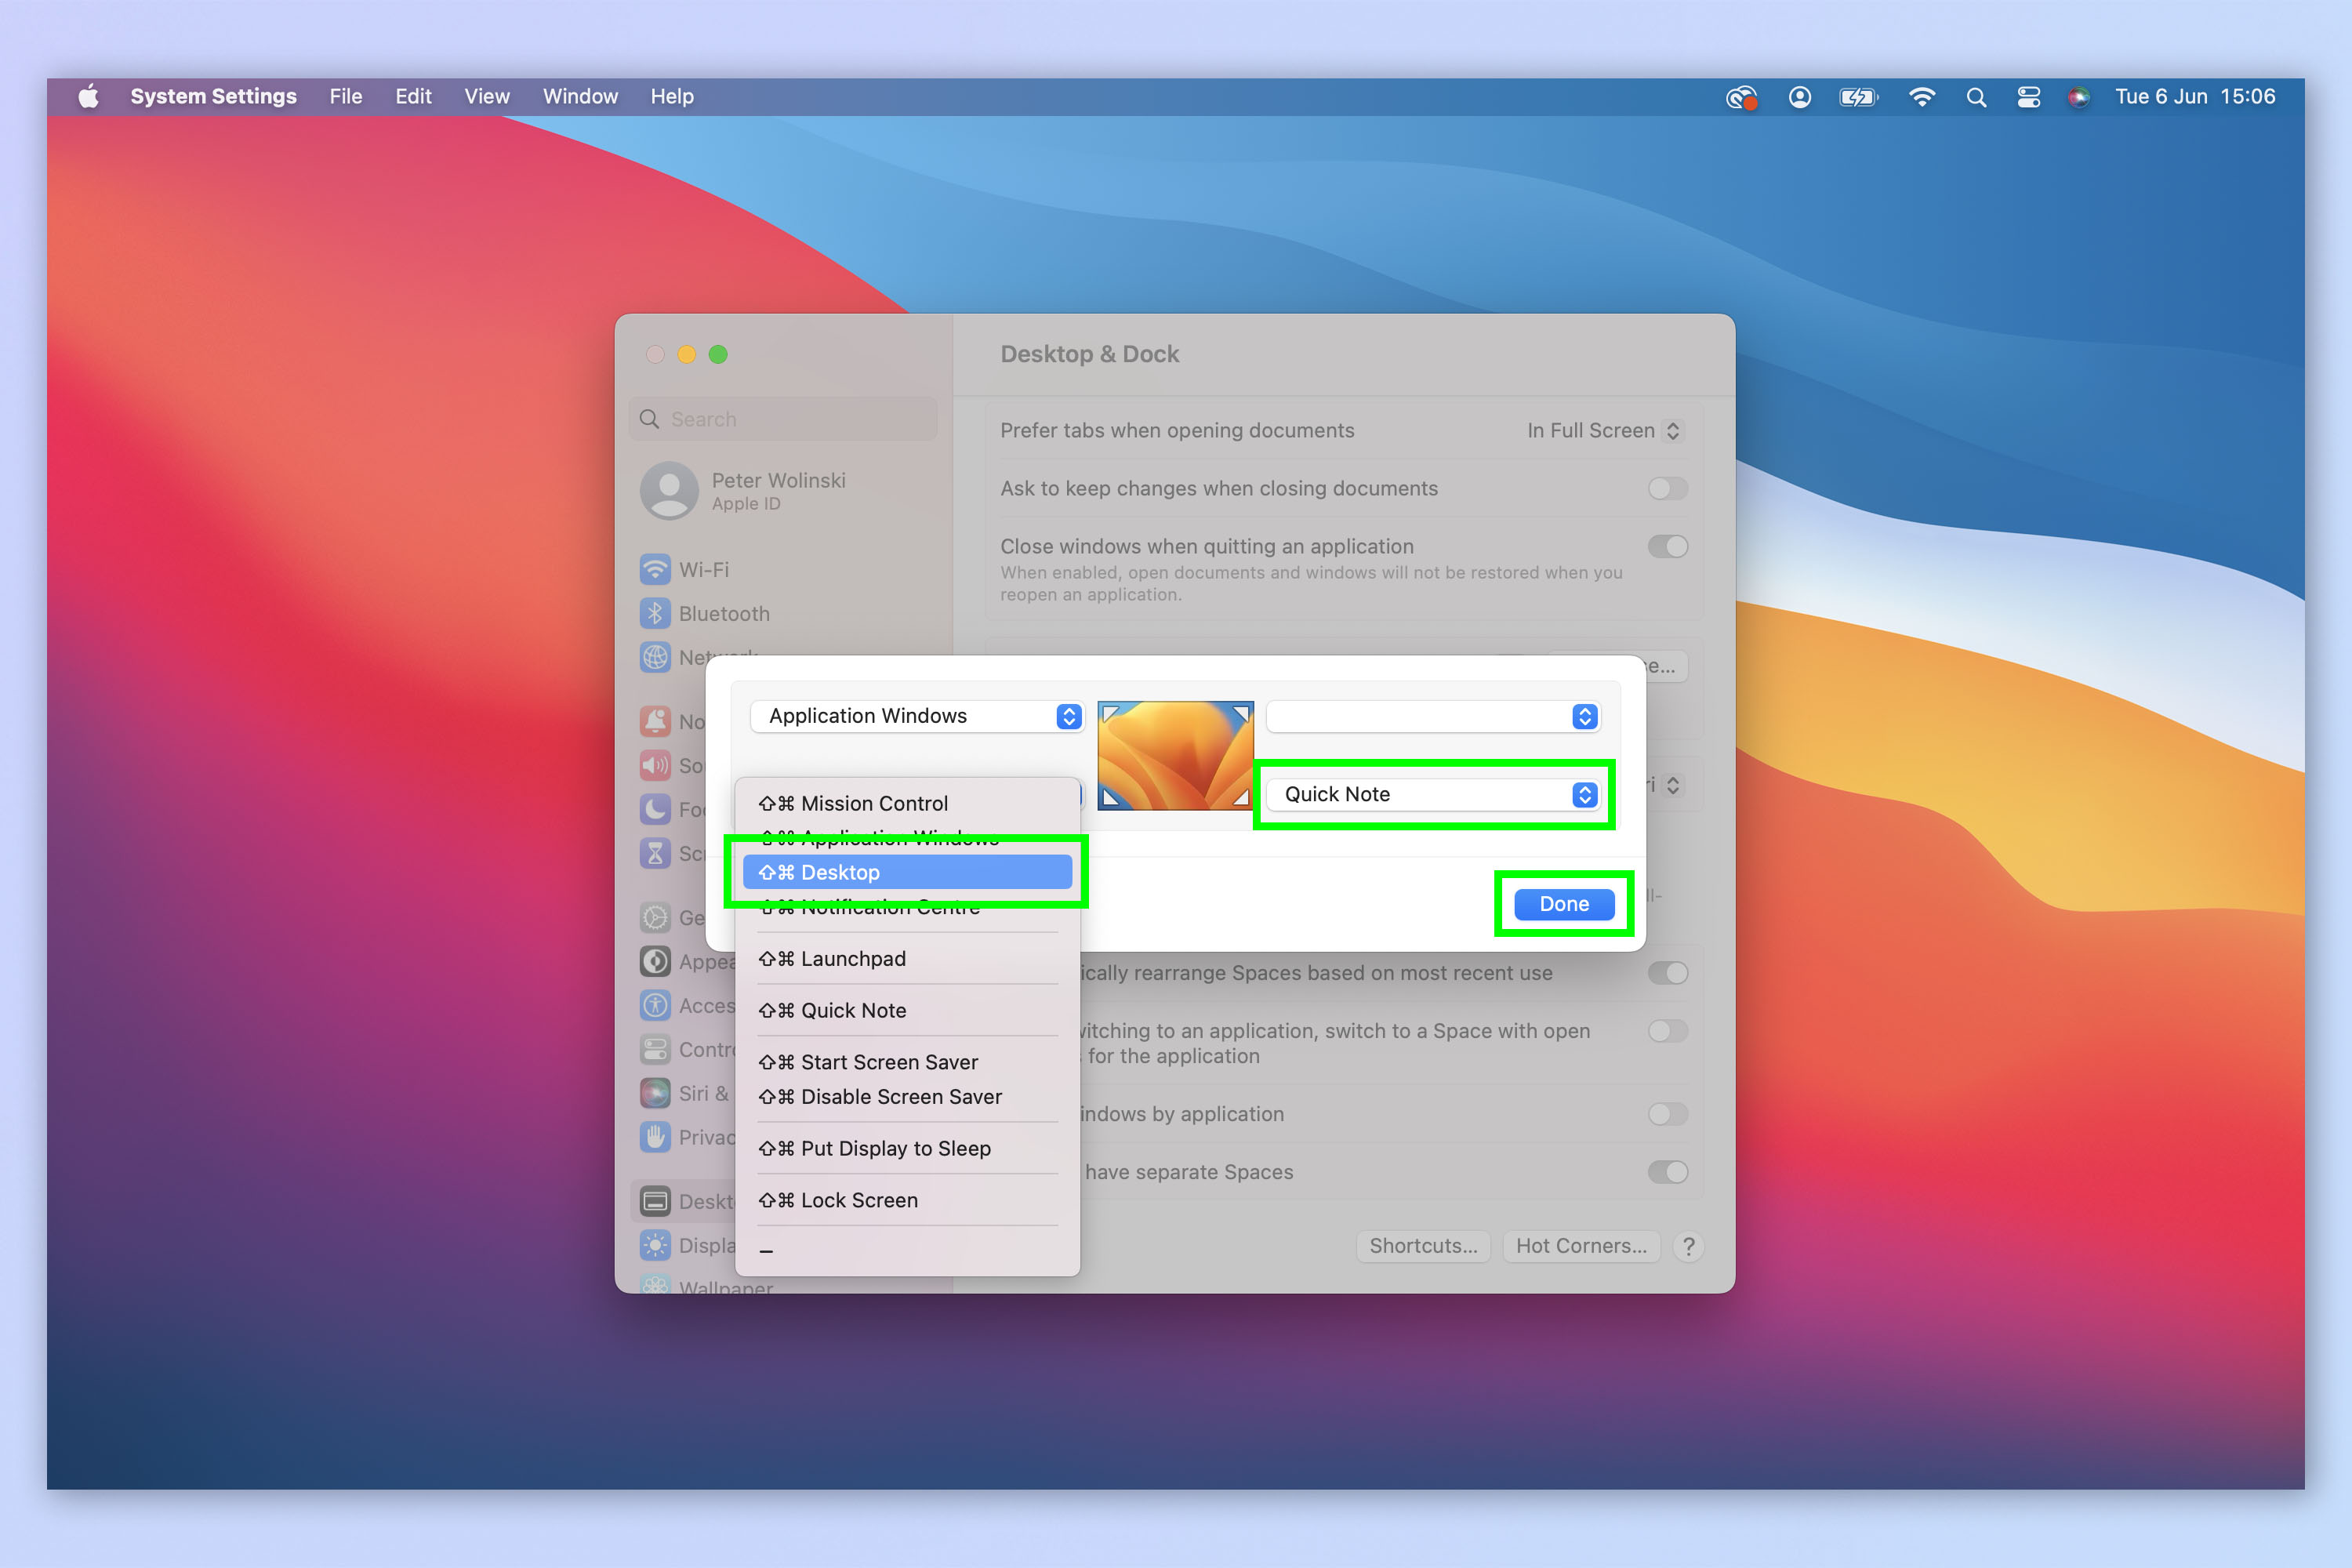
Another super useful UI feature is Hot Corners, which allows you to assign certain functions or applications to a corner of the screen. This gives you quick access to the things you use the most.
To set up Hot Corners, open System Preferences and click Desktop & Dock. Now scroll down and click Hot Corners. Click a corner and select a function from the dropdown menu to assign it to that corner. Click Done when you're happy and move your mouse cursor into a corner to activate the Hot Corner.
Full guide: how to use Hot Corners on Mac
8. Add folders to Finder
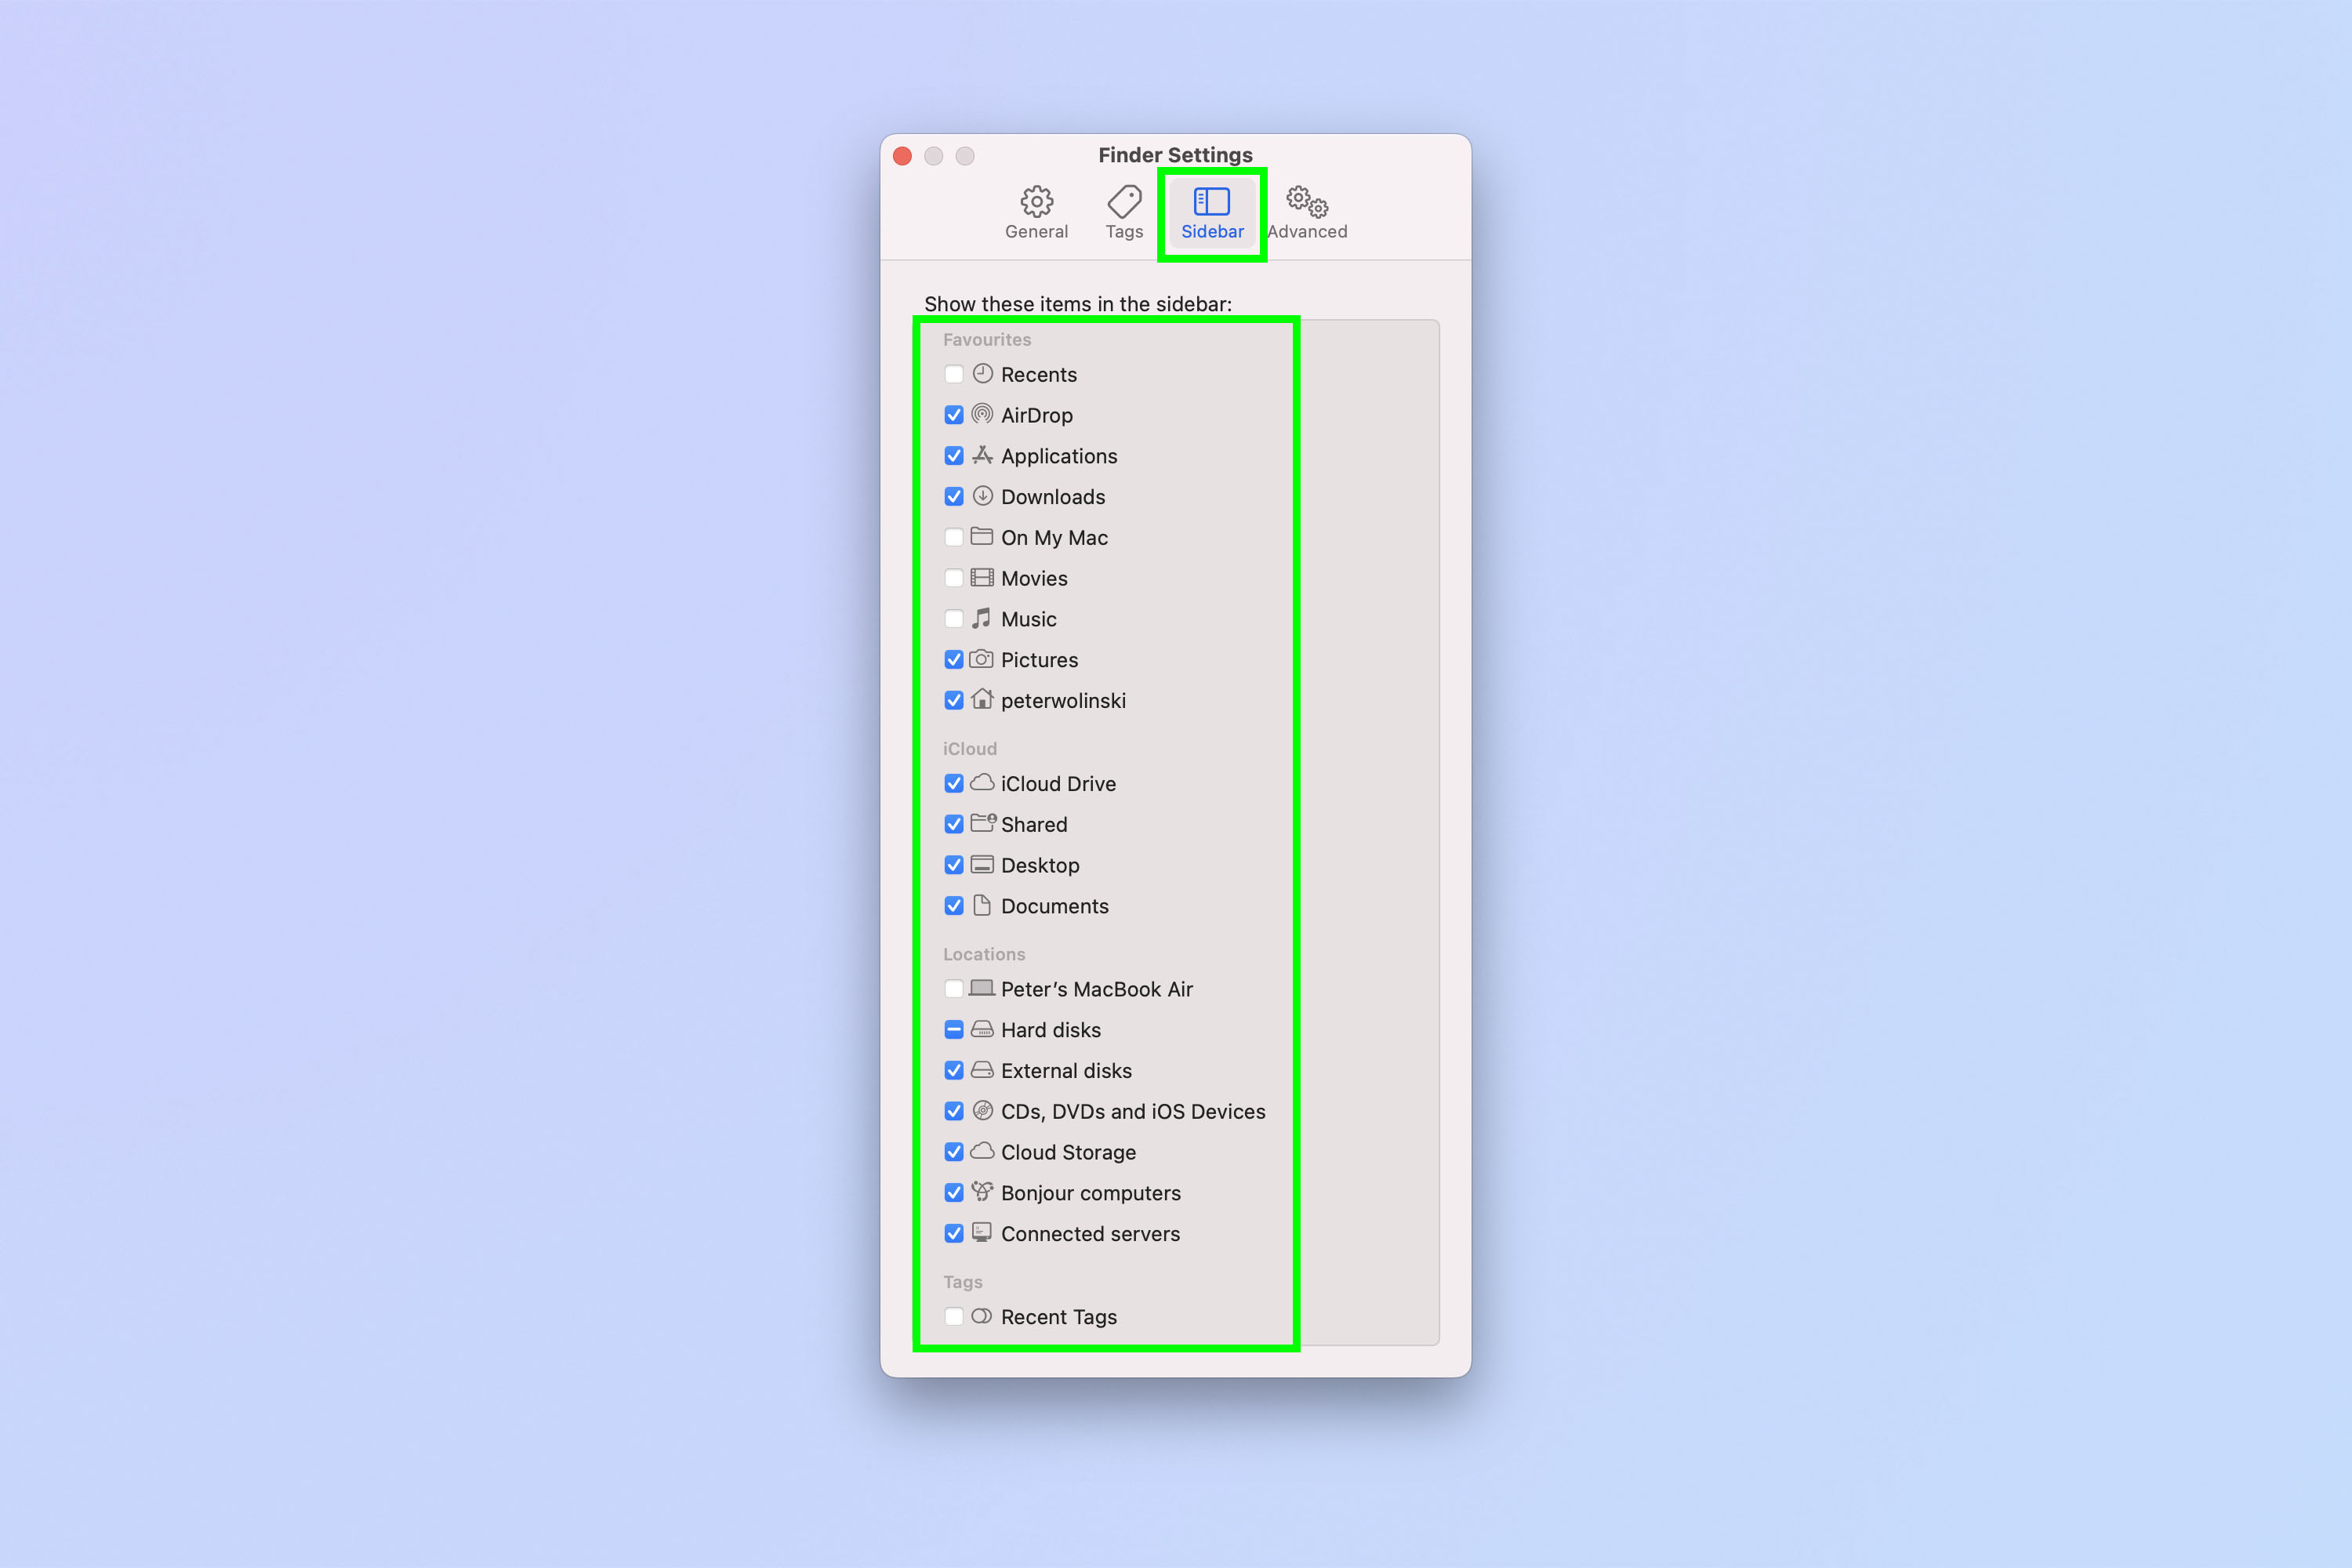
If you're used to using a Windows PC and the File Explorer, you may find Finder a bit confusing at first, as it won't show you crucial file directories such your drives and user folders in the sidebar. Without access to these directories, you don't have easy access to the entirety your machine, which sucks.
This is another example of things that I find really counter-intuitive with macOS, and something I always change as soon as I get a new Mac. Luckily, it's easy to sort out.
With Finder open, click Finder in the top left toolbar and select Settings. Go to Sidebar and check the directories that you want to appear in the Finder sidebar. I'd recommend your home folder (denoted by the house symbol) where all your user files are stored, and Macintosh HD, which is your entire OS partition.
Full guide: how to find the home folder on Mac
9. Master keyboard shortcuts
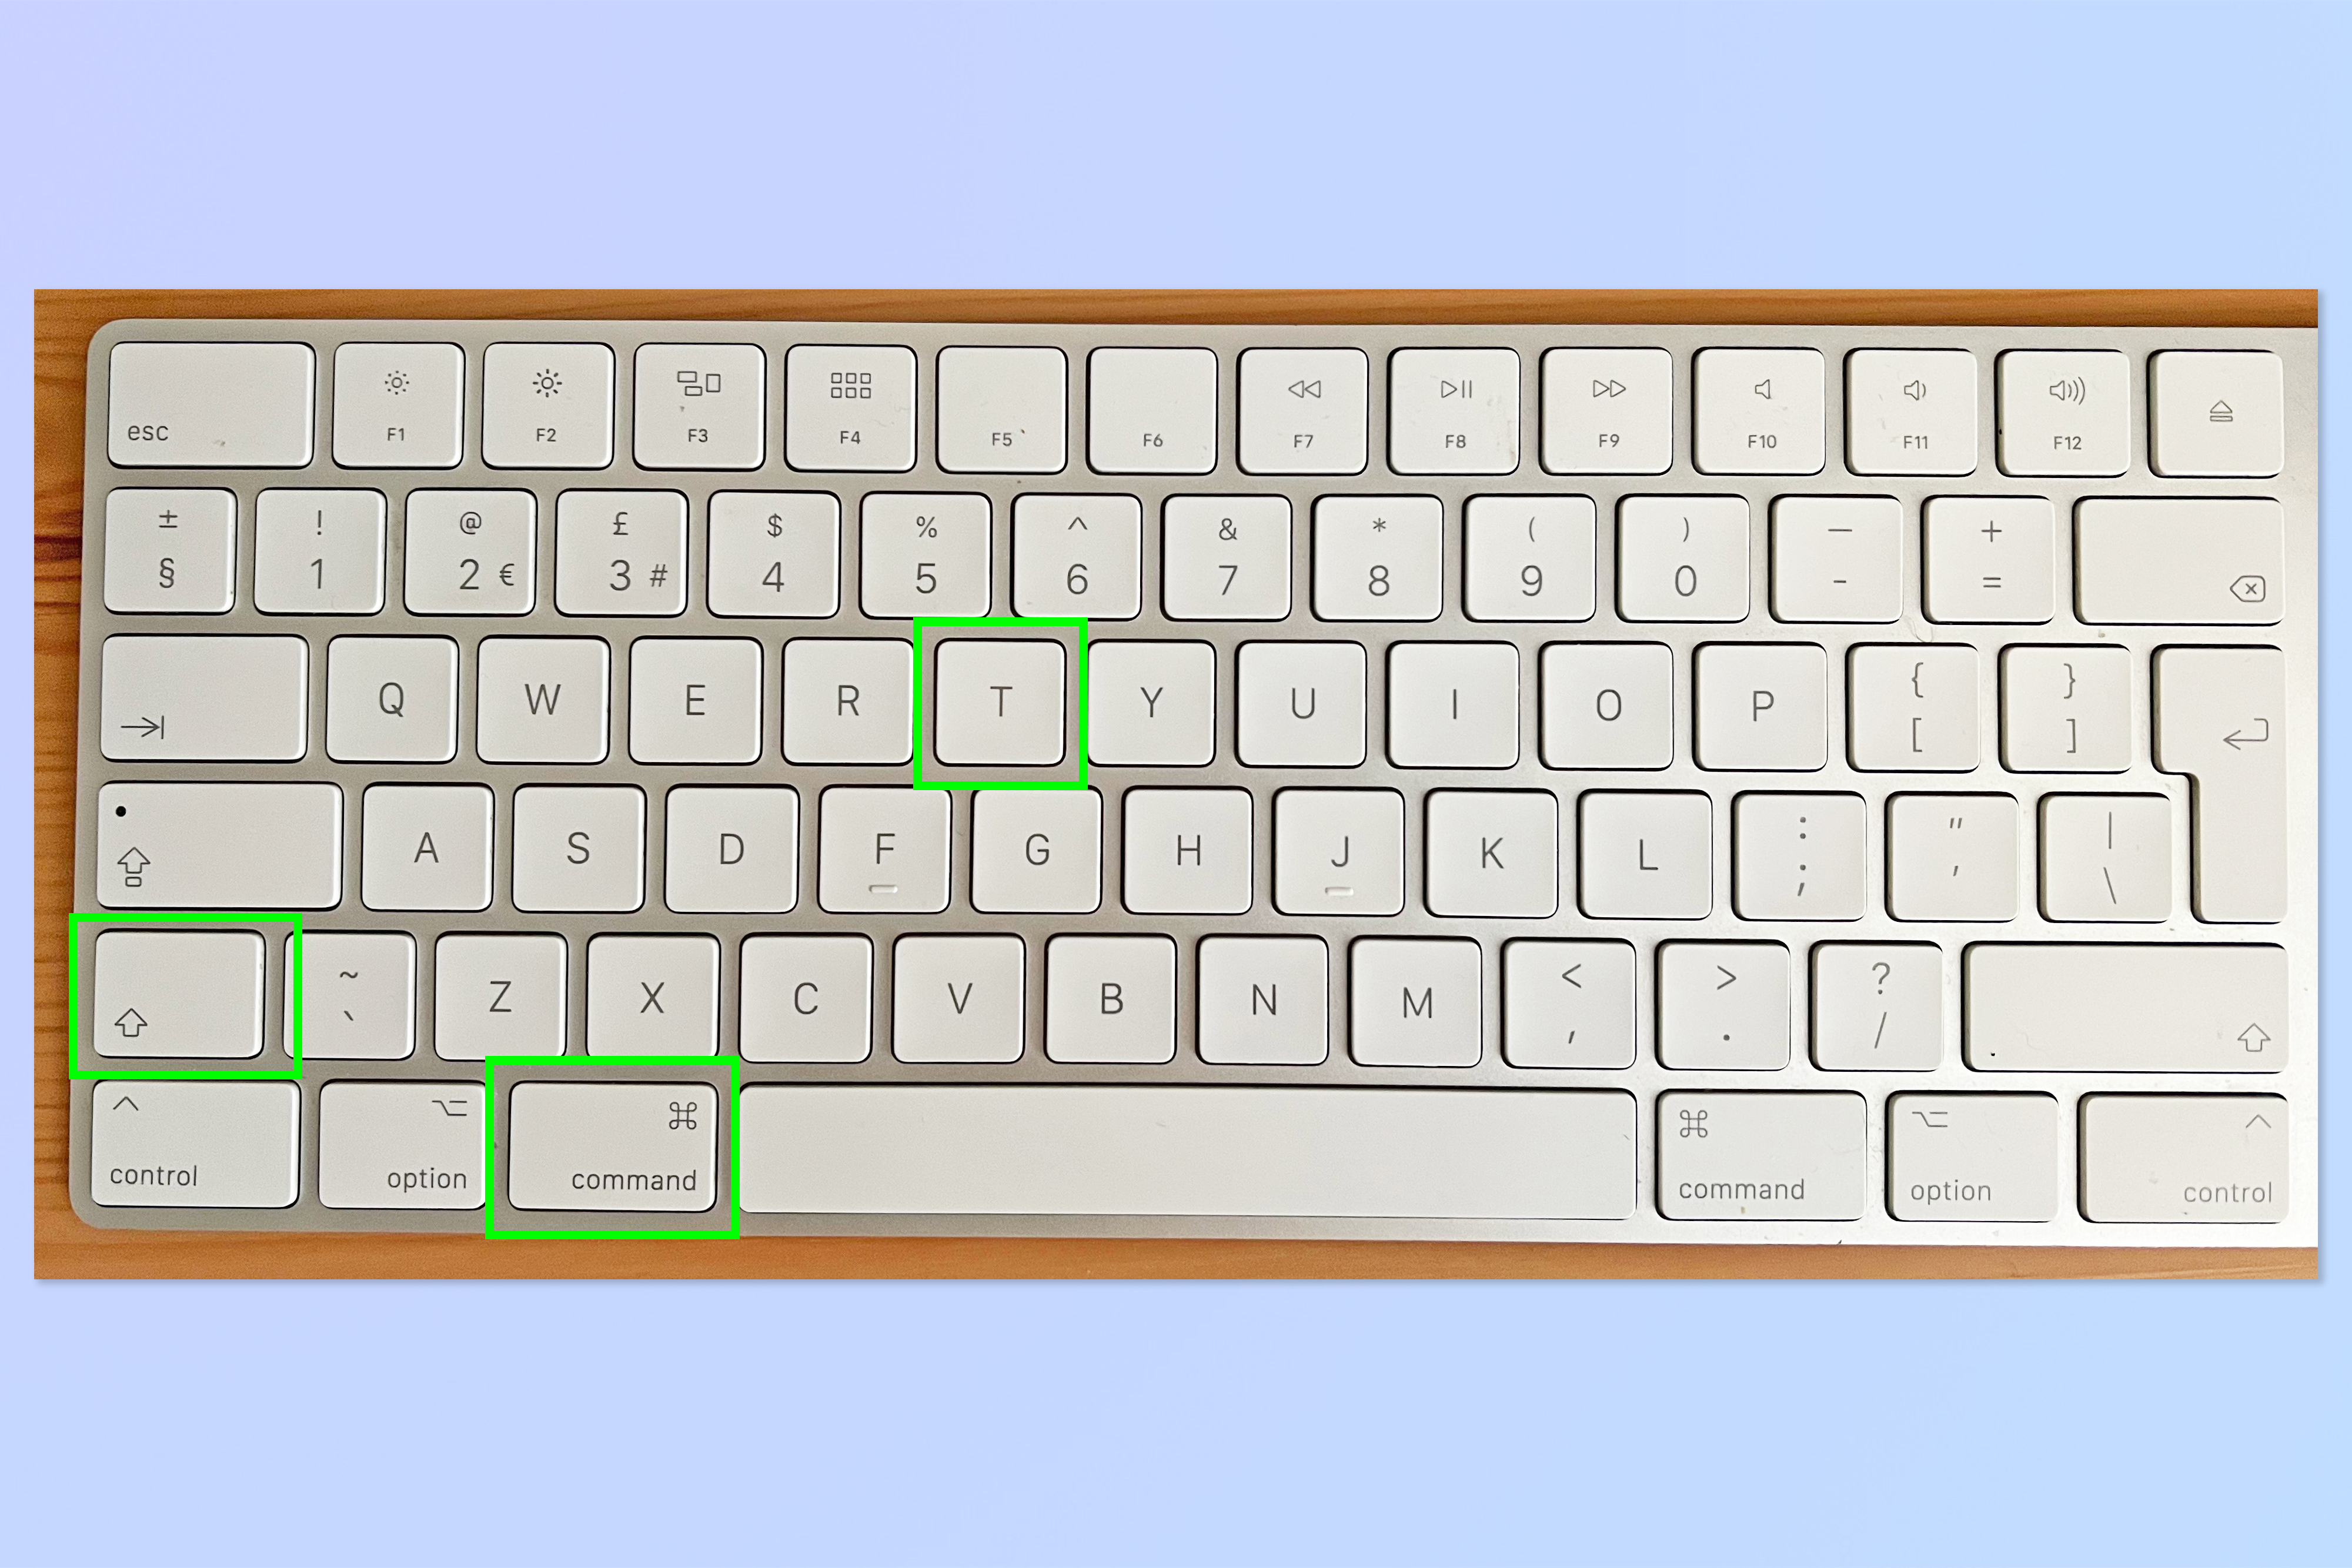
Finally, probably the most useful tip for using your new Mac is to get to grips with keyboard shortcuts. There are a huge number of keyboard shortcuts built into macOS by default, which will allow you to quickly perform certain functions. Take a look at the list of keyboard shortcuts on Apple's website and remember the ones you'll use the most. These will save you lots of time in the future as you'll be able to perform your most-used functions by muscle memory.
With that, you're well on your way to becoming a confident and experienced Mac user. If you'd like to graduate onto some sterner stuff, you'll want to check out the Terminal commands every Mac power user should know. We can also show you how to clear the cache on Mac, if your machine is running a little slow. And how to Inspect Element on Safari for Mac, if you feel like tinkering behind the scenes of web pages. Messy desktop? Learn how to use desktop stacks on Mac.

Peter is a Senior Editor at Tom's Guide, heading up the site's Reviews team and Cameras section. As a writer, he covers topics including tech, photography, gaming, hardware, motoring and food & drink. Outside of work, he's an avid photographer, specialising in architectural and portrait photography. When he's not snapping away on his beloved Fujifilm camera, he can usually be found telling everyone about his greyhounds, riding his motorcycle, squeezing as many FPS as possible out of PC games, and perfecting his espresso shots.
 Club Benefits


