Snapseed is the best photo editing app you're probably not using — and it's free
How to transform your images using this free photo editing tool
Here at Tom’s Guide our expert editors are committed to bringing you the best news, reviews and guides to help you stay informed and ahead of the curve!
You are now subscribed
Your newsletter sign-up was successful
Want to add more newsletters?
Join the club
Get full access to premium articles, exclusive features and a growing list of member rewards.
If there’s one thing more amazing than the editing tools on offer in Snapseed, it’s the fact that you won’t have to pay a penny to use any of them.
It’s one of the reasons why we believe it’s among the best photo editing apps for Android and iOS. Useful for casual users as well as professionals, it's extremely intuitive and packed with features geared towards image manipulation.
Before we dive into the task, it's worth noting that Snapseed is a nondestructive editor. This means you can tap the Stack icon at the top of the editing screen to view your edits as layers, allowing you to easily undo changes or make further adjustments.
Article continues belowLet’s dive in to how it works.
1. Open a photo
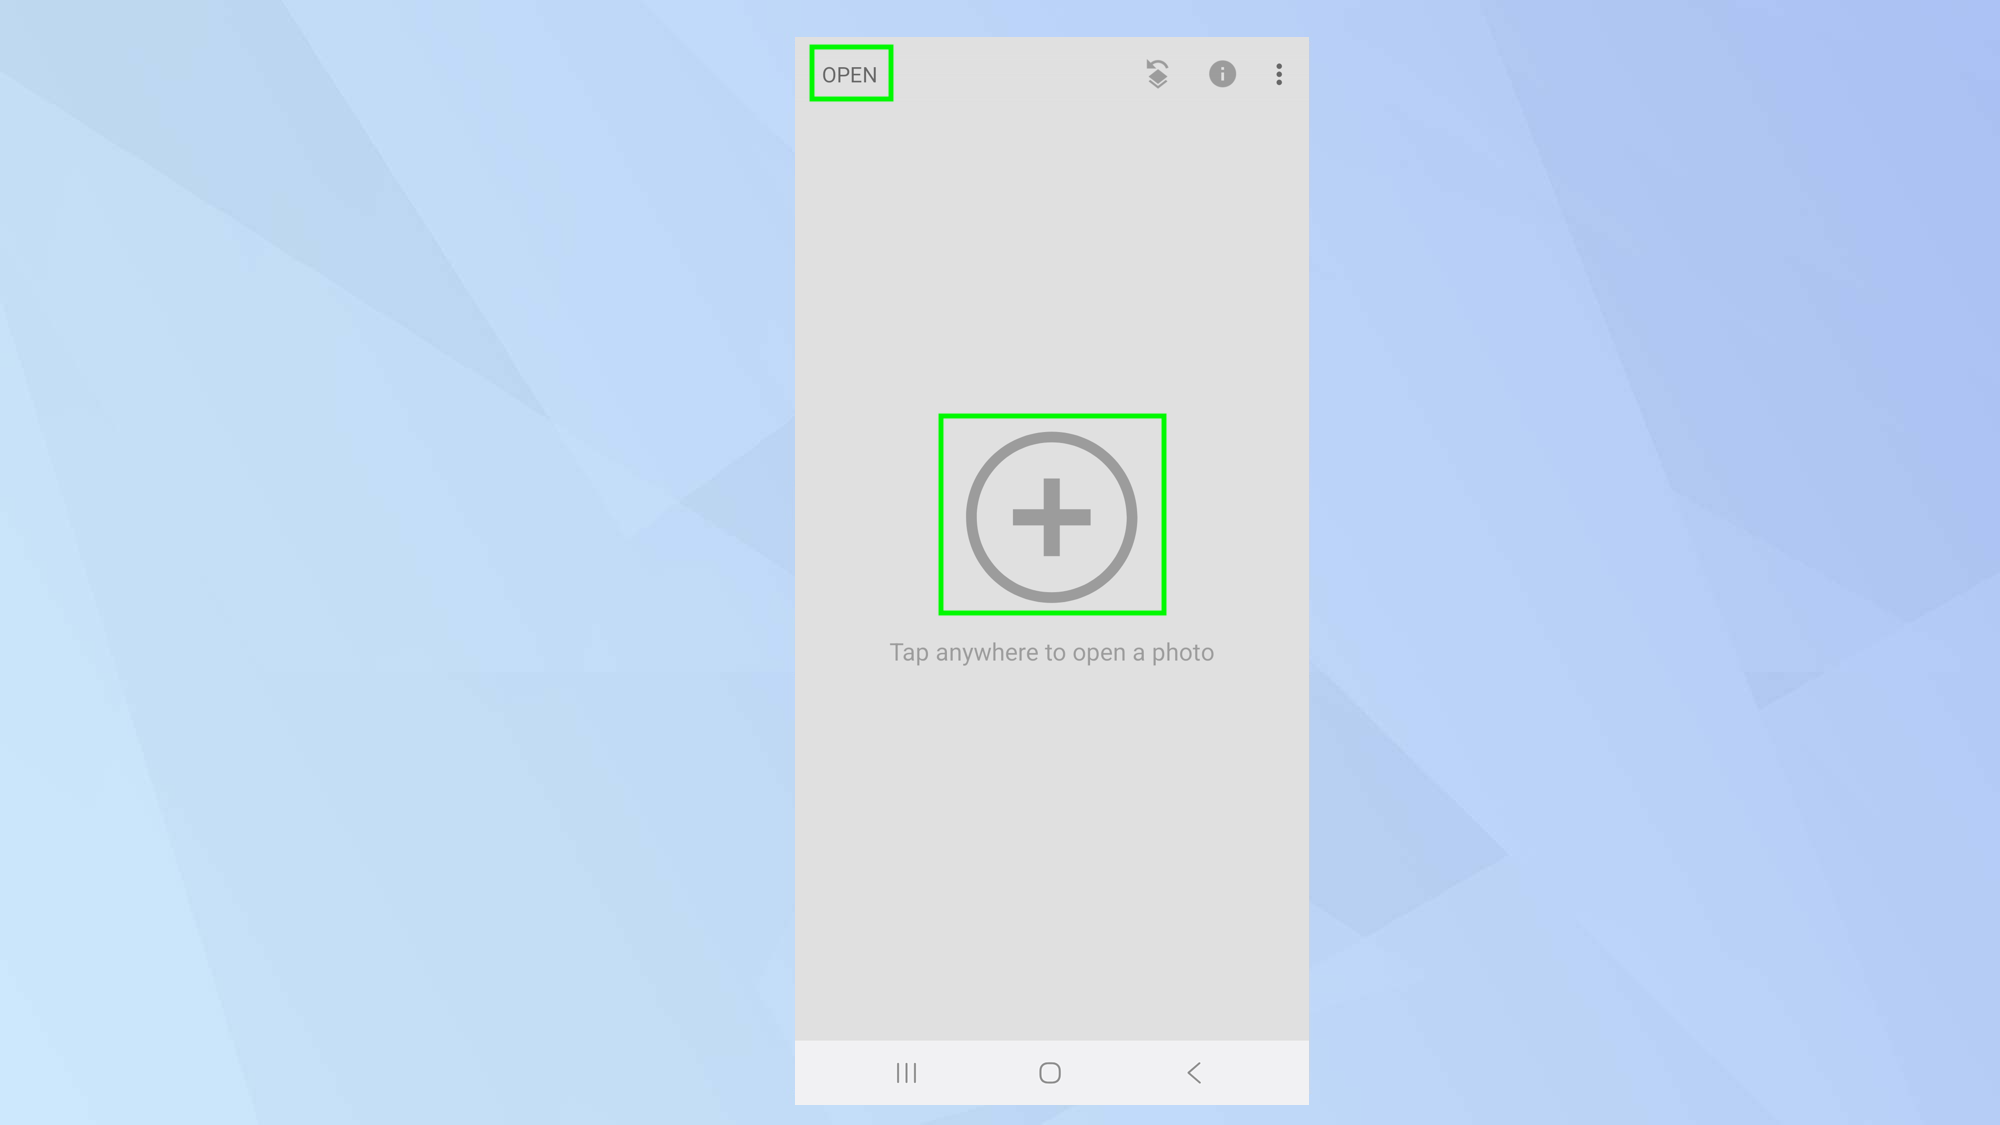
Launch Snapseed and you can either tap anywhere on the screen to find an image to work with, or select open in the top-left corner of the screen if you’re already working on an image.
2. Change the style
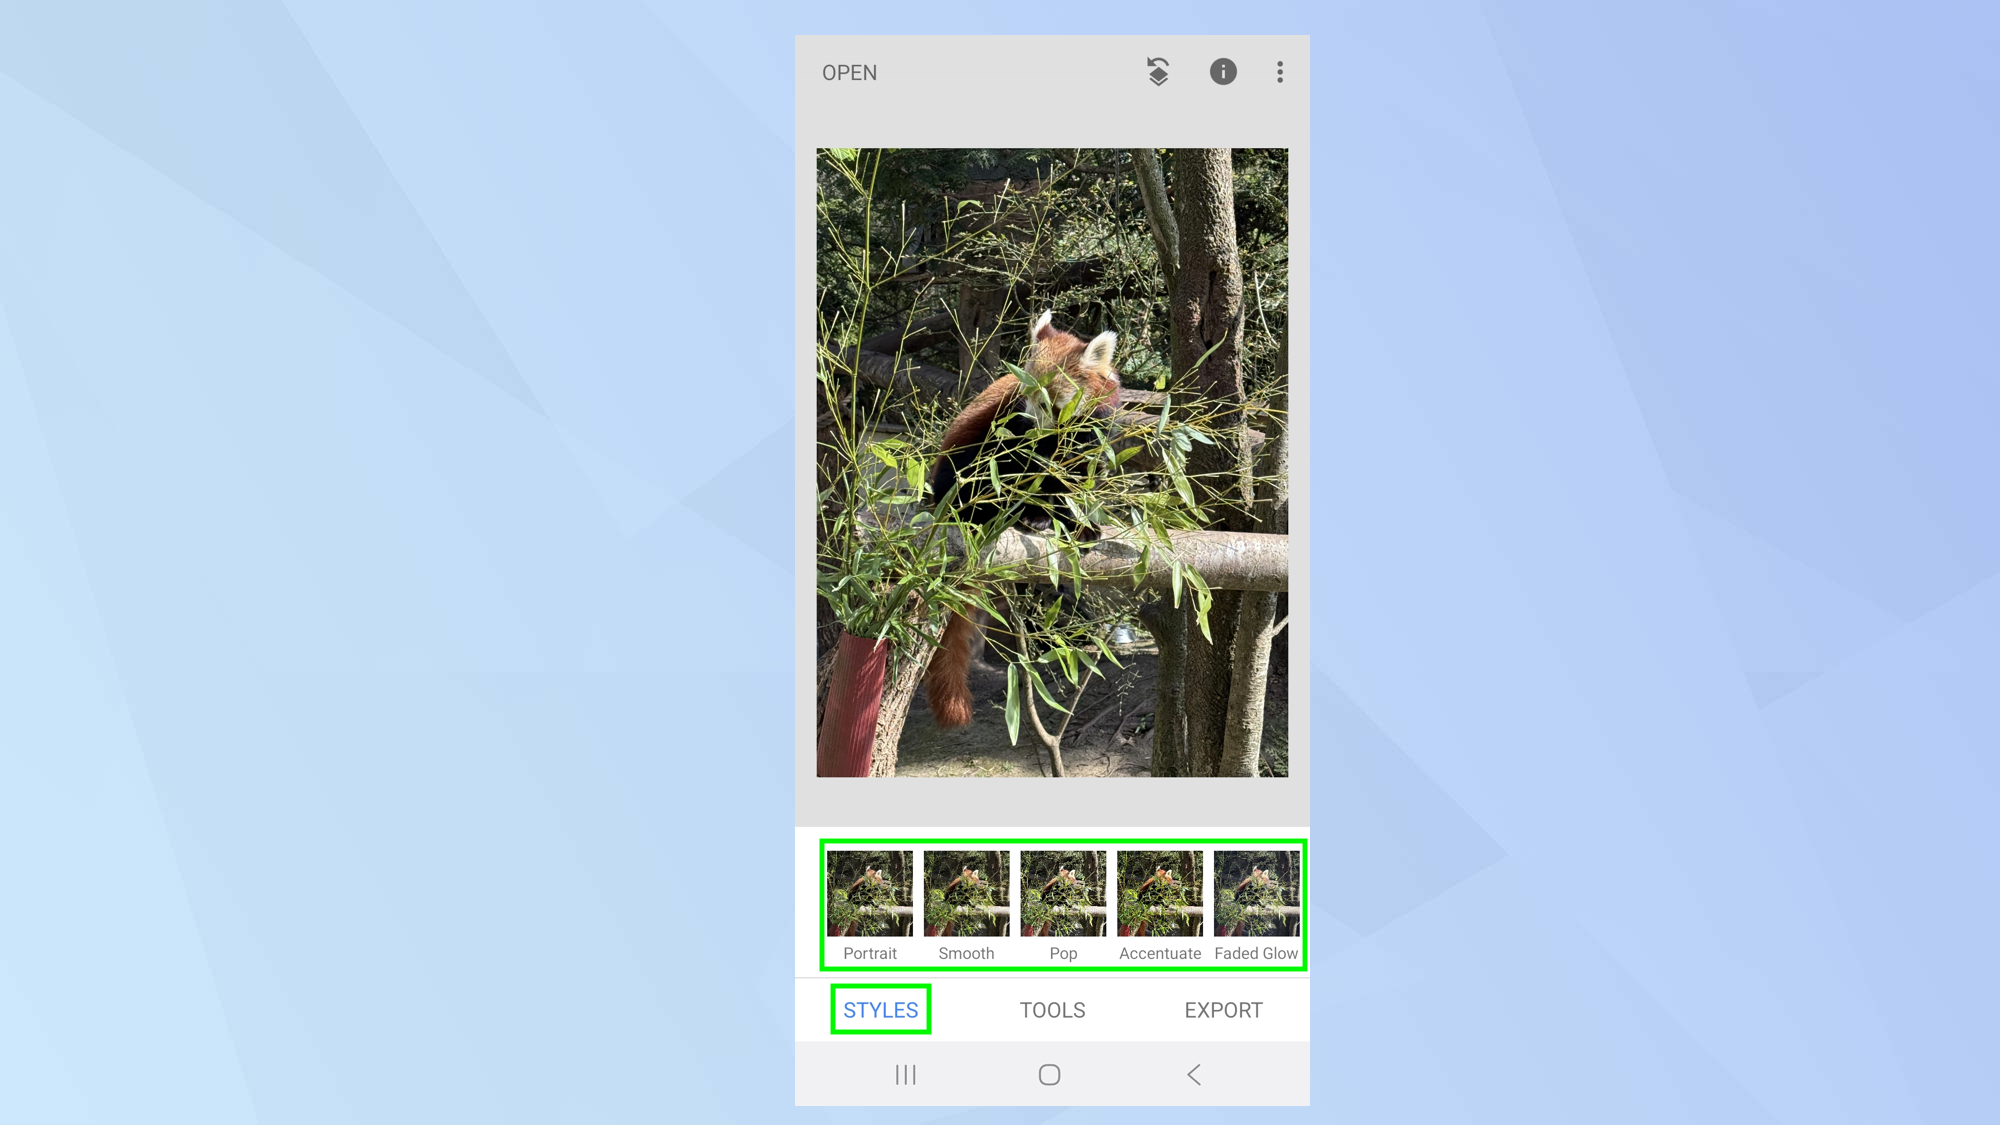
Once the image is on the screen, you will see three tabs running along the bottom. Tap Styles (or tap Looks if you’re using iOS) and you can very quickly alter the look of the image – just select one of the styles.
For example, you can choose Portrait, Smooth, Pop or Accentuate. In each case, you will see the image change to reflect the style and, if you like what you see, you can select the icon.
3. Create your own style
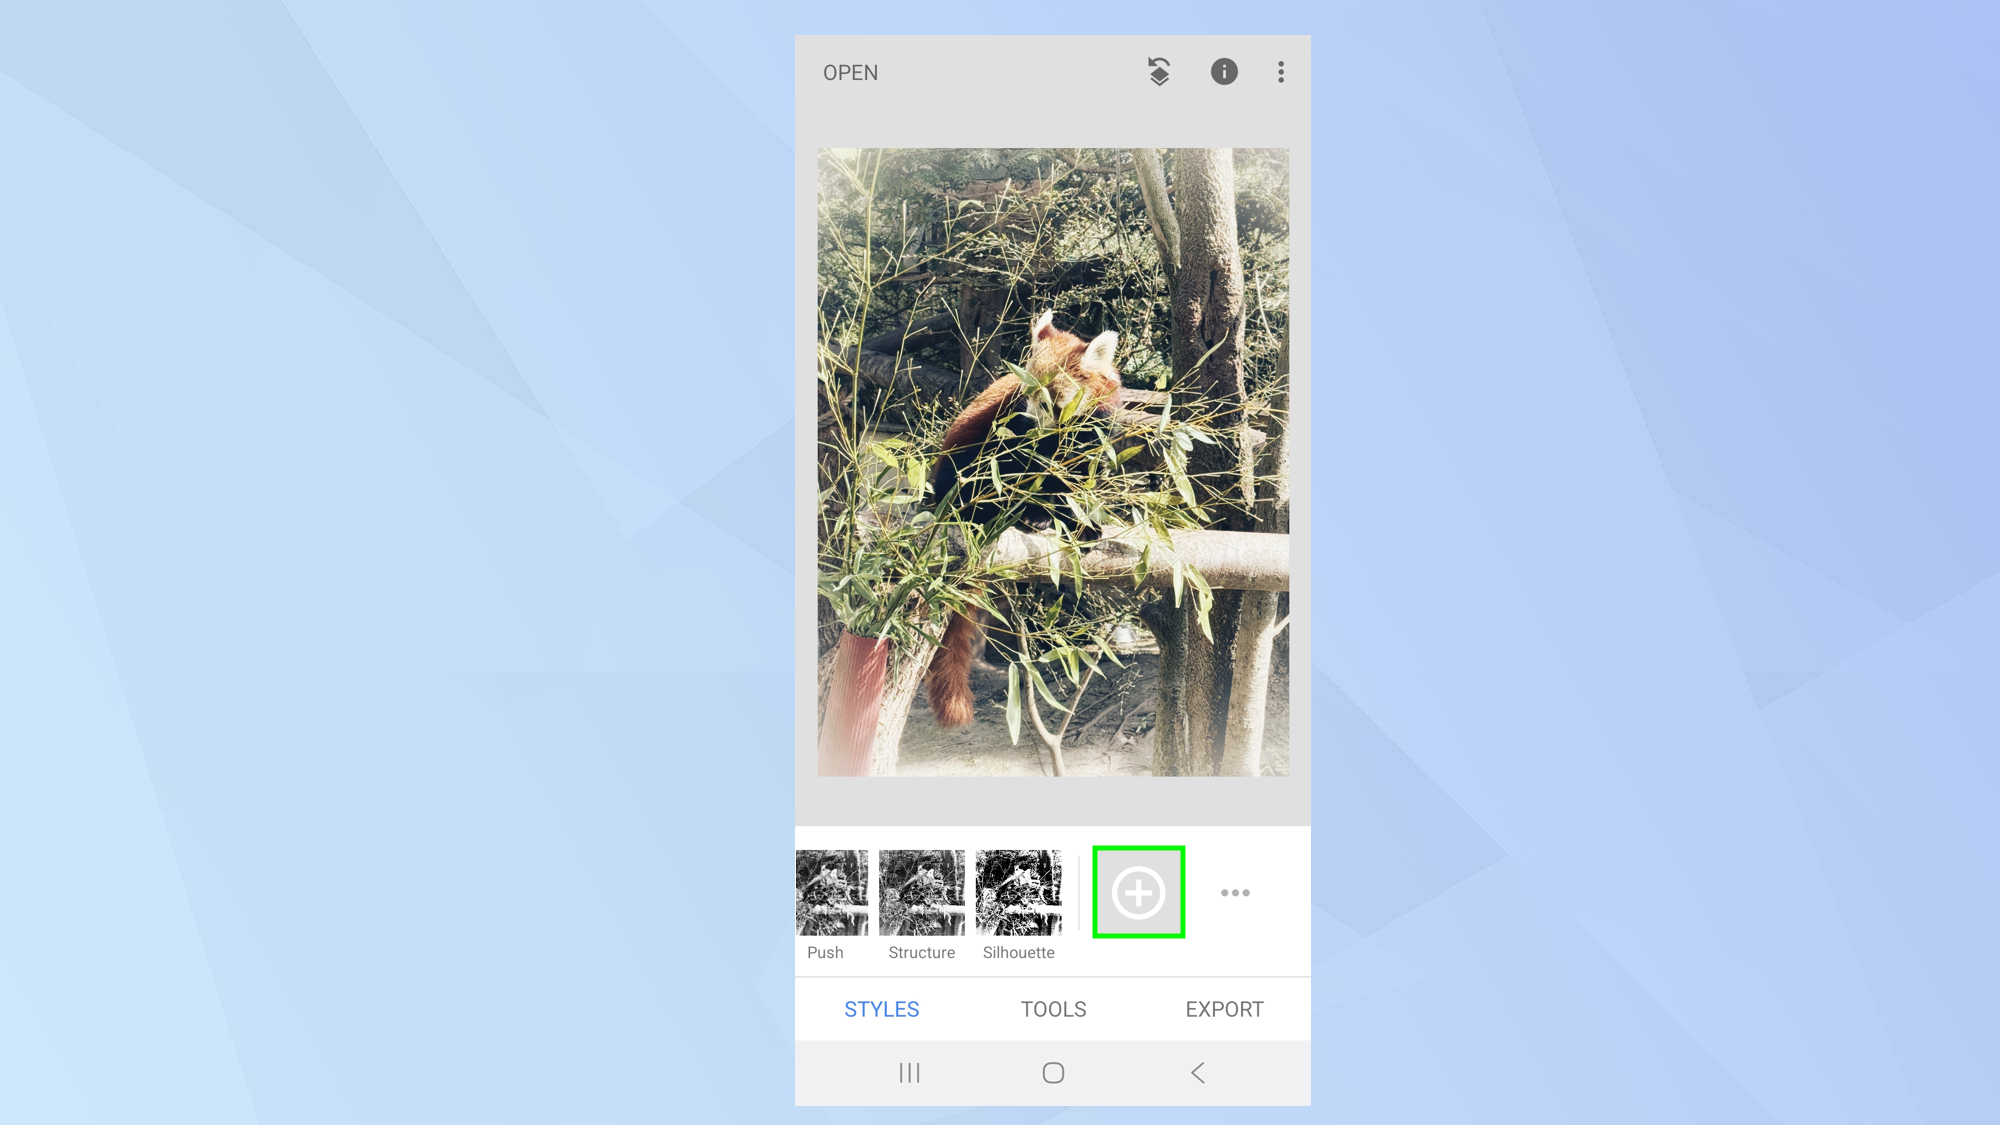
As you manually edit your image – we’ll show you how you do that in the next step — you can end up altering many settings.
If you like the resulting style of those combined edits, you can save them as a style which can then be applied to other images. This means you won’t need to keep altering the same settings over and over again.
To do that, whenever you have an edited image on the screen, tap Styles and swipe left on the options until you see the plus icon (+).
Tap + and you can give the style a name. Remember to tap Save.
4. Use the tools
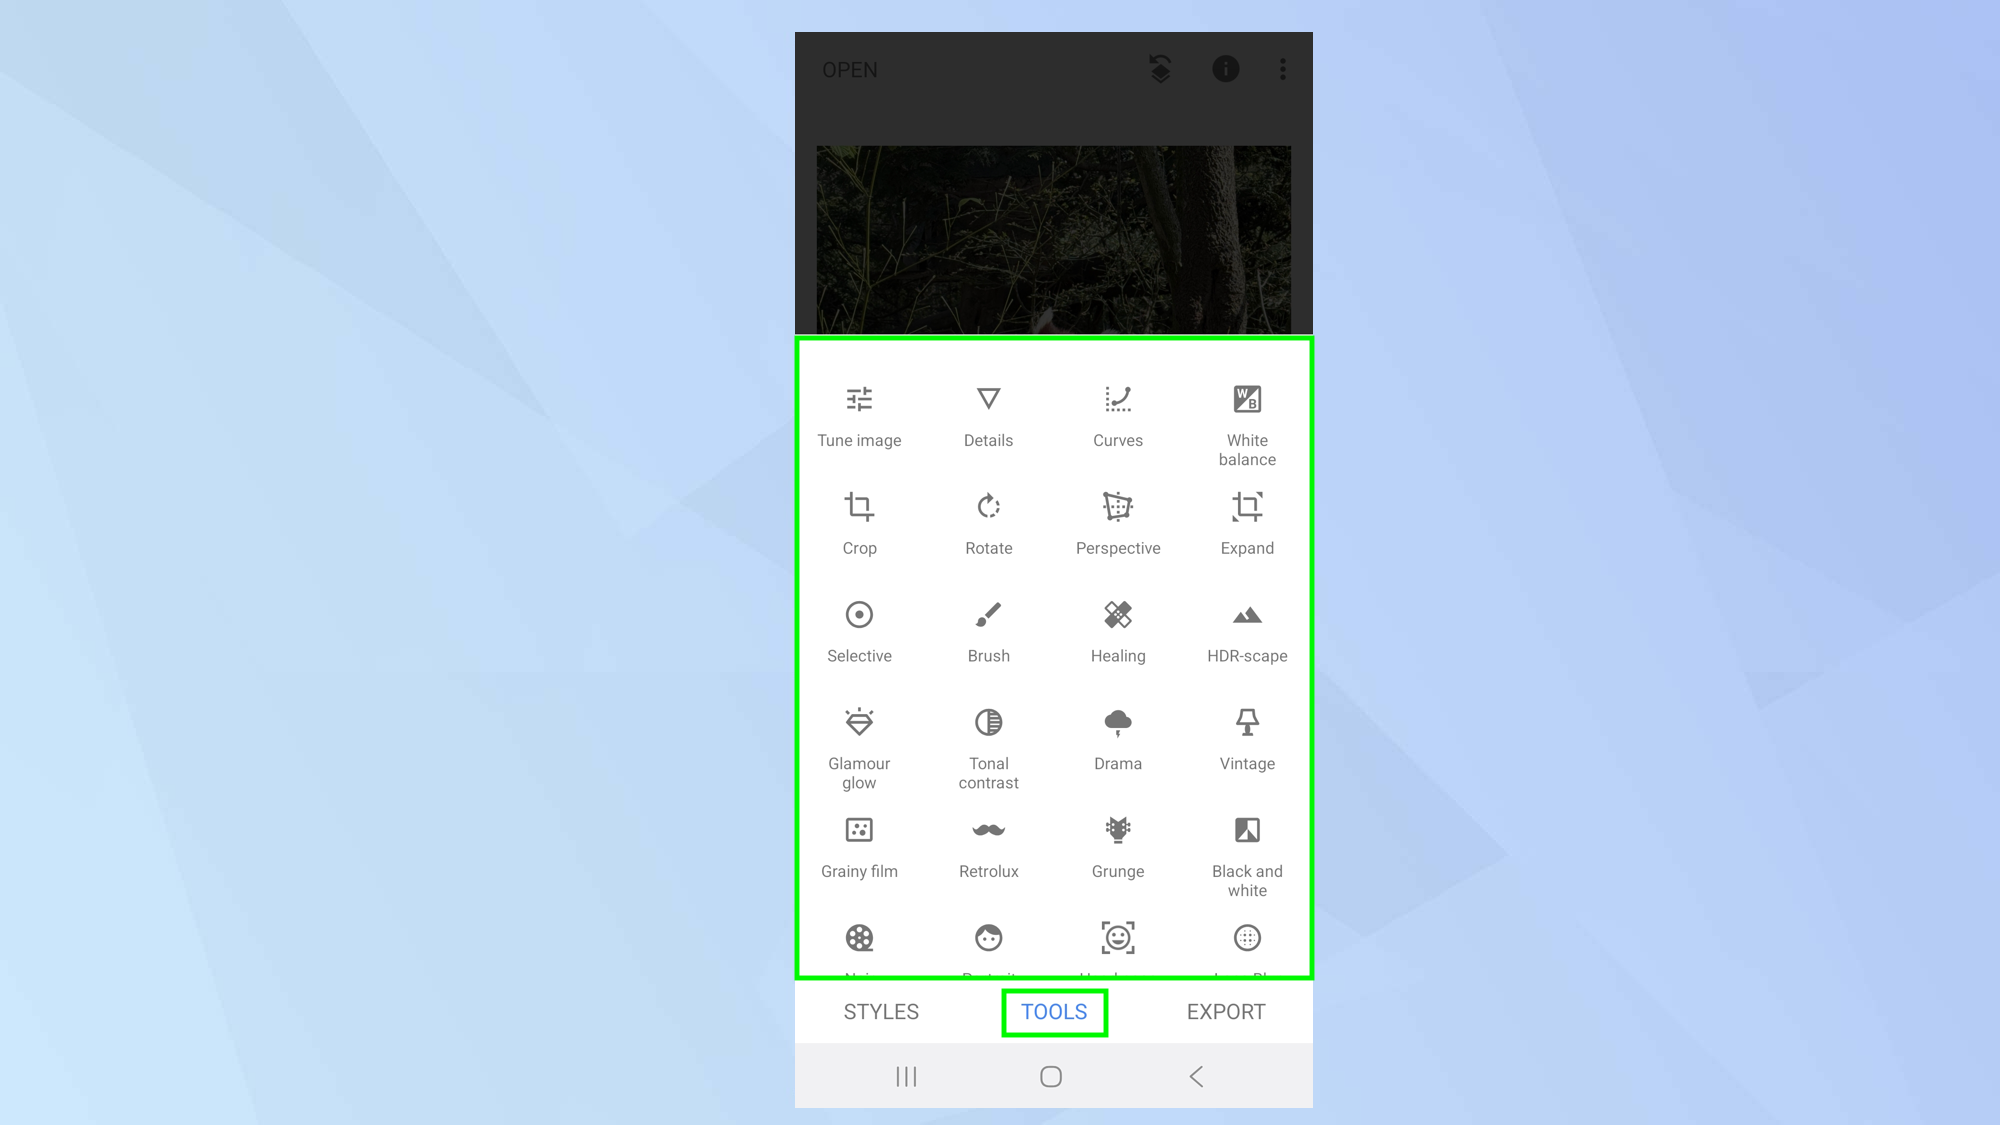
Now comes the potentially overwhelming part of the app, but the part that nonetheless allows you to make fine adjustments and edits to your images.
Select Tools and a menu comprising 28 tools will appear. Each of those tools gives you further options and, in truth, you could likely write a book exploring them all. But we can bunch some of them to give you a concise overview.
5. Use some filters
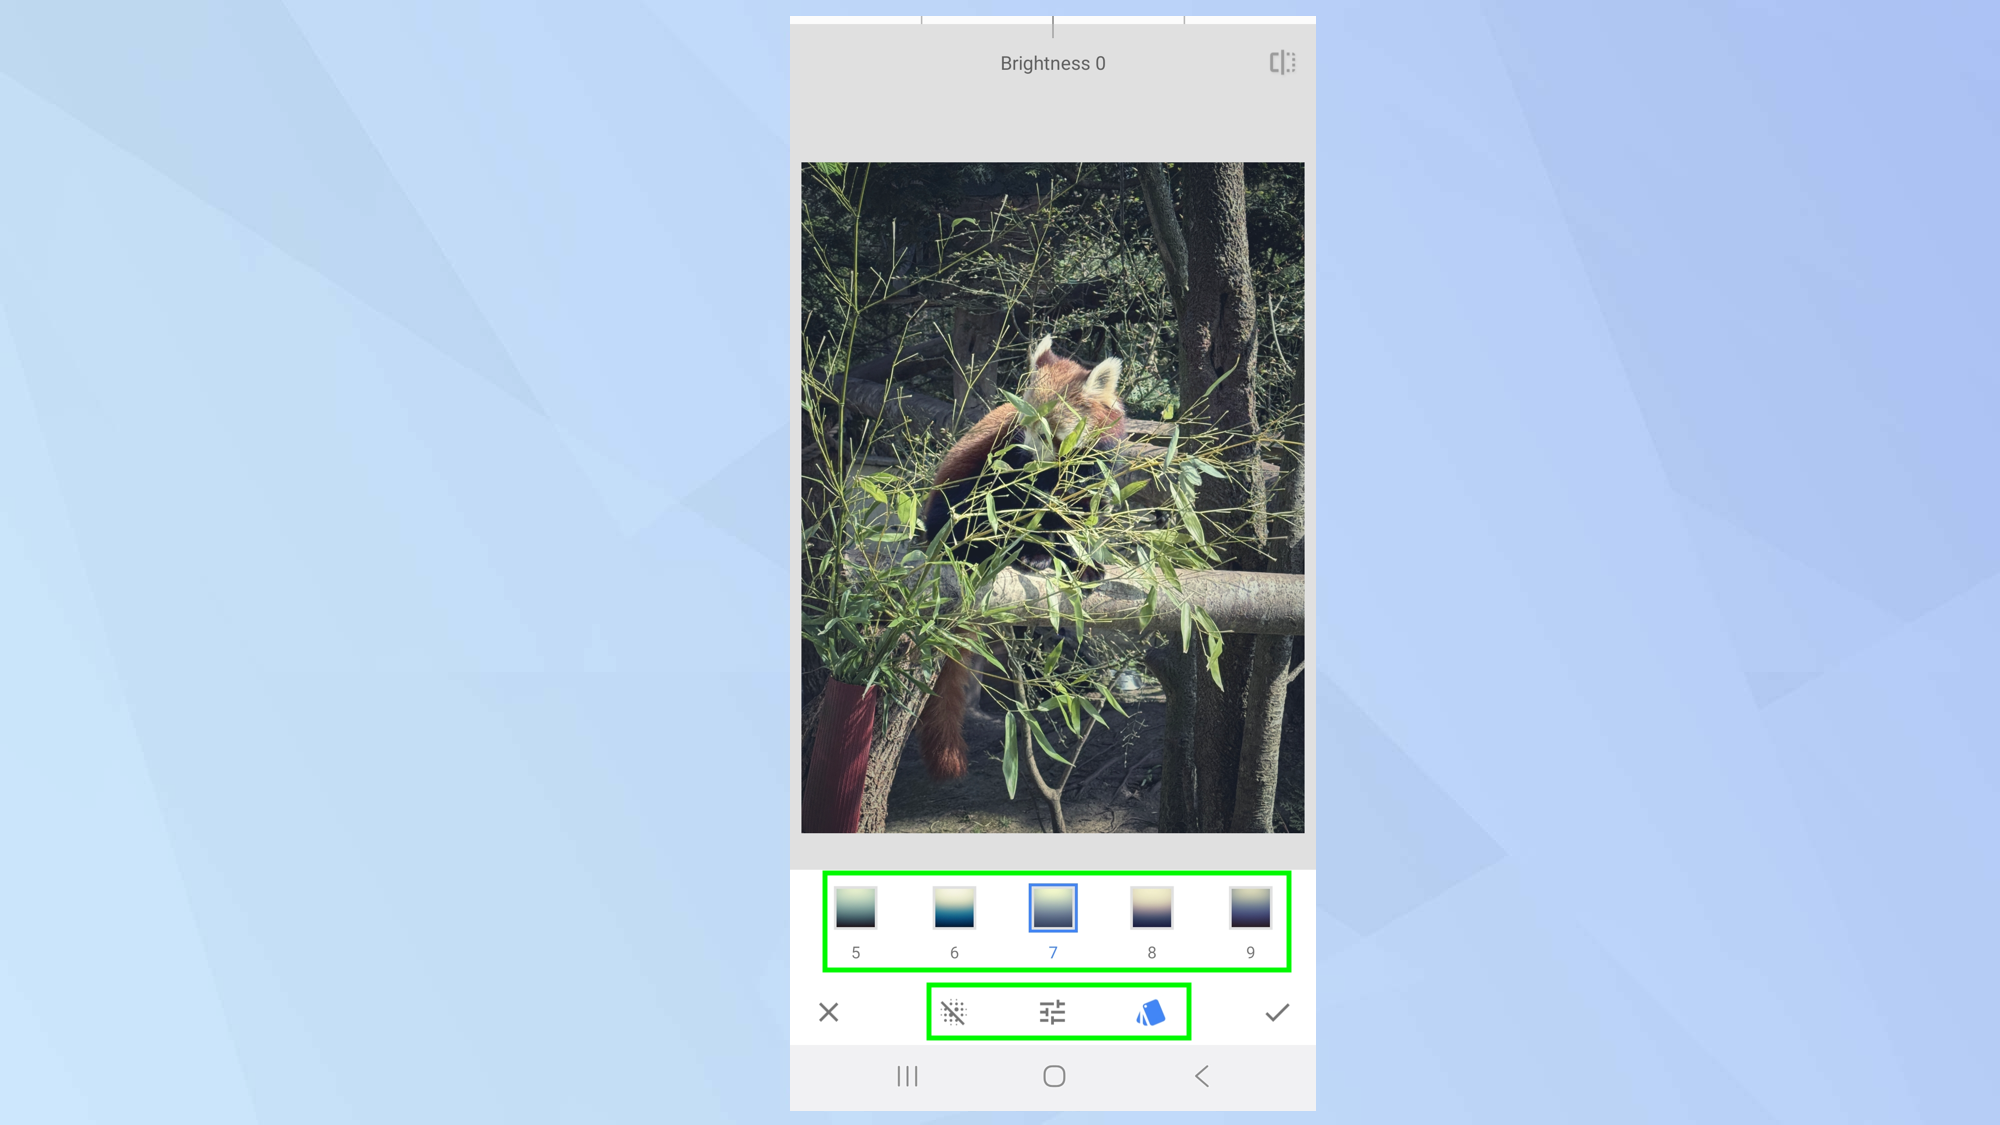
There are some other ways, aside from Styles, to instantly change the look of an image. You can instead apply filters which are found within Tools.
Select vintage, for example, to lend your image a nostalgic look and you can also choose drama, grainy film, retrolux, grunge, black and white or noir.
For each, just select from the filter options that display at the bottom of the screen.
If there are faces in your image, you may want to tap Portrait. This will smooth out skin, work on the eyes and brighten faces, ensuring subjects look their very best.
6. Get healing powers
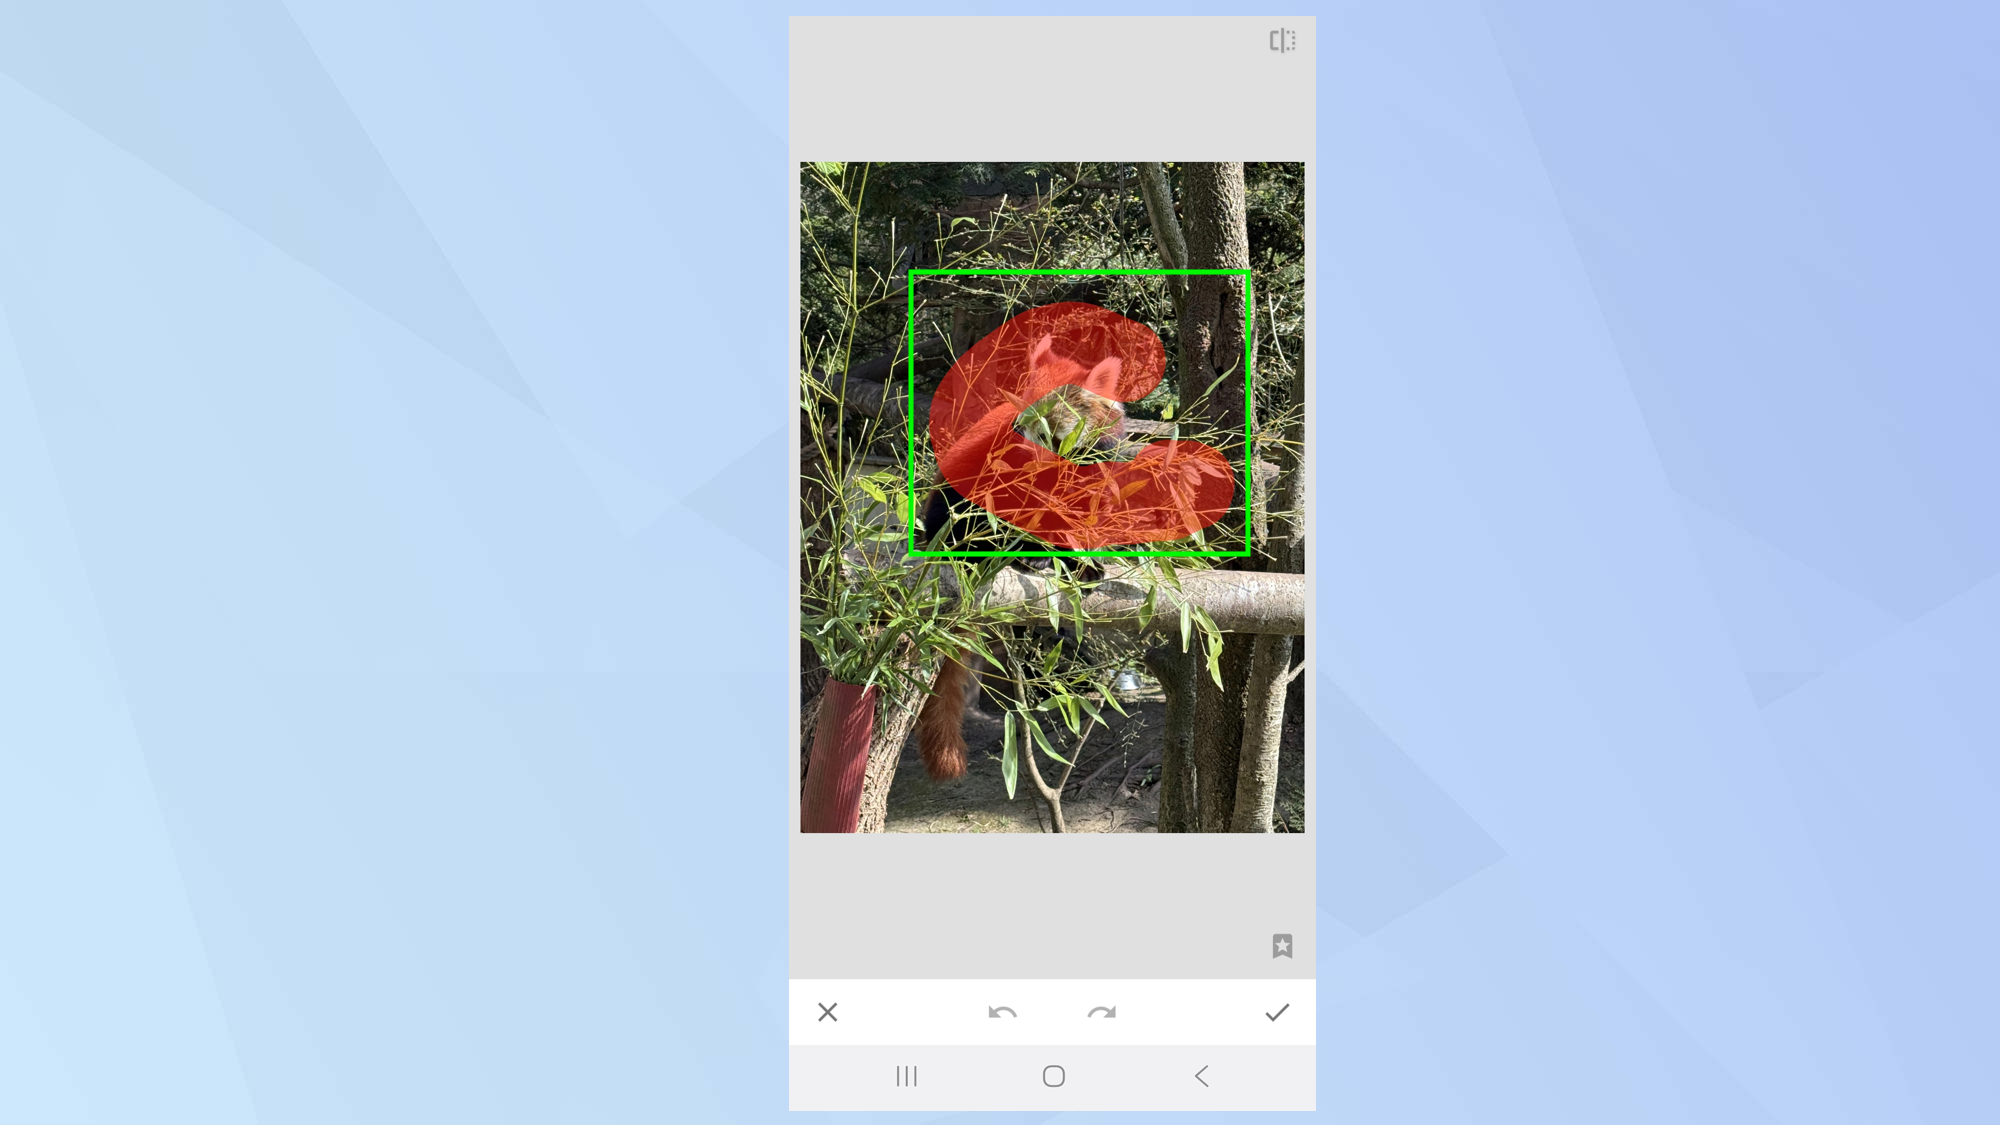
The healing tool is also great at removing unwanted elements. Zoom into an image by pinching in on the screen and use a couple of fingers to move to the part of the image you want to manipulate.
You can then brush or tap on unwanted spots to remove them. This is great for taking away distracting elements or removing blemishes.
7. Tune your image
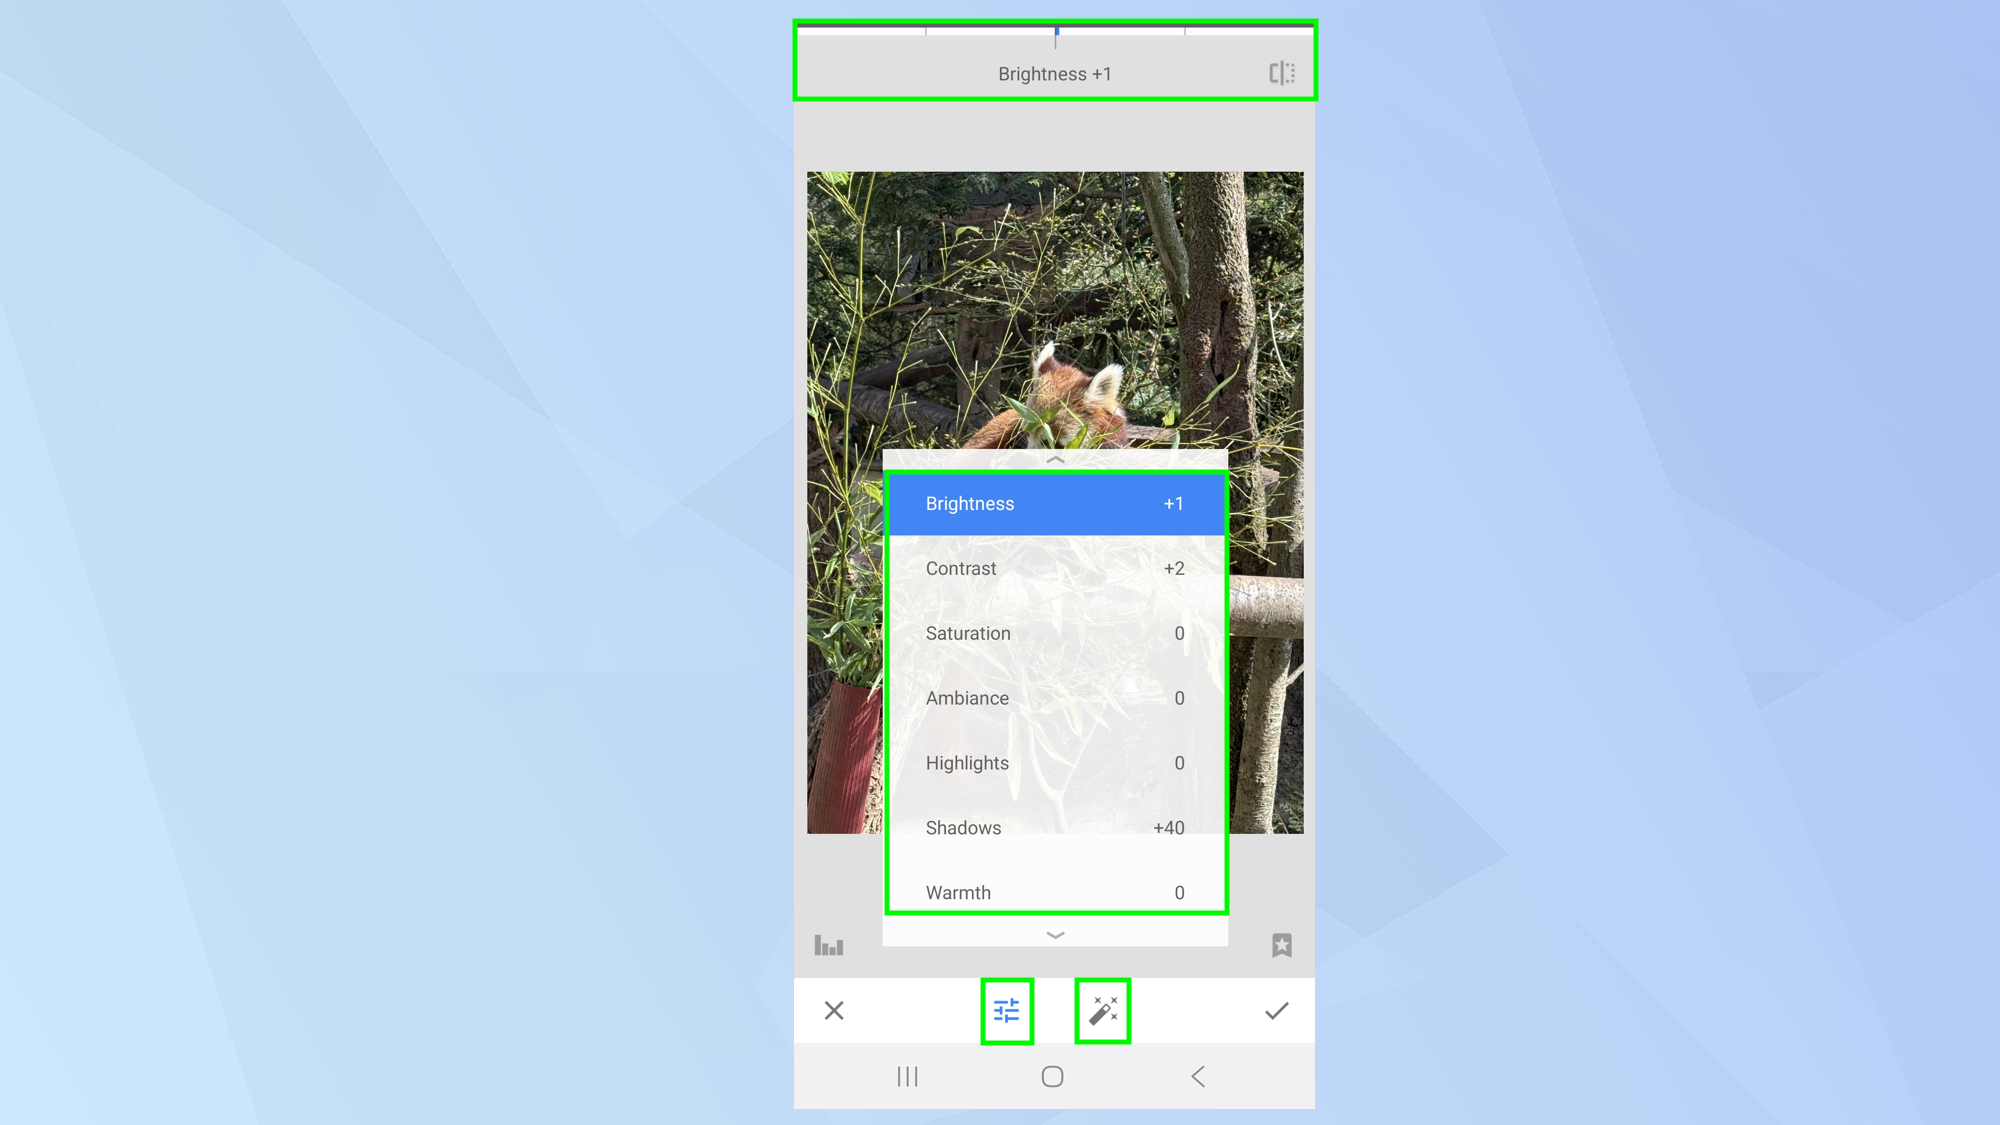
For even finer adjustments, tap Tune Image then select the menu icon to make changes to the:
Brightness: make the image darker or lighter.
Contrast: alter the difference between the lightest and darkest areas of an image.
Saturation: change the intensity or purity of a color.
Highlights – adjust the brightest areas of an image.
Shadows – adjust the darkest areas of an image.
Warmth: add orange or blue.
In each instance, after you select which tuning option you require, you can swipe your finger left and right to make an adjustment.
You can also tap the magic wand icon to get Snapseed to automatically adjust your image — it will assess the picture and offer a suggested improvement.
When you’re satisfied, just tap the tick icon or else tap X.
8. Make more adjustments
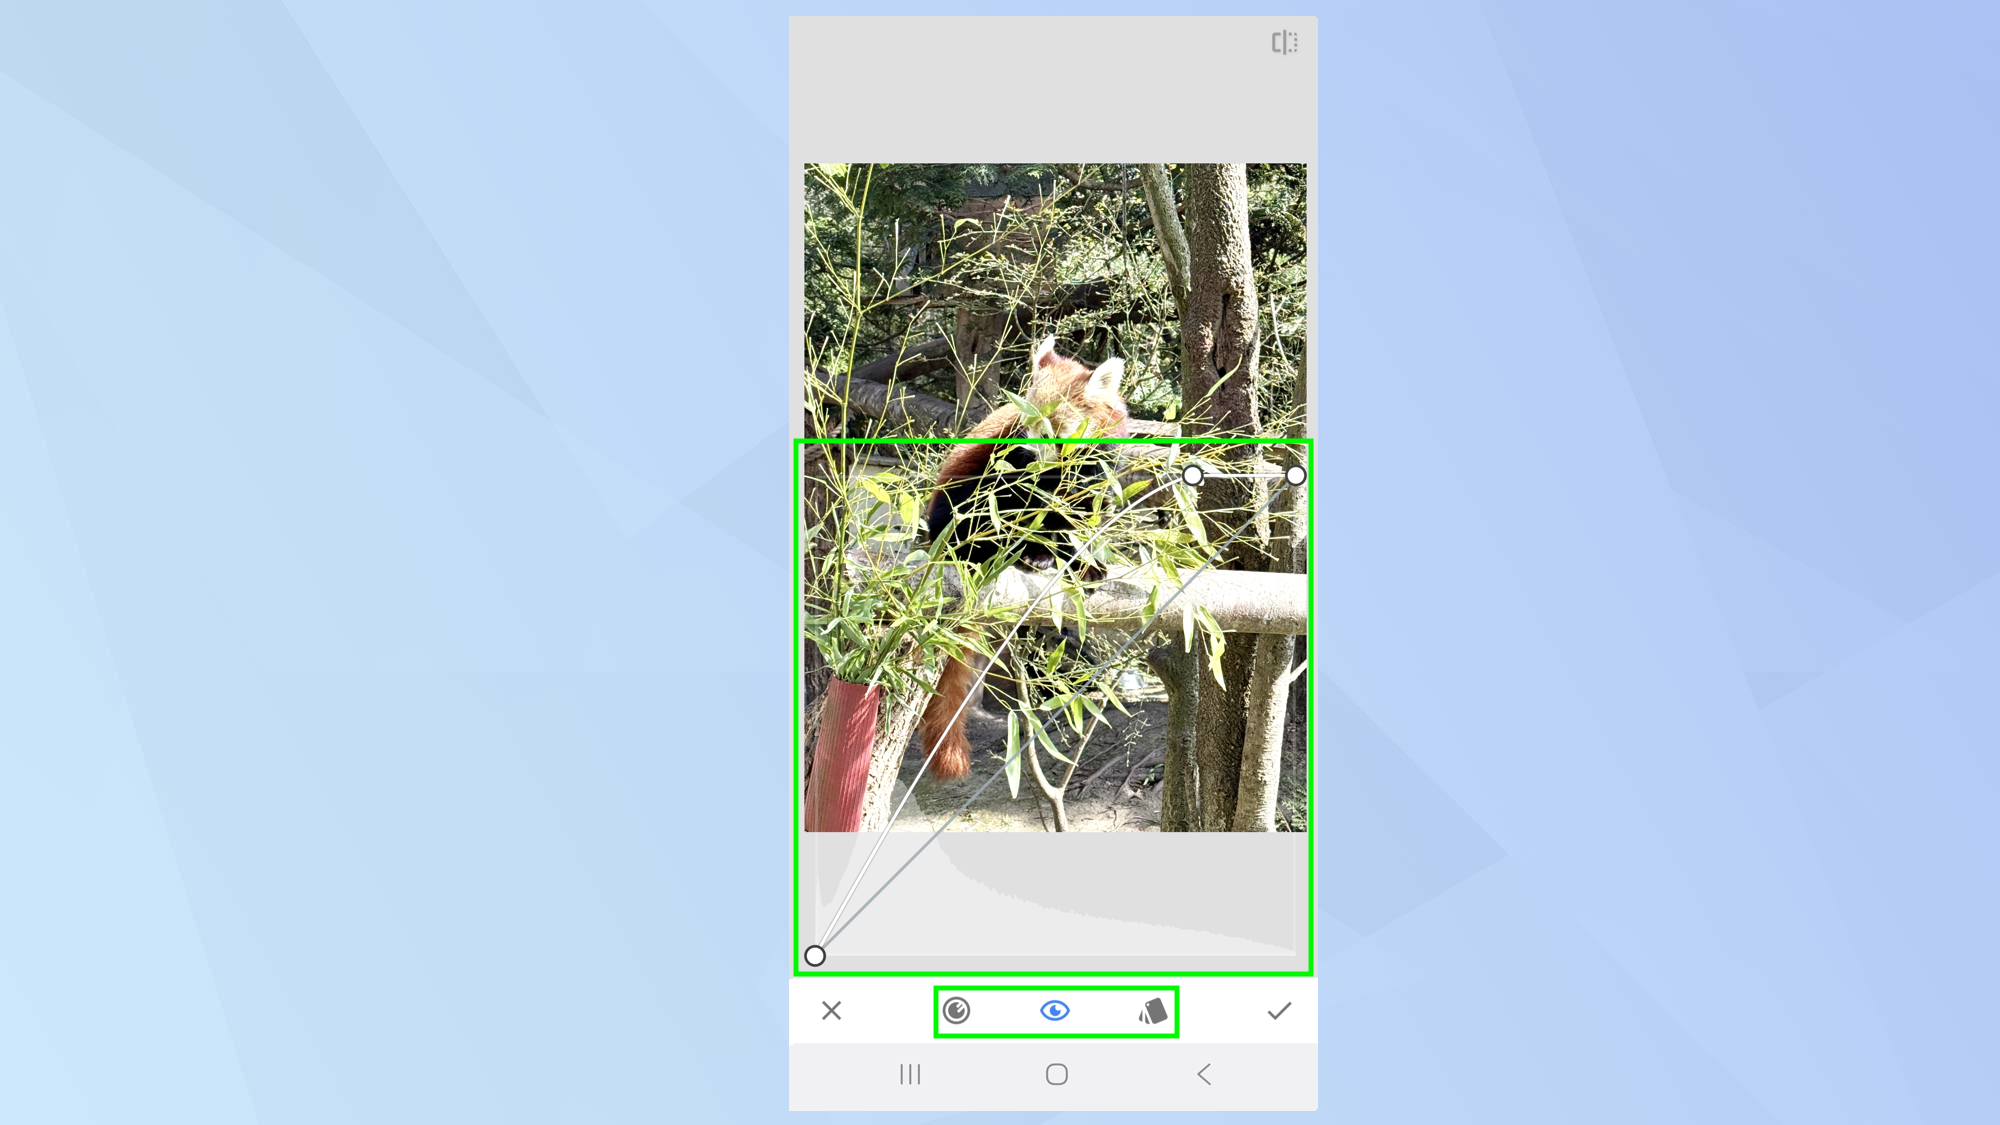
If you select Details, you can tap the menu icon to change the structure of the image or edit how sharp you want it to look.
You can also select Curves to precisely adjust the contrast, highlights, brightness and shadows. Just drag the nodes up and down to increase and decrease.
You can select White balance to change the temperature of an image by ensuring white objects appear white.
You can also choose tonal contrast to change the high, medium and low tones or to protect shadows and/or highlights, further building on the changes made under the Tune Image option. This brings out the character and visual depth of an image.
Again, swipe left and right to make adjustments. And when you’re satisfied, just tap the tick icon or else tap X.
9. Manipulate the image
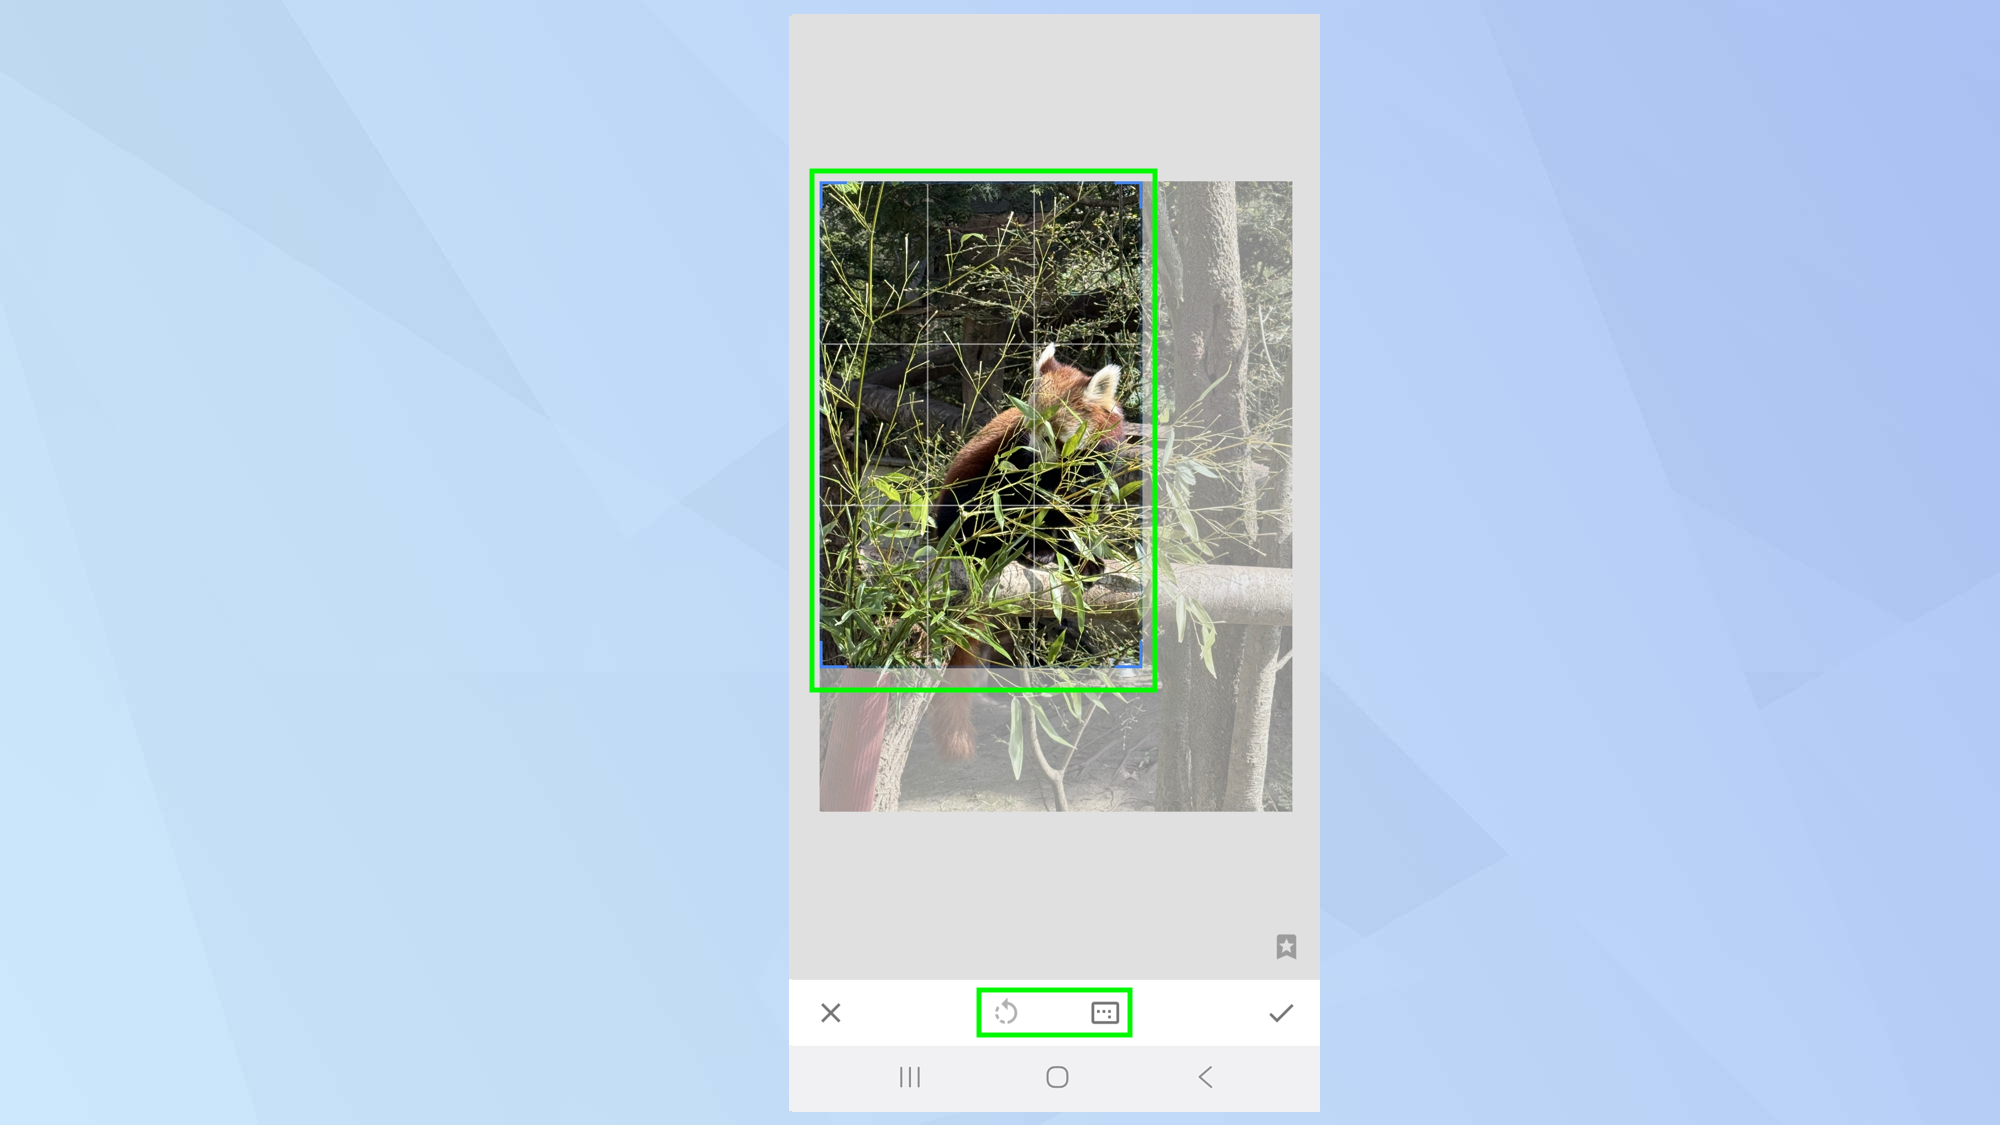
Some other very useful tools include crop, rotate, perspective and expand.
Tap Crop then choose a size for your image and use the handles to cut away distractions.
Tap Rotate to spin the image on a vertical axis or rotate it by 90 degrees. You can move your finger on the image to make fine rotation adjustments too.
Tap Perspective to adjust an image’s geometry and straighten lines. And you can tap Expand to go beyond the image’s dimensions and create extra canvas space.
When you’re satisfied, just tap the tick icon or else tap X.
10. Focus on a subject
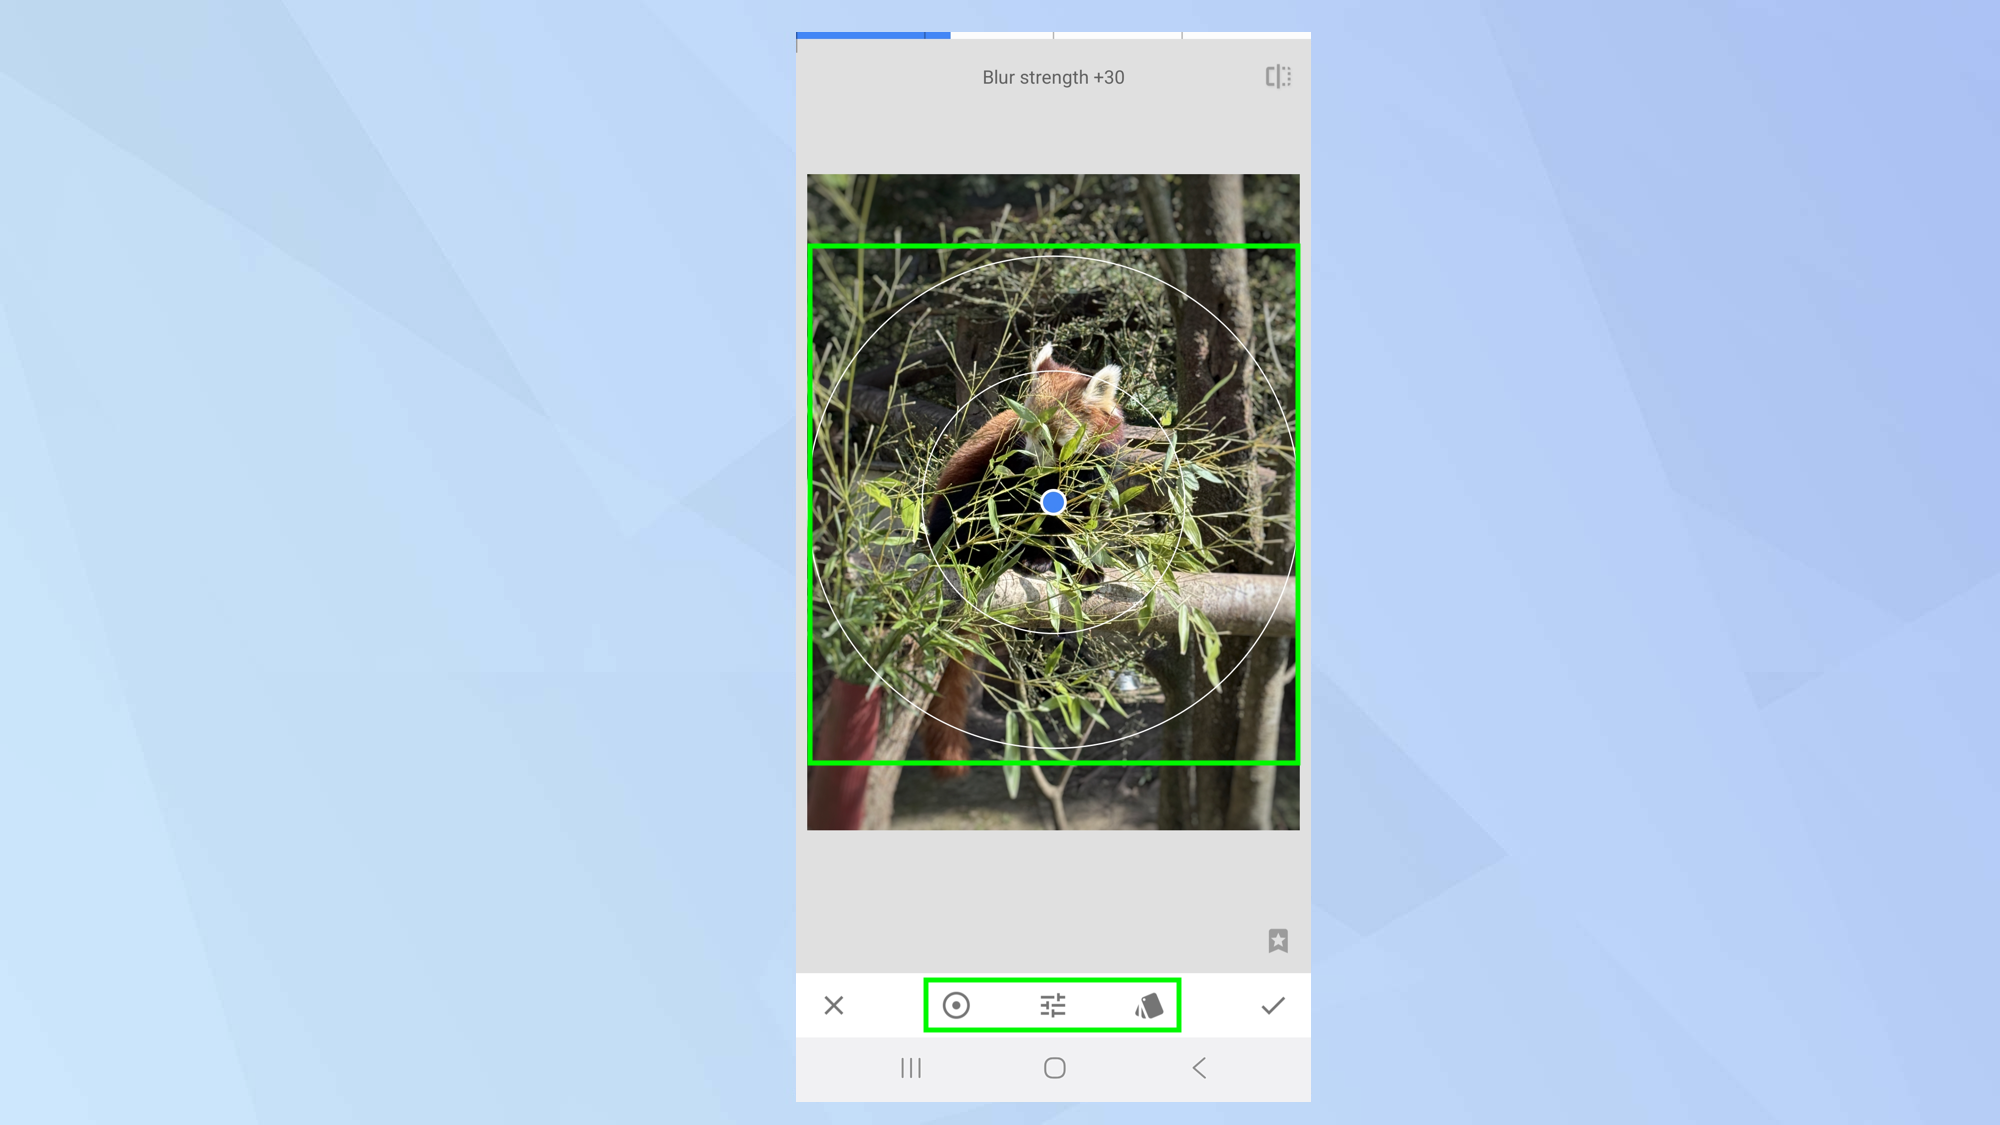
If you would prefer to focus more clearly on a subject, select Lens Blur, move the focal point and swipe left and right to alter the blur strength. It will blur the background and ensure the central part of the image is in greater focus.
You can also tap Vignette, it works in much the same way, you move the focal point and swipe left and right to make adjustments — but tap the menu icon and you can choose to alter the outer brightness or inner brightness.
When you’re satisfied, just tap the tick icon or else tap X.
11. Add some extras
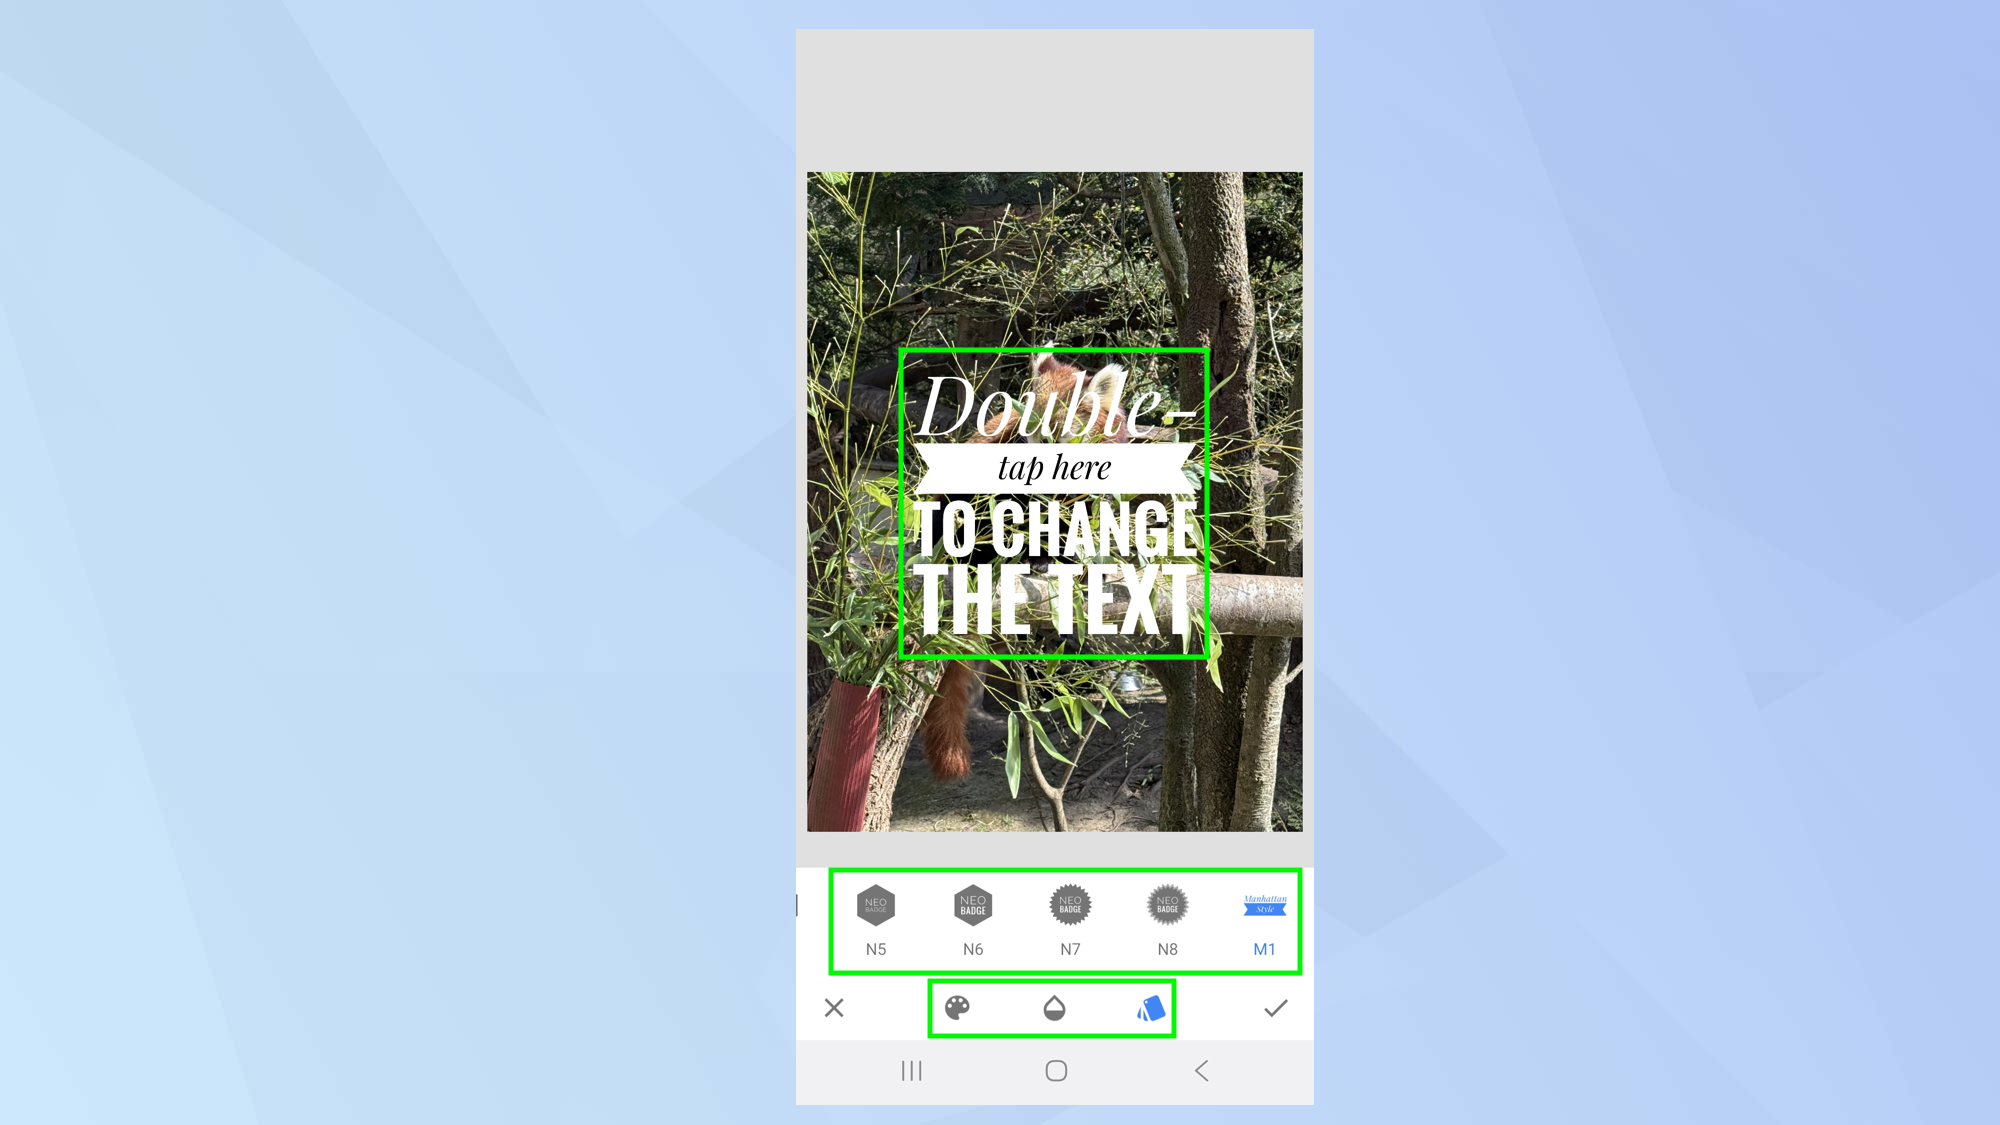
Snapseed also lets you tap Text and choose a font/visual style to overlay words on to your image. The opacity of the text can then be adjusted if you tap the central icon.
You can also tap Frames to add one of many different frames to your image. When you’re satisfied, just tap the tick icon or else tap X.
12. Export your images
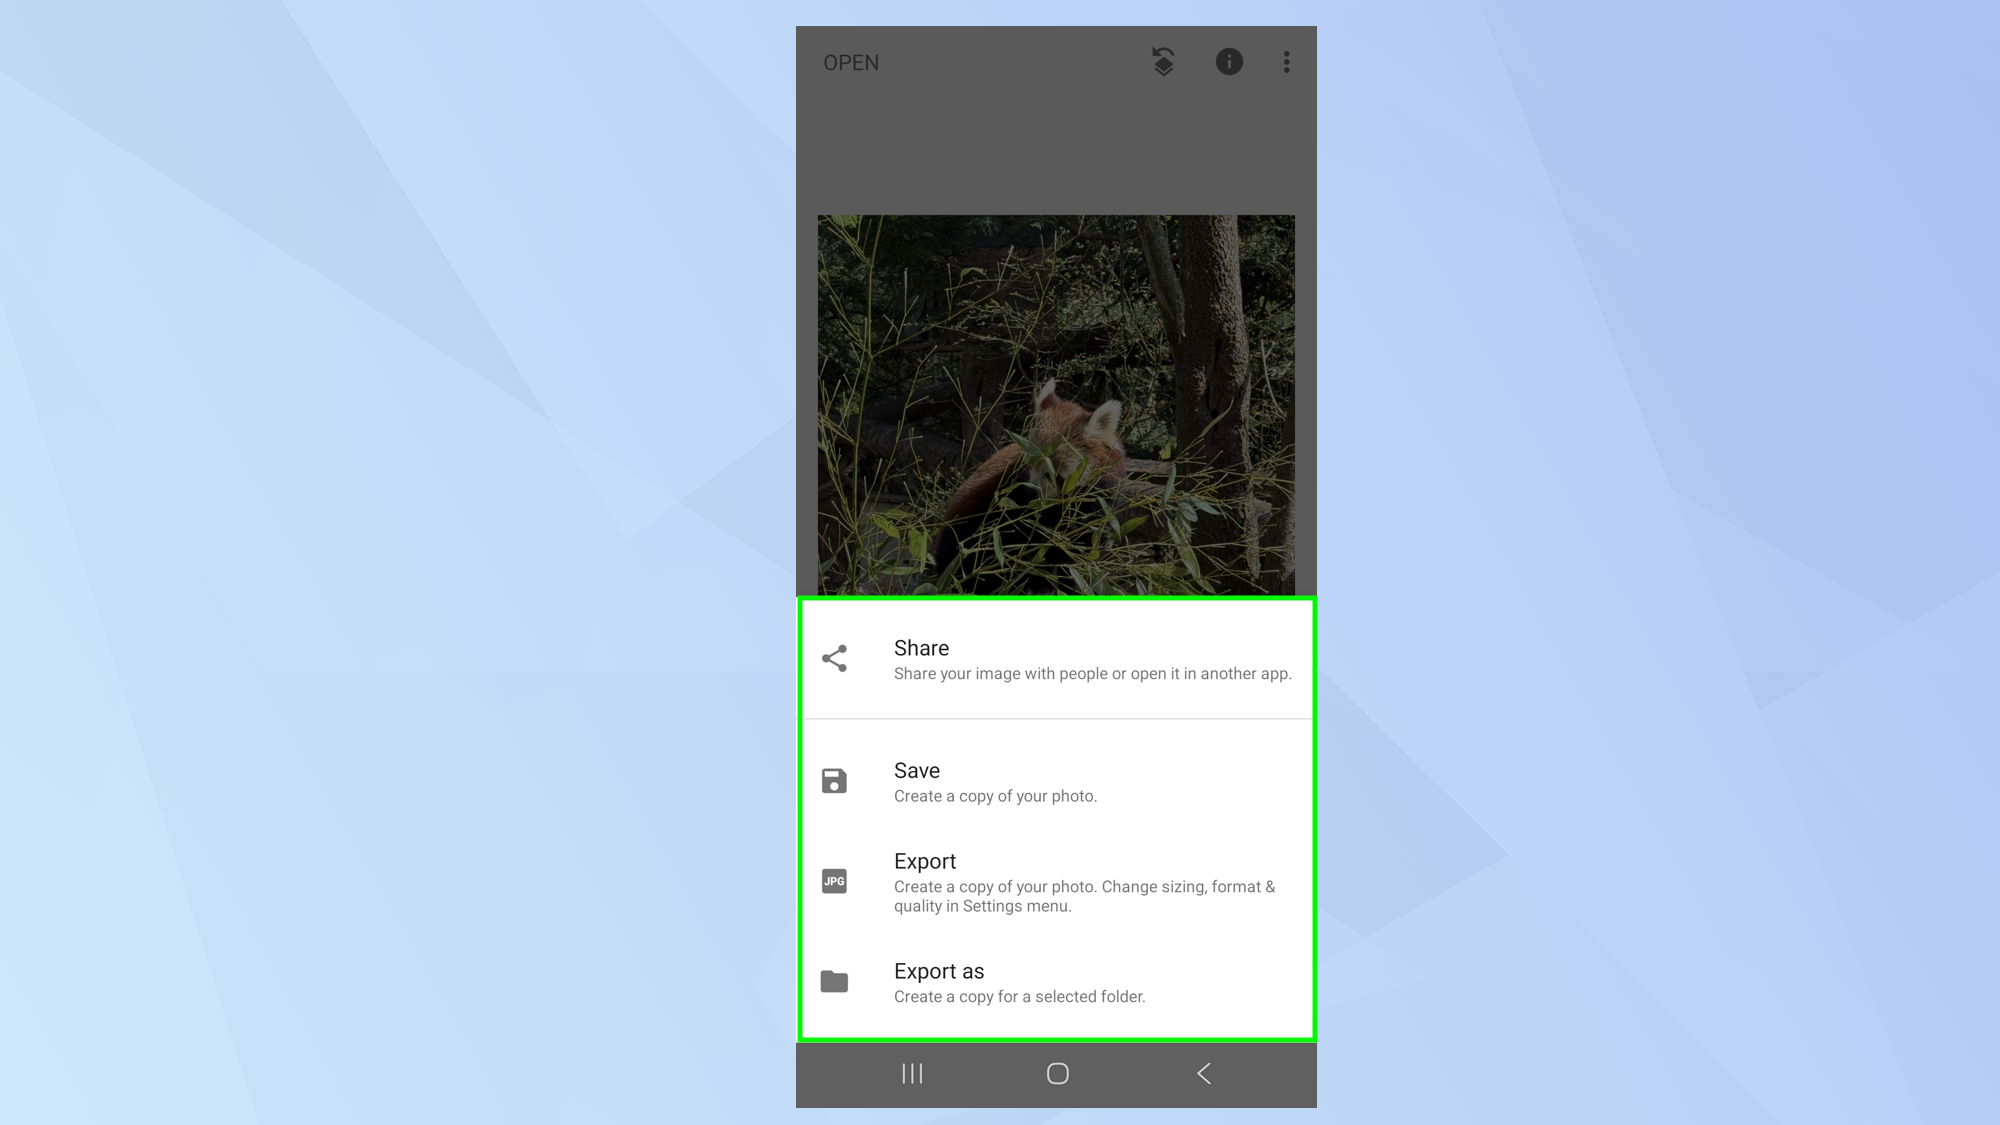
When you are finished editing your image, you have a number of options. Just tap Export.
You can select Share. This lets you send the image via Gmail, Messages, Drive, Bluetooth and more. You can also use this option to print or save to the Photos app. If you select Save, you will create a new version of the Photo.
Alternatively, you can tap Export but, before you do, tap the three-dot menu icon in the top-right of the screen when you’re editing an image and select Settings.
This allows you to choose the maximum image size for exporting and the format and quality of the image. Finally, you can select Export As and save the image in a specified folder.
And there you go! That’s the basics of how to use Google's Snapseed. While you're here, why not take a look at our other useful photo editing guides?
Check out how to use the best face photo editing feature on a Samsung Galaxy, or if you're a Pixel user, how to use the Google Pixel 9 Reimagine AI feature.
If you want to explore Gemini's image-editing tools, we've got you covered.
Get instant access to breaking news, the hottest reviews, great deals and helpful tips.

David Crookes is a freelance writer, reporter, editor and author. He has written for technology and gaming magazines including Retro Gamer, Web User, Micro Mart, MagPi, Android, iCreate, Total PC Gaming, T3 and Macworld. He has also covered crime, history, politics, education, health, sport, film, music and more, and been a producer for BBC Radio 5 Live.
You must confirm your public display name before commenting
Please logout and then login again, you will then be prompted to enter your display name.
 Club Benefits


