Own an Apple device? 7 crucial security measures you need to take to keep you and your data safe
Don’t forget, your data is just as important and valuable as the devices you use so check out these essential security measures

Whether you are using a computer, tablet or phone, you will inevitably end up storing lots of precious data on your device. Should it ever become lost, then you’re potentially allowing others to access your emails, messages, bank accounts, notes, photos, videos and so much more. It’s crucial, then, that you take security of your devices seriously.
Here we are going to look at seven measures you need to be taking — or, at the very least, considering — when using an Apple device. Before checkout out each one, though, it’s worth assessing the devices you have. Older devices are almost certain to be less secure than newer ones because there comes a time when they cannot be updated any more. So if you have, for example, an iPhone 8, maybe now is the time to consider upgrading to new device, such as an iPhone 15.
You should also make sure that you’re running the latest operating system on your devices. As you'll likely know Apple releases emergency security updates to patch iPhone, iPad and Mac and being up-to-date will help close vulnerabilities. So learn how to update an iPhone and how to download macOS, for example, and be wary when installing a beta because, by their very nature, they are not guaranteed to be bug free. You should also consider automating the process: go to Settings, tap General, select Software Update and turn on Automatic Updates.
Assuming you do have an up-to-date device, however, let’s get stuck in and look at 7 security measures you need to be taking.
Own an Apple device? 7 security measures you need to be taking
Some of the entries will work for various Apple devices.
1. Perform a Safety check
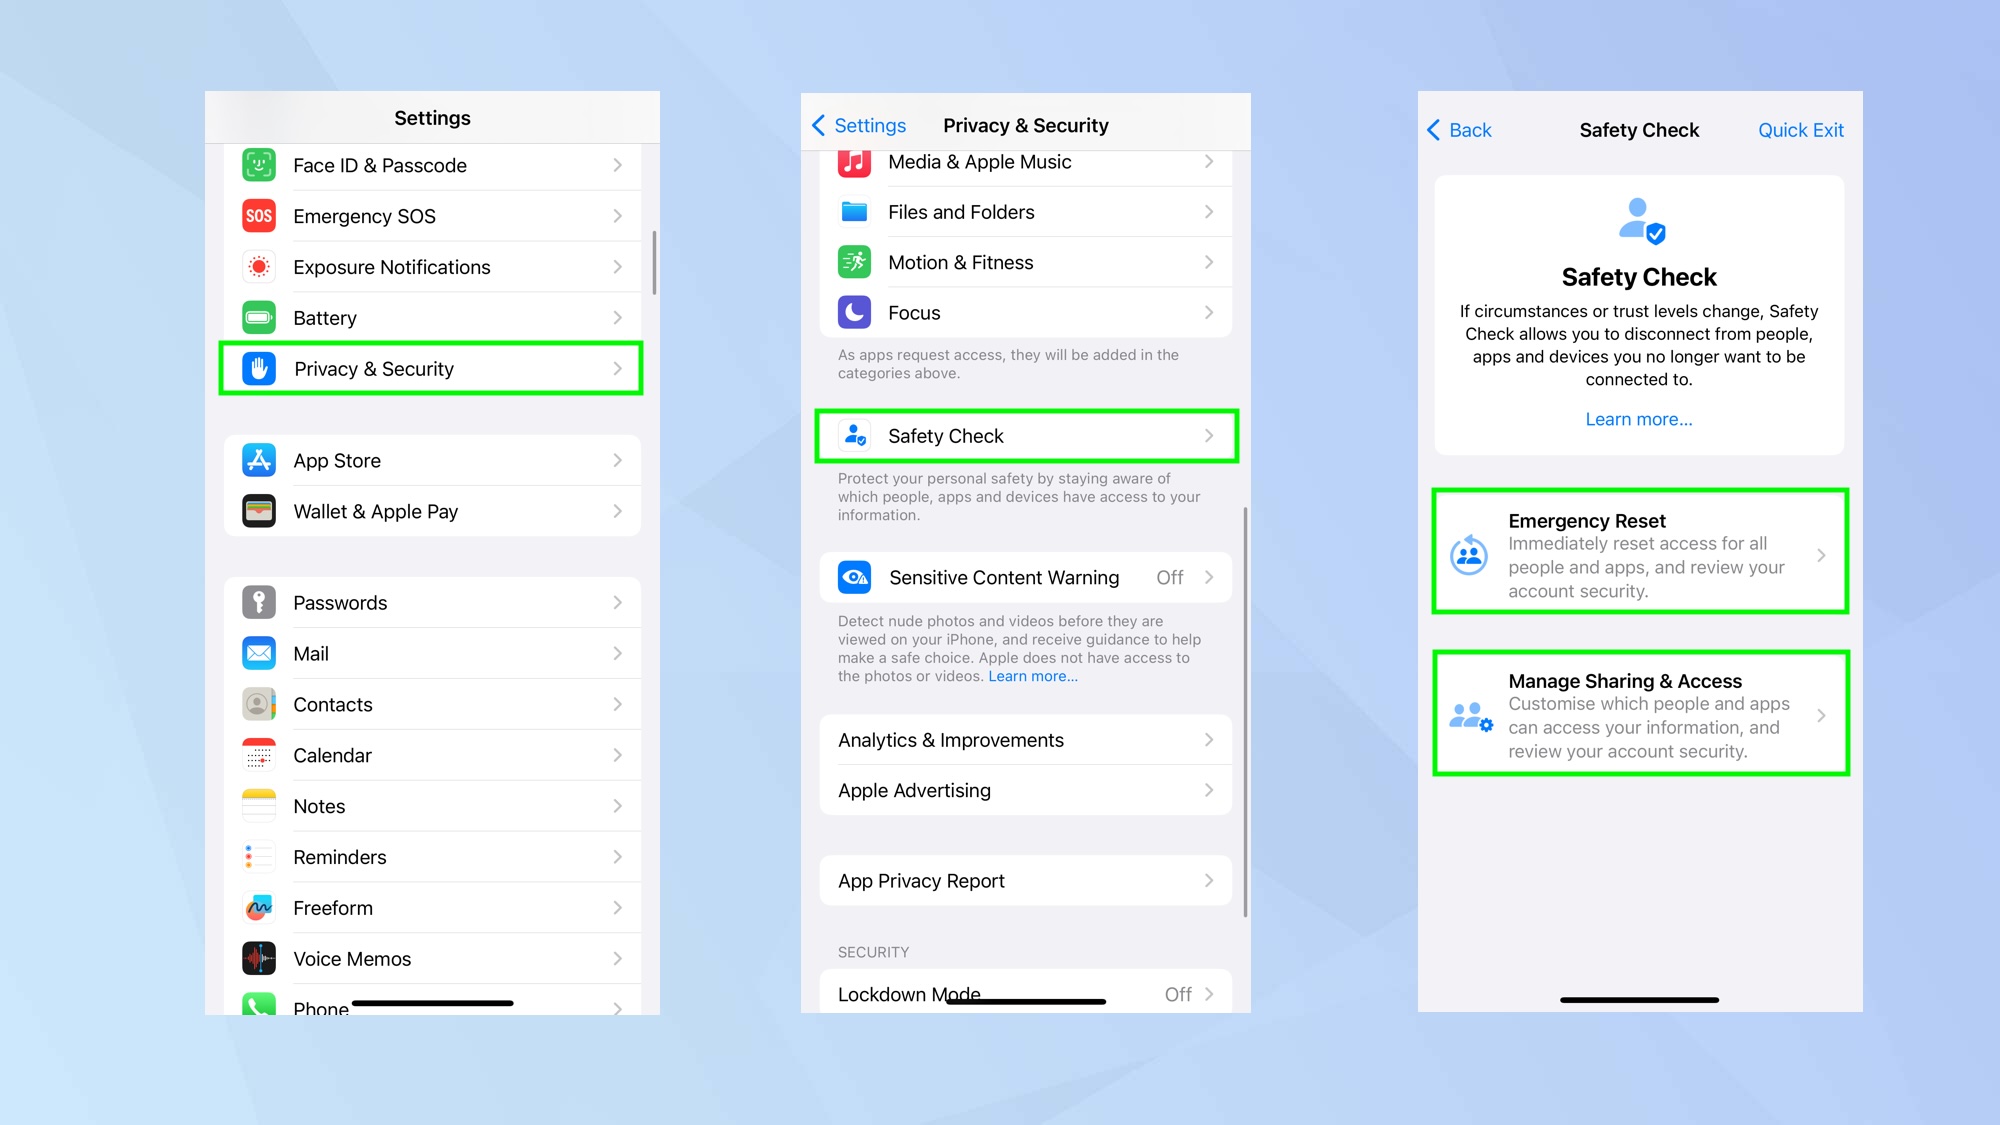
First of all, it's worth knowing how to use Safety Check on iPhone. This allows you to prevent apps (and certain people) from accessing sensitive information on your iOS device. You’re able to perform an Emergency Reset which removes sharing access for all people and apps while resetting your Apple ID password. To access Safety Check, open the Settings app, tap Privacy & Security and tap Safety Check then explore the options.
2. Use Face ID/Touch ID as well as a passcode
You may think FaceID and Touch ID are poor security measures that are easily bypassed. If someone points your iPhone or iPad towards your face or presses your finger on the Home button, then surely that will let them access your data.
While this is true, you’re looking at an extreme situation. Both Face ID and Touch ID are secure ways of unlocking your iPhone, signing into apps and authorizing payments. And, of the two, Face ID is said to be 20 times more secure (Apple says the likelihood of someone being able to use their own face to unlock your device is one in a million whereas the likelihood of bypassing Touch ID is one in 50,000).
Using Face ID or Touch ID also protects against shoulder surfing which is when potential thieves watch as you enter a passcode, make a note of your login credentials and use them to unlock your iPhone or Mac after stealing your device.
But that’s not to say passcodes are redundant. You still need to set a passcode on your Apple device (opting for an alphanumeric code is going to be more secure than a numeric one). You should also learn how to change the passcode on iPhone and iPad and change it frequently.
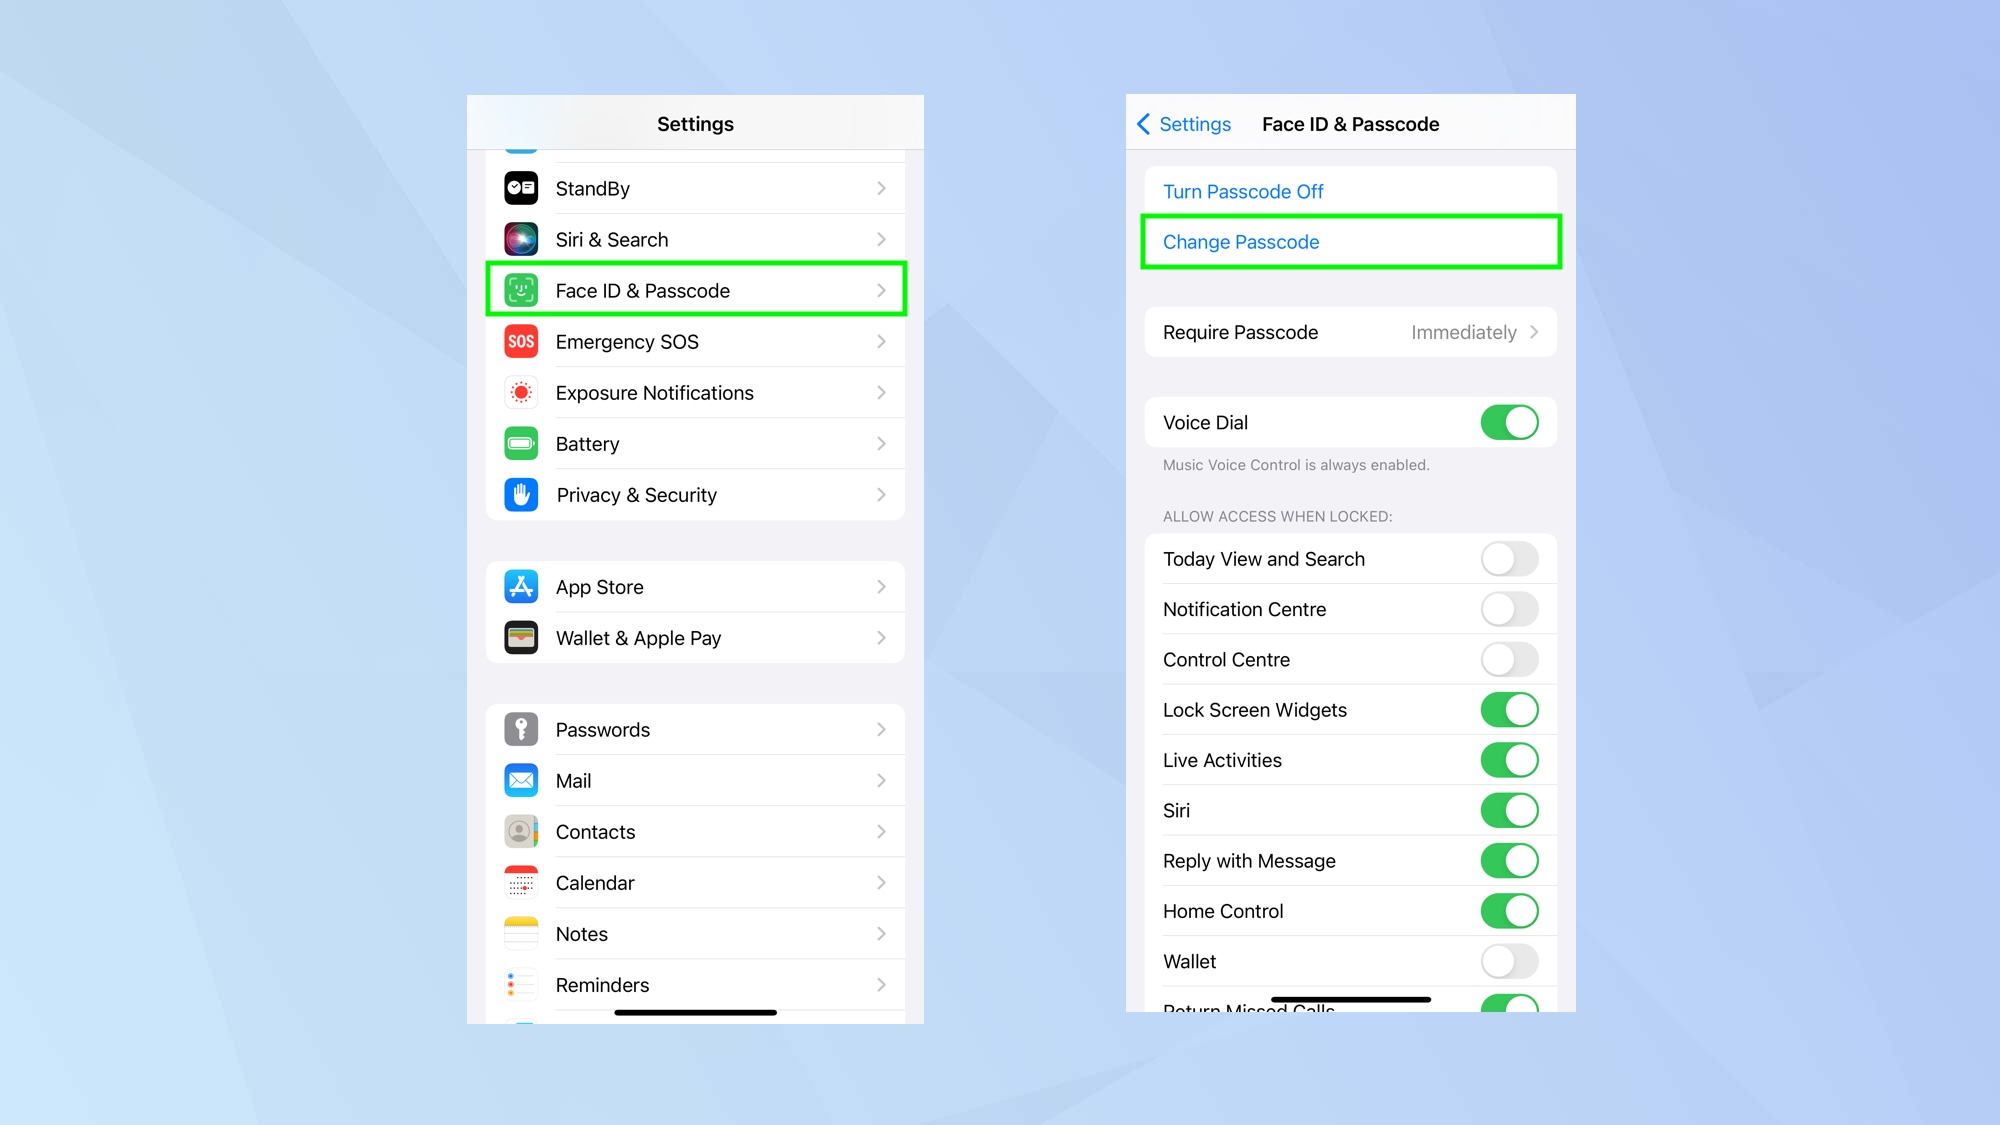
Essentially open the Settings app, tap Face ID & Passcode (or tap Touch ID & Passcode), enter your current passcode and tap Change Passcode. When you set a passcode, it encrypts your iPhone data with 256-bit AES encryption for added security. To set up Touch ID on Mac, go to System Preferences > Touch ID, then follow the instructions on-screen. After setting it up, you can choose what you use Touch ID for (e.g. payments, autofill etc), to customize your security.
3. Lock your device more quickly
If your device is unlocked and someone swipes it, you don’t want them to be able to continue accessing your information for ages. For maximum security, it’s best to have your iPhone automatically lock after a short period of inactivity — perhaps after a minute.
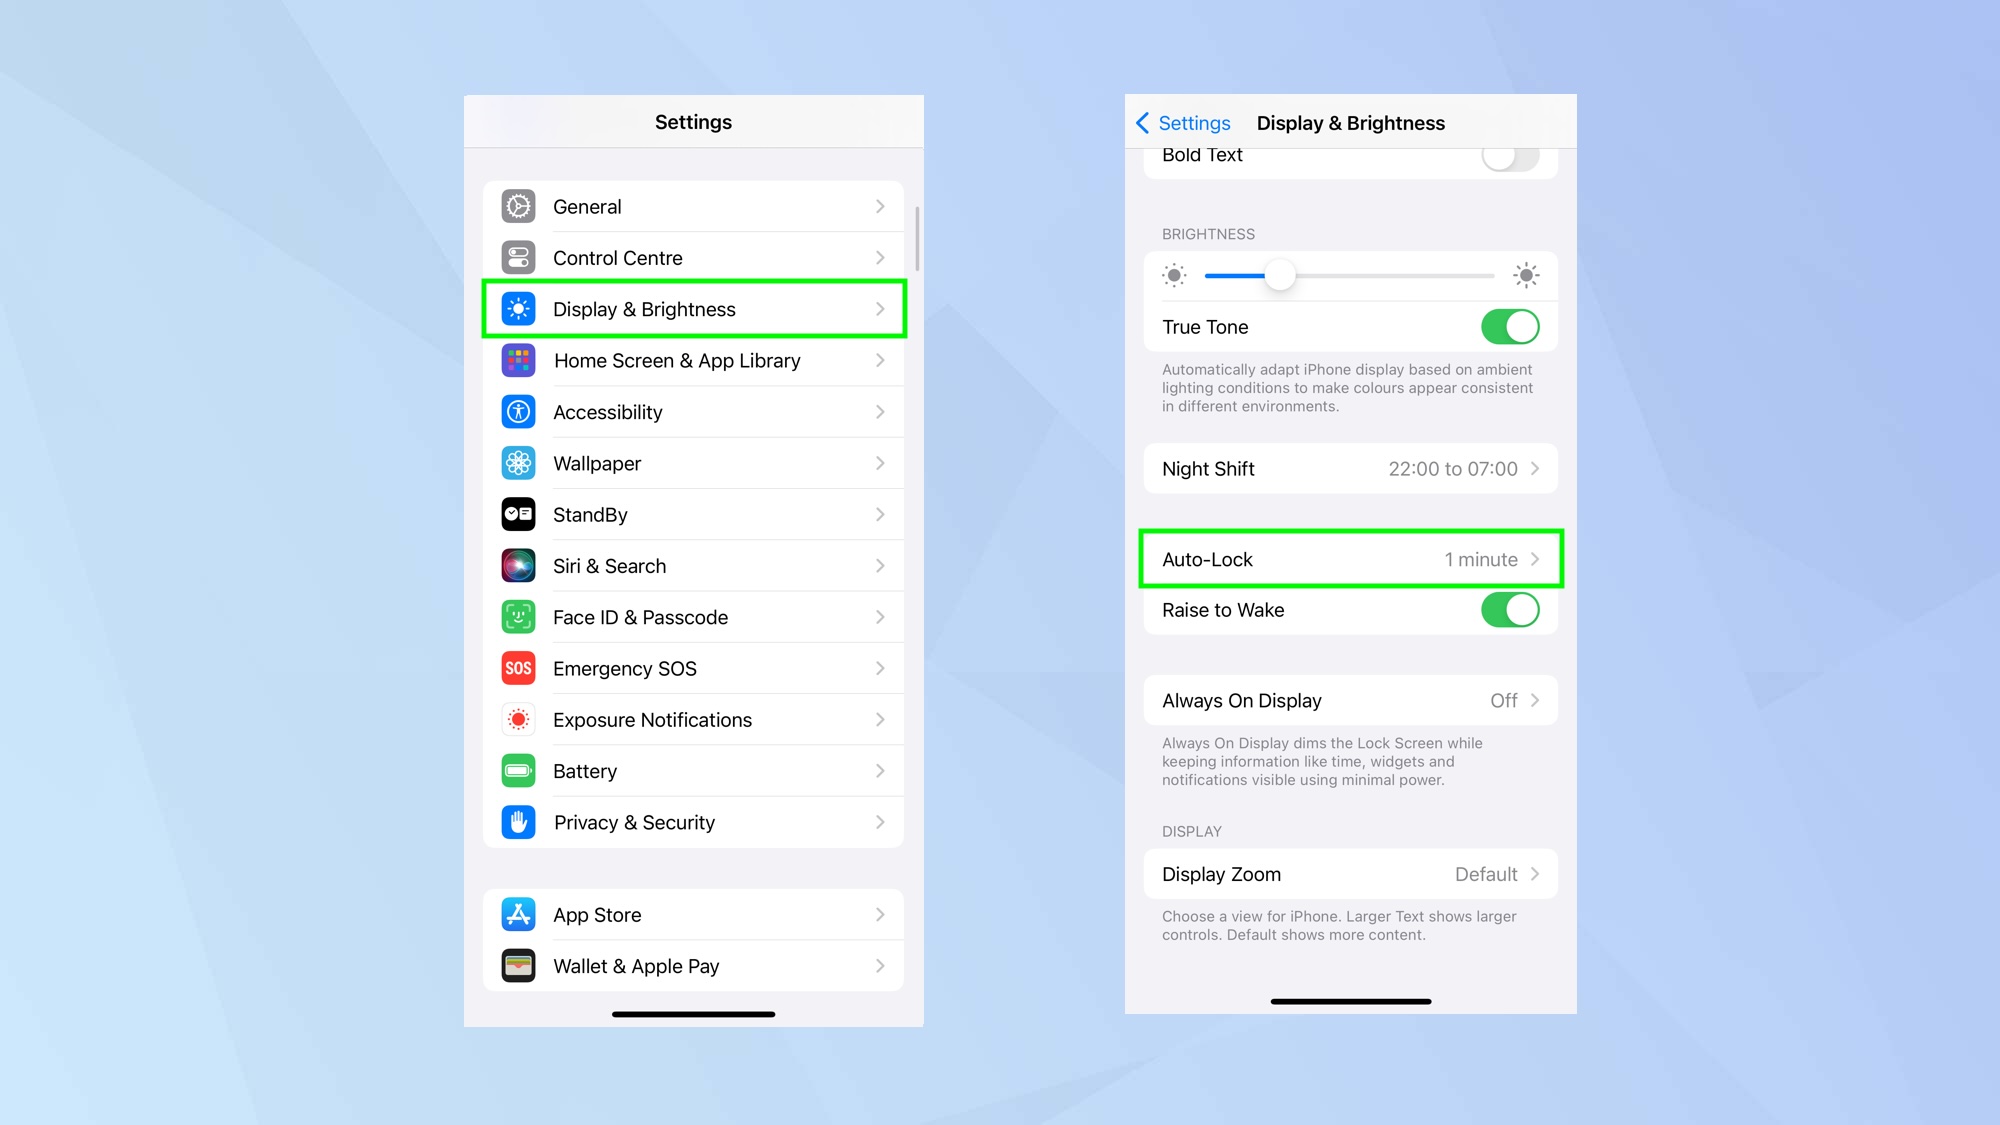
To do this on an iPhone or iPad, open the Settings app, tap Display & Brightness and select Auto-Lock. Now choose an amount of time (we’d suggest never choosing Never).
On a Mac, select the Apple menu, select System Settings, click Privacy & Security, click Advanced and turn on Log out automatically after inactivity. Click Log out after and choose an amount of time.
If you have an Apple Watch, you can also learn how to lock your iPhone from your Apple Watch with a Focus Modes hack. Should a thief steal your unlocked iPhone, you can quickly lock the device.
4. Erase data after many failed login attempts
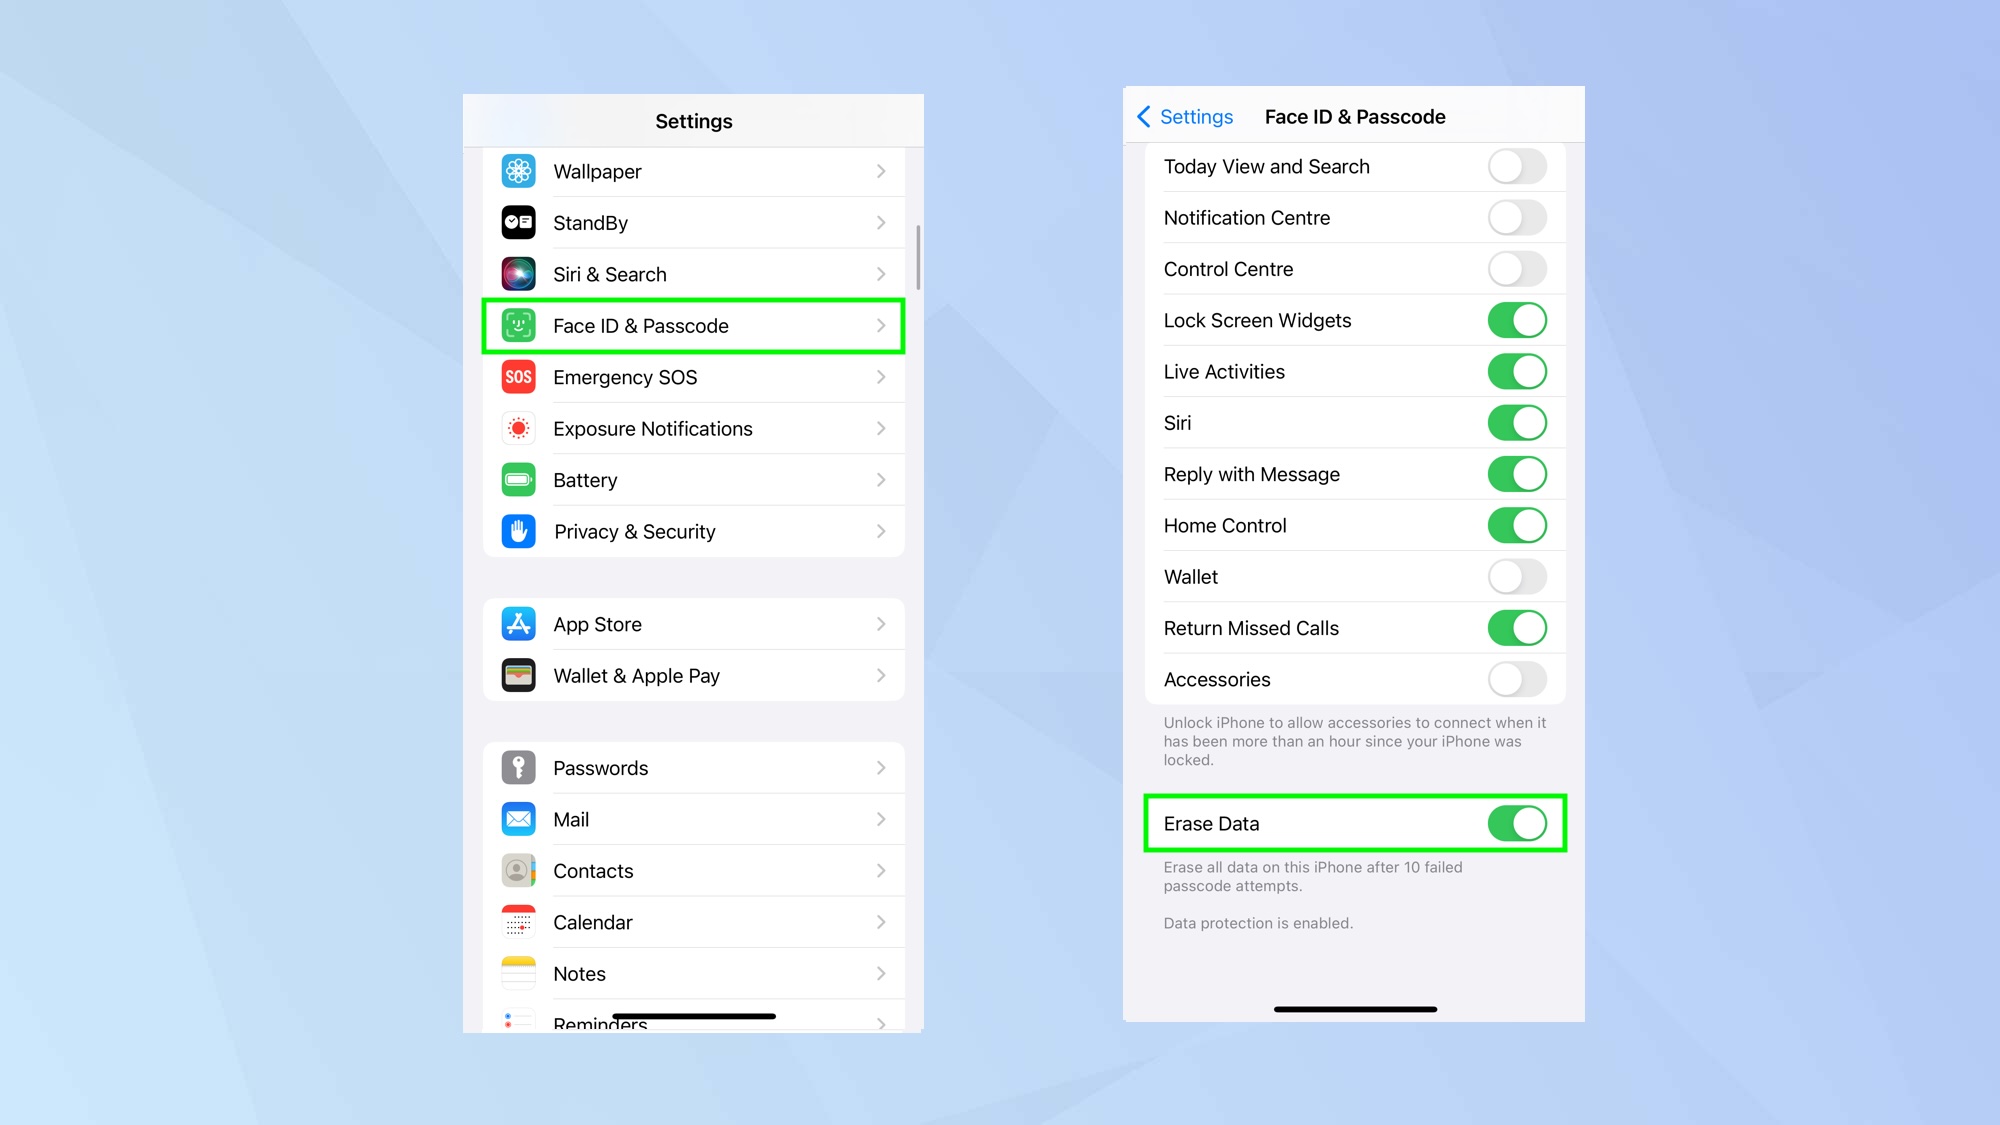
For additional peace of mind, consider erasing the data on your iPhone after 10 unsuccessful passcode attempts. That way, should your iPhone fall into the wrong hands, the device will at least have your private data removed.
If you’re going to do this, discover how to back up your iPhone first — you will want to have iCloud Backup turned on so that you can restore your data to a replacement iPhone (or back to the existing iPhone). This is easy enough: go to Settings, tap your name, select iCloud, tap iCloud Backup and toggle iCloud Backup on.
Once that’s done, go to Settings, tap Face ID & Passcode, enter your passcode and scroll down. Toggle Erase Data on.
5. Set up a recovery key
A recovery key will allow you to reset your password and regain access should you ever lose access to your account. You will need to set up a recovery key ahead of such a situation, however, and then keep the randomly generated 28-character code safe — if you lose the recovery key and can’t access a trusted device signed in with your Apple ID, then you’ll be permanently locked out of your account.
Sounds scary but don’t worry: just be careful and keep the recovery key written down in a place where you tend to keep other important documentation. If this sounds like something you want to do, then learn how to set up an Apple recovery key. One can be set up on an iPhone, iPad or Mac.
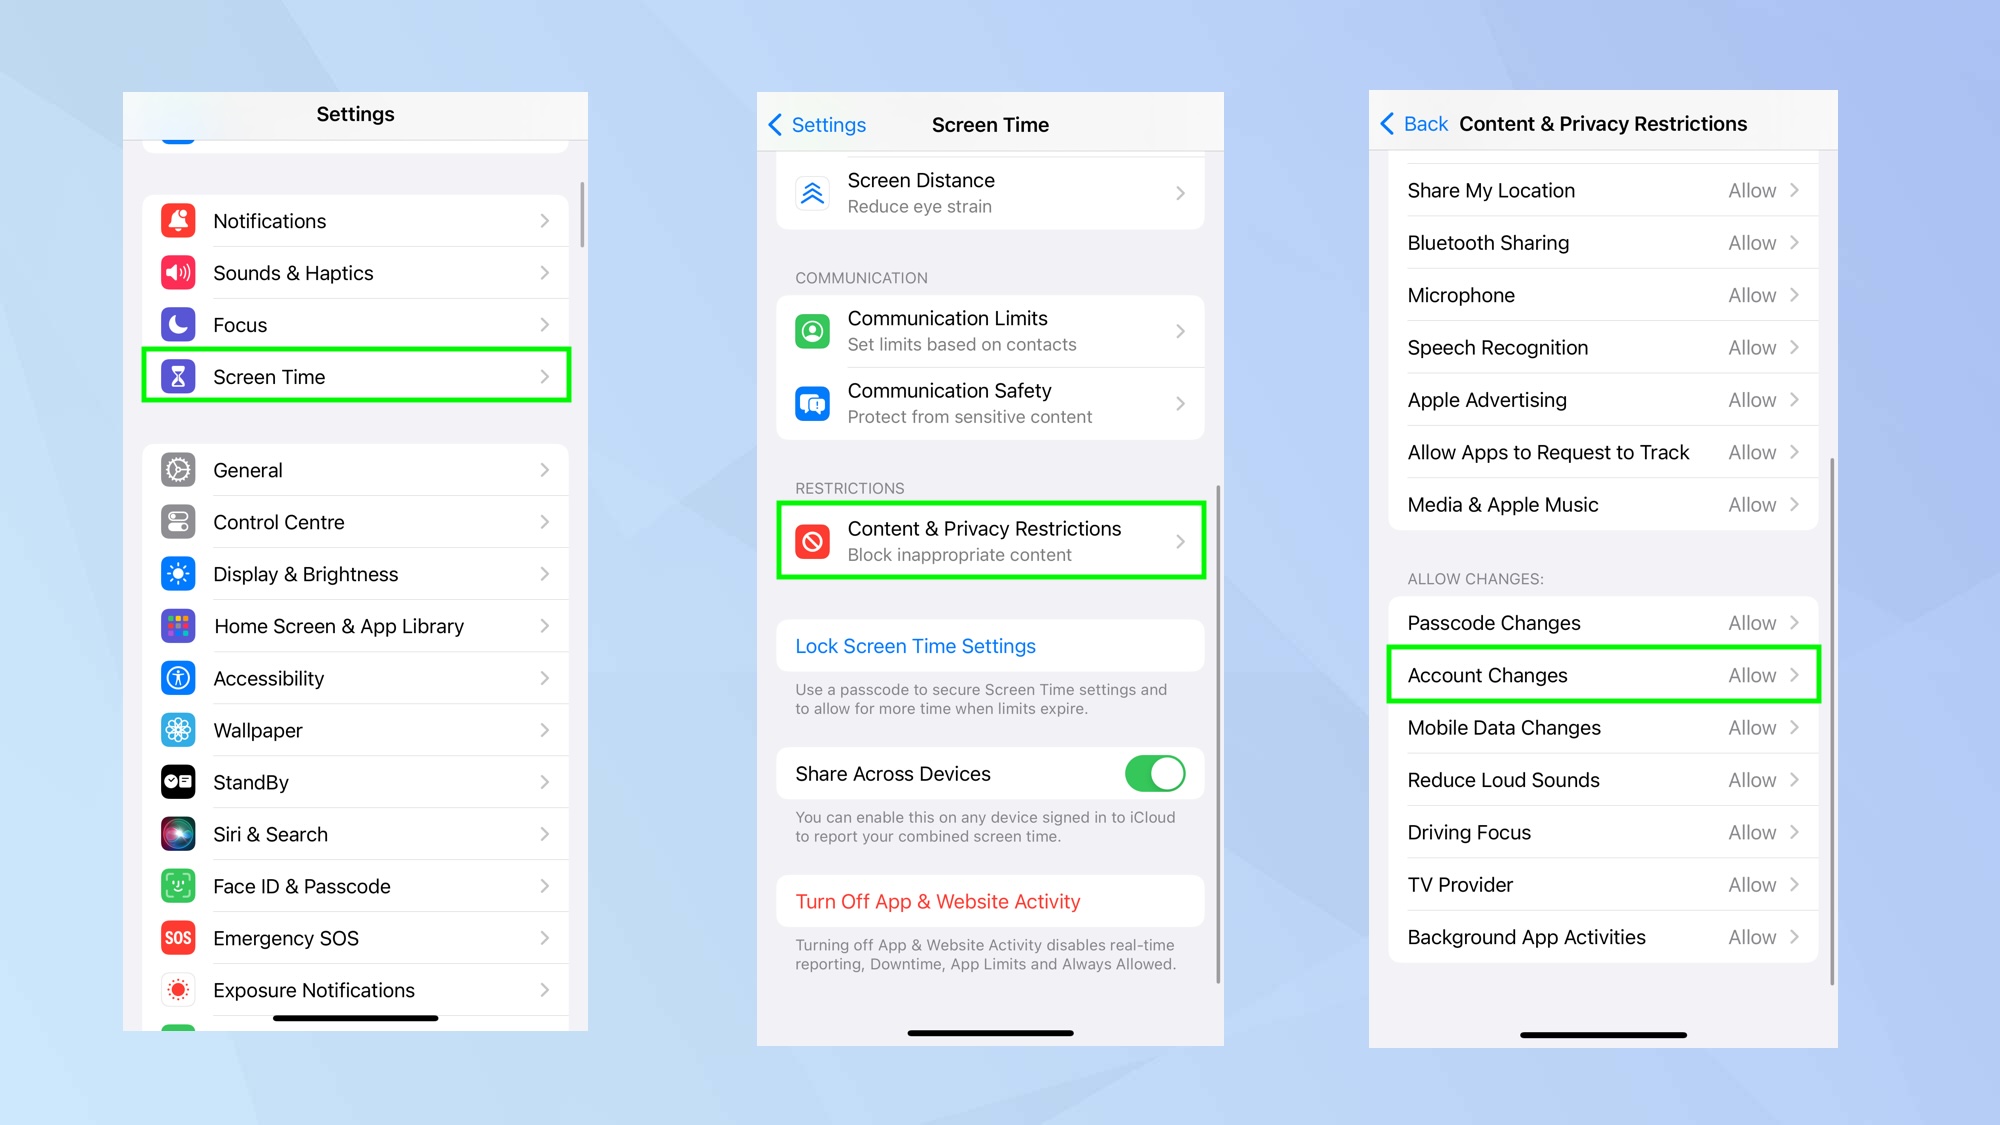
Since iPhone thieves are locking owners out of their devices, you may want to stop others setting up a recovery key and locking you out of your account. Go to Settings, tap Screen Time and select Lock Screen Time Settings. Enter a four-digit passcode (not the one you use to unlock your iPhone). Now go to Settings, tap Screen Time and select Content & Privacy Restrictions. Toggle Content & Privacy Restrictions on and scroll down to Account Changes. Tap Account Changes and select Don’t Allow. You would have to go back and allow account changes if you want to make alterations yourself in the future.
6. Add two-factor verification and/or hardware security keys
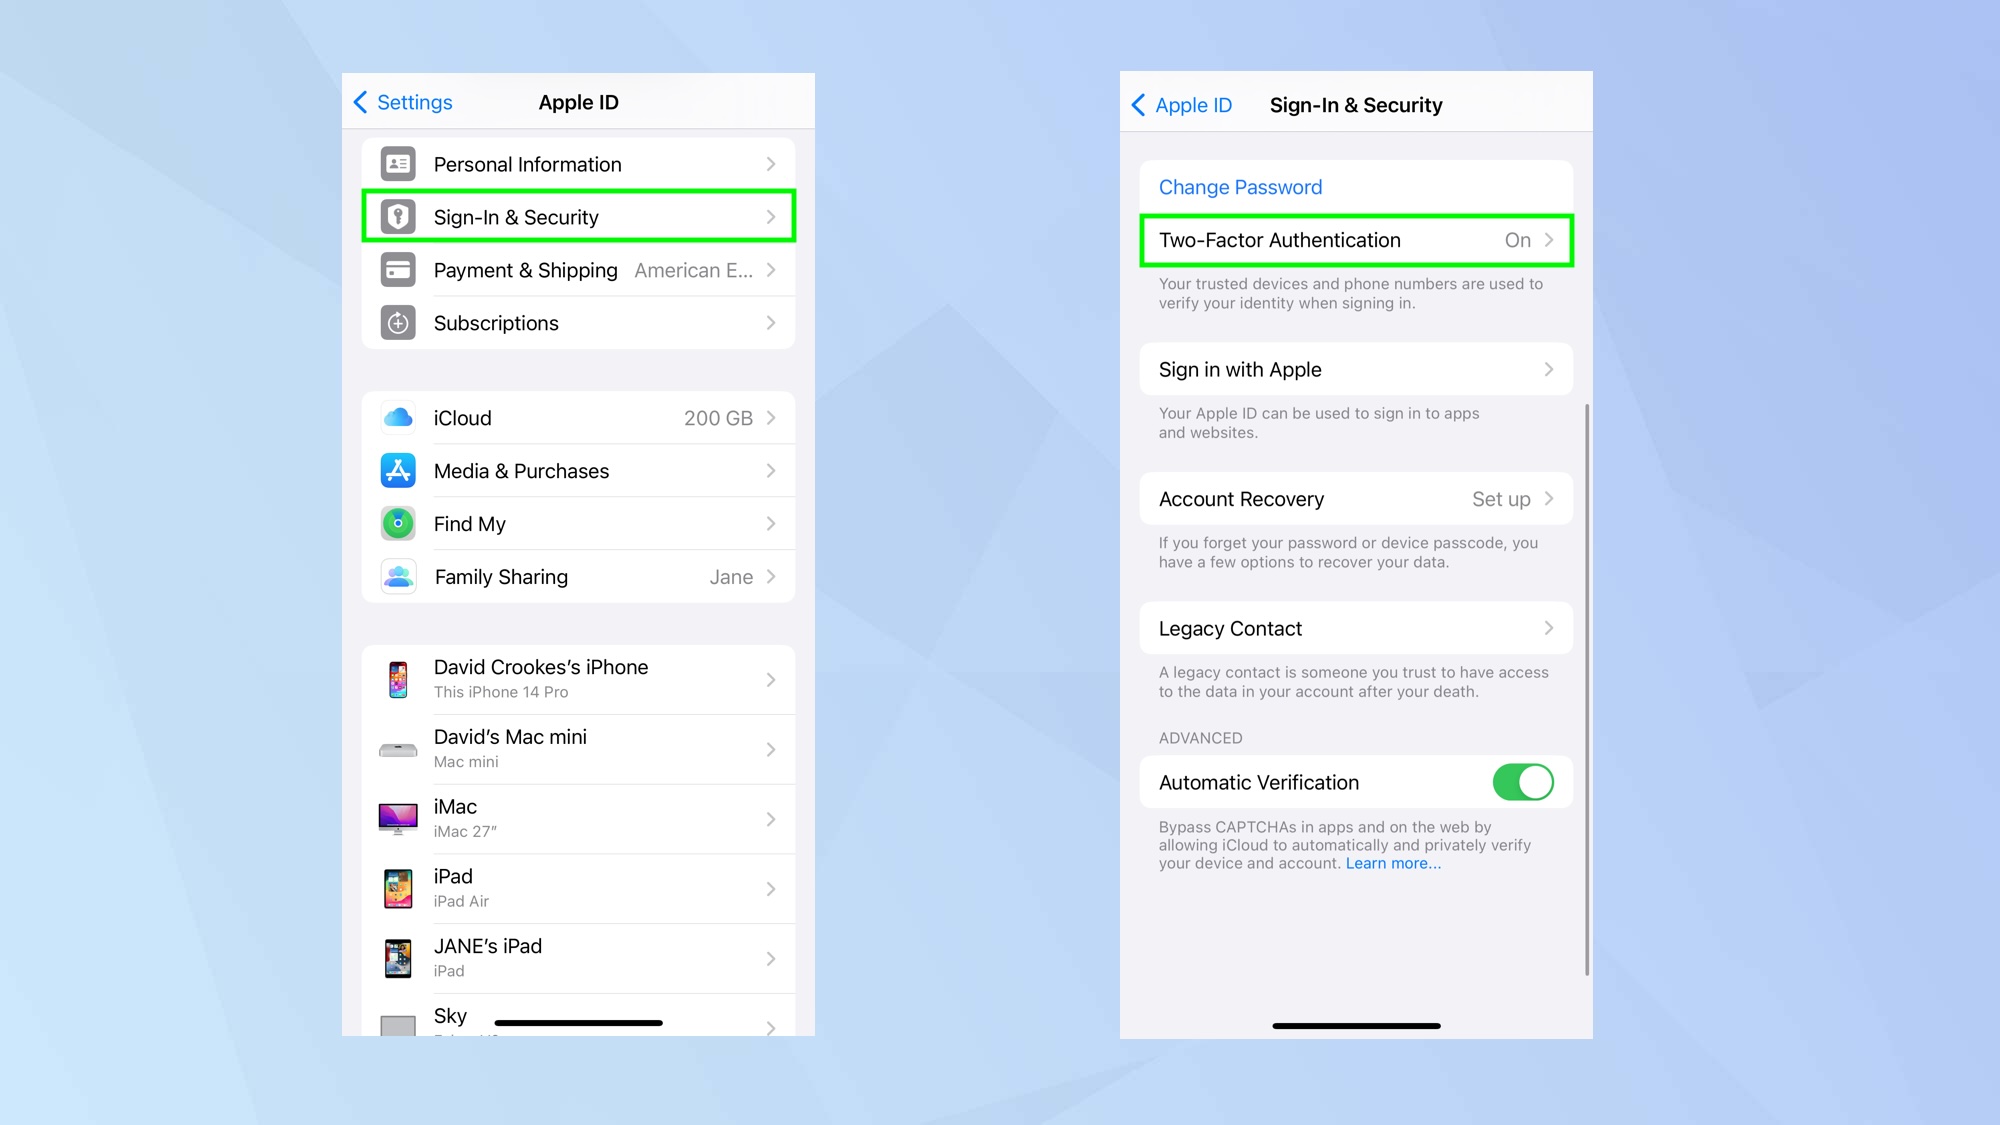
Adding two-factor authentication for your Apple ID is essential if you want to enhance your Apple device’s security. Activate it on an iPhone or iPad (sign into your Apple ID account page, tap Sign In & Security and select Two-Factor Authentication) or on a Mac (click the Apple menu, select System Settings, click your Apple ID, choose Sign-In & Security and tap Two-Factor Authentication) and a PIN will be sent via SMS text message or Apple’s Find My feature.
As of iOS 16.3, iPadOS 16.3 and macOS 13.2, Apple has also allowed the use of a physical security key for Apple ID and iCloud accounts on iPhone, iPad and Mac. This requires two-factor verification to be set up. Once it is, learn how to add security keys to your Apple account.
7. Enable Advanced Data Protection
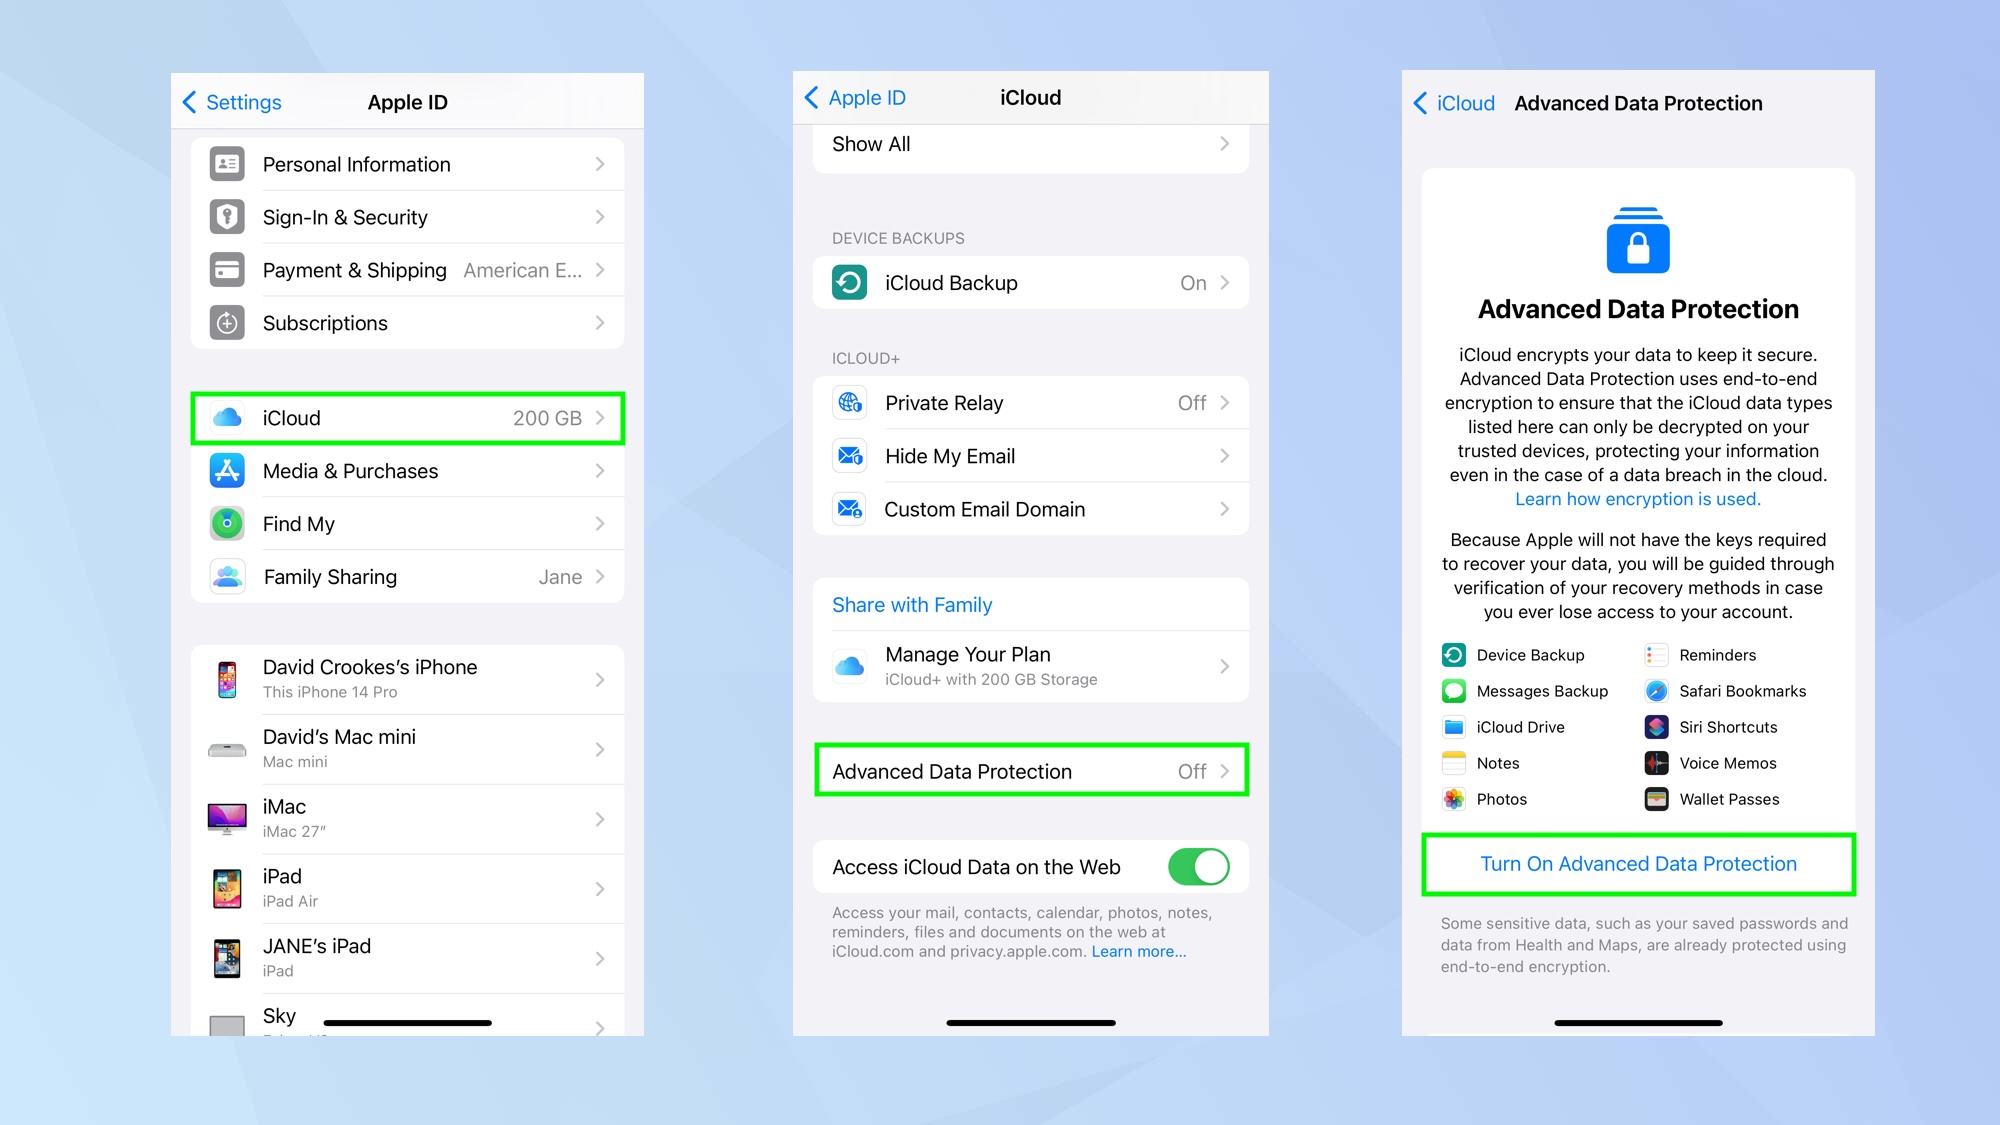
Introduced in iOS 16.3, enabling Advanced Data Protection on iPhone enables end-to-end encryption for vast swathes of iCloud data. Apple says it is the highest level of cloud data security and it involves creating a recovery method so that you don’t end up locking yourself out of your account.
Learn how to turn on Advanced Data Protection and exactly what it entails before getting stuck in. Essentially, though, you open the Settings app, tap your Apple ID, select iCloud and tap Advanced Data Protection. Select Turn on Advanced Data Protection.
And there you go: 7 security measures you need to be taking. Your security should now be boosted, but you can go further. Learn 7 easy ways to improve your online security for free or make your router more secure. It’s also worth learning how to create strong passwords that are also easy to remember and discover how to secure your Wi-Fi.
Get instant access to breaking news, the hottest reviews, great deals and helpful tips.

David Crookes is a freelance writer, reporter, editor and author. He has written for technology and gaming magazines including Retro Gamer, Web User, Micro Mart, MagPi, Android, iCreate, Total PC Gaming, T3 and Macworld. He has also covered crime, history, politics, education, health, sport, film, music and more, and been a producer for BBC Radio 5 Live.
 Club Benefits


