How to set up parental controls on Android with Google Family Link
Keep an eye on your kid's screen time activity with Google Family Link

Smartphones are incredible tools that offer so many different things to do, but that doesn’t mean you should let your kids have unfiltered access to it all. Fortunately, if you need something simple to control your kid’s screen time, you don’t need to go hunting for the best parental control apps. Google has built some of those basic features into the Android operating system.
Google Family Link allows you to supervise your child’s devices to ensure they aren’t doing anything they’re not supposed to. Features include setting screen time limits, approving app downloads or purchases, tracking their location, better securing their account, and more. But you will need to set it up first, and that can be a pretty lengthy process. Fortunately we can take you through it step-by-step.
Here’s how to set up parental controls on Android with Google Family Link.
How to set up parental controls on Android with Google Family Link
1. Download Google Family Link on your device
2. Sign into your own Google account
2a. Create your child their own Google account if necessary
2b. Remove your existing account if necessary
3. Open your child’s device and find the parental controls menu
4. Start setting up parental controls
5. Link your child’s Google account to your own
6. Read about Supervision, and enter your child’s account password
7. Let the accounts link
8. Manage your kid’s apps and filters
9. Review controls, and set limits from either device
We'll take you through all the steps in detail below.
1. Download Google Family Link on your device
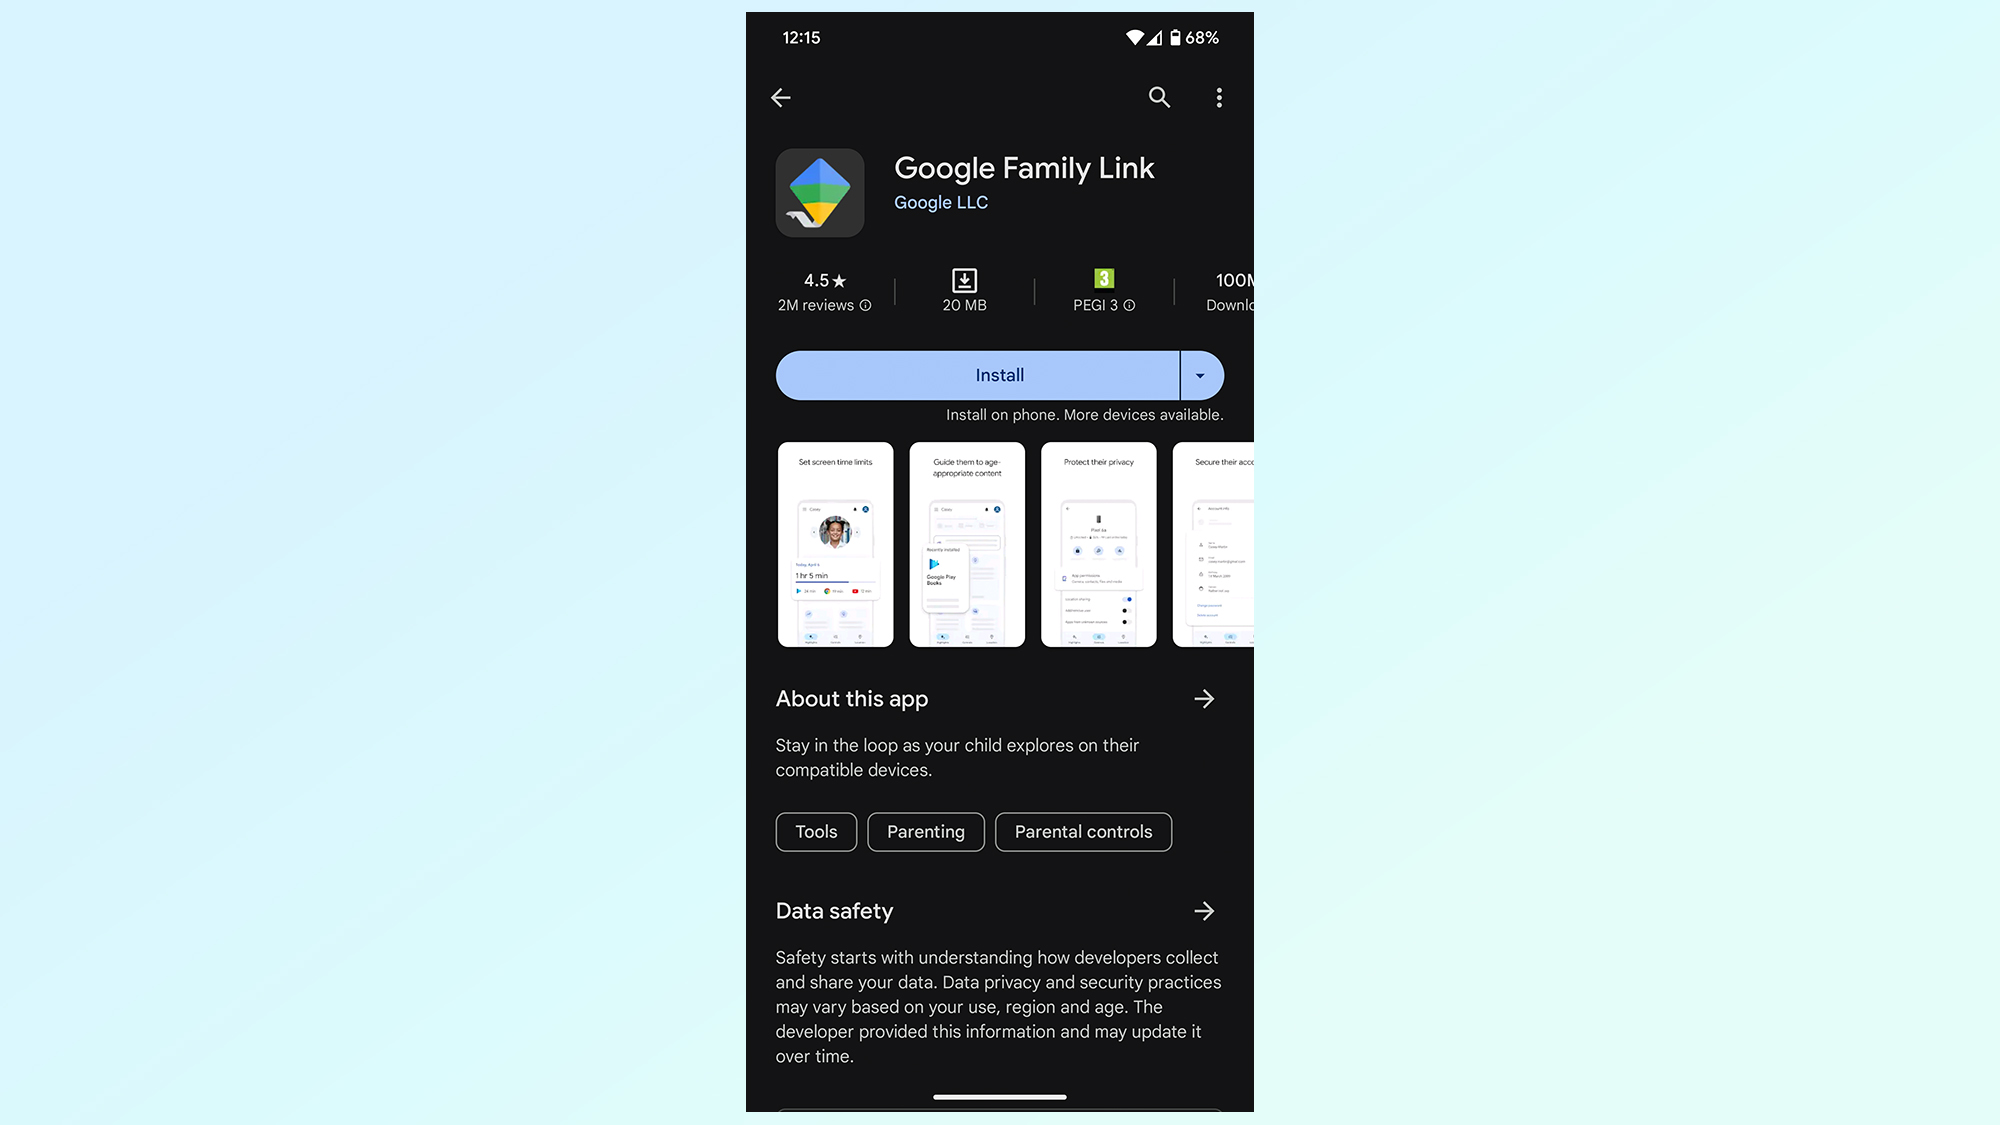
The first thing you’ll need to do is download Google Family Link app from the Google Play Store. It’s free and shouldn’t take more than a few minutes.
2. Sign into your own Google account
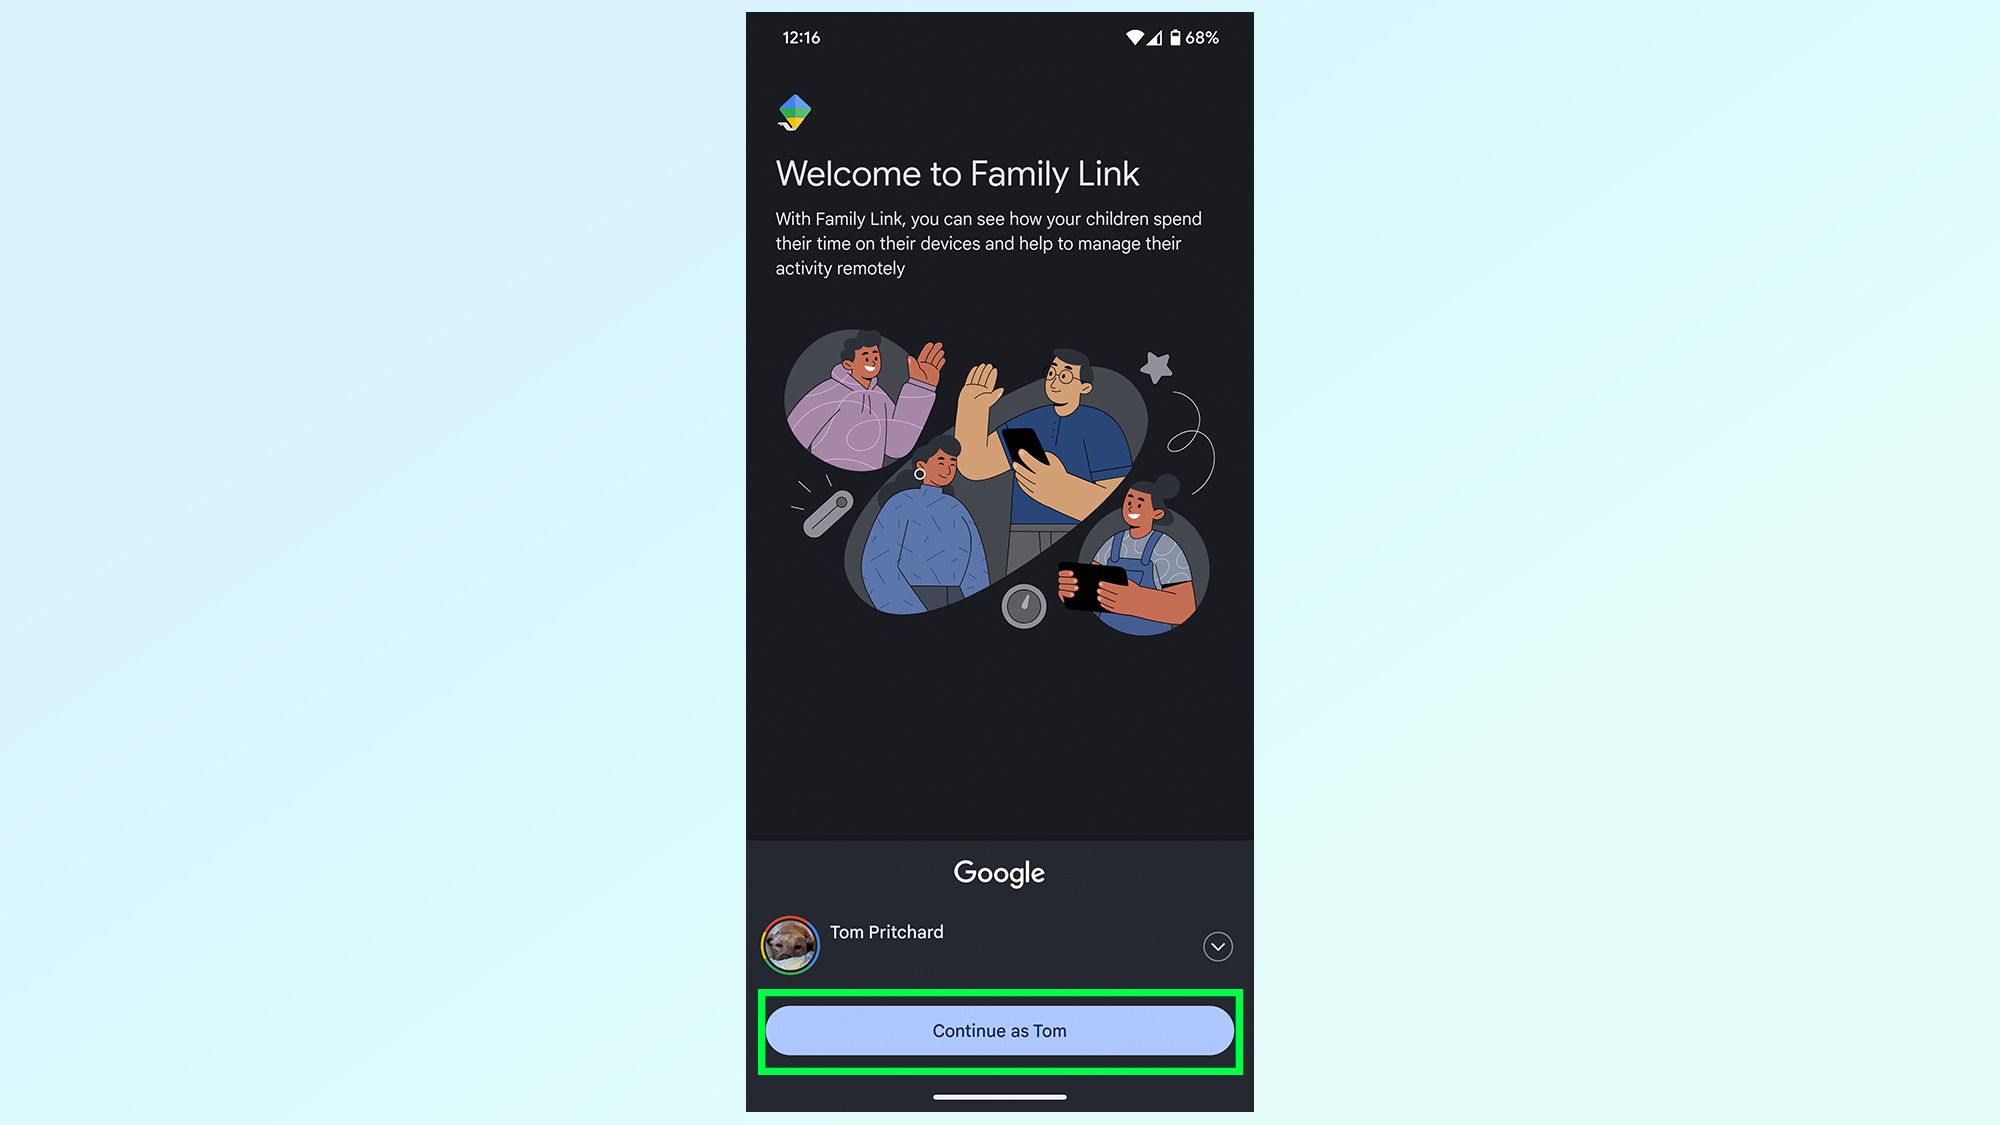
Your next step is to sign into your own Google account on Family Link. This confirmation screen should only matter if you have multiple Google accounts on a single device, but all you need to do is tap Continue.
2a. Create your child their own Google account if necessary
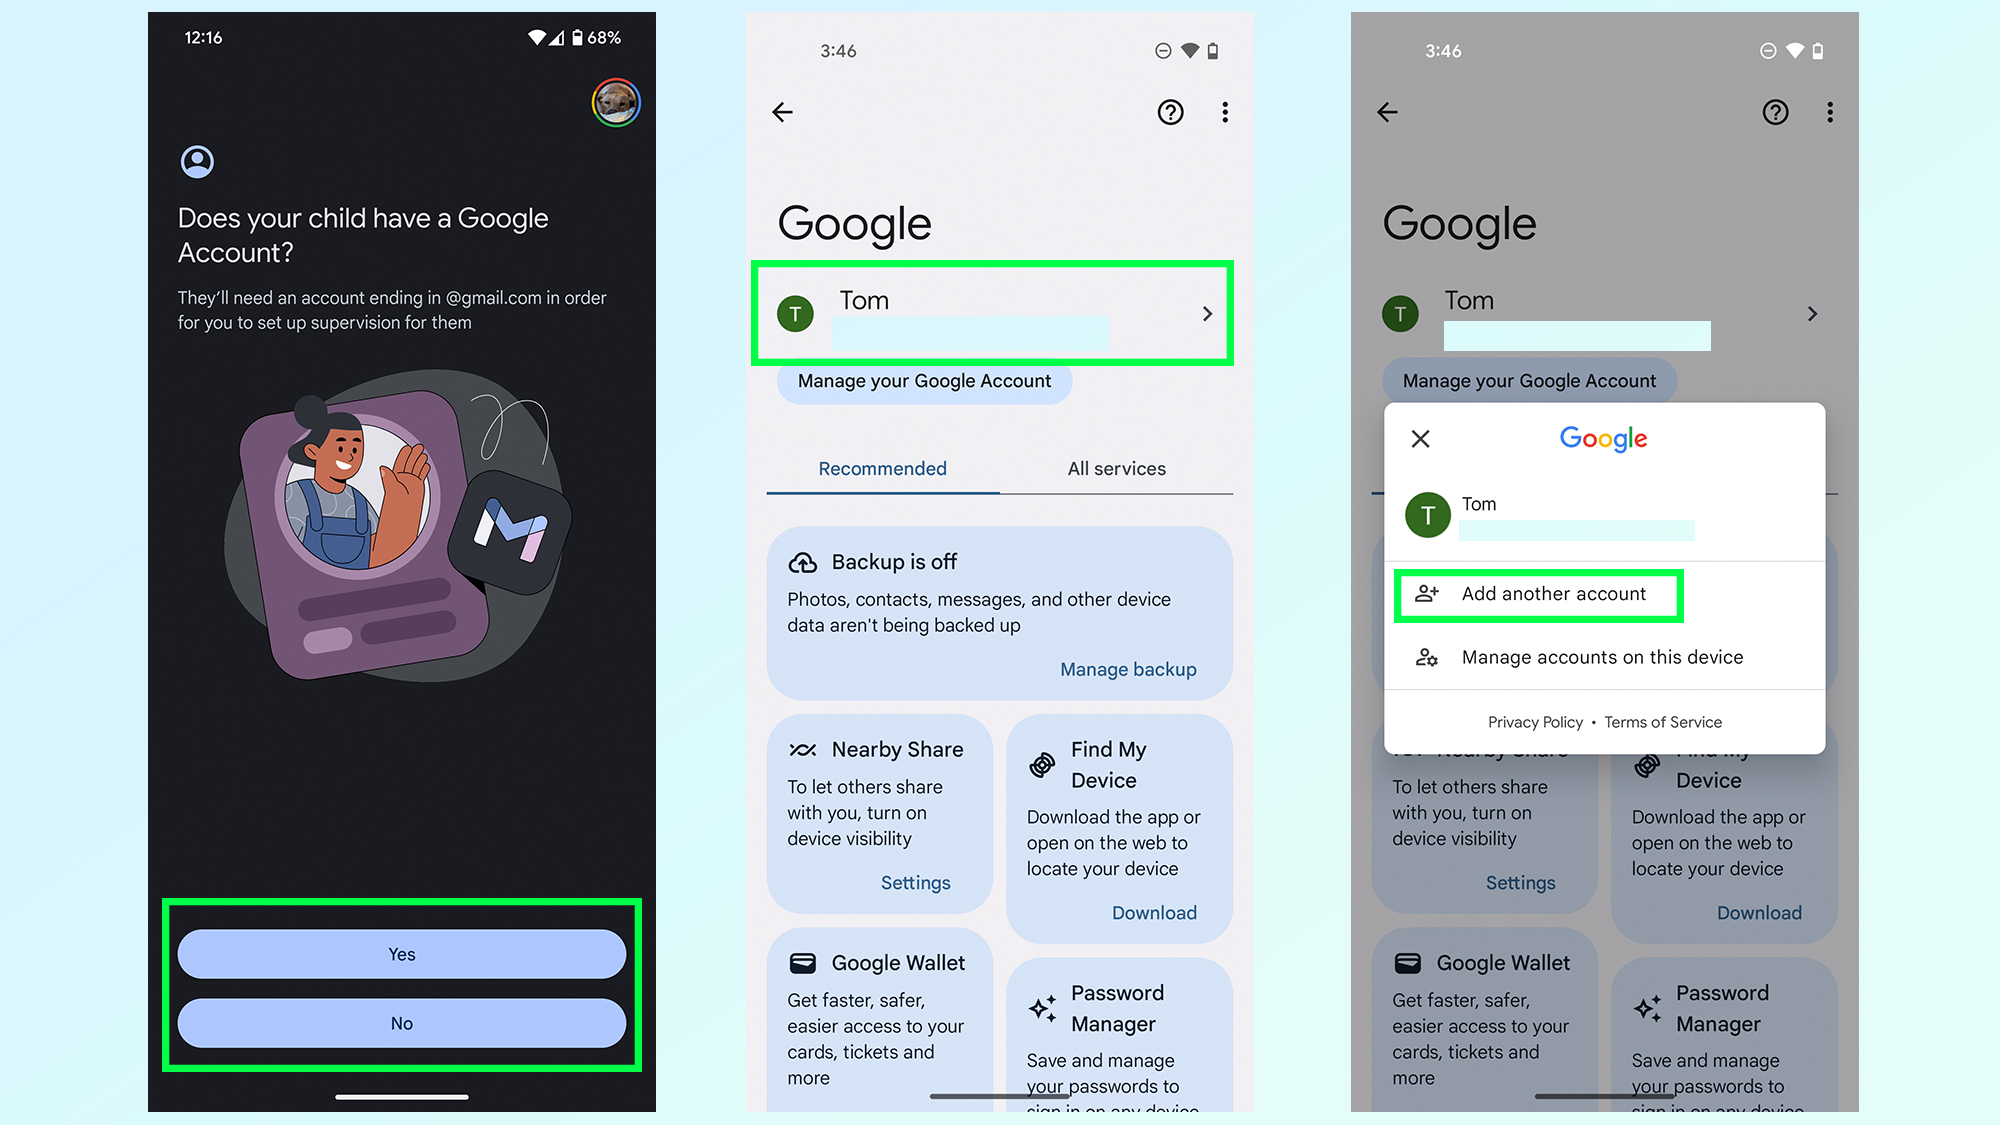
Your child’s device will need to be logged into a separate Google account for Family Link to work. If they don’t have one, you’ll need to set one up. If you haven’t set up your kid’s phone yet, you’ll be prompted to do this during the set-up sequence. Check out our guide on how to set up an Android phone for more information.
If you’ve already set up the device with a different account (such as your own) you can create a new one in just a few minutes. Open the Settings menu and scroll down to the Google menu. From there, tap the account name at the top of the page followed by Add another account. This will walk you through the process of creating a brand new Google account
2b. Remove your existing account if necessary
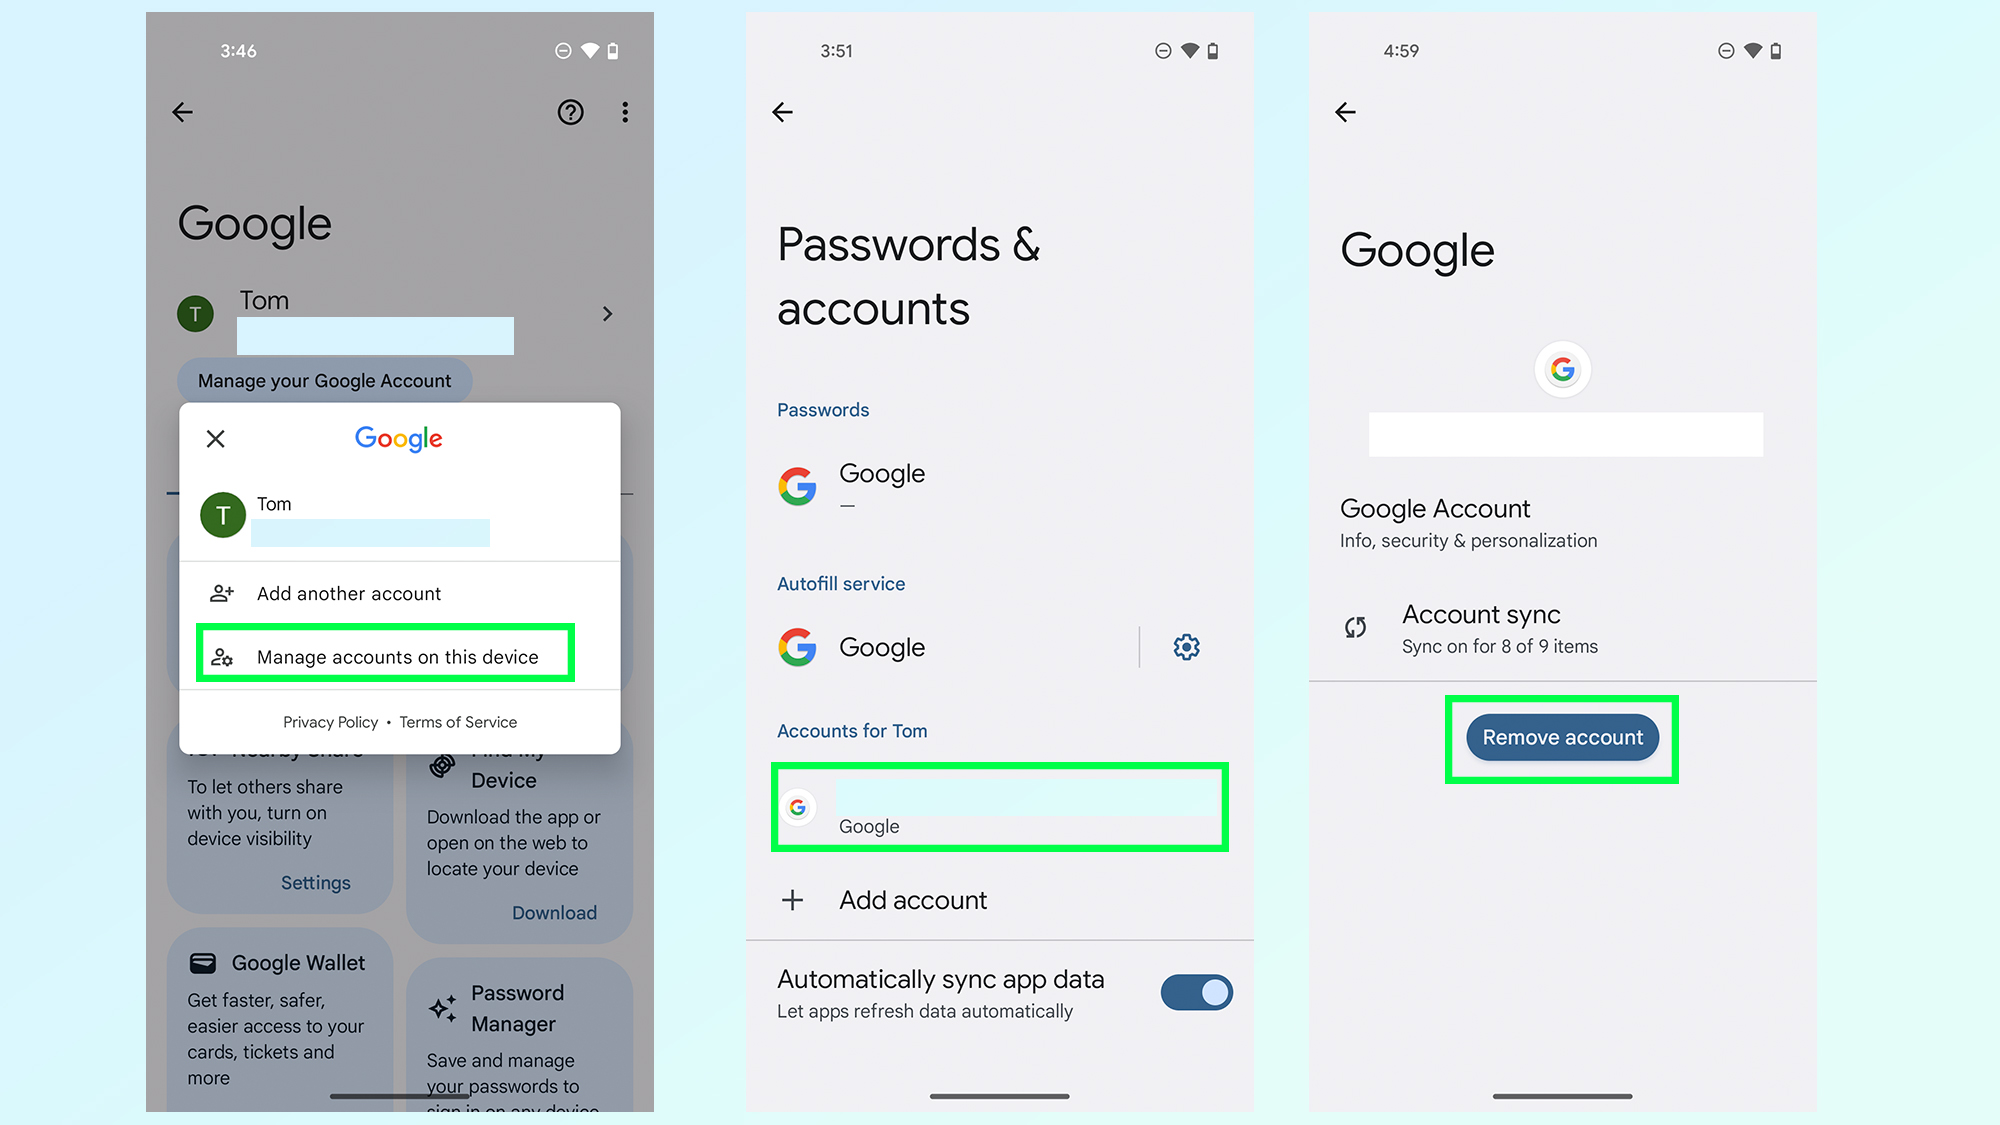
You’ll then want to remove the first account from your kid’s device. Follow the steps in part 2a, but tap Manage accounts on this device instead of adding a new account. Tap the account name you want to remove and select the Remove account option at the bottom of the screen.
3. Open your child’s device and find the parental controls menu
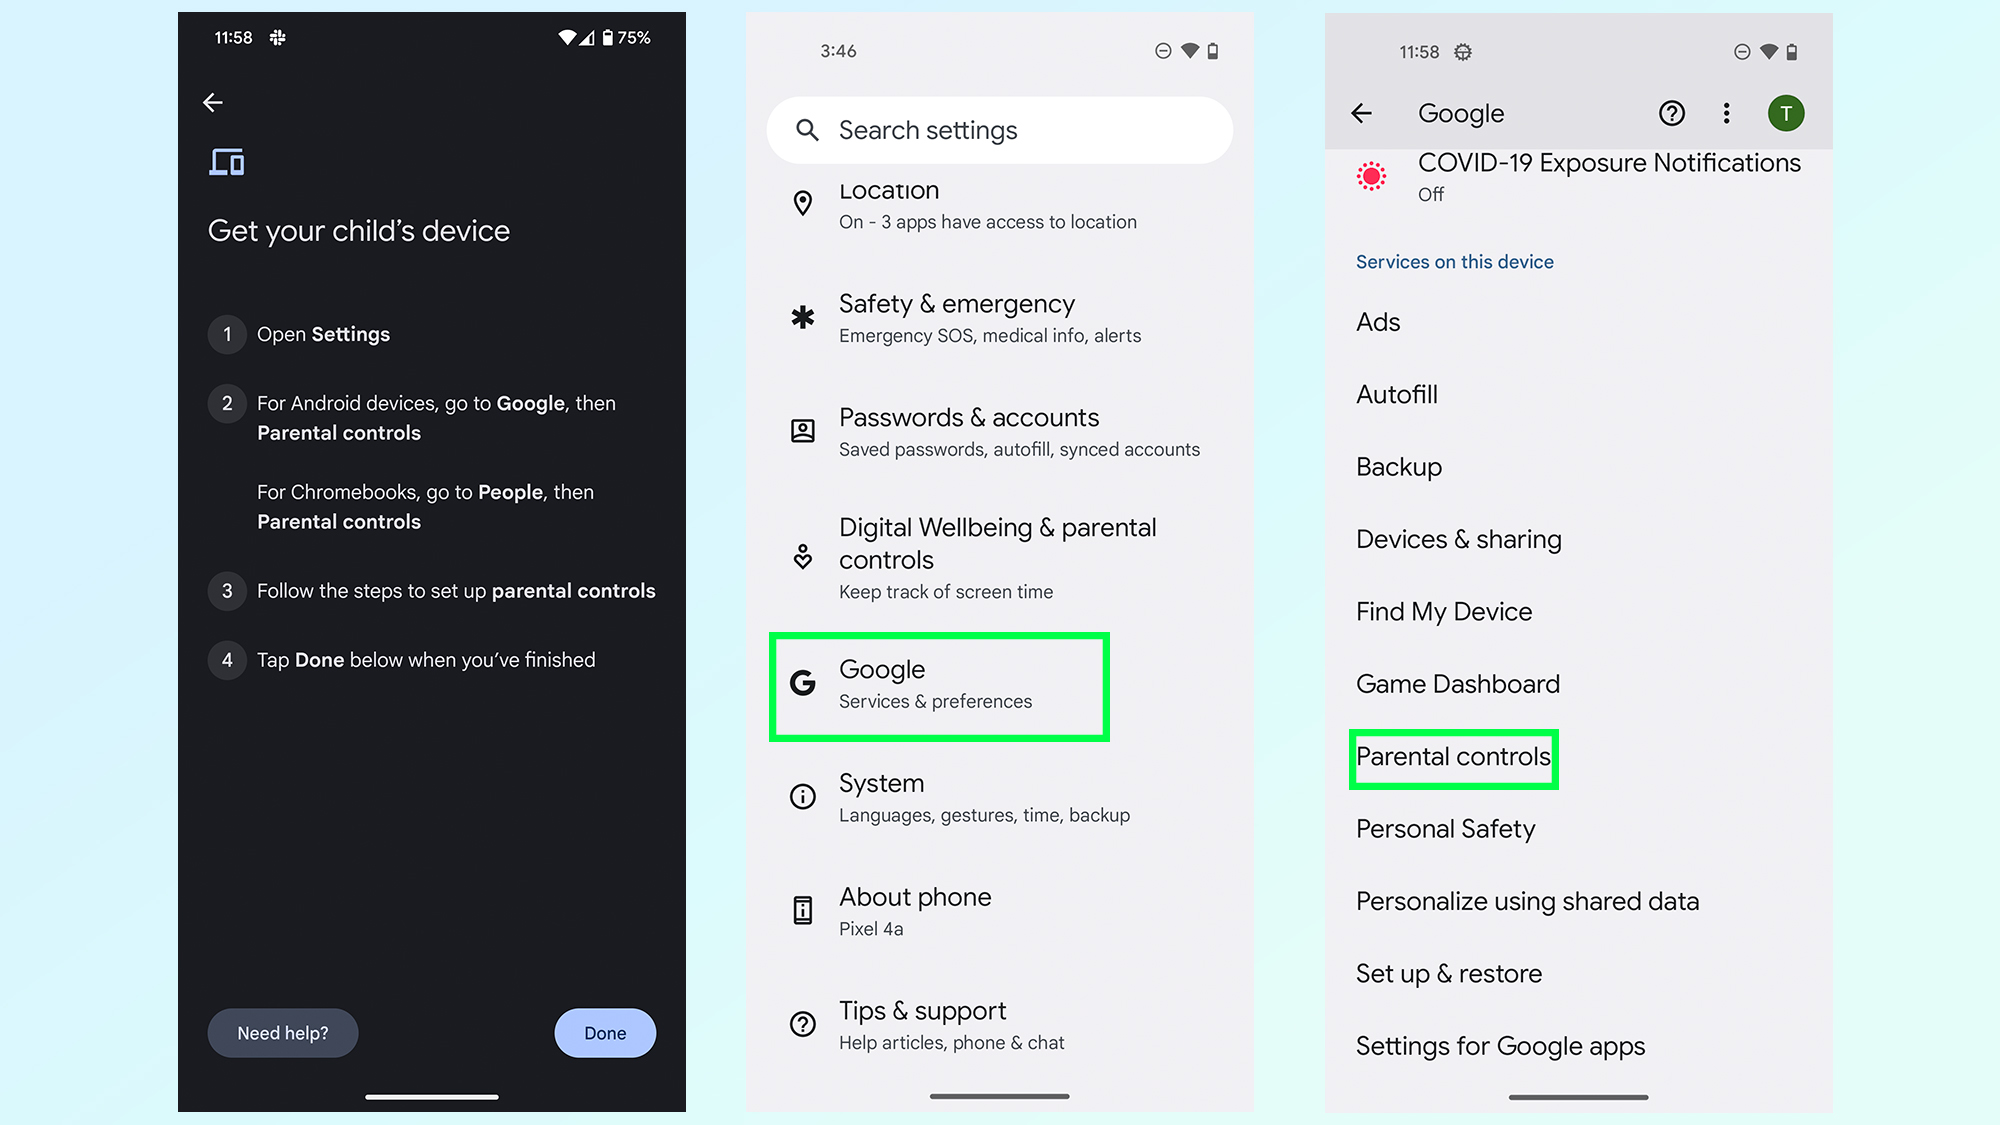
Once your kid’s device has its own Google account setup, you’ll have to head into the Settings menu. Scroll down and tap the Google menu, then tap Parental controls.
4. Start setting up parental controls
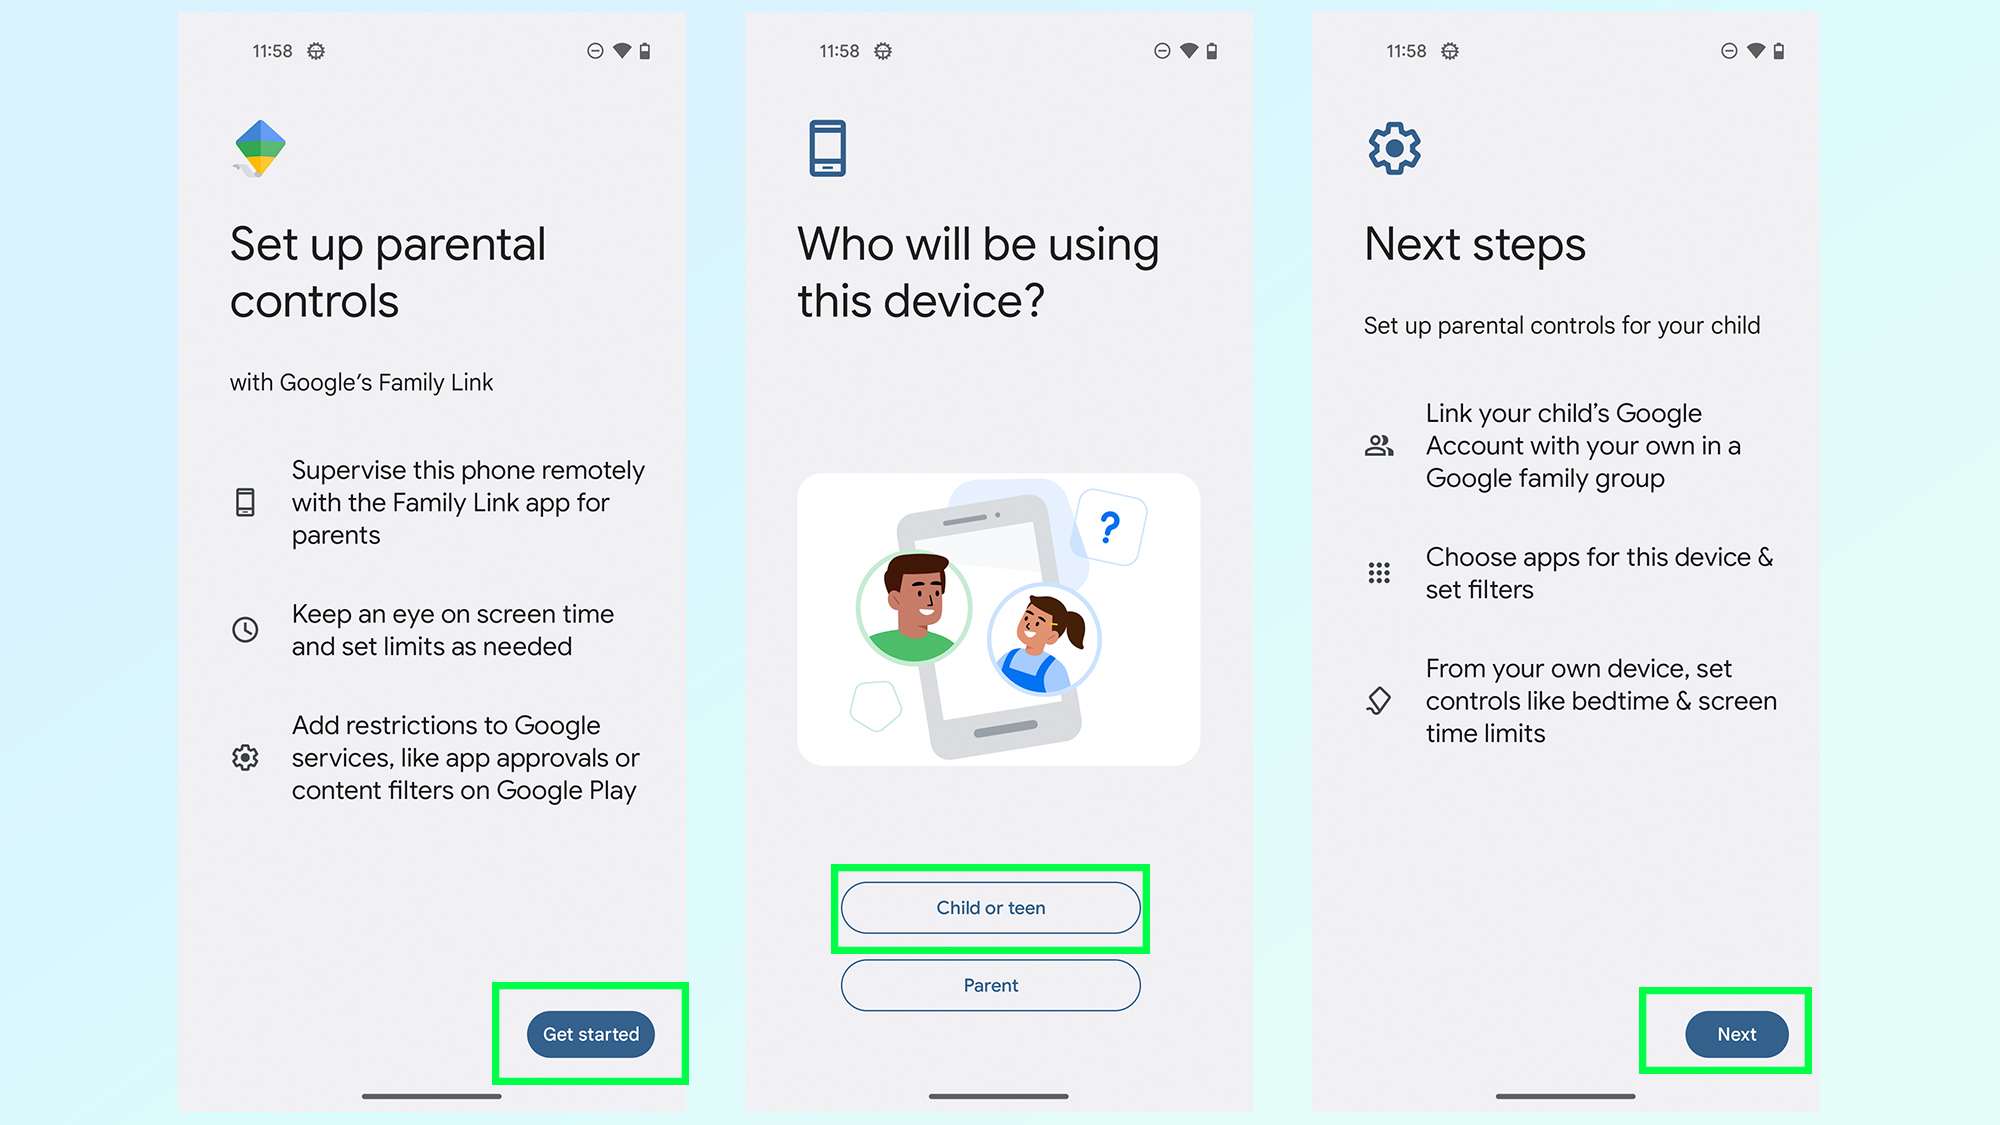
The parental controls setup process will begin. The first screen gives you a quick run-down on what Family Link is and how it works, you’ll want to tap Get Started and then tell Google who the device is being used by — in this case a child or teen.
This will bring up another menu giving you a rundown of the final few steps. Tap Next to continue.
5. Link your child’s Google account to your own
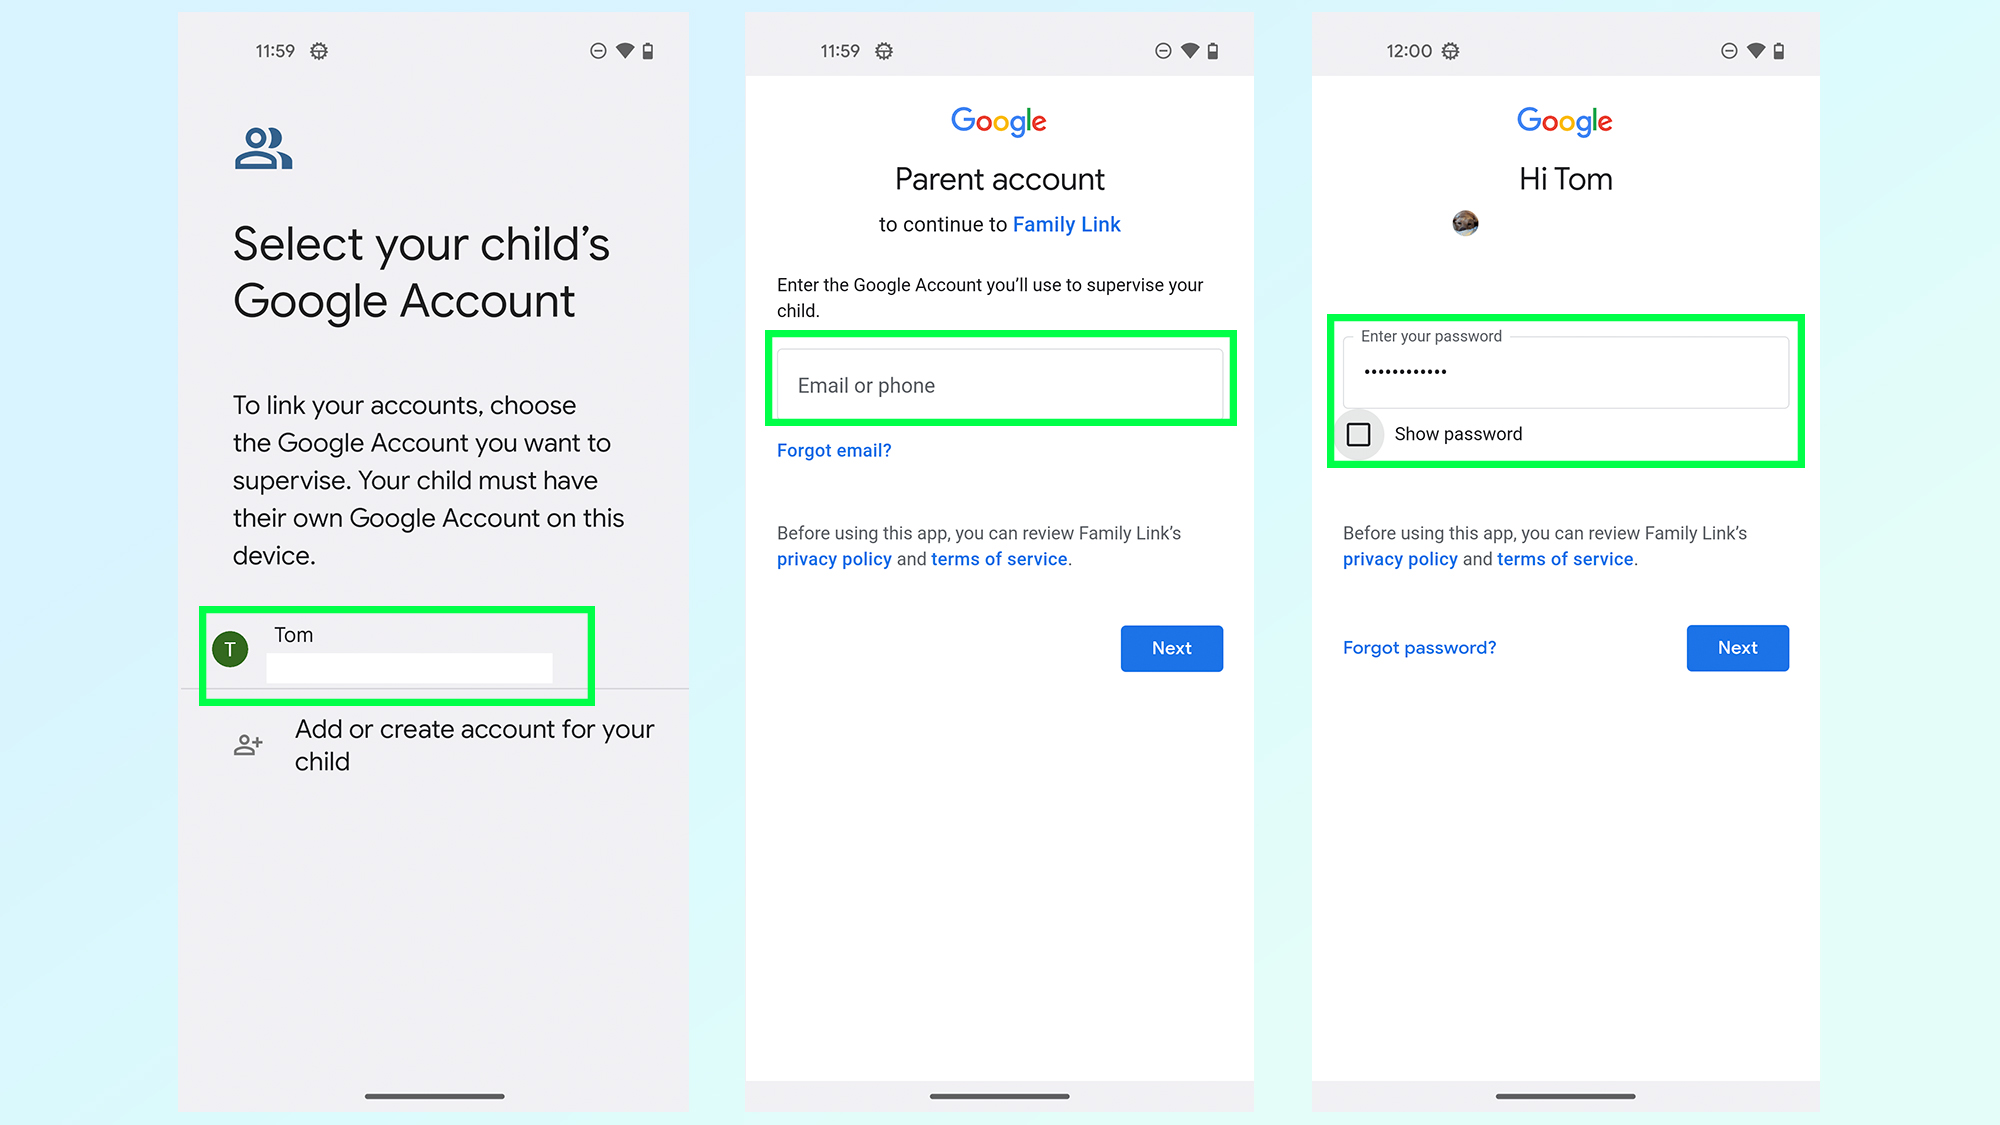
The first step is to tap the account you want to add parental controls to. From there you’ll be asked to log into your own Google account. This is 2-3 screens, covering username, password and 2-step verification (if you have it enabled).
In our experience the account-linking process could be a bit glitchy. If things don’t happen the way they should, don’t be afraid to start this step again.
6. Read about Supervision, and enter your child’s account password
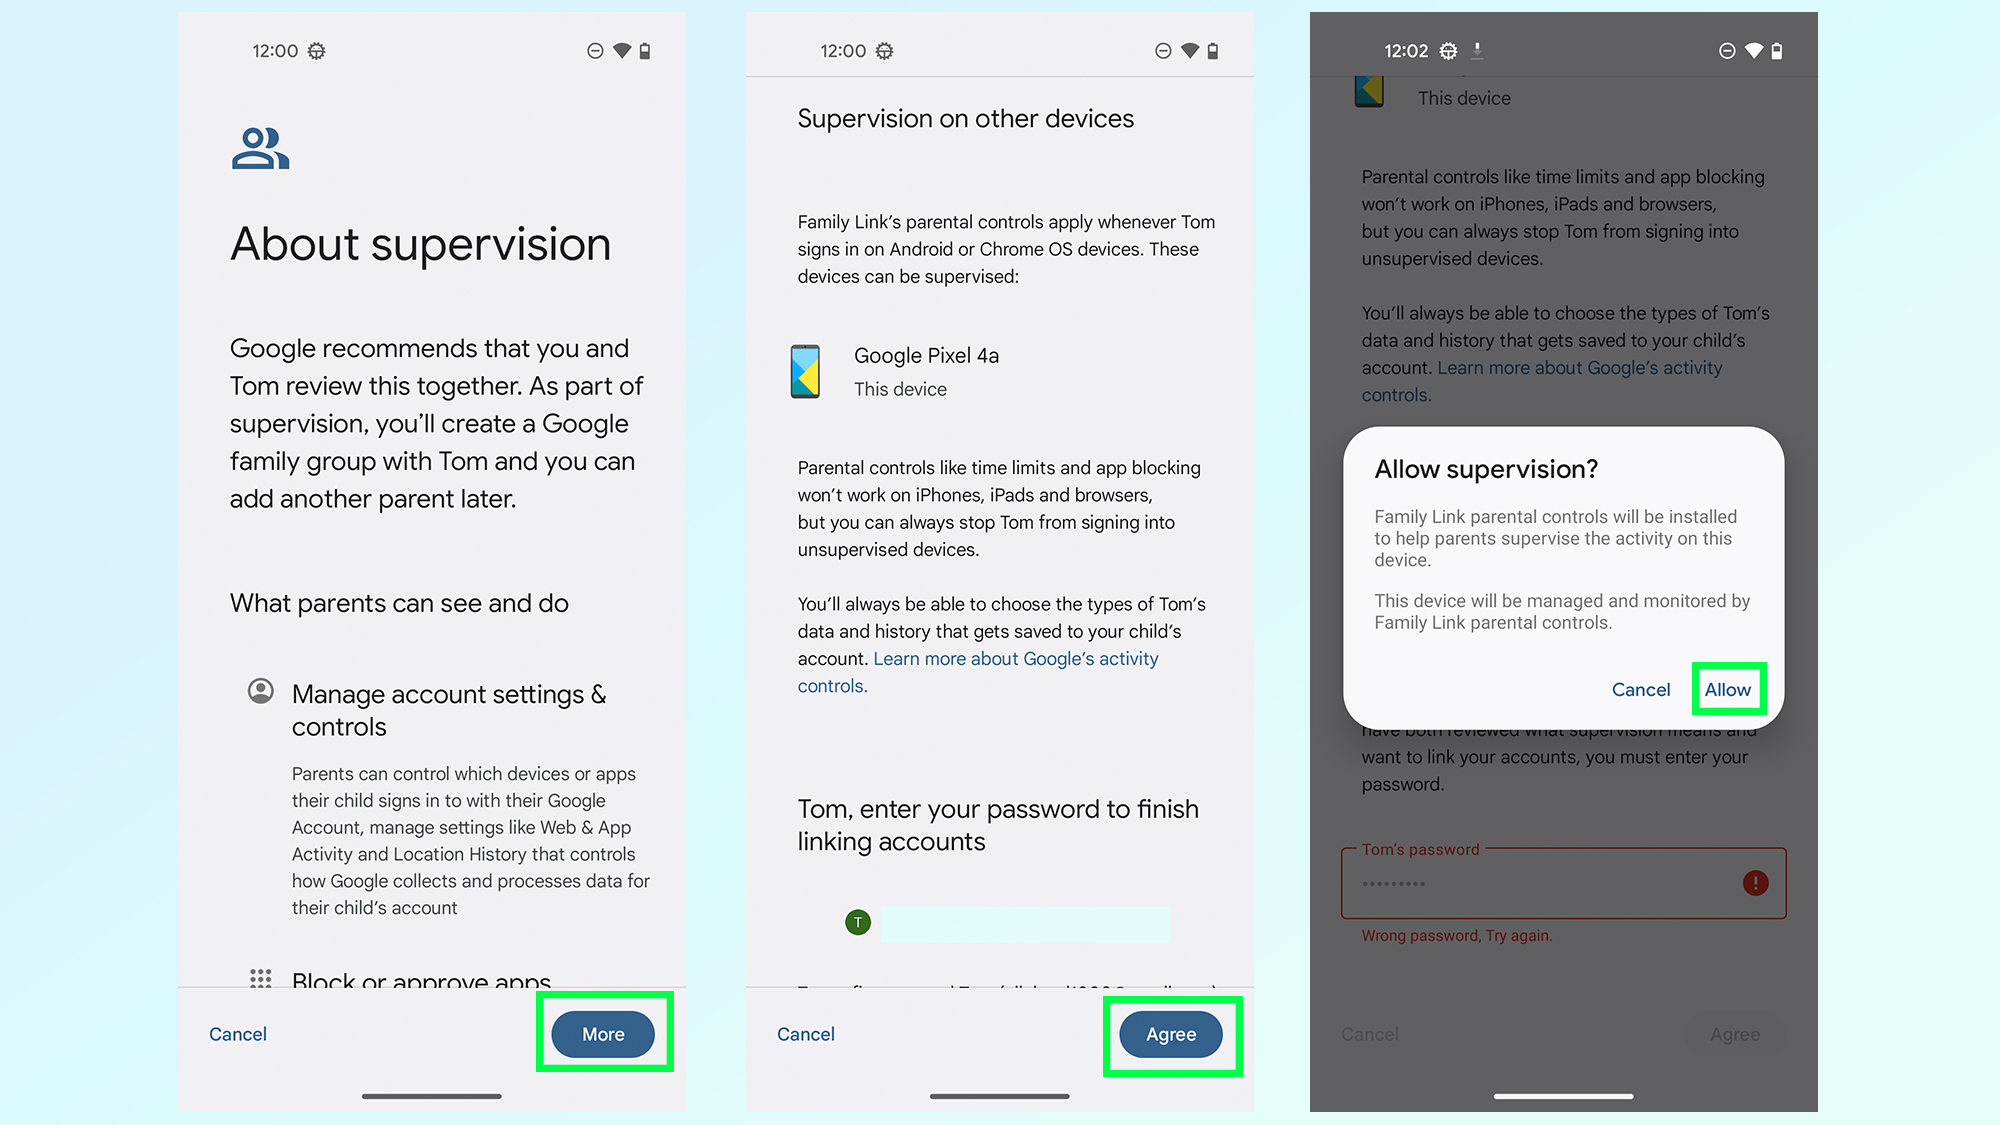
Once logged in you’ll be met with a lengthy page about the Supervision feature and what you, as a parent, can do with it. Either Scroll down the page or tap More to keep reading until the end.
Once at the end the page will show you which devices will be supervised, and will ask you to enter the password for your kid’s account.
Enter the password and press Agree, at which point a final confirmation will flash up asking if you want to add parental controls to this device. Tap Allow to continue.
7. Let the accounts link
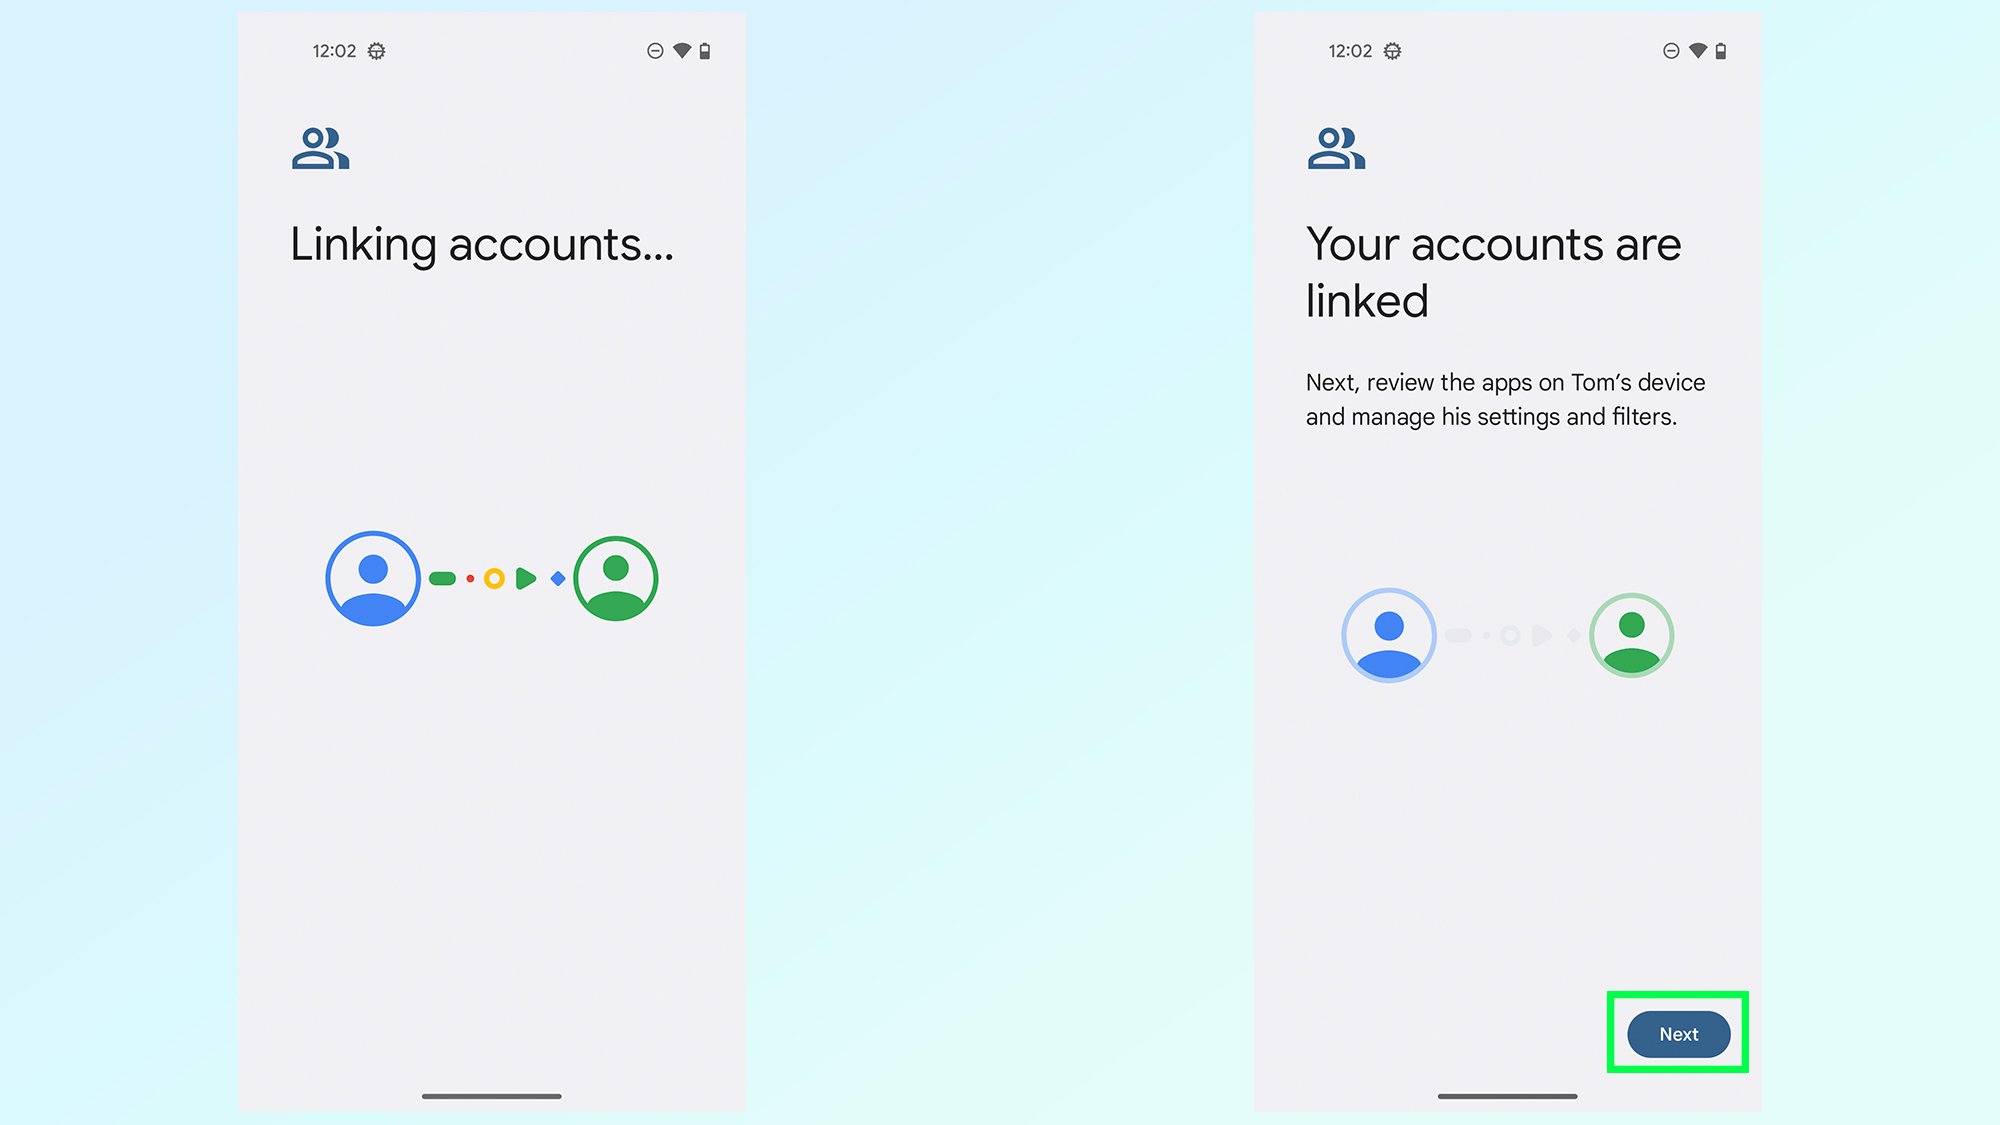
Wait while the accounts link, which may take a couple of minutes. Once everything is ready a confirmation screen will appear, telling you their parent and child accounts are now linked. Tap Next to continue.
8. Manage your kid’s apps and filters
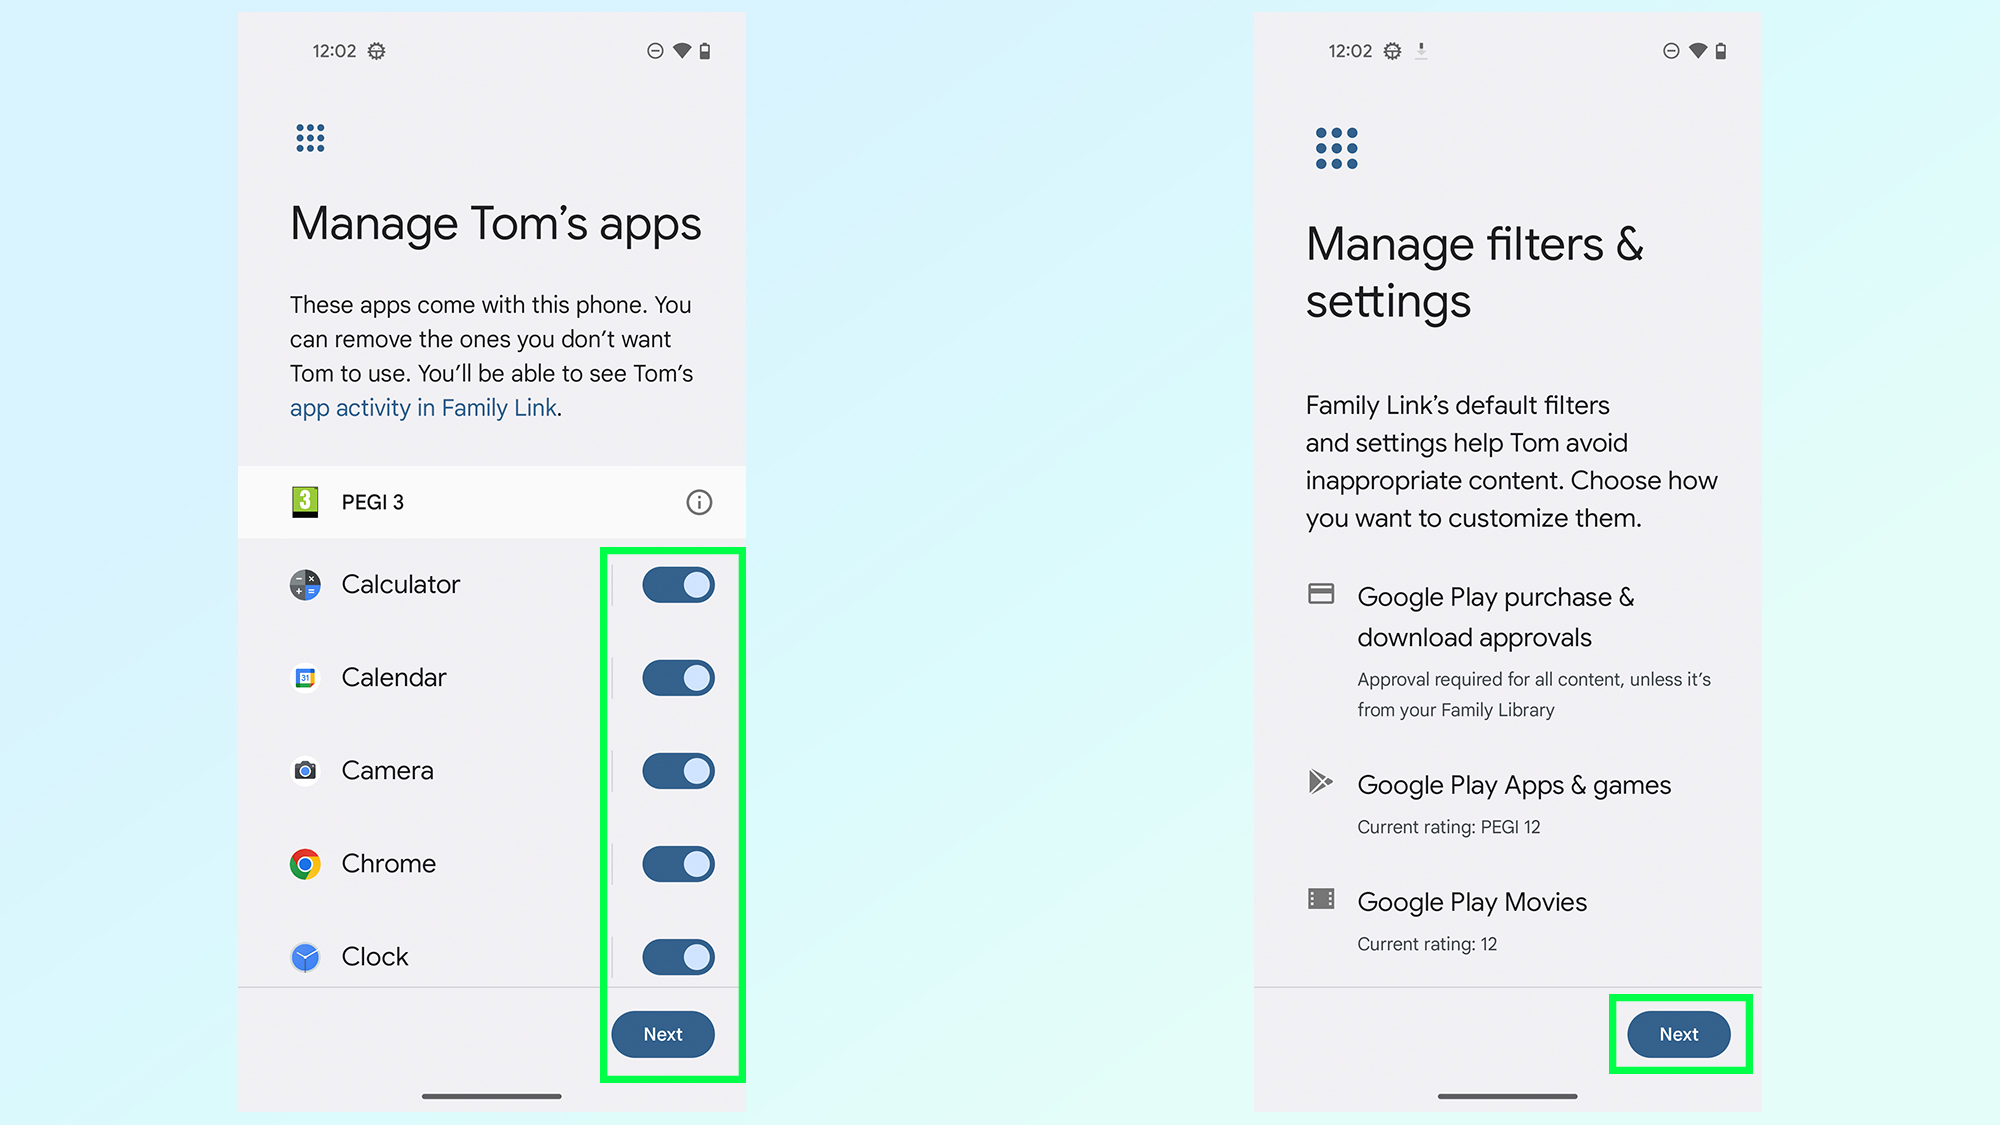
The next two screens will let you manage apps and filters on your kid’s Google account. That includes approving apps that are already on the phone with the toggle buttons, and changing various settings related to downloads and purchases. This includes setting age ratings and requiring approval for all purchases and downloads.
These can be altered later in the Family Link app, but it’s good to check things over as you get started. Once you’re done with each page hit the Next button.
9. Review controls, and set limits from either device
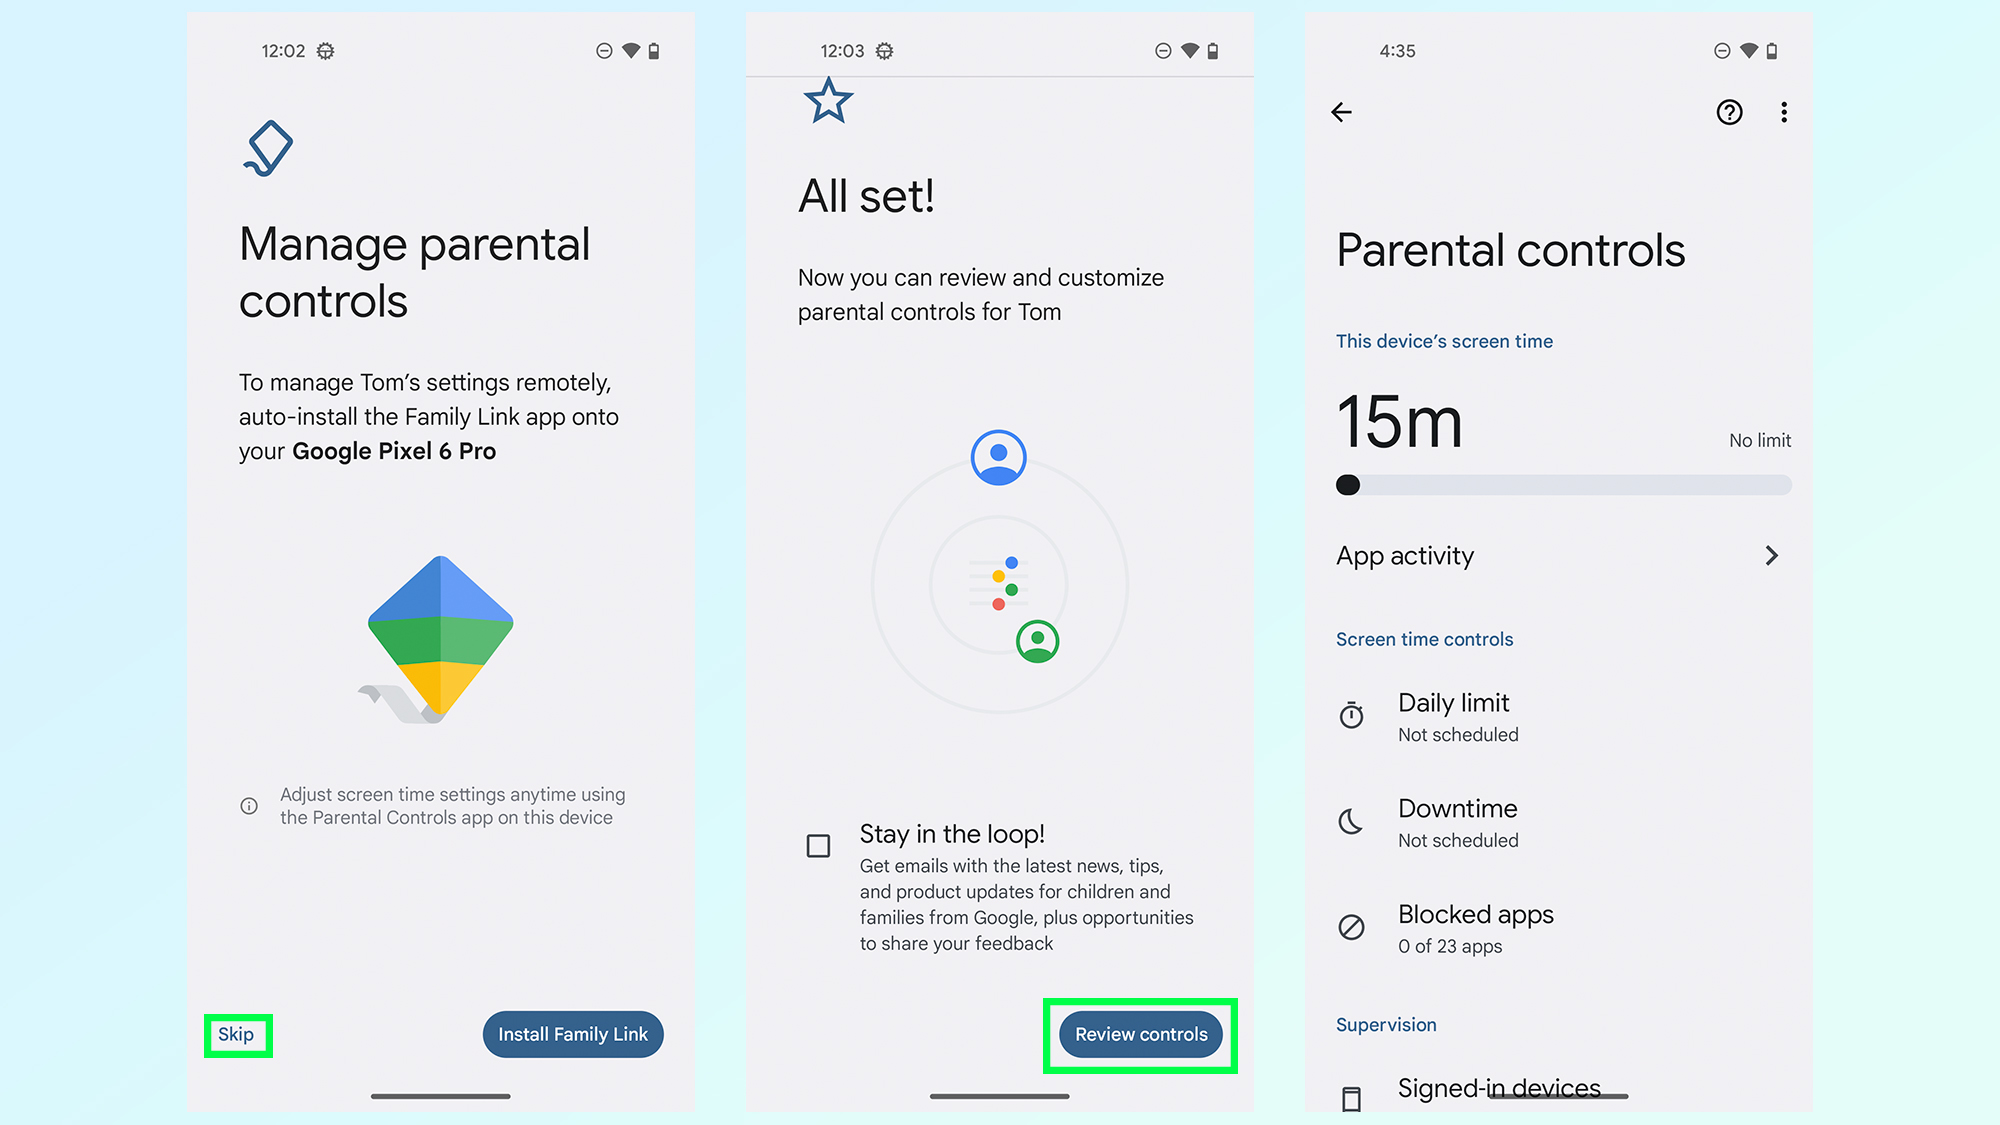
Android will then prompt you to install Family Link, if you haven’t done so already. If you have done this as part of step 1, tap the skip button in the bottom left.
The phone will now confirm everything it set up, letting you then review your controls over the kid’s device. It does make it look as though your kid could go into the settings menu and alter the settings themselves. But attempting to do so asks for your Google account password — meaning only you should be able to.
10. Control settings from the Family Link app
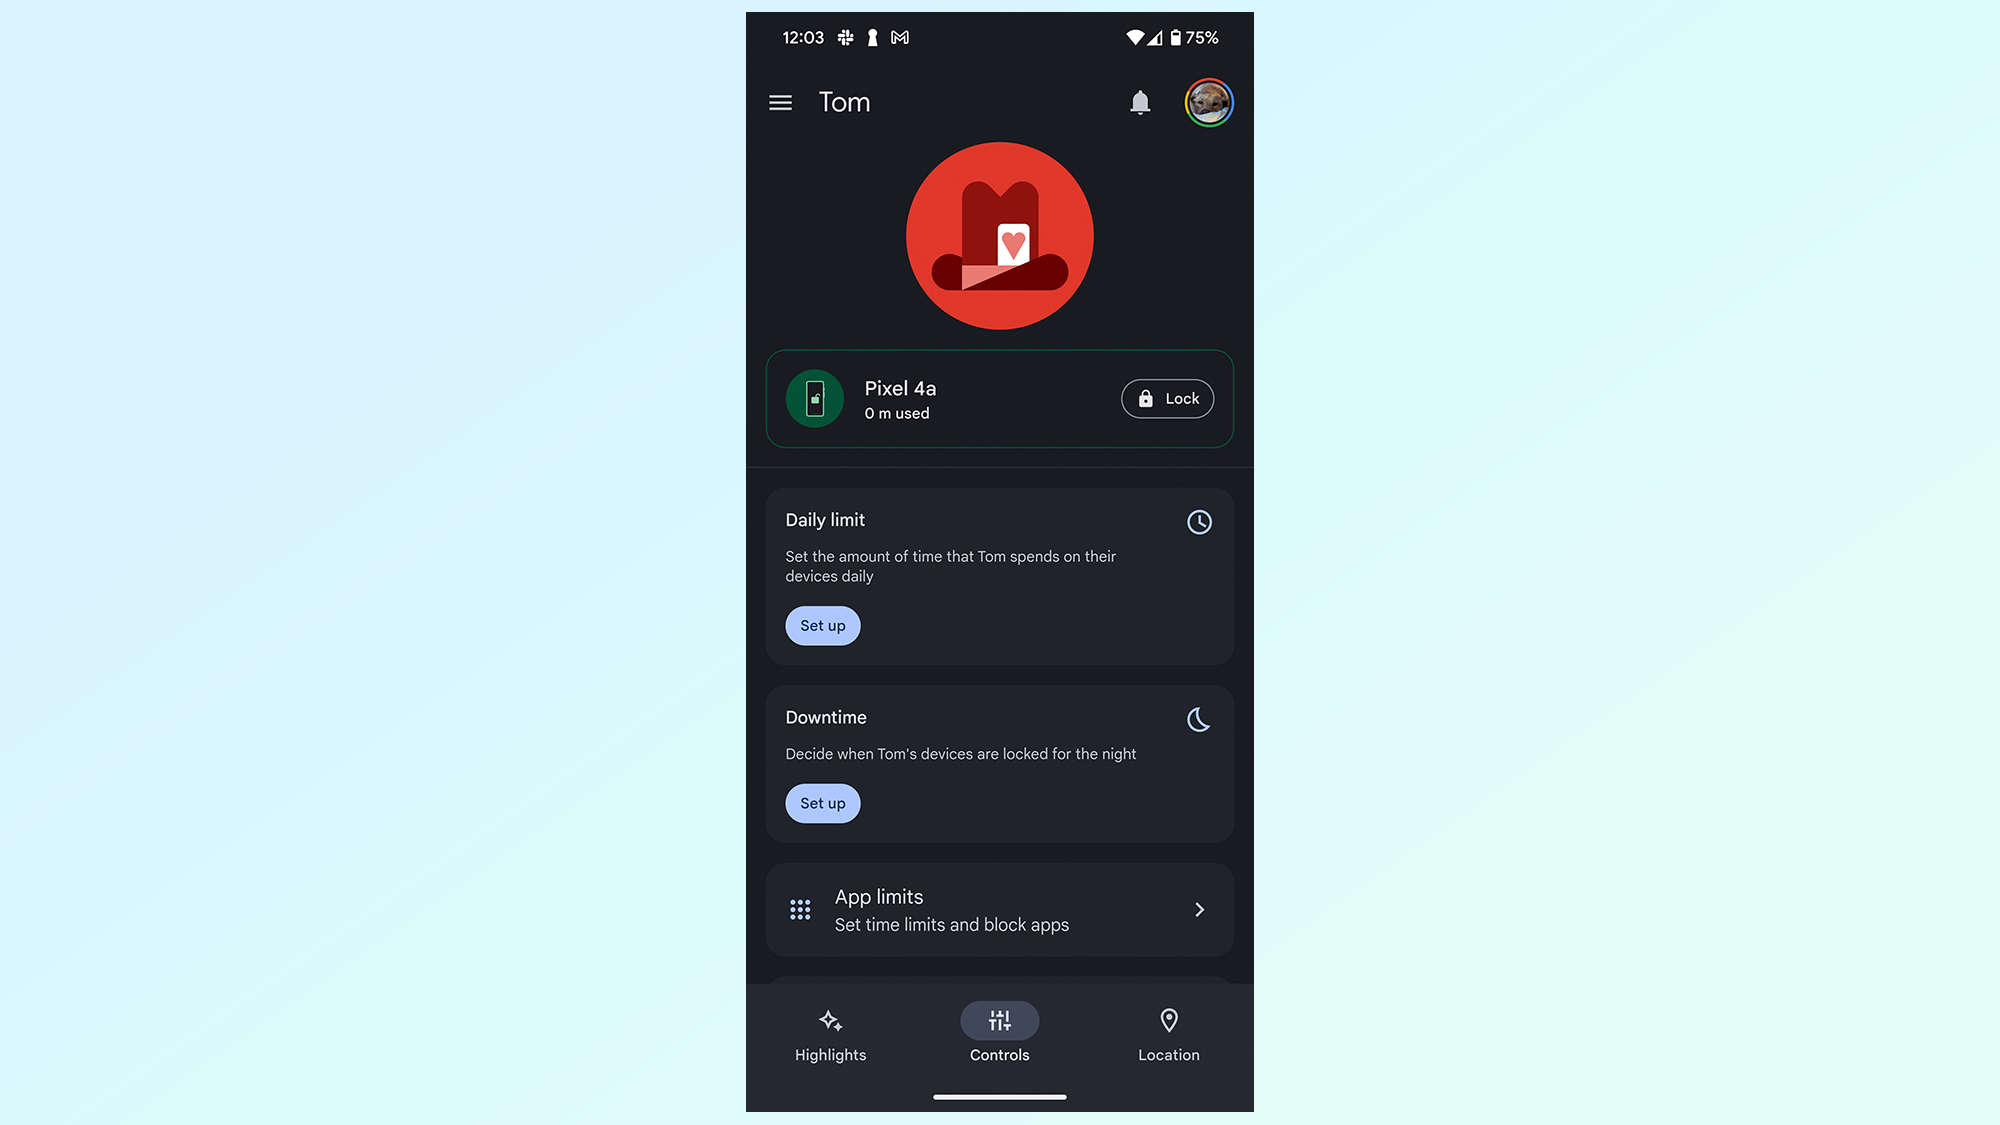
Accessing your kid’s device to change settings shouldn’t be necessary, since you already have the Family Link app installed. The app itself lets you set up a variety of features including time limits (on apps and the phone as a whole), restrictions on content they can view, a device bedtime and so on. It’s also possible to remotely lock the device if you feel the need, and to track its location.
And there you have it, a guide to setting up parental controls on an Android phone, using Google Family Link. If you've done that and are looking for more ways to better utilize your Android phone, but sure to check out some of our other tutorials.
They include how to scan documents to the cloud with Google Drive, how to protect your child on their new phone, how to automatically track video subjects on a Samsung Galaxy, and how you can capture stunning videos with a brand new Pixel 8 Pro feature.
Get instant access to breaking news, the hottest reviews, great deals and helpful tips.

Tom is the Tom's Guide's UK Phones Editor, tackling the latest smartphone news and vocally expressing his opinions about upcoming features or changes. It's long way from his days as editor of Gizmodo UK, when pretty much everything was on the table. He’s usually found trying to squeeze another giant Lego set onto the shelf, draining very large cups of coffee, or complaining about how terrible his Smart TV is.
 Club Benefits


