How to Lock Down Your Twitter Privacy Settings
Just because you like Twitter doesn't mean you don't have a right to privacy. Here's how to lock down the essential settings.

Some time ago, a website launched that cataloged public Twitter posts that mentioned a person on vacation for an extended period of time. That info was then mashed-up exactly where that person's house was located via Twitter or a connected app. Just ponder for a moment how bad of a privacy problem that is for anyone with a little free time on their hands and an interest in stealing your stuff.
Twitter privacy is kind of a big deal. There aren’t a lot of settings to edit, but they’re very important to check out. And it almost goes without saying, but maybe it’s time to stop checking into your own house on Foursquare and having that shoot a message over to Twitter for all to see. Just saying.
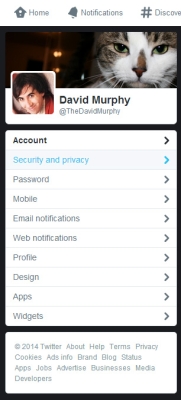
1. Pull up Twitter’s settings menu by logging into the service and clicking on the giant gear icon in Twitter’s upper-right hand corner. Click on Settings in the drop-down menu to start your privacy-themed journey.
MORE:10 Facebook Privacy and Security Settings to Lock Down
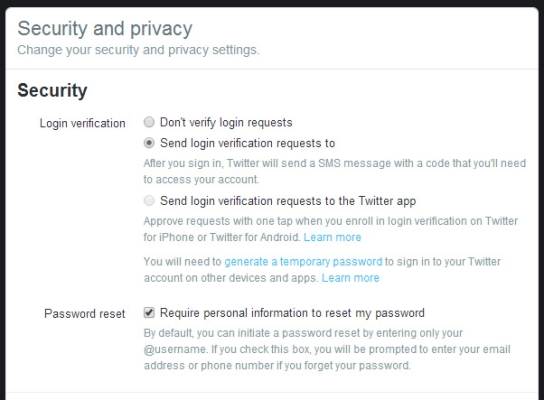
2. Click on Security and Privacy on Twitter’s left-hand sidebar. Force Twitter to verify any login requests to your account, which you can either do via an SMS message to your mobile device or a prompt within your iOS or Android Twitter app. Whichever you pick, you’ll gain increased protection against unauthorized access of your account.

3. Require additional information whenever a password reset request is made. This isn’t the most foolproof way to stop a dedicated person from breaking into your account, but the setting will at least force someone to find out your associated email address or phone number when attempting to reset your password.

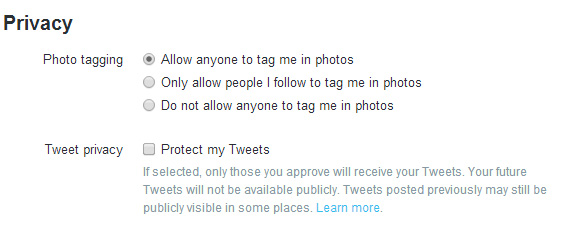
4. To keep your Twitter photo feed from getting all cluttered up, you can elect to only allow those who you follow (or nobody at all) to tag you in photos via the service.
Get instant access to breaking news, the hottest reviews, great deals and helpful tips.

5. Click Protect My Tweets to limit your posts to just those you follow. What you’ll lose in Twitter publicity, you’ll gain in Twitter privacy.

6. Flip off the option called “Add a location to my Tweets” if you don’t want Twitter to use any geo-tagged information sent to the service when you post your 140-character messages. Feel free to use the websites Ready or Not or GeoSocial Footprint to see just how bad you’ve been about this (and use Twitter’s big “Delete all location information” button to do just that, once GeoSocial Footprint has scared the heck out of you).

7. Keep your Twitter identity a bit more secret by unchecking the options that allow others to find you via email address or phone number.

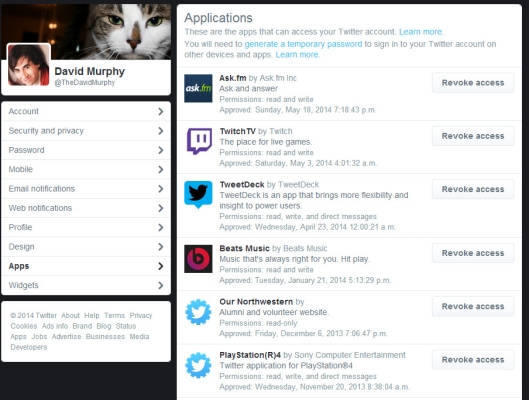
8. Check out which third-party apps you’ve allowed access to your Twitter account (and in some cases, post on your behalf). These can be a privacy problem just waiting to happen, so click on Apps on Twitter’s left-hand sidebar (of its overall Settings section) and revoke access to anything that seems unfamiliar or anything that you know you don’t use anymore.


David Murphy is a tech journalist based in Silicon Valley specializing in phones, smart homes, wearables and other gadgets. He has written product guides, tutorials and reviews on all kinds of different hardware and software for titles such as WSJ, CNN, Reviewed, Wirecutter, Android Police, PCMag and others. He's also a big fan of World of Warcraft.
 Club Benefits


