How to record Steam games and make your videos look their best
Learn to record Steam games and make your gameplay videos look great
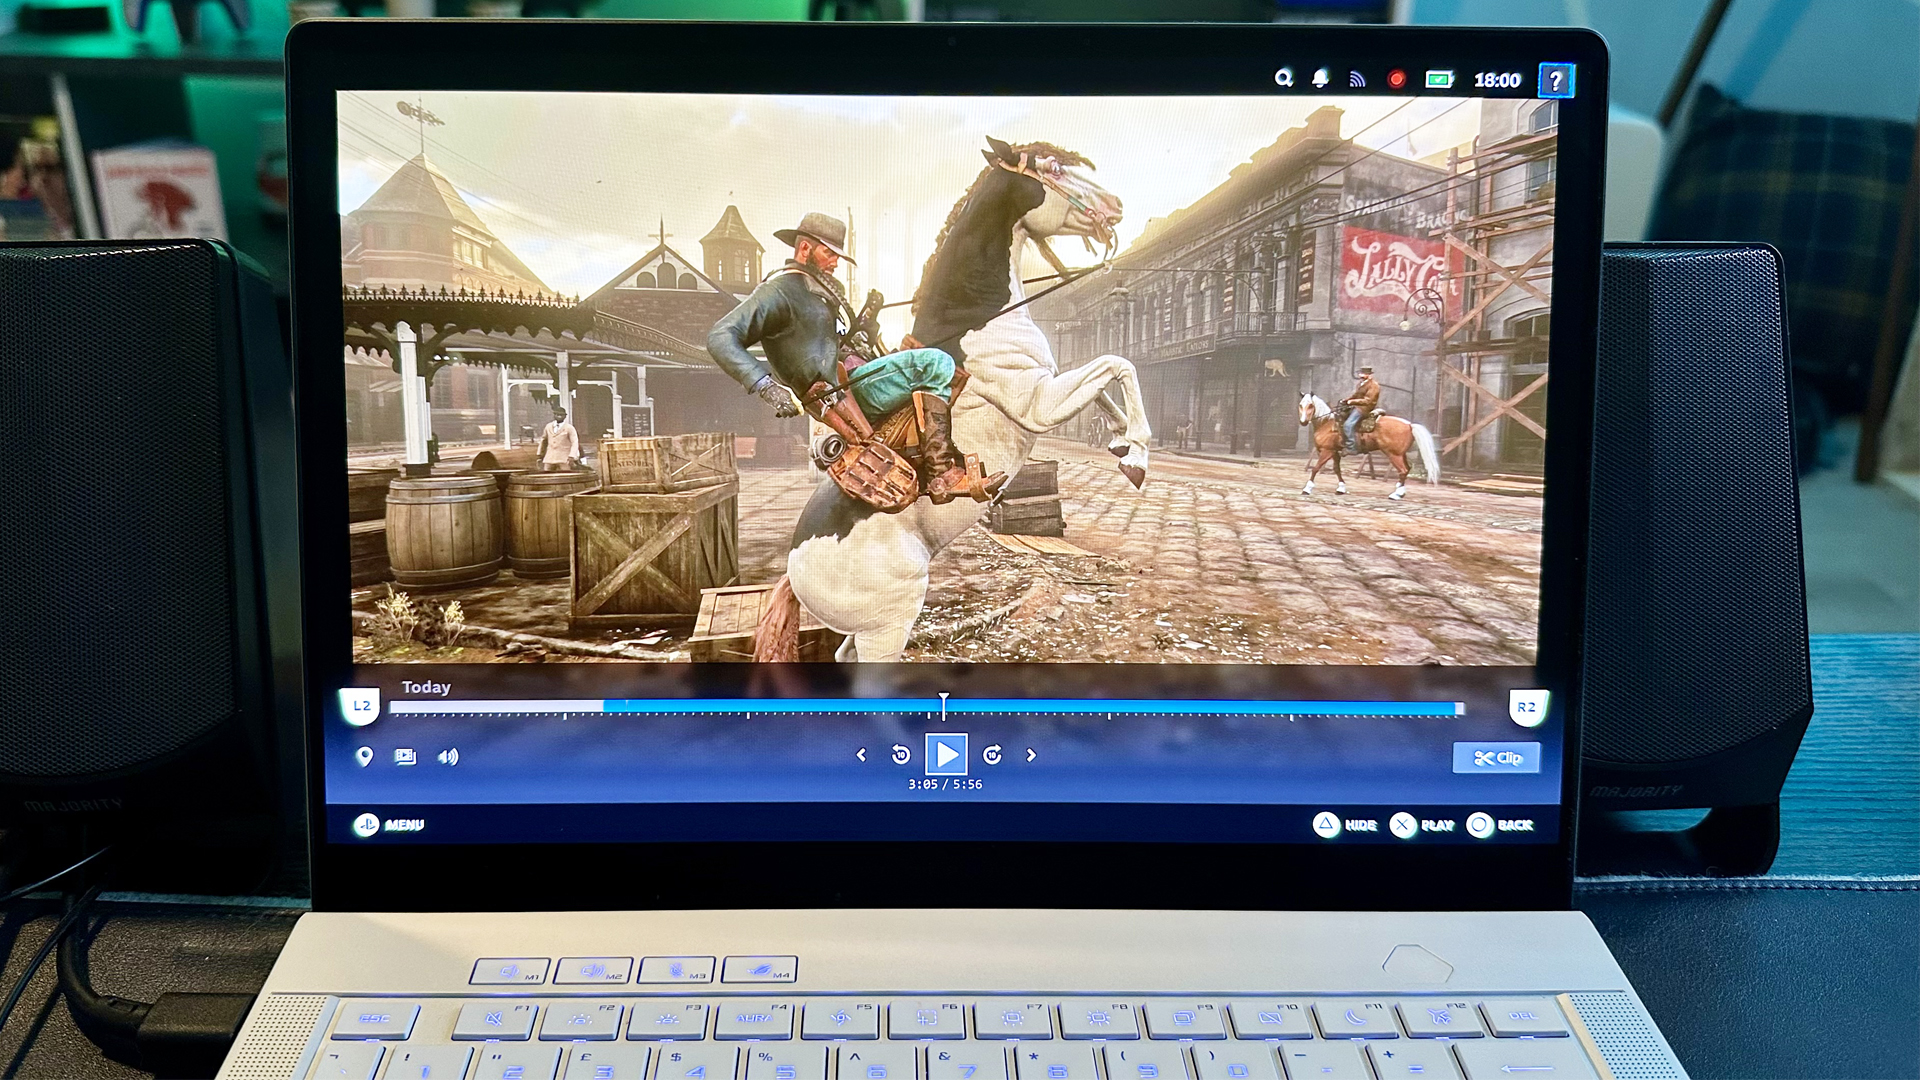
Learning how to record Steam games is great if you want to build up a video library of your favorite gameplay moments on Valve’s digital platform. “Steam Game Recording” is a feature that has been available in beta form for a little while now, and accessing the gameplay recorder via Steam’s settings menu is a fairly simple process I'll guide you through below.
When it first came to Valve’s platform, my teeny mind quickly became obsessed with a feature I called “a game-changing new upgrade." That’s a statement I still strongly stand behind, and I’ve had a ton of fun reliving moments from the best Steam games thanks to Valve’s game recorder.
There are a couple of main recording methods you can use with Steam's gameplay-capturing software, and I’ll guide you through them. Changing your preferred method, be it manual or letting your game record continuously in the background, is a doddle.
Oh, and another great aspect about Steam Game Recording? It works on both Steam Deck and the incredible Steam Deck OLED, and the manner of tweaking your settings is really no different than changing your recording preferences on one of the best gaming PCs.
Below, I’ll guide you through the process of how to record your favourite Steam games, while also recommending my favourite settings to ensure you’re getting the right quality video to suit the hardware levels of your PC or gaming laptop.
How to record Steam games
- Open Steam, then go to Steam settings
- Click "Interface", then choose "Steam Beta Update"
- Scroll down to “Game Recording”
- Select your preferred recording method
- Choose where your videos are saved
- Tweak video quality settings
- Select your frame rate for recordings
- Enable “Record Microphone” if you’re a creator
Read on to see full illustrated instructions for each step.
1. Open Steam, then go to Steam settings
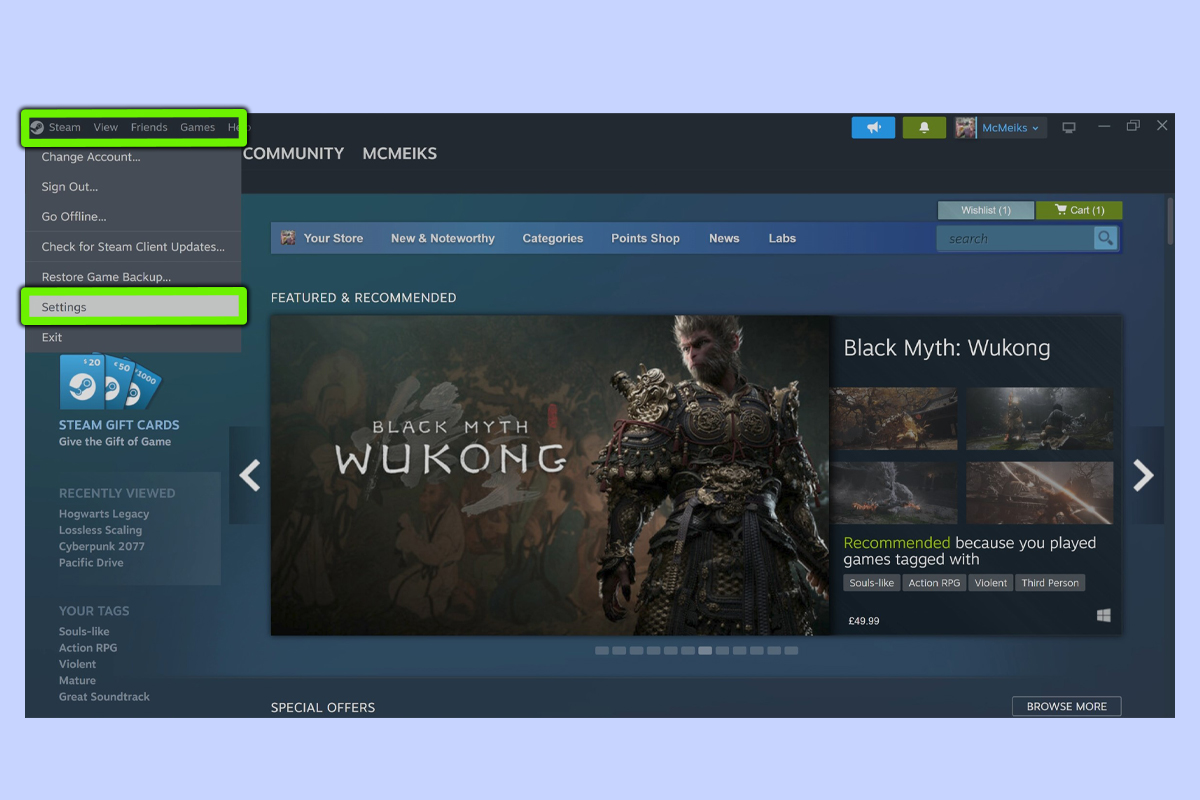
First open the Steam app, then click on the Steam icon in the top left of the window, then scroll down and click on the Settings.
2. Click "Interface", then choose "Steam Beta Update"
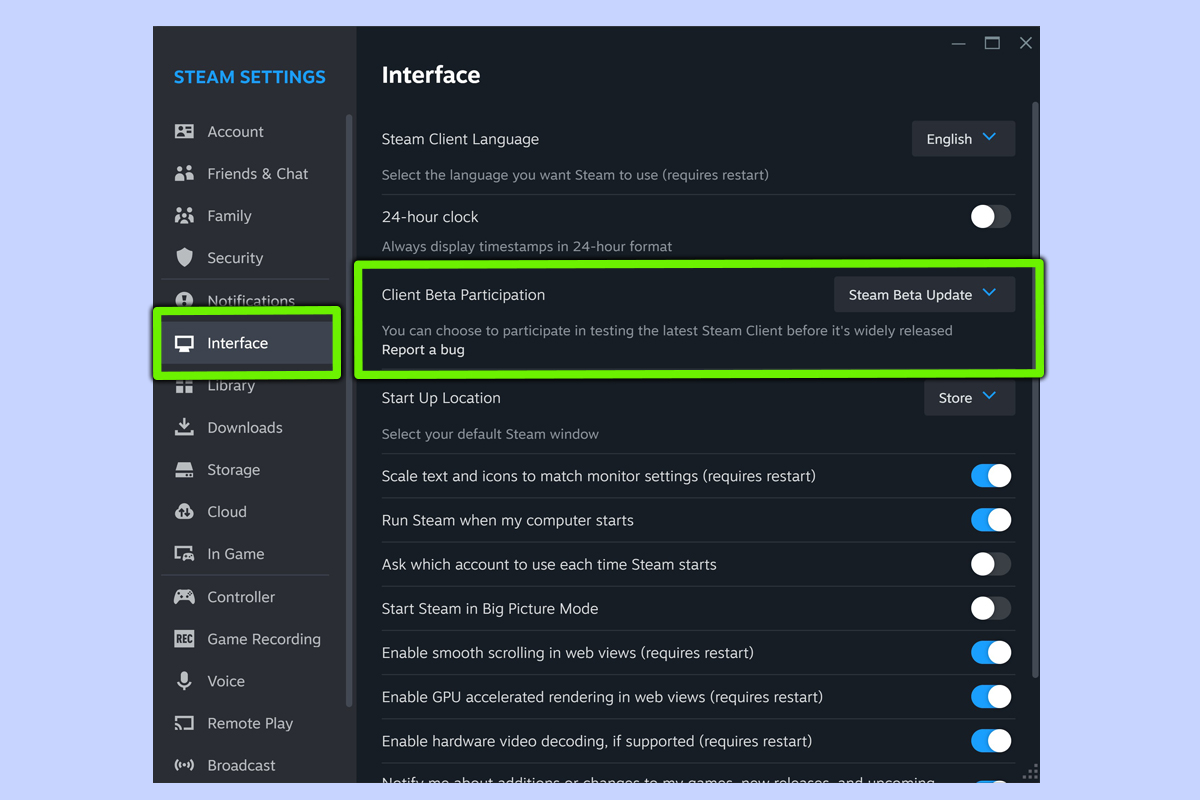
To enter the beta that grants you access to Steam Game Recording, from settings, scroll down to "Interface" then select "Steam Beta Update" from the dropdown box, and you’ll be automatically signed up to the latest beta. After Steam restarts, “Game Recording” will appear near the bottom of the settings menu.
3. Scroll down to “Game Recording”
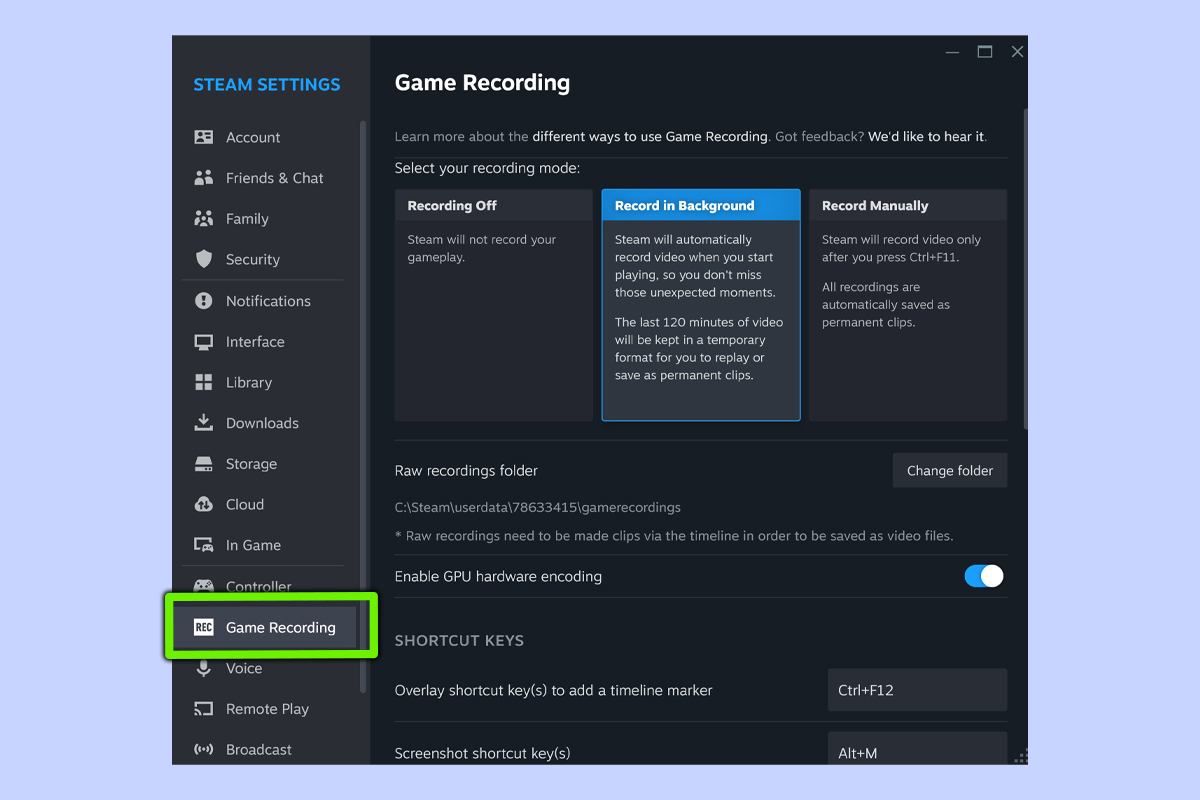
Next, scroll down to the “Game Recording” tab. Once you click into this menu, you’ll be given a ton of options to tinker with, affecting everything from the bitrate quality of your gameplay videos, the length of recordings and whether you want your PC to record your mic or not.
4. Select your preferred recording method
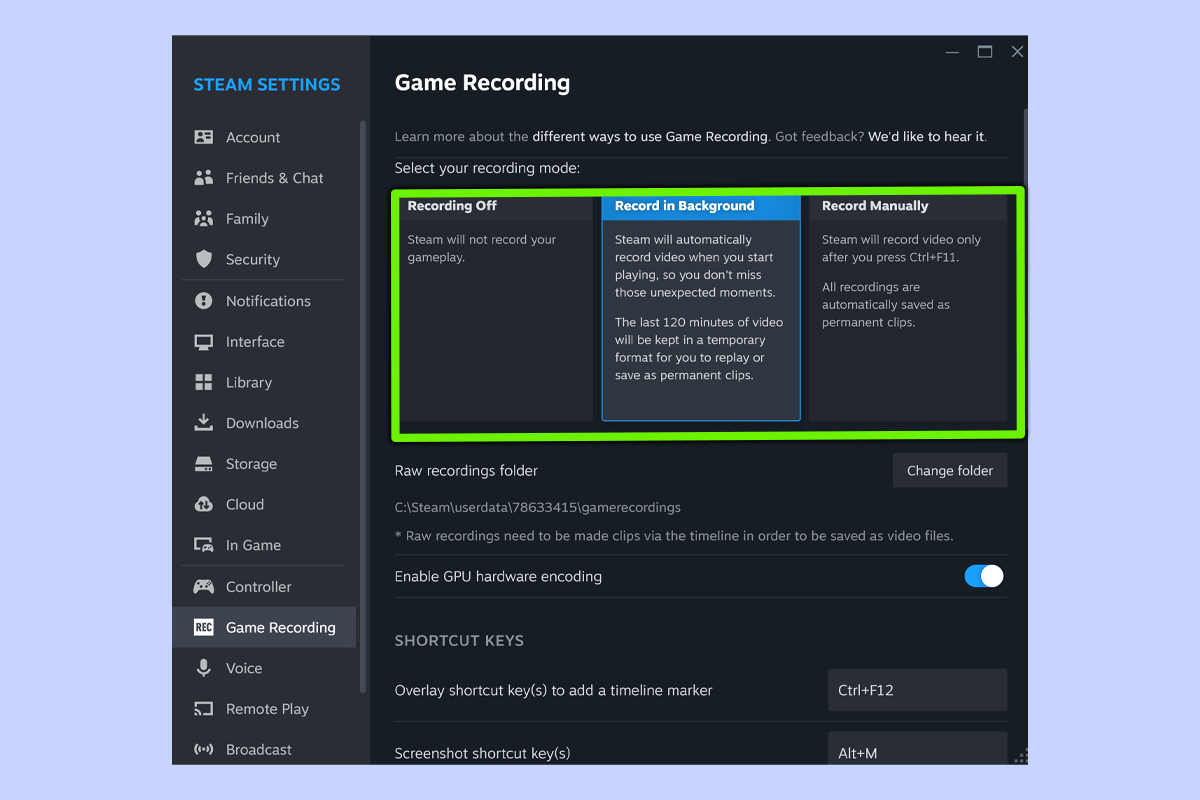
You have three main options here. Choose “Recording Off” to ensure Steam won’t record your gameplay… although why are you here, then? The second option is “Record in Background”, where Steam will automatically keep the last 120 minutes of footage saved in a temporary format, giving you the option of then editing said footage down that you can then curate into saved clips.
The last choice is “Record Manually”, where Steam starts to record your gameplay as soon as you press Ctrl+F11 on your keyboard. Whichever recording method you go with, for the best performance, ensure “Enable GPU hardware encoding” is enabled.
5. Choose where your videos are saved
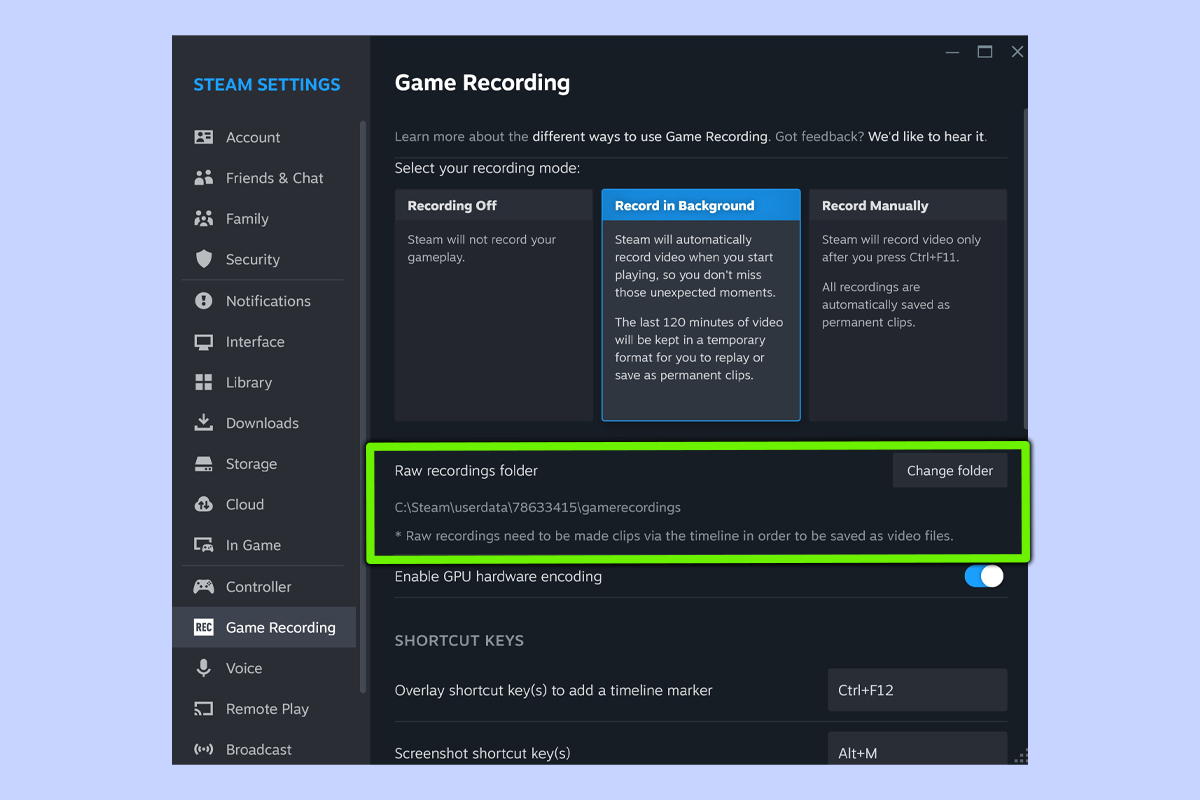
While Steam will save your game recordings on your main C:// drive by default, if you have multiple drives, you can change the location of the “Raw recordings folder” by clicking on “Change folder”. If you’re lucky enough to have a drive with a lot of free space on it, go for that one.
6. Tweak video quality settings
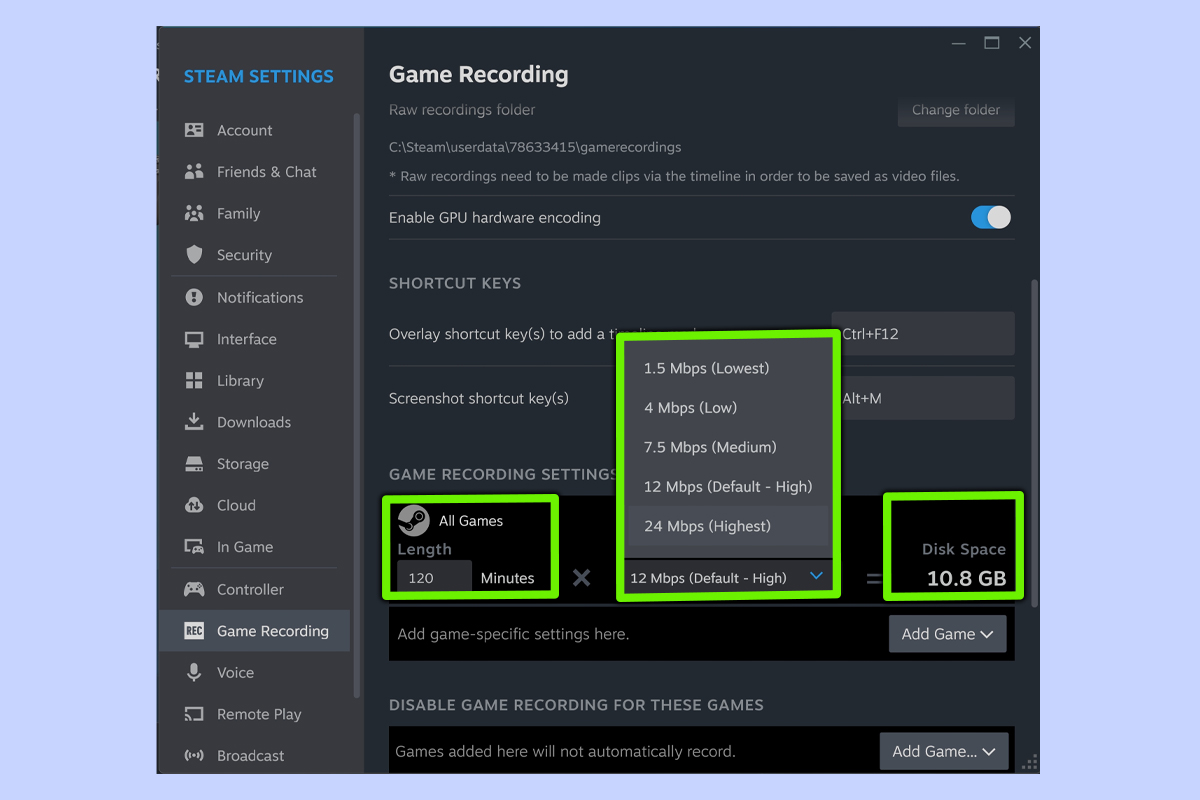
Under “Game Recording Settings”, you have the option of setting how long Steam will record your gameplay (if you went with background recording). This is also the section that allows you to tweak the image quality of your gameplay recordings.
By default, Steam Game Recording is set to 12 Mbps (High), but if you want even better quality footage (and you have the SSD space for it), go with 24 Mbps (Highest). For those really struggling for storage space the 7.5 Mbps (Medium) may provide the best compromise.
7. Select your frame rate for recordings
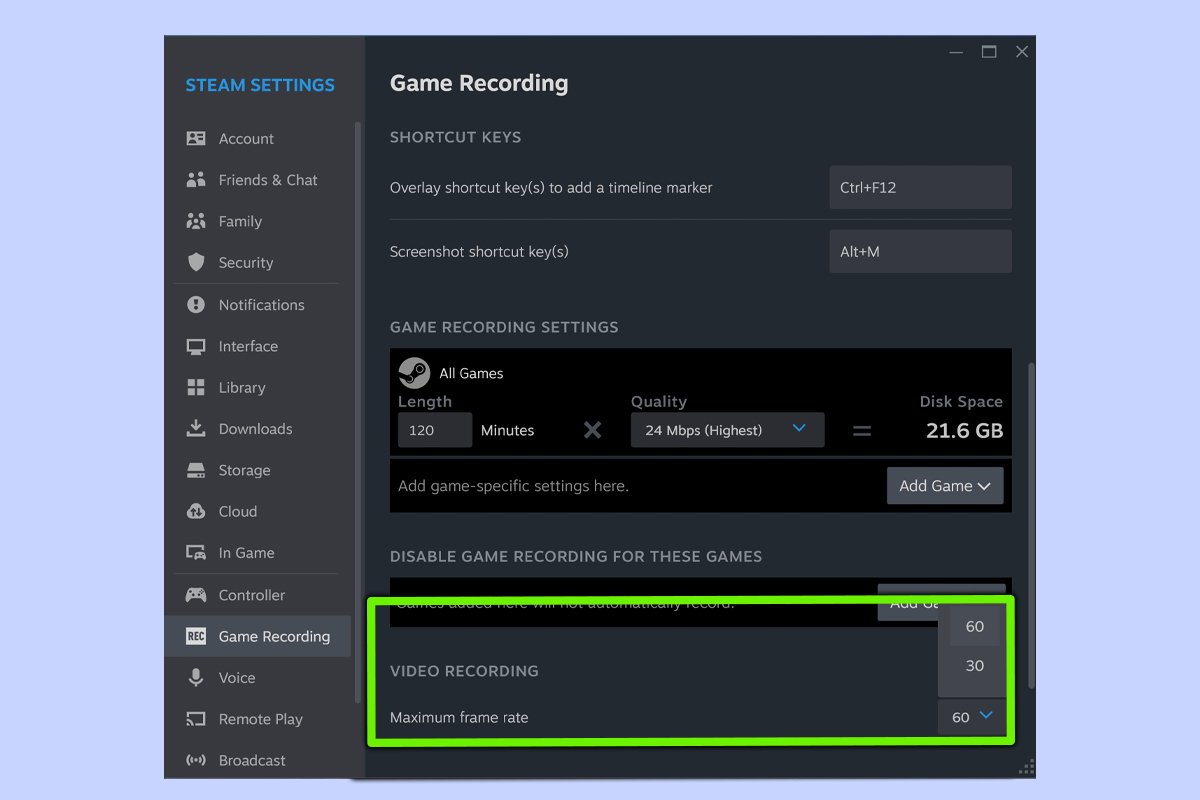
Once you settle on your quality preset, you now have the option of tweaking what fps your game is recorded at via the “Maximum frame rate” option. By default it’s set to 60 frames per second — which is more demanding on your hardware — so if you look back at your recordings and are seeing big frame dips, it may be sensible to lock this option to 30 FPS.
8. Enable “Record Microphone” if you’re a creator
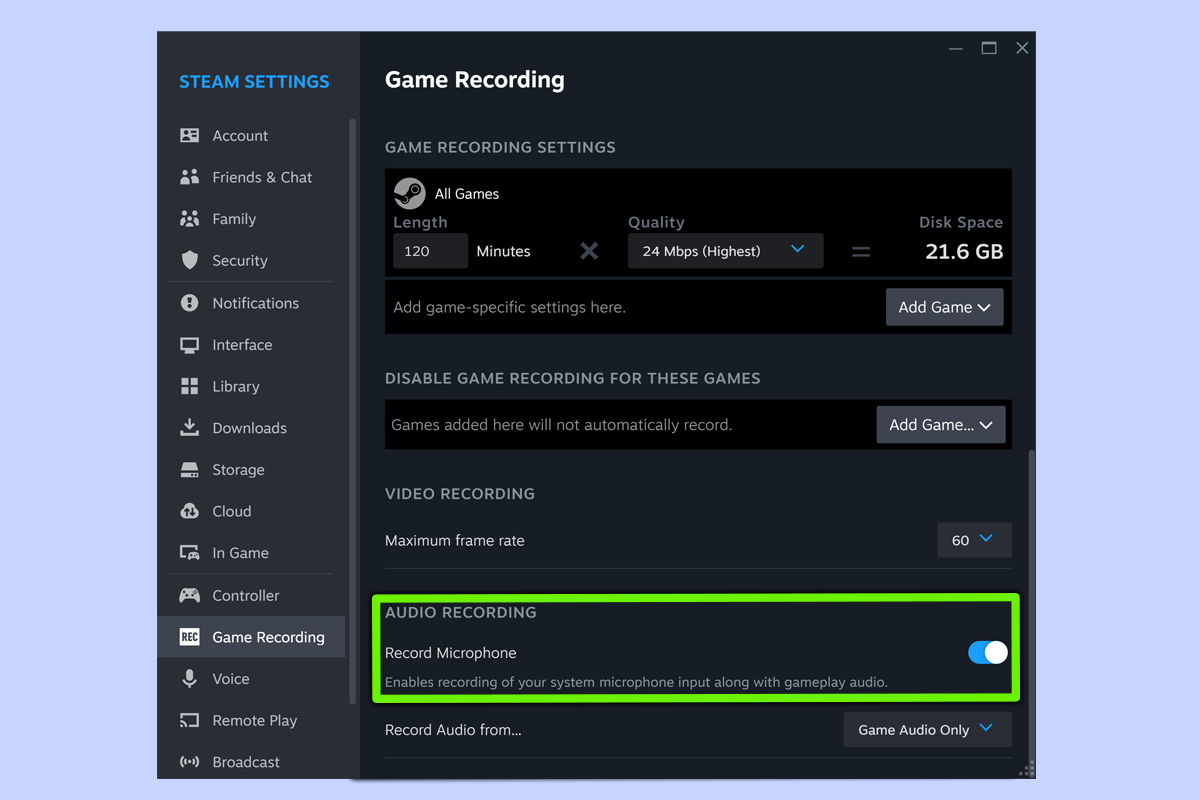
If you’re a creator/streamer, Steam Game Recording gives you the option to record your microphone, which is handy if, say, you’re a YouTuber who uploads game walkthroughs with voiceover. If that sounds like you and you want your voice to be captured as you game, simply ensure the “Record Microphone” setting is enabled.
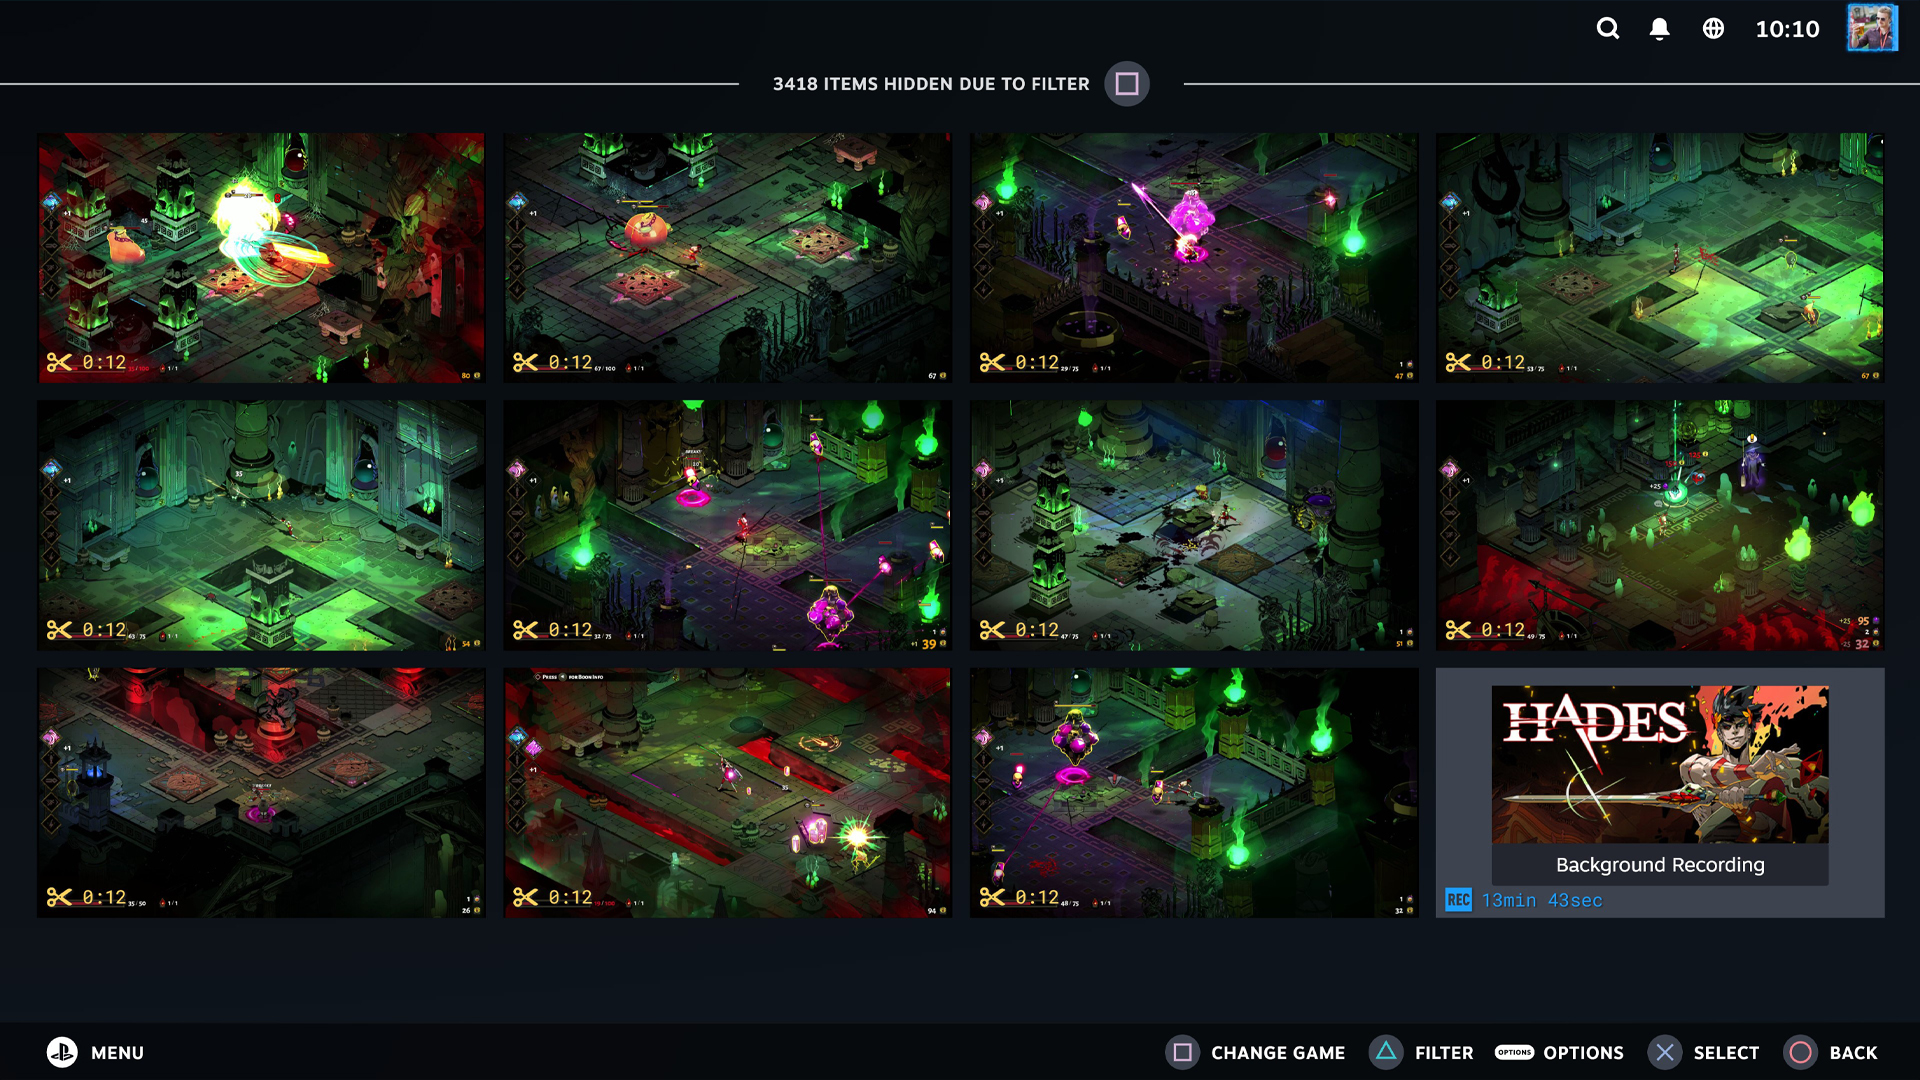
And you’re done! You’ve just learned how to record Steam games, and now know how to tweak video quality settings and much more.
Get instant access to breaking news, the hottest reviews, great deals and helpful tips.
You can easily access your footage by selecting a game from your Steam library, clicking on its page, then scrolling down until you see the “Recordings and Screenshots” tab on the right. From here you can further edit your videos. Steam has done a great job of providing a grid system to view your clips and a simple, easy to learn video editor to slice and snip footage to your heart’s content.
In the need of more PC gaming tips? Check out How to download Steam and install it on Windows, learn how to add non-Steam games to Steam and ensure you unlock this PS5 controller hack to make it a better gamepad.

Dave is a computing editor at Tom’s Guide and covers everything from cutting edge laptops to ultrawide monitors. When he’s not worrying about dead pixels, Dave enjoys regularly rebuilding his PC for absolutely no reason at all. In a previous life, he worked as a video game journalist for 15 years, with bylines across GamesRadar+, PC Gamer and TechRadar. Despite owning a graphics card that costs roughly the same as your average used car, he still enjoys gaming on the go and is regularly glued to his Switch. Away from tech, most of Dave’s time is taken up by walking his husky, buying new TVs at an embarrassing rate and obsessing over his beloved Arsenal.
 Club Benefits


