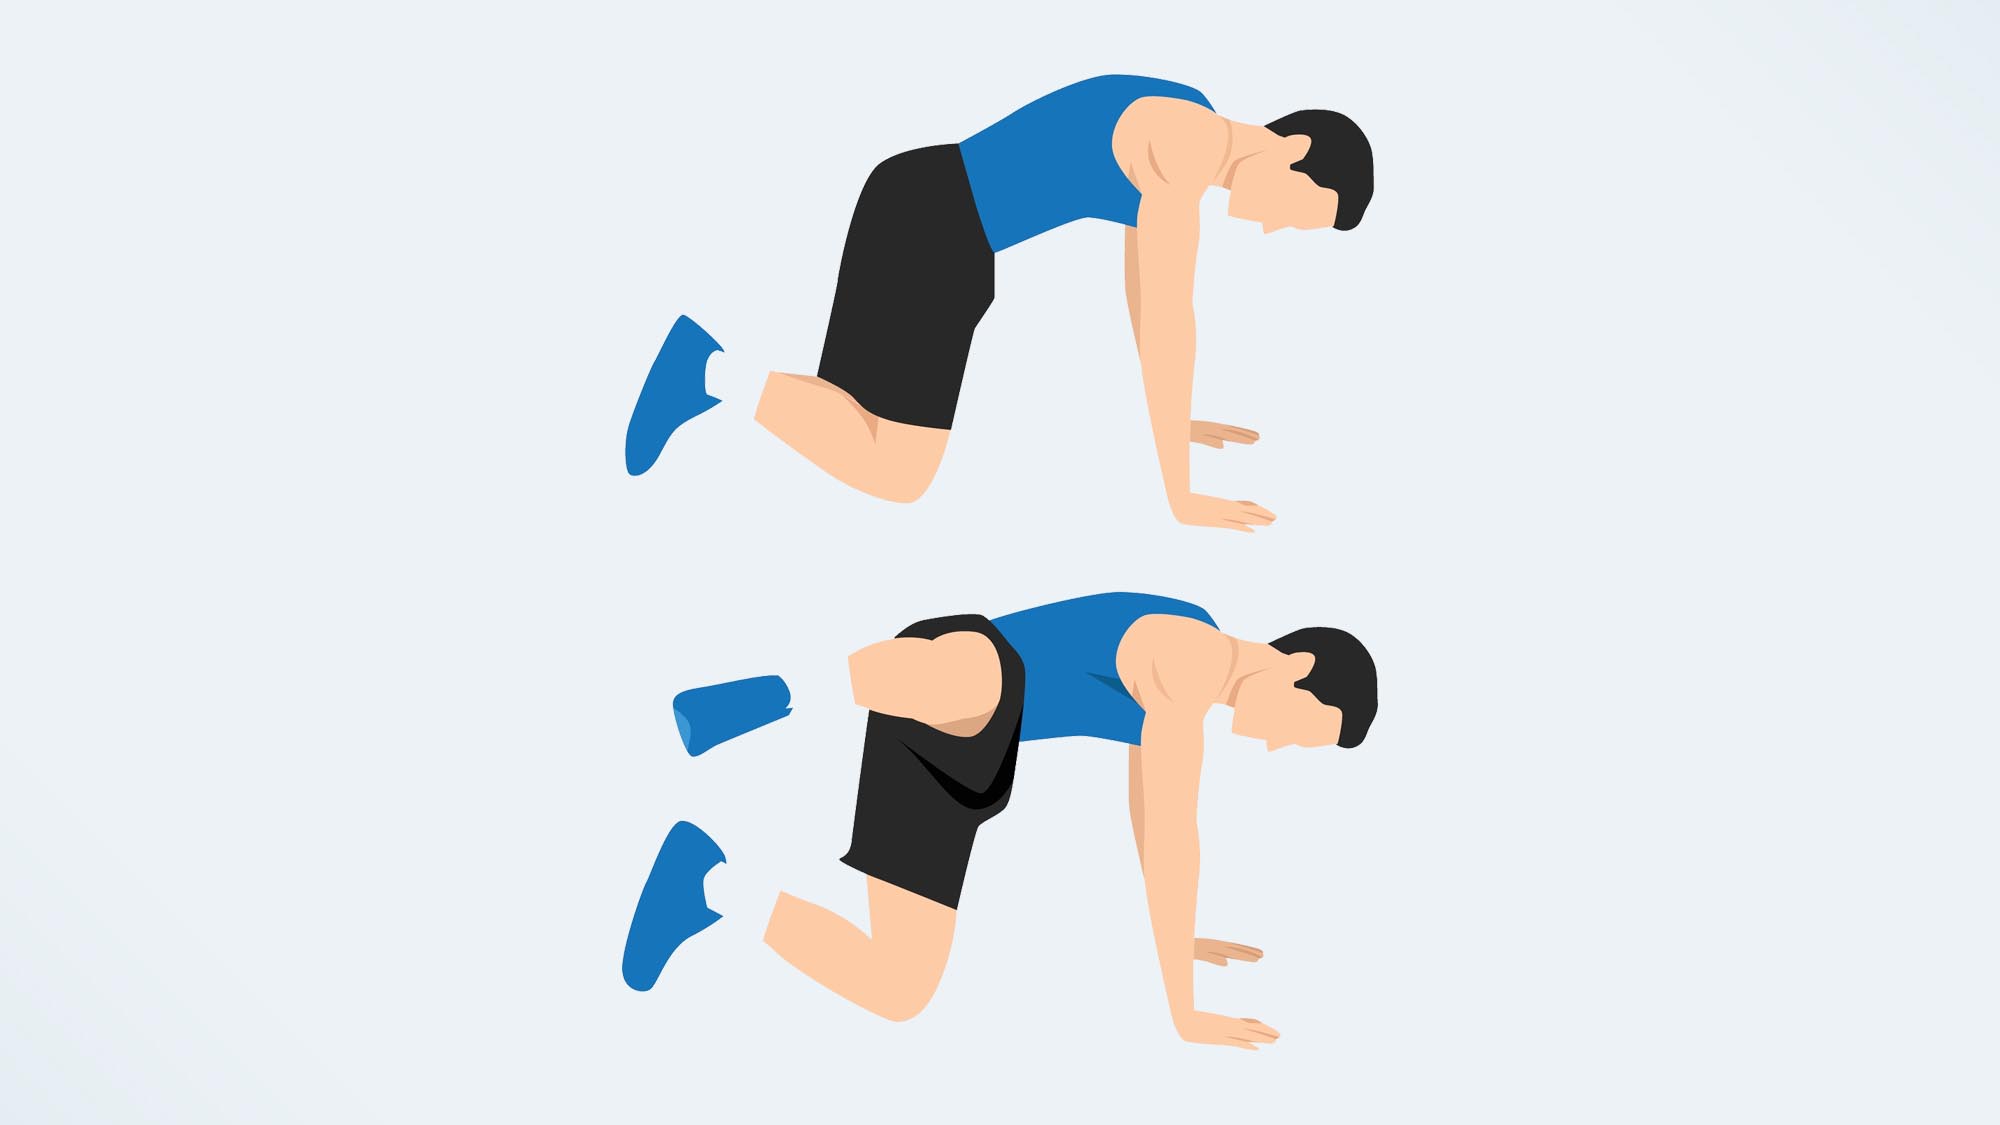
Fire hydrants — how to do them and the benefits for sculpting your glutes, hips, and core
This move looks odd, but it works your legs hard

If you’re looking to work your legs without reaching for the best adjustable dumbbells, or a kettlebell or two, fire hydrants are a good place to start. The move might look (and sound) a little odd, but it does a good job of strengthening your glutes, hips, and core muscles, without the need for weights. Read on to find out how to do a fire hydrant and the benefits for your body.
As a reminder, if you’re new to exercise, or you’re returning to exercise following an injury or pregnancy, it’s a good idea to check in with your doctor first and chat with a personal trainer, before adding a new exercise to your routine. This exercise is relatively well suited for beginners, and pregnant women, as it doesn’t involve lying on your back, but as always, it needs to be done with the correct form to work the targeted muscles. If in any doubt, always ask a personal trainer to check your form.
How to do fire hydrants
Let’s start with how to do fire hydrants with the perfect form:

- Start off on all fours, palms flat on the ground, arms straight, and knees under your hips (this is known as tabletop).
- You should be looking down at the floor. Your starting position is crucial, so be sure your back is straight and your core is engaged.
- With your weight evenly distributed between both hands, raise your left leg to the side, keeping your knee at a right angle. How far you can raise your leg will depend on fitness, flexibility, and strength. Aim to raise it to at least an angle of 45 degrees but if you are in good shape and flexible, you may be able to get your thigh almost parallel with the floor.
- Hold for a second and lower. That’s one rep. Start off with 10-20 reps on each side and move up to three sets. Do not strain and stop if you feel any discomfort.
Fire hydrants: What are the benefits?
As mentioned above, this simple-sounding bodyweight exercise works on your glute and hip strength, as well as engaging your abdominal muscles, which have to work to hold your torso stable in the move. It’s important to keep your core and pelvis stable during the exercise — the movement should be coming from your glute muscle, not your pelvis.
The fire hydrant exercise helps improve hip mobility by working on all of the major hip movements — extension, rotation, and abduction (moving your leg away from your body). It can help tone and sculpt the glute muscles, which can, in turn, lower your risk of injury, and help improve your posture.
Fire hydrants: Form mistakes to look out for
It can be difficult to know when you’re not doing an exercise correctly, so here’s the form mistakes to watch out for when practicing fire hydrants:
Rocking your hips from side to side: As mentioned above, your pelvis should stay still during this exercise. Think about engaging your core — sucking your belly button in towards your spine, and squeeze your glute as you lift your leg.
Get instant access to breaking news, the hottest reviews, great deals and helpful tips.
Jerking the leg up and down: The key to this exercise is moving slowly, and with control. Jerking your knee up and down too quickly will minimize the effectiveness of the exercise, and mean your glutes won’t be working as hard.
Fire hydrants: Variations to try
If you’ve mastered the fire hydrant and you’re looking to up the intensity, here are a few variations to try:
Ankle weight fire hydrants
As you might have guessed, this modification involves strapping a pair of the best ankle weights around your ankles to increase the resistance. If you’re new to exercising with ankle weights, don’t go too heavy too quickly — you’d be surprised by how much harder they make the exercise.
Resistance band fire hydrants
Adding a small loop resistance band to your legs during this exercise forces your glutes and hips to work harder against the resistance. To do this, grab one of the best resistance bands and loop it above your knees.
Fire hydrant pulses
To do this exercise, complete the fire hydrant as normal, but at the top of the movement, with your knee lifted to the side of your body, pulse your knee up a few inches, then lower it. Complete a few of these pulses, before lowering your knee back down towards the ground. This increases the time your glute spends under tension, making the move harder without having to use extra equipment.
Fire hydrant kicks
For fire hydrant kicks, complete the fire hydrant as normal, but once your leg is lifted, extend it out and away from the body. Reverse the movement so you have a 90-degree bend in your knee, and lower your leg to finish one rep. This variation further works the muscles on the side of the hip.
Standing fire hydrants
Finally, if you have wrist pain or mobility issues that make working on all fours difficult, you might prefer to do a standing variation of this exercise. Here’s how to do it:
- Start by standing on an exercise mat with your feet hip-width apart.
- Bend one knee to 90 degrees and lean your trunk forward, engaging your core.
- Lift your leg to 45 degrees without moving the rest of your body.
- Lower your leg to your starting positon, but don’t remove the bend in your knee. That’s one rep.
- Complete all your reps on one side before switching.
More from Tom's Guide
- Windshield wipers: How to do them and the benefits for blasting your core
- I did 100 fire hydrants a day for a week — here's what happened
- I did 50 oblique crunches a day for a week — and here's what happened to my abs

Jane McGuire is Tom's Guide's Fitness editor, which means she looks after everything fitness related - from running gear to yoga mats. An avid runner, Jane has tested and reviewed fitness products for the past five years, so knows what to look for when finding a good running watch or a pair of shorts with pockets big enough for your smartphone. When she's not pounding the pavements, you'll find Jane striding round the Surrey Hills, taking far too many photos of her puppy.
 Club Benefits


