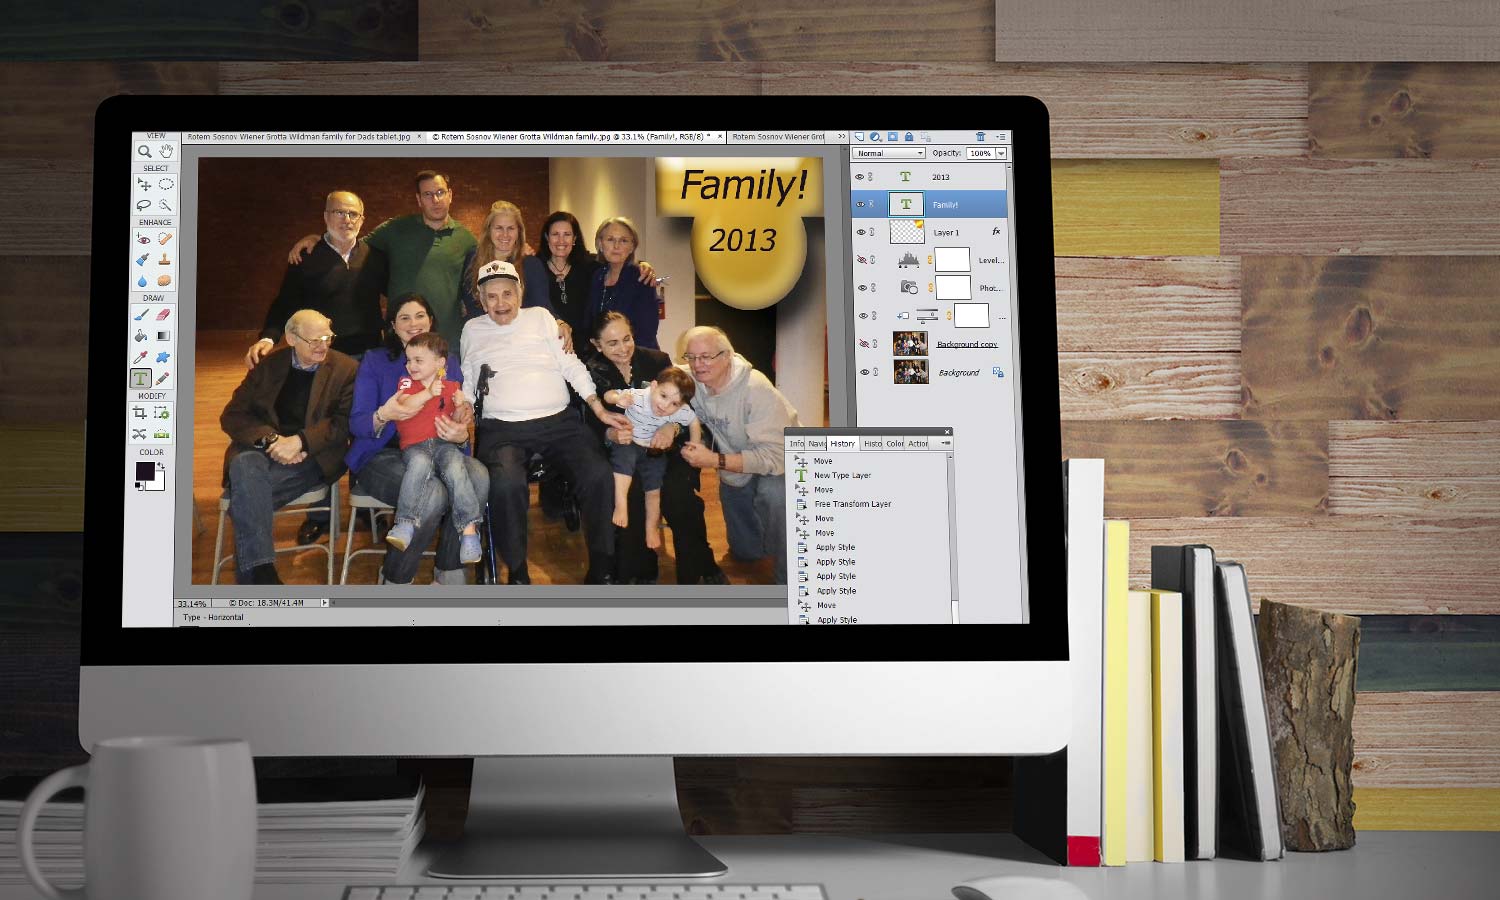
Tom's Guide Verdict
Elements 13 delivers easy guided photo-editing, fun projects, a creative learning experience and accessible power for more-experienced users.
Pros
- +
Intuitive, effective file handling and management
- +
quick and generally accurate face recognition
- +
Guided Edits mode is a fun way to learn advanced processes
- +
Expert mode offers a wide range of commands and tools.
Cons
- -
Managing folders of pictures not as easy as it could be
- -
No autocomplete suggestions when tagging photos with names
- -
Guided Edits often don't have Undo or Redo options.
Why you can trust Tom's Guide
EDITORS' NOTE: A newer version of this software is now available. Adobe Photoshop Elements 14 adds support for selfies, removes haze from landscapes and analyzes photos to suggest tools to improve them. Stay tuned for a full review.
Who it's for: Snapshooters, families, amateur photographers and advanced hobbyists.
Adobe Photoshop Elements may have begun as "Photoshop-lite," but it has evolved into a mature application with its own distinct personality. The newest version, Photoshop Elements 13, continues in this tradition, delivering easy-to-use guided photo editing, plus accessible power features for more adventurous or experienced users. Though a bit more expensive than Corel's competing PaintShop Pro X7 ($65-$80), Elements 13 is a more powerful and intuitive program that gets our recommendation.
Unlike most of Adobe's products, Photoshop Elements is still sold as a perpetual license ($100) rather than a cloud subscription. It is also available in a $150 bundle with Adobe Premiere Elements (see review), Adobe's excellent consumer video-editing software.
Design and Interface: Accessible yet deep
Photoshop Elements 13's tabbed interface is partitioned into two separate windows with self-explanatory names: Organizer and Photo Editor. Opening a picture from the Organizer to the Editor requires using a button at the bottom of the screen, rather than a more intuitive double-click on the thumbnail. Otherwise, the interface of each screen is straightforward and clean.
MORE: Best PC and Mac Photo Editing Programs
The optional Welcome screen has big buttons that link directly to either the Organizer or the Editor, plus access to helpful tutorials. (See Learning and Help, below, for details.) The three editing modules are Quick, Guided and Expert. While each module has a slightly different interface, they all conform to a similar industry standard view: pull-down menus at the top, a toolbox to the left and command/feature panels to the right. A highly visible ribbon below the workspace displays either the options for the currently selected tool or a Photo Bin containing all currently open pictures.
Get instant access to breaking news, the hottest reviews, great deals and helpful tips.
Organizing Your Photos: Efficient sorting and keywording, plus mobile access
The Organizer module's main tabs are: eLive, Media, People, Places and Events. Media displays everything in your library, while People, Places and Events show only those photos you've tagged for those respective categories. (See Learning and Help, below, for information about eLive.)
The left panel can display either Albums or Folders. Unfortunately, the Folders don't automatically show all the folders and files of images on your computer. You have to first "import" those by pointing Elements to specific folders on your hard drive so it can create links to them.
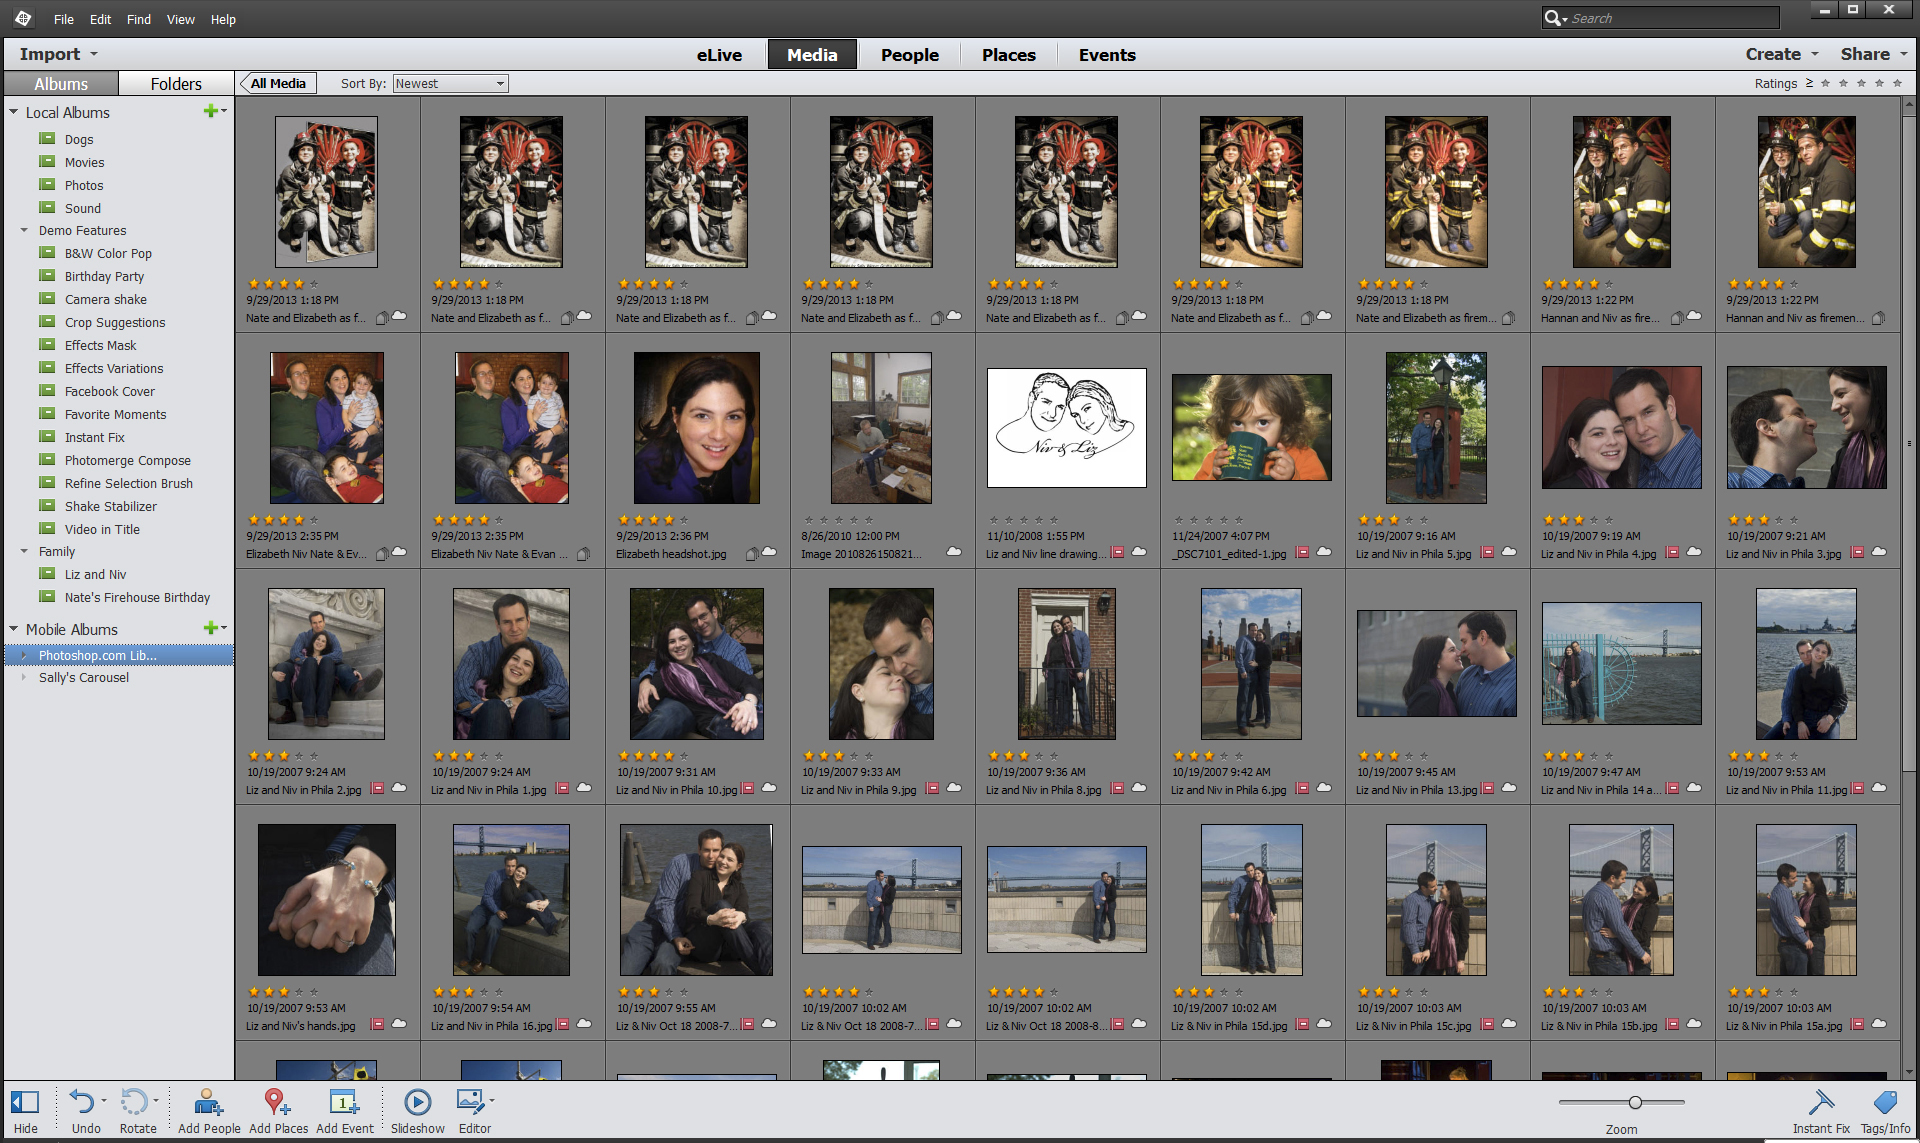
The Albums, which are virtual collections of related photos, are quite easy to create and organize, either by using a dialog box or by simply dragging and dropping thumbnails into the Albums. In addition to Local Albums (those residing only on your computer or network), the hierarchy tree includes Mobile Albums, where you organize and view those pictures and videos you wish to sync with your iOS, Android or Windows 8 mobile devices.
In order to synchronize your Mobile Albums, you need to have the Adobe Revel app on your mobile device and be signed into your Adobe ID account: Both the app and ID are free. As soon as Revel installed on our Nexus Android tablet, the mobile albums synced via our Internet connection, and we were able to browse through our pictures and videos on the device.
MORE: Best Cameras of 2015
You can add keywords to individual pictures or groups of photos by either dragging the thumbnails onto the keyword in the list you've created (which is displayed to the right) or dragging the keyword from the list onto the thumbnails.

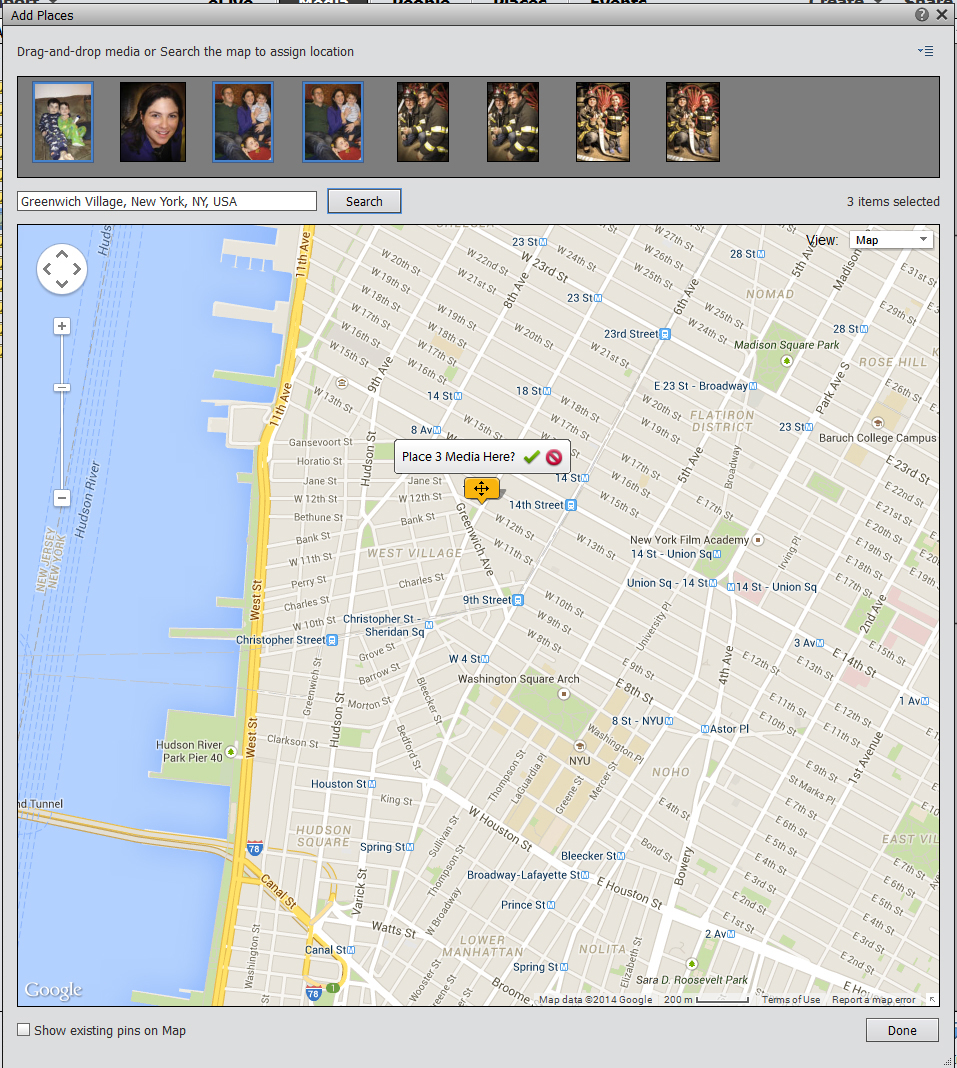
Geotagging (which displays on a map where a photograph was taken) is also a simple operation. For those photos that don't have geographical information in their metadata (which GPS-enabled cameras provide), you can either enter the name of a location in the Place search field or click and drag the photo within the map for a very precise location placement.
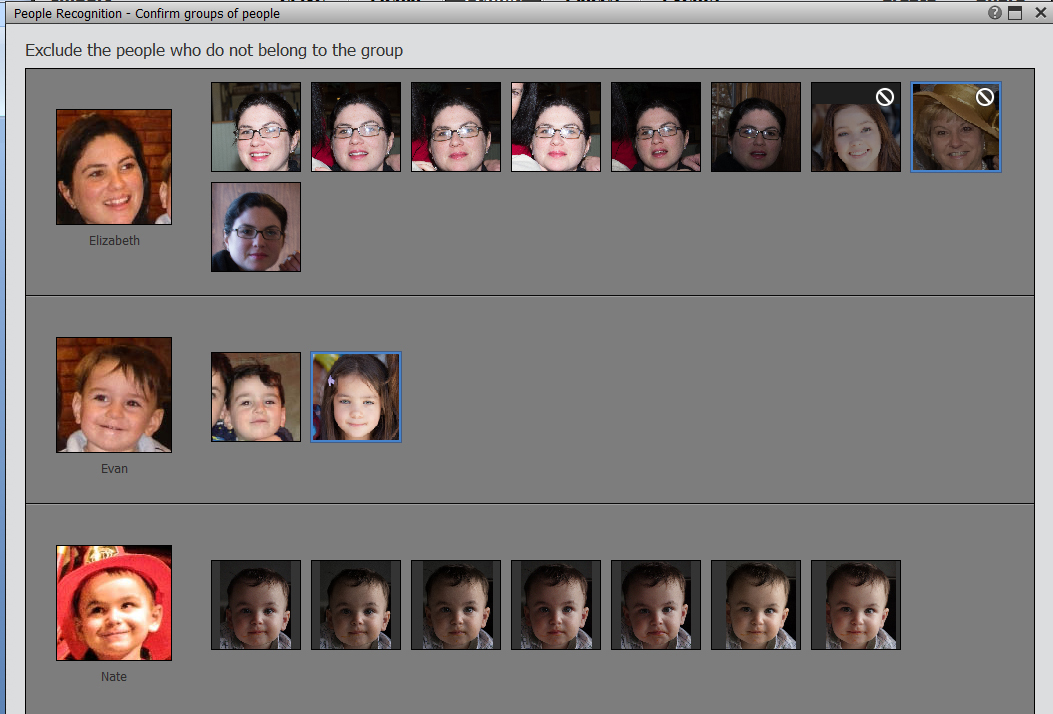
When you click on Add People, Photoshop Elements quickly analyzes your pictures and groups them according to the software's fairly good guesses as to which faces belong to the same person. You have the option of giving Elements access to your Facebook friends list to help identify people. Then you can exclude any that are a wrong guess. Unfortunately, you can't use a hot key to select several pictures at once that you would like to exclude; you must click on each photo individually.
When you tag a photo with a person's name, Photoshop Elements 13 doesn't use type-ahead to suggest names you have already entered or that are in your Facebook friends list. So it won't catch if you've mistyped a name the second time, and you may assign different names to the same person.
Beginner Editing: Helpful Quick and Guided modes
Quick Editor
Photoshop Elements' Quick editor has a streamlined interface with a limited toolbox. However, unlike other simplified photo-editing interfaces (such as the Adjust mode in PaintShop Pro or all of Picasa[link TK]), Photoshop Elements' Quick toolbox includes selection tools, which permit you to limit the area of a picture affected by an edit. This includes the new Refine selection brush (also available in the Expert module), which makes it much easier to clean up selections.
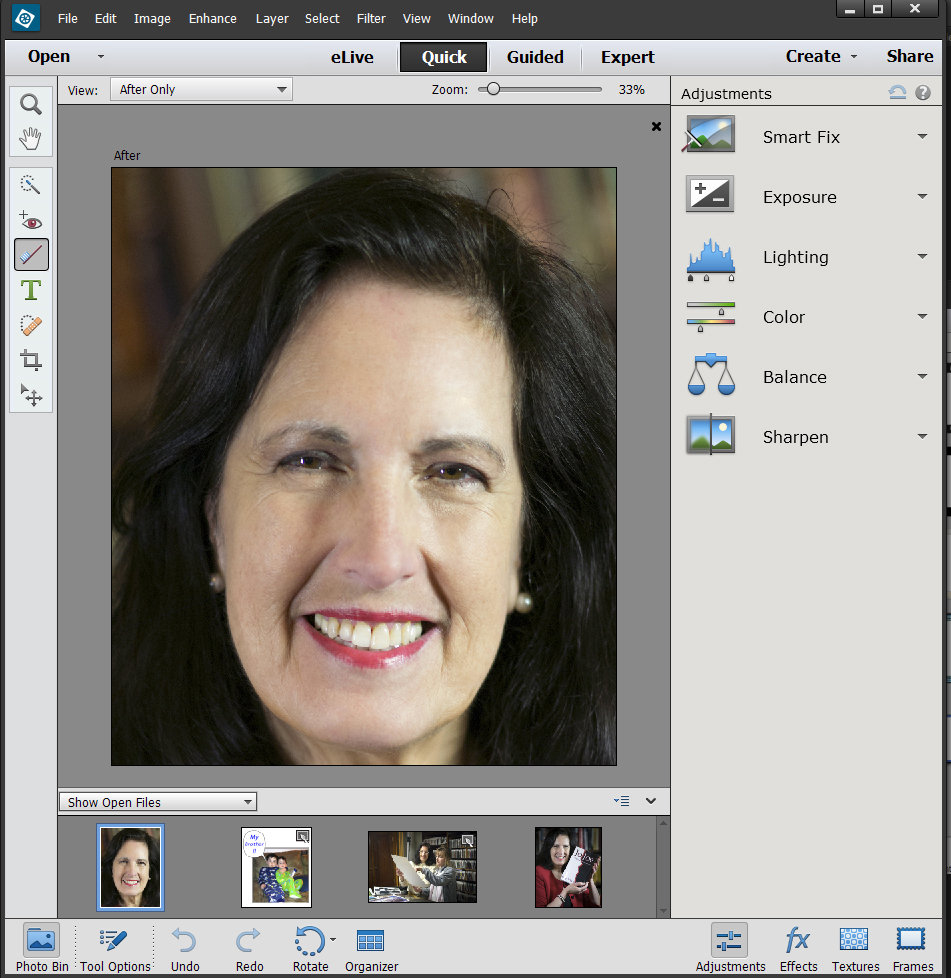
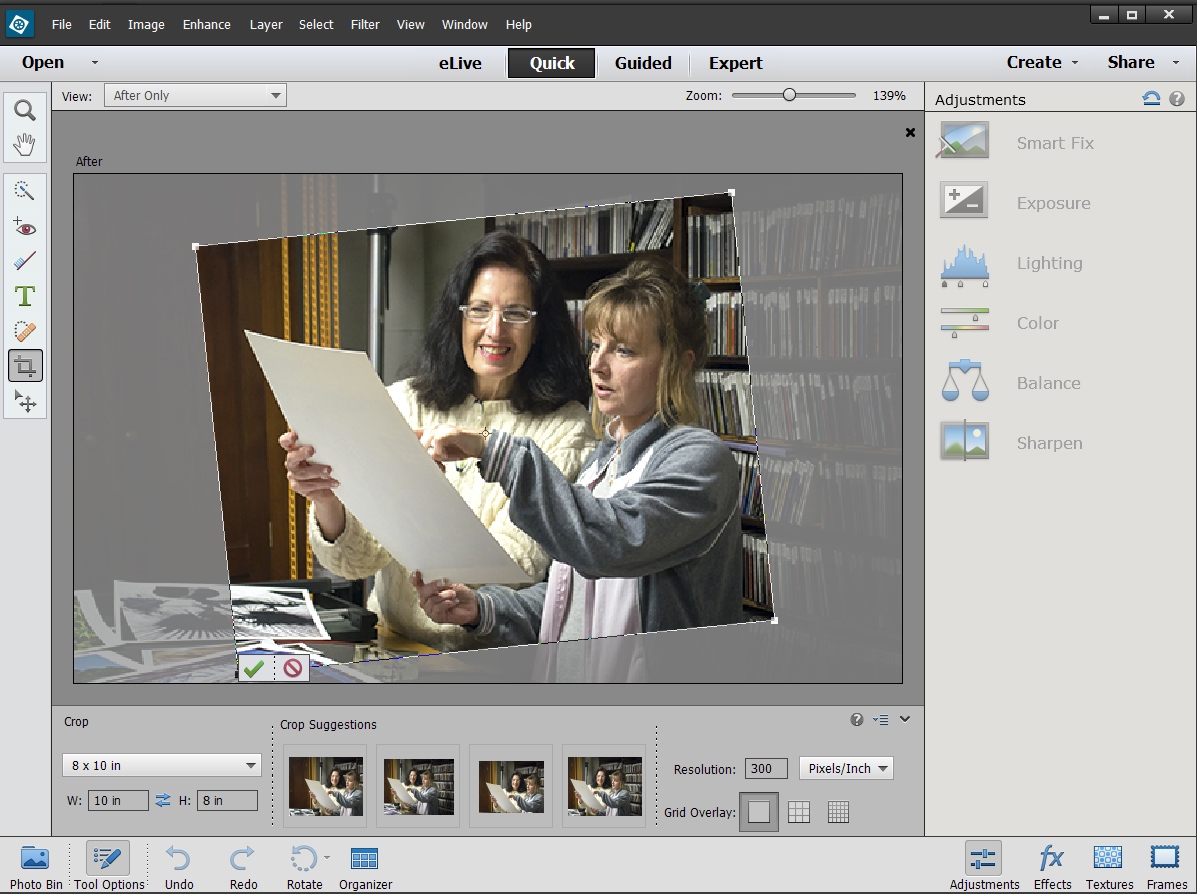
Photoshop Elements' Crop tool (also in the Expert module) has been redesigned for greater simplicity. When you set the crop to a specific photo size, such as 5 x 7 inches, or set dimensions manually in the tool options ribbon, four thumbnails display suggested possible crops. You can still adjust the crop boundaries manually, and even rotate them.

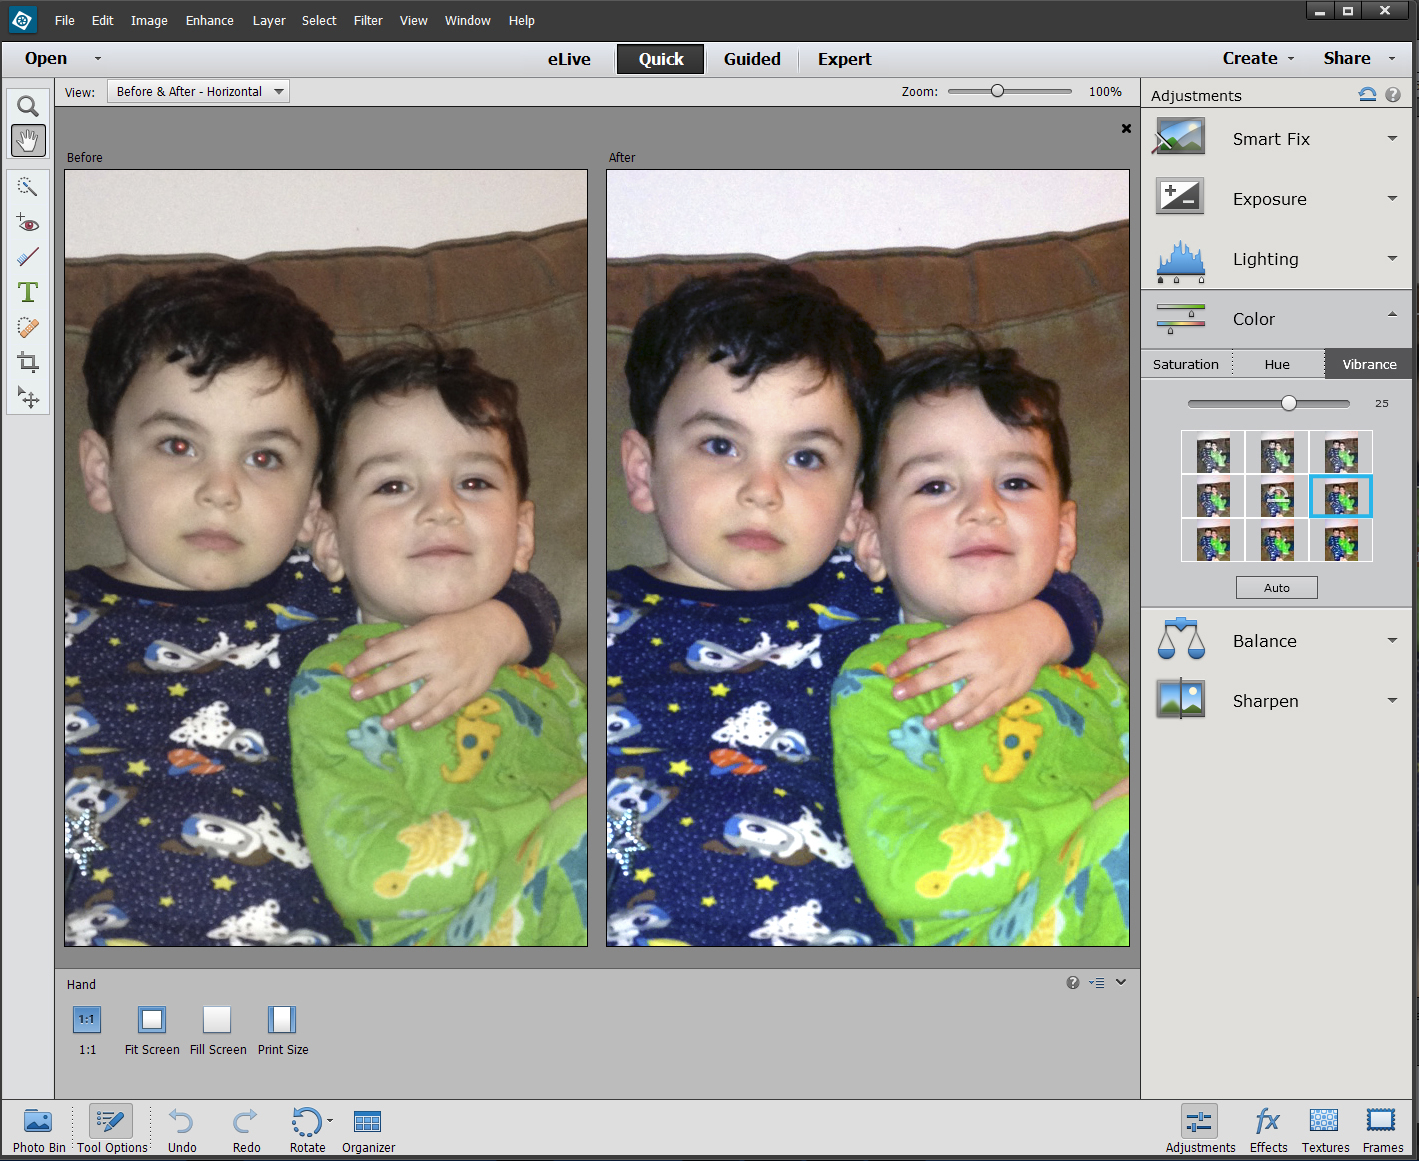
The panel to the right has tabs for Effects, Textures, Frames and several types of Adjustments: Smart Fix, Exposure, Lighting, Color Balance and Sharpen. In the Adjustments tabs, you can click one of nine displayed thumbnails to quickly select a predefined edit level, or drag a slider for more precise changes.
The Special Effects Quick Edits, such as Vintage photo, Pencil Sketch or Black & White, are limited to only five thumbnails each, with no slider.
While many of the commands and tools in the top of screen pull-down menus are greyed out in the Quick editor, the entire library of fully customizable filters (similar or identical to some of the sophisticated effects available in Photoshop) is still available in this mode,.
MORE: How Many Megapixels Do You Really Need
In addition, you can access the very powerful and fun-to-use Photomerge commands (which are an Adobe exclusive and available throughout all three edit modes). These guided projects step you through combining elements from two or more photographs to improve exposure, fix scowls in group pictures, take an element from one picture and put it in another, etc.
Guided Edits
Photoshop Elements' Guided edit module provides step-by-step guidance on editing processes and creating various interesting effects. The panel to the right is divided into four categories: Touchups (Correct Skin Tones, Enhance Colors, Restore Old Photo, Remove Scratches and Blemishes, etc.), Photo Effects (B&W effects, Line Drawing, Old Fashioned Photo, etc.), Camera Effects (Depth of Field, Tilt-Shift, Vignette, etc.) and Photo Play (Puzzle Effect, Reflection, etc.).

Each Guided Edit provides instructions and the necessary tools for following them in one panel. For instance, the new B&W Color Pop creates a black and white image with a bit of color retained from the original picture. Step No. 1 is to decide what color you want to retain: Click on the Red, Yellow, Blue or Green icon, or use an eyedropper tool to select a specific color in the picture. In Step No. 2, you can refine the effect by using the provided brush (with an adjustable size and opacity) to add or subtract color areas in the picture. Then in Step No. 3, you can choose to add some saturation to the color.
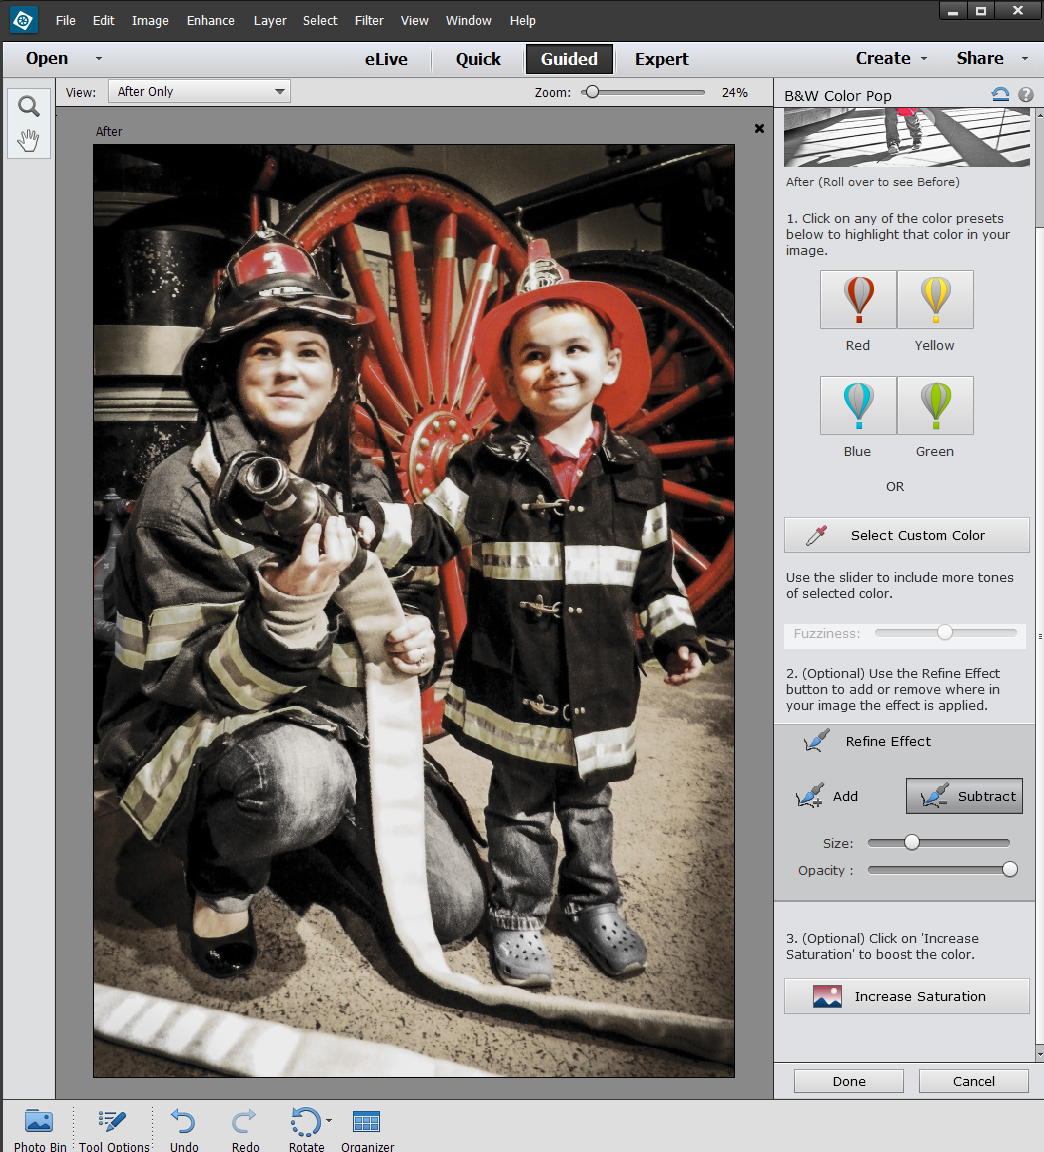
Unfortunately, the Guided Edits often don't have Undo or Redo options, or any other way to backtrack without starting all over again. Even so, they are a great, fun way to learn some rather advanced processes.
Advanced Photo Editing: Expert options and controls
The Expert module provides the widest range of options, commands and tools. You can customize the right-side panels by nesting or docking the many palettes, such as for Effects, Graphics, Histogram(distribution of light and dark elements in a photo), History and Actions.
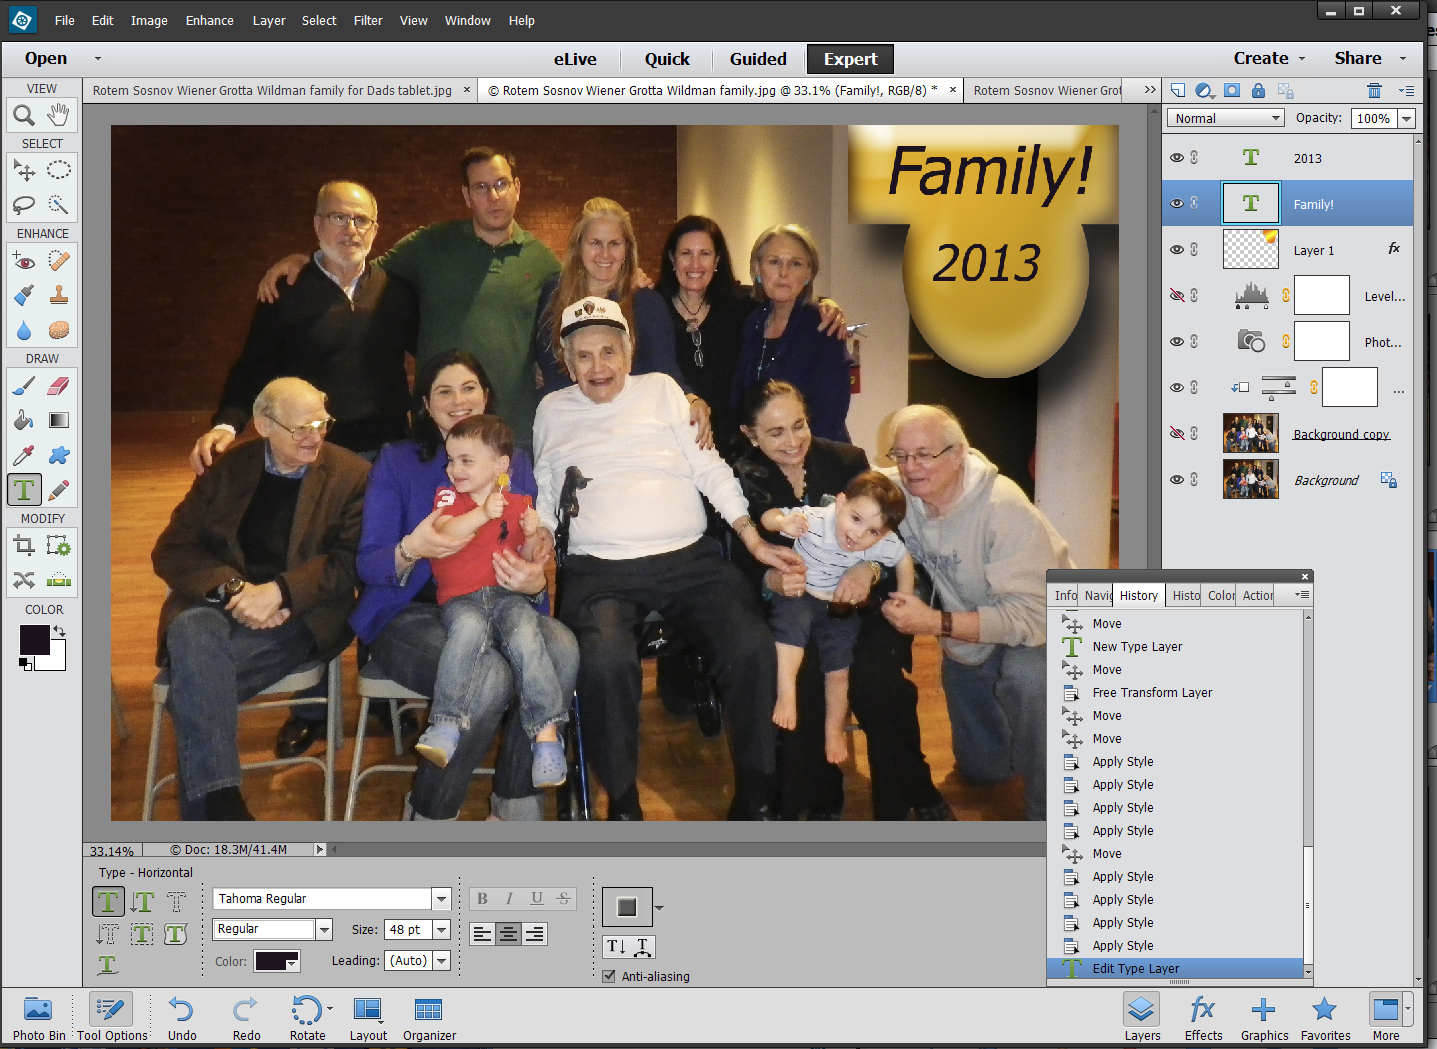
The heart of the Expert mode is the Layers palette, where you can manage and work on diverse elements within a composition, such as portions of different pictures, type and shapes. Elements 13's Layers palette includes creative layers options familiar to Photoshop users, such as Adjustment Layers (tonal and color edits), Blend Modes (how layers' pixels will merge visually) and Layer Masks (which select areas of a layer that will be applied to the final image). One new function allows you to drag and drop a layer from one picture to another; it works better than the similar feature in Corel PaintShop Pro (see review).
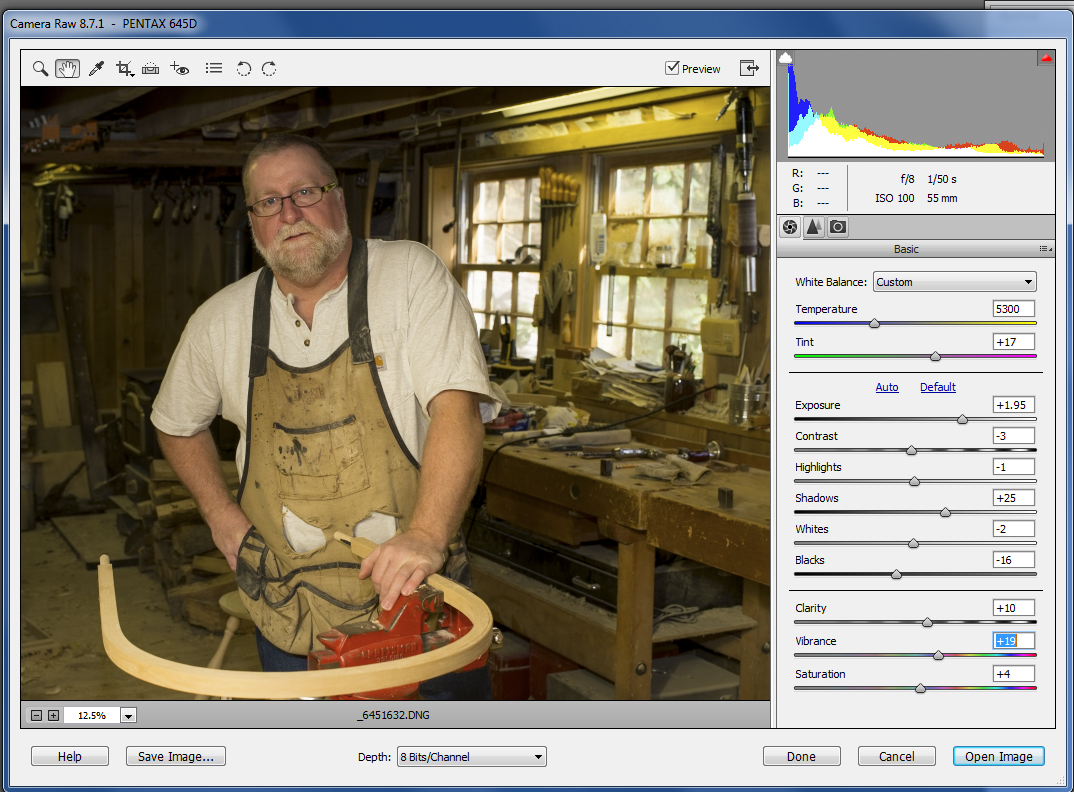
Photoshop elements works with RAW files, which contain all the original, unprocessed data captured by the camera sensor. When you open a RAW file (either through the File/Open dialog or from the Organizer), the program brings it up in a modified Camera RAW window. It's the same utility for processing RAW image files for Photoshop CC, though with fewer controls.
However, the Expert module isn't full Photoshop. Elements focuses on those functions, commands and effects that are most likely to be of interest to consumers. For instance, Actions (predefined macros) are limited to more personal or fun processes, such as "Make 4 Percent Thinner," which causes a person to look skinnier. In another limitation, you can't create and save custom Actions.
Fun Projects: A nice variety with promises of more
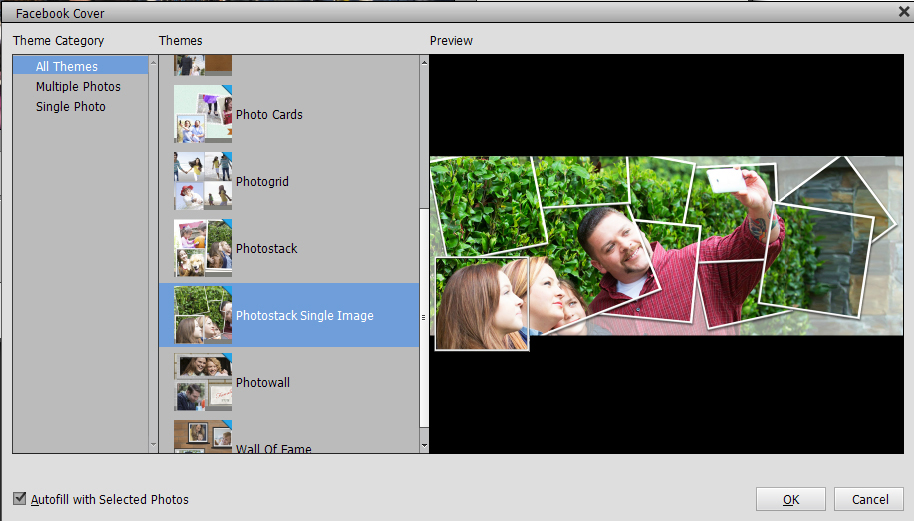
Photoshop Elements has a variety of projects you can create with your photos, such as a photo book, greeting card, instant movie, collage, DVD jacket or calendar. A cool new Facebook cover creator uses a single picture or several images and some rather nice templates to define both your profile and cover photo. At present, Photoshop Elements has only a few Facebook cover templates. However, as the company will be doing with other content within the program, Adobe says it will be adding new templates periodically.

Output and Sharing: Flexible and fun
While you can create projects, share pictures and print from both the Organizer and Photo Editor, the Organizer has all options, while the Photo Editor has only a subset. The full range of sharing options in the Organizer includes sending by email; uploading to Facebook, Flickr, Twitter, SmugMug Gallery, Vimeo or YouTube; burning video DVD or Blu-Ray; and creating a PDF Slideshow.
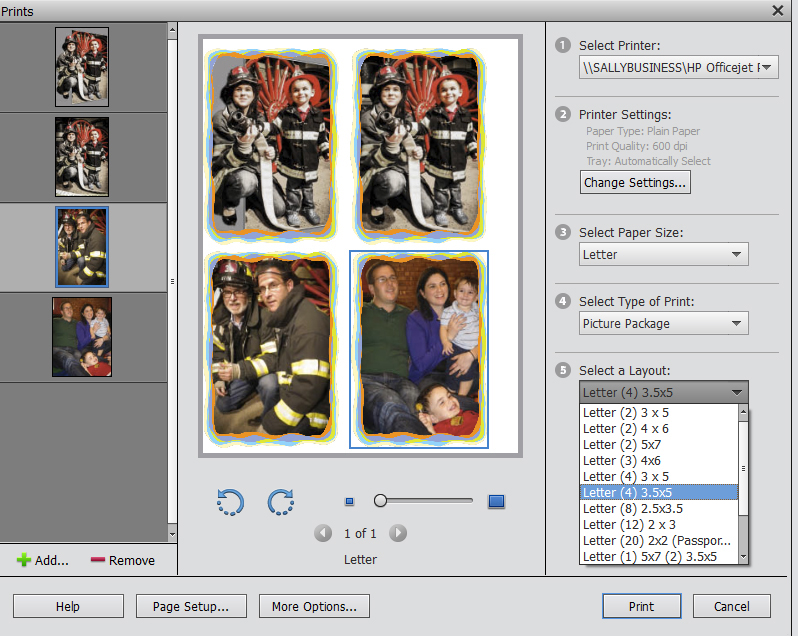
If you print from the Organizer, your options include creating print packages of two to 20 pictures on a page, adding frames to the pictures and generating a contact sheet. The print dialog is flexible, allowing you to drag and drop pictures onto the page or within the page.
Both the Organizer and Photo Editor have a direct link for ordering prints from Shutterfly. (The first 50 prints size 4 x 6 inches are free.)
Learning and Help
From the very beginning, Photoshop Elements helps users feel comfortable making choices and deciding what to do first. It begins with the Welcome screen, which opens as soon as you start the program and provides you the helpful option of seeing an Overview or the What's New section (new features). Clicking on Overview displays a slideshow flyover of the program, plus Web links to resources called "Explore more Elements features," "View video tutorials" and "Join the conversation (on Facebook)."
MORE: DSLR vs. Mirrorless Cameras: Which Is Better for You?
One of the main tabs in both the Organizer and Photo Editor is for the eLive module. This nicely designed webpage is filled with links to videos and blog posts in three categories: Inspire, Learn and News items. While some are little more than advertisements, others are quite helpful. For instance, at the time of our testing, recent Learn post topics included a video on how to animate a string of holiday lights, and a post from a food blogger explaining some new features in Elements 13.

Unfortunately, the program's Help, which is found in the Help pull-down menu, is not context sensitive (tailored to the specific tool or operation you are using). Instead, it takes you to the index website on Photoshop Elements, which is filled with links to good articles and how-tos. When you use the Search field on that page to try to find the specific answer or guidance you need, you must type in "Photoshop Elements" along with the search subject; otherwise, it will search and find responses about the entire Adobe product line.
Bottom Line
Photoshop Elements 13 is an excellent, highly accessible, yet powerful consumer photo-editing program with only a few annoyances. For the vast majority of users, Elements is a far better choice than the more-complex Photoshop CC or the less-robust Corel PaintShop Pro X7. Elements 13 delivers on fun, ease of use and top-quality results, in an interface that helps users master even sophisticated photo-editing techniques.
- How to Take Great Photos with a DSLR or Mirrorless Camera
- 10 Best Android Camera Apps
- Best and Worst iOS 8 Camera Apps

Sally Wiener Grotta is the president and lead analyst of DigitalBenchmarks test lab (www.DigitalBenchmarks.com). The scripts she created for various tech publications for testing and evaluating digital cameras, image quality, software and related technologies have become industry standards. Among her numerous books is the first major volume on image processing “Digital Imaging for Visual Artists” (McGraw-Hill), co-authored with Daniel Grotta. Her hundreds of reviews, stories and columns have appeared in scores of magazines, journals and online publications.
