Whether it was a PS5 or a new graphics card for your gaming PC, everybody likely has one device or gadget they weren’t able to buy during the pandemic. For me personally, it was the Raspberry Pi.
You see, the Raspberry Pi Foundation’s single-board computer is highly versatile and while you can use it as a desktop PC, it can also make a great web server, Wi-Fi extender, Network-attached storage (NAS) device and more. The possibilities are almost endless but until recently, there was just one problem. You couldn’t buy one anywhere without dealing with scalpers who jacked up the price by more than five times its original cost.
This is why I jumped on the opportunity to pick up a Raspberry Pi 4b when I saw it going for just $60 online. However, much to my chagrin, the Raspberry Pi 5 was announced the day after I placed my order. I felt a twinge of buyer’s remorse until I remembered why I was finally buying a Raspberry Pi in the first place.

As someone who loves to tinker, I had originally wanted one to downsize my digital dashboard by using a Raspberry Pi 4 instead of a mini PC. However, at that time the Raspberry Pi 4b in the configuration I wanted was still going for $160, so I ended up buying a tiny workstation for that project
However, a new device recently came across my desk that finally pushed me over the edge and convinced me it was time to get a Raspberry Pi and learn to program it.
Inspired by a keyboard
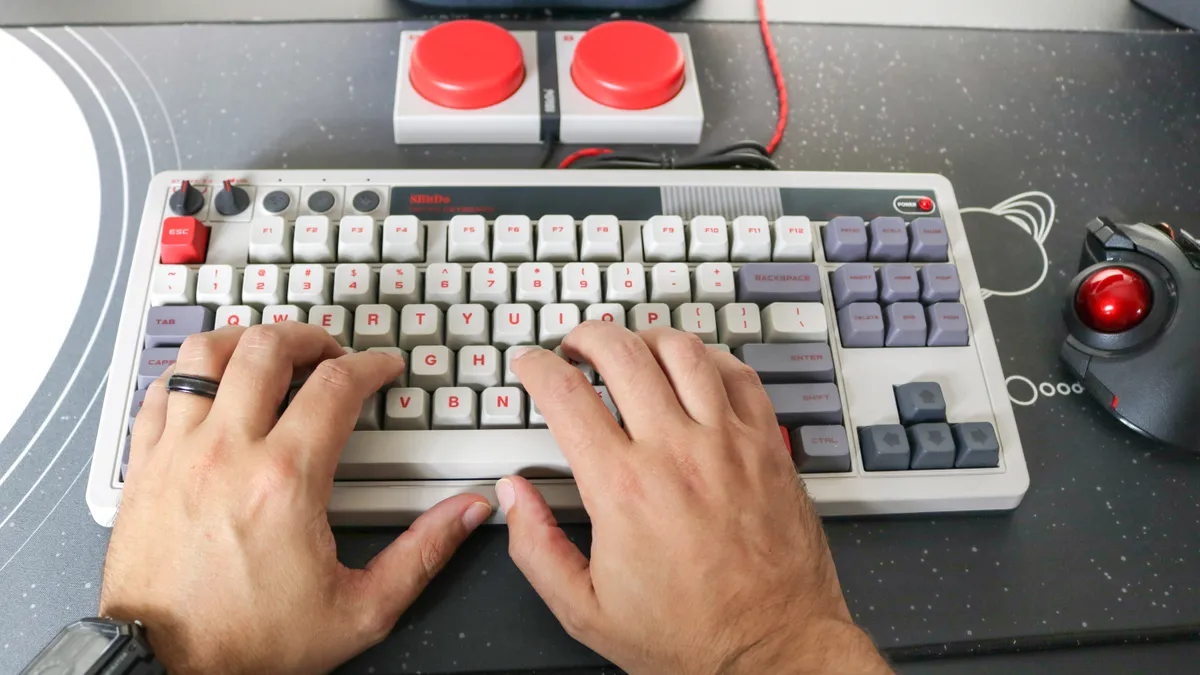
Back in September, I had a chance to test out 8BitDo’s new Retro Mechanical Keyboard ($99, Amazon) and suffice it to say, after using it for a week I walked away thoroughly impressed. From the volume dials at the top to the red power LED on the right side, it’s a very unique device and one of the best mechanical keyboards out right now in my opinion.
While there’s a lot to love about 8BitDo’s first attempt at making a keyboard, the way in which the company got the NES color scheme and design just right really left an impression on me. Since I already have 8BitDo’s NES-style mouse ($30, Amazon) that I picked up years ago, I knew I was really close to putting together a complete retro computer setup.
The one thing I was missing, though, was a PC to connect these peripherals to. Taking apart a broken NES console and retrofitting it to use as a modern PC was one option, or I could achieve something similar with an old, beige PC case. However, using a Raspberry Pi would be easier and cheaper and during my research, I had already come across several Raspberry Pi cases that were designed to look just like classic game consoles.
Finding the perfect case for a retro-style setup

Since the Raspberry Pi 4b was first released back in 2019, there are all manner of different styles of cases for it. From cases that look like the first PlayStation to the Super Nintendo and even the Game Boy, whatever your preferred retro console is, there’s a case for your Raspberry Pi that looks like it.
As I was trying to match the look of the NES, I ended up going with a case from Retroflag ($40, Amazon). Actually, there are two NES-esque Raspberry Pi cases to pick from online. However, the first one I looked at has all of the ports at the front (not ideal) while the second one has them at the back. This updated case also has a few more tricks up its sleeve too.

The biggest and most notable change is that it has a real cartridge slot just like the NES did. However, instead of a single game, the included cartridge holds a 2.5-inch SSD that you can use for additional storage or even for the operating system. In fact, Retroflag sells additional cartridges so you can use multiple SSDs with your Raspberry Pi, as well as an adapter so you can connect these cartridges to your PC.

Since Raspberry Pi OS or whatever other operating system you decide to use runs off of a micro SD card, there’s a storage compartment at the bottom of the case that holds multiple cards. This is actually a design feature that Retroflag copied over from the original NES, which had an expansion port at the bottom of the console. However, unlike with Retroflag’s NES-style Raspberry Pi case, there was never a way to use the console’s expansion port as Nintendo never released any accessories for it.
Putting it all together
I took the easy route and purchased a microSD card with Raspberry Pi OS pre-installed as I wanted to see just how easy building a similar setup would be for a beginner. However, Raspberry Pi OS and the other Linux distros for the Raspberry Pi are completely free and can be downloaded and then installed on any micro SD card you have laying around.

Installing the Raspberry Pi 4B in Retroflag’s case was a pretty straightforward affair but slightly different than building a PC. For this reason, I recommend you watch a few YouTube tutorials before you put everything together, especially as the included instructions aren’t the clearest.

With my new NES-style Raspberry Pi computer built, I set it up alongside the 8BitDo Retro Mechanical Keyboard and 8BitDo N30 mouse and plugged everything into a portable monitor ($89, Amazon). The first boot took a bit longer than expected but once everything was up and running, I dived into Raspberry Pi OS and started messing around.
For those unfamiliar with the operating system, it’s a beginner-friendly Linux distro based on Debian that’s designed to work with any Raspberry Pi model. As it runs Chromium for its browser, I signed into my Google account and was right at home. The case fan spins constantly and is a bit louder than I would have liked but as I chose this case over others purely for its aesthetics, I didn’t mind too much. I can always swap out the case though and put my Raspberry Pi 4b in a different one down the road if I want to.
The perfect weekend project
I’ve been building PCs for the last 18 years and back when I started out doing so as a teenager, I would have loved to have something simpler and less expensive like the Raspberry Pi to learn on. The model I used isn’t the fastest and using it as my main computer would certainly be a stretch, but the new Raspberry Pi 5 is two to three times faster if you want to go this route.
For this project though, I wanted to see what the Raspberry Pi 4b is all about and I knew that there would be plenty of cases to choose from to build my retro-style computer setup. Now that I’ve had some time to mess around with a Raspberry Pi, I could certainly see myself picking up the latest model some day. For now though, I’m more than happy to try out all of the different distros for the one I have and come up with some different projects that can utilize this popular single-board computer.
If you’re a tinkerer yourself or a parent that wants to teach their kids about computers the right way, building and programming your own Raspberry Pi could be the perfect weekend project. It’s amazing how far the little Raspberry Pi has come since it was first launched in 2012 and I’m looking forward to seeing all of the new use cases the Raspberry Pi community comes up with for the latest model.
More from Tom's Guide
- This is the most underrated accessory for your desk and it’s super cheap
- How to make a cheaper Sonos speaker with a Raspberry Pi
- I mounted a mini PC to the back of my monitor for an even cleaner setup