If you hold tension in your lower back and want to reduce back stiffness, build flexibility and increase range of motion, here’s a three-move foam roller routine I swear by. It takes less than 10 minutes, depending on how long you spend on each exercise and is accessible for most people.
I recommend picking up one of the best foam rollers for relieving muscle tension and reading our guide on choosing the right one for you. I would also use an exercise or yoga mat with ample cushioning for your joints.
Once you’re ready, check out the three foam roller exercises below, plus the benefits and how to do them properly.

Watch the 3-move foam roller routine by Dr. Kristie Ennis
Dr. Kristie Ennis is a physical therapist, nutritionist and certified strength and conditioning specialist and recommends these three foam roller exercises for opening up tight back muscles. “Help relieve stiffness and pain in your back,” she says. “Loosening up the surrounding joints and muscles can help ease tightness and pain in the low back. Also, learn the one foam roller move you should definitely not do!”
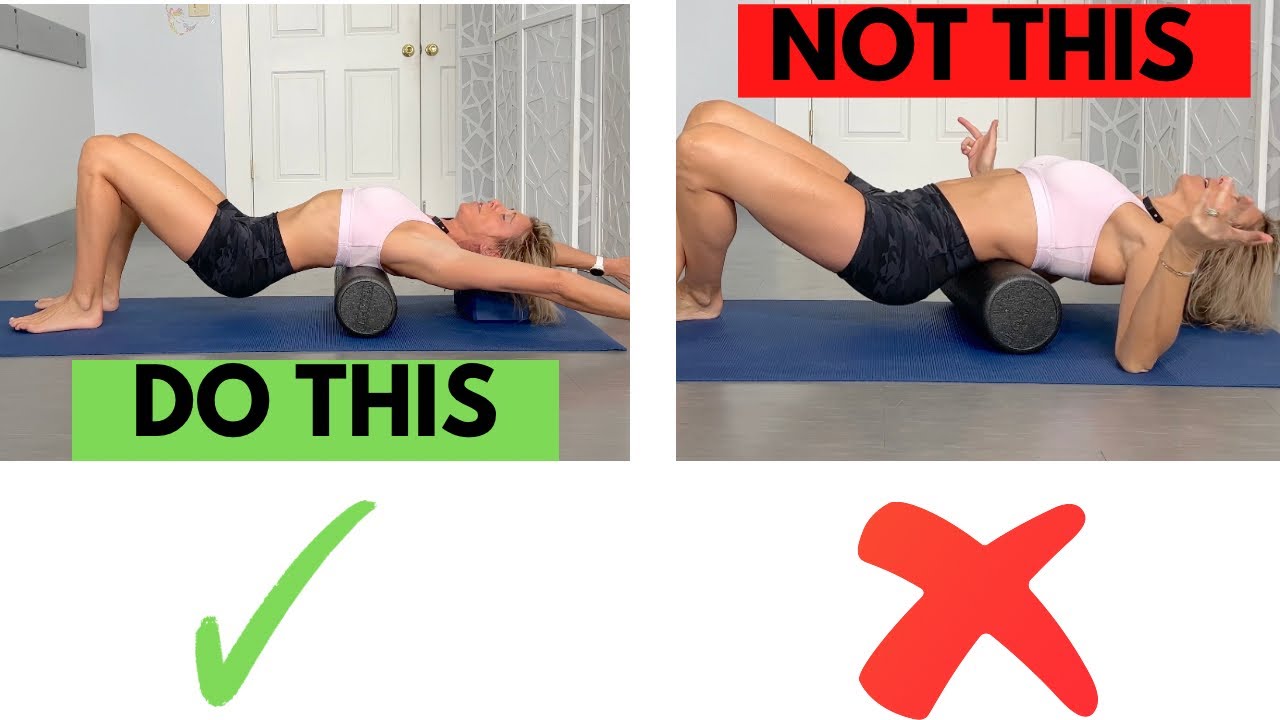
Ennis advises avoiding placing the foam roller directly onto the lower back and extending and rolling over it, which adds unnecessary pressure on the vertebrae of the lumbar spine without anything to disperse the force, increasing the potential for overextension and pain. So now you know what not to do, let's take a look at the three moves Ennis recommends.
1. Cat cow x 5 reps
Start on your knees with the foam roller before you and place both hands on the roller. Ennis encourages you to squeeze your shoulder blades together and lift your fingers toward you as you roll forward, lift your head and stretch through your lats.
Once you've found a deep stretch, pause, then roll the foam roller toward you and press down through your hands, drawing your upper back toward the ceiling and tucking your pelvis slightly under, chin to chest. Follow with your breath and repeat for at least five reps per position (cat and cow).
2. Thoracic spine mobilization
This move is directed toward the mid-back to reduce hunching and stiffness. Place the roller at the bottom of your shoulder blades, press your feet down, knees bent and cross your arms as if you’re about to hug yourself. Lean over the roller and (if you can) release your head toward the mat.
Ennis gives a further scaling option to lift your bum away from the ground, then roll the roller slightly up your back. Return to the starting position, lower your bum to the mat and slightly curl and crunch upward. You can also roll side to side to massage the muscles on either side of the spine.
The last variation of this move requires a yoga block which you can place beneath your head. From here, raise your arms overhead and bring your hands down behind you for an even deeper stretch, palms facing up. If you want to, lift your bum into the air and hold the position. Ennis doesn’t give a time or rep count for this exercise but encourages you to keep going until you feel a “snap, crackle, pop” or you start to feel a release.
3. Lower back soft tissue release
The last foam roller exercise targets the lumbar spine without placing the roller directly onto the lower back. Start on your side and position your roller between the ribcage and hip region. Bring your elbow down for support and roll so your torso is at a 45-degree angle.
Roll slightly forward and raise the top arm overhead if that's not challenging enough. From here, Ennis provides the option to add gentle dynamic movement. With the top arm stretched overhead, press down with the foot on the same side for balance, then draw your opposite knee toward your chest and touch your elbow and knee together in front of your body — similar to a side-on version of a bicycle crunch.
The move targets the quadratus, gluteus medius and oblique muscles. Work until you feel a gentle release and switch sides.
Verdict
I added this to my routine after a long day spent at my desk writing and could feel an almost immediate release through my mid-back along with the familiar crackling I’ve become used to when rolling out my muscles. You’d need to foam roll regularly to see long-term improvements, but even just 10 minutes a day in the morning, evening, or after workouts could help reduce tension and soreness.
If you’re unfamiliar with foam rolling, the myofascial release method helps get into the tight fascia (connective tissue) that wraps and supports your muscles, bones and tissues. These little communication devices tell your nervous system that it’s safe to relax and this conversation is relayed to your muscles, which can then begin to relax.
I don’t know anyone who would categorize foam rolling as fun — it’s often uncomfortable if you’re tight or sore — but the method can improve blood flow and oxygen delivery to your muscles.
There’s existing research that supports foam rolling, but even the best foam roller exercises aren’t a quick fix or cure-all. The Cleveland Clinic tells us that healthy fascia stretches with you, but tight fascia restricts movements and can cause pain, so the goal is to keep everything “loosey goosy” as Ennis puts it.
Ennis also advises you to stop if you experience pain and only do what feels good for your body. Whenever I train clients, I ask them to try and differentiate between discomfort and pain. Foam rolling can feel “yucky” physically and emotionally for some people, but it’s normal. In these moments, focus on breathing, inhaling deeply through your nose and exhaling through your mouth. Practice being comfortable with the uncomfortable for a short time.
If you’re a foam rolling beginner, finding the best foam roller for your needs will help ease you in. For example, you might avoid firm rollers to begin with, as these can feel more intense.
That said, if you have undiagnosed pain or an existing injury, I strongly recommend seeing your physician or a physiotherapist first and avoiding rolling directly over any injured body parts.
More from Tom's Guide
- This 6-minute foam roller exercise routine builds stronger muscles and releases tension in your lower body
- Forget sit-ups — build core strength and improve your posture with this 10-minute abs workout
- I'm a personal trainer, this one-minute stretch opens your hips and builds lower body flexibility