This hidden Windows 11 feature measures anything on your screen — how to enable it
Pixel-perfect measurements on your screen
Mastering how to use Windows 11 PowerToys Screen Ruler will infuse your workflow with precision and convenience. Microsoft PowerToys offers various utilities to augment your Windows 11 interaction, and Screen Ruler is one such utility.
This tool lets you swiftly and accurately measure pixels on your screen. The measuring is based on image edge detection, a process to reveal boundaries within an image. You can obtain dimensions in varying formats, for example by creating a bounding box and measuring its dimensions, gauging horizontal and vertical spacing between elements simultaneously, or finding out only the vertical or horizontal spacing.
Whether you're a designer, developer, or someone keen on pixel-perfect precision, the Screen Ruler is here to help. In this guide, we'll explore how to enable, use and personalize the Screen Ruler.
And if you're eager to explore more PowerToys, check out our article on these three Microsoft PowerToys to install.
How to use Windows 11 PowerToys Screen Ruler
Note: To access Screen Ruler, you need Microsoft PowerToys. Read this guide on how to get PowerToys on Windows 11 if you need help.
1. Enable PowerToys Screen Ruler
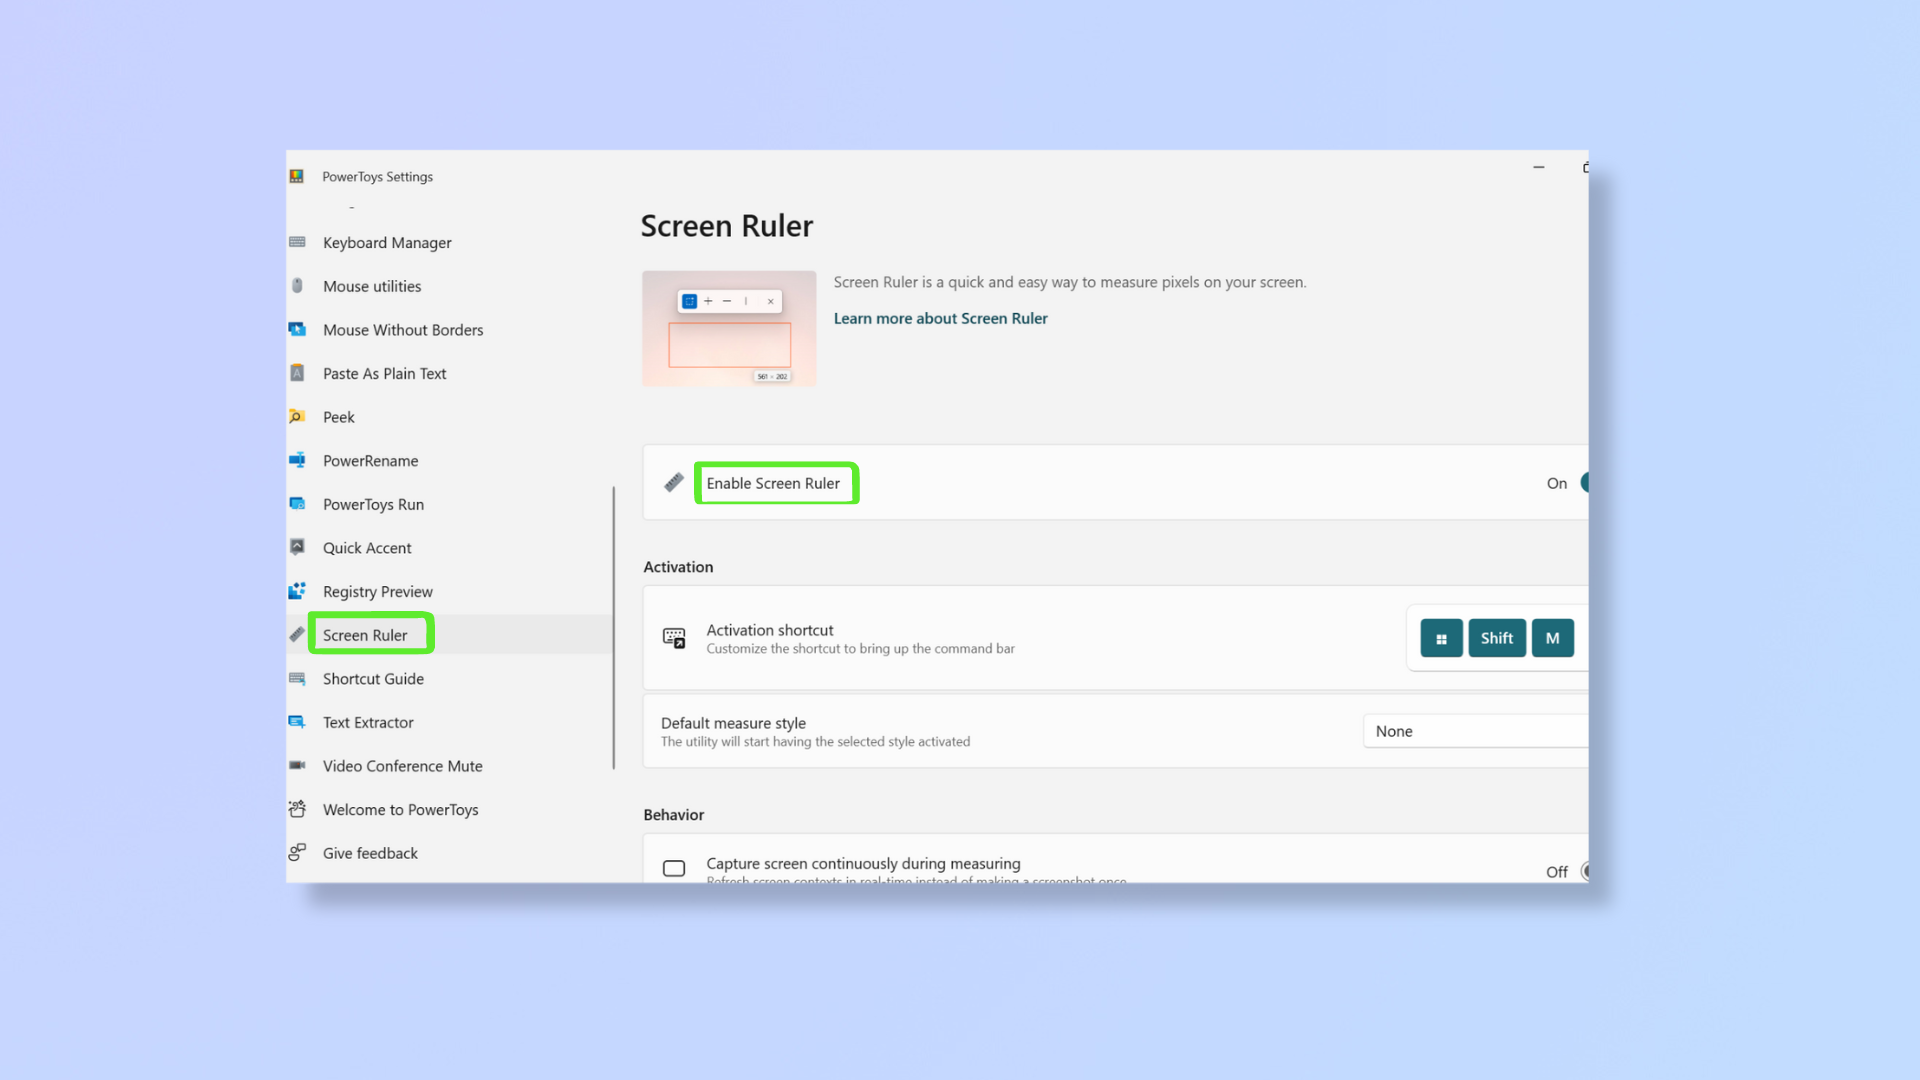
First, open the PowerToys app, and then scroll down the left pane to click on Screen Ruler. Toggle Enable Screen Ruler on.
2. Press Windows key + Shift + M to use Screen Ruler
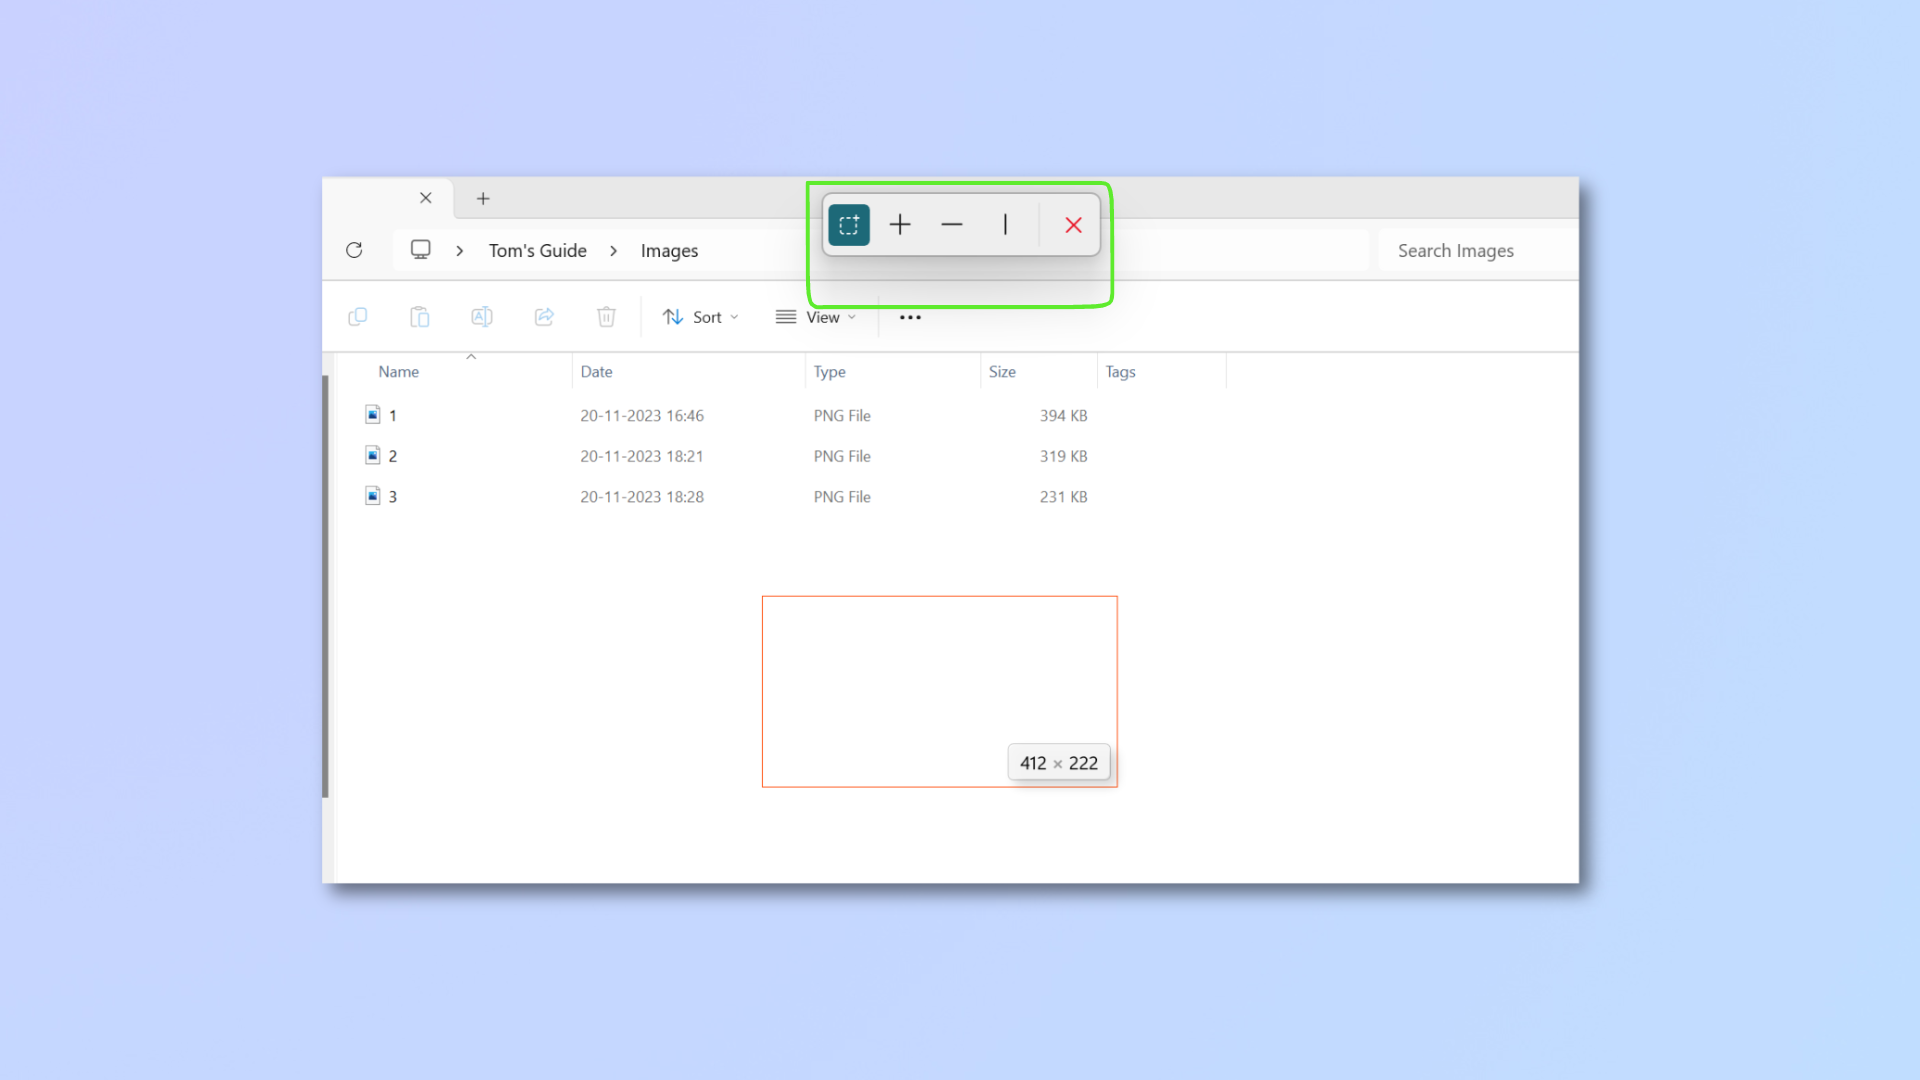
To activate Screen Ruler, hit Windows key + Shift + M and a toolbar will appear at the top with different icons:
- Bounds (Dashed square symbol): This is a rectangular box tool. Click it, then click and drag your mouse anywhere to create a bounding box. You’ll find the box’s pixel dimensions displaying as you drag it. Press Shift to make the selection box (or boxes) remain in place until you close the interaction.
- Spacing (╋): This tool gauges horizontal and vertical spacing simultaneously. Click the + icon and move your pointer to the desired location to get the dimensions.
- Horizontal spacing (━): This tool only measures horizontal spacing. Click the ━ icon and move your mouse to the target location to obtain the pixel dimensions.
- Vertical spacing (┃): This tool only measures vertical spacing. Click the ┃ icon and move the cursor anywhere on the screen to get the pixel dimensions.
Once you have the required pixel dimensions with any of the tools, click the primary mouse button to copy the measurement. You can also select the four measuring tools by pressing shortcut keys Ctrl + 1 / Ctrl + 2 / Ctrl + 3 / Ctrl + 4.
3. Customize the Screen Ruler tool
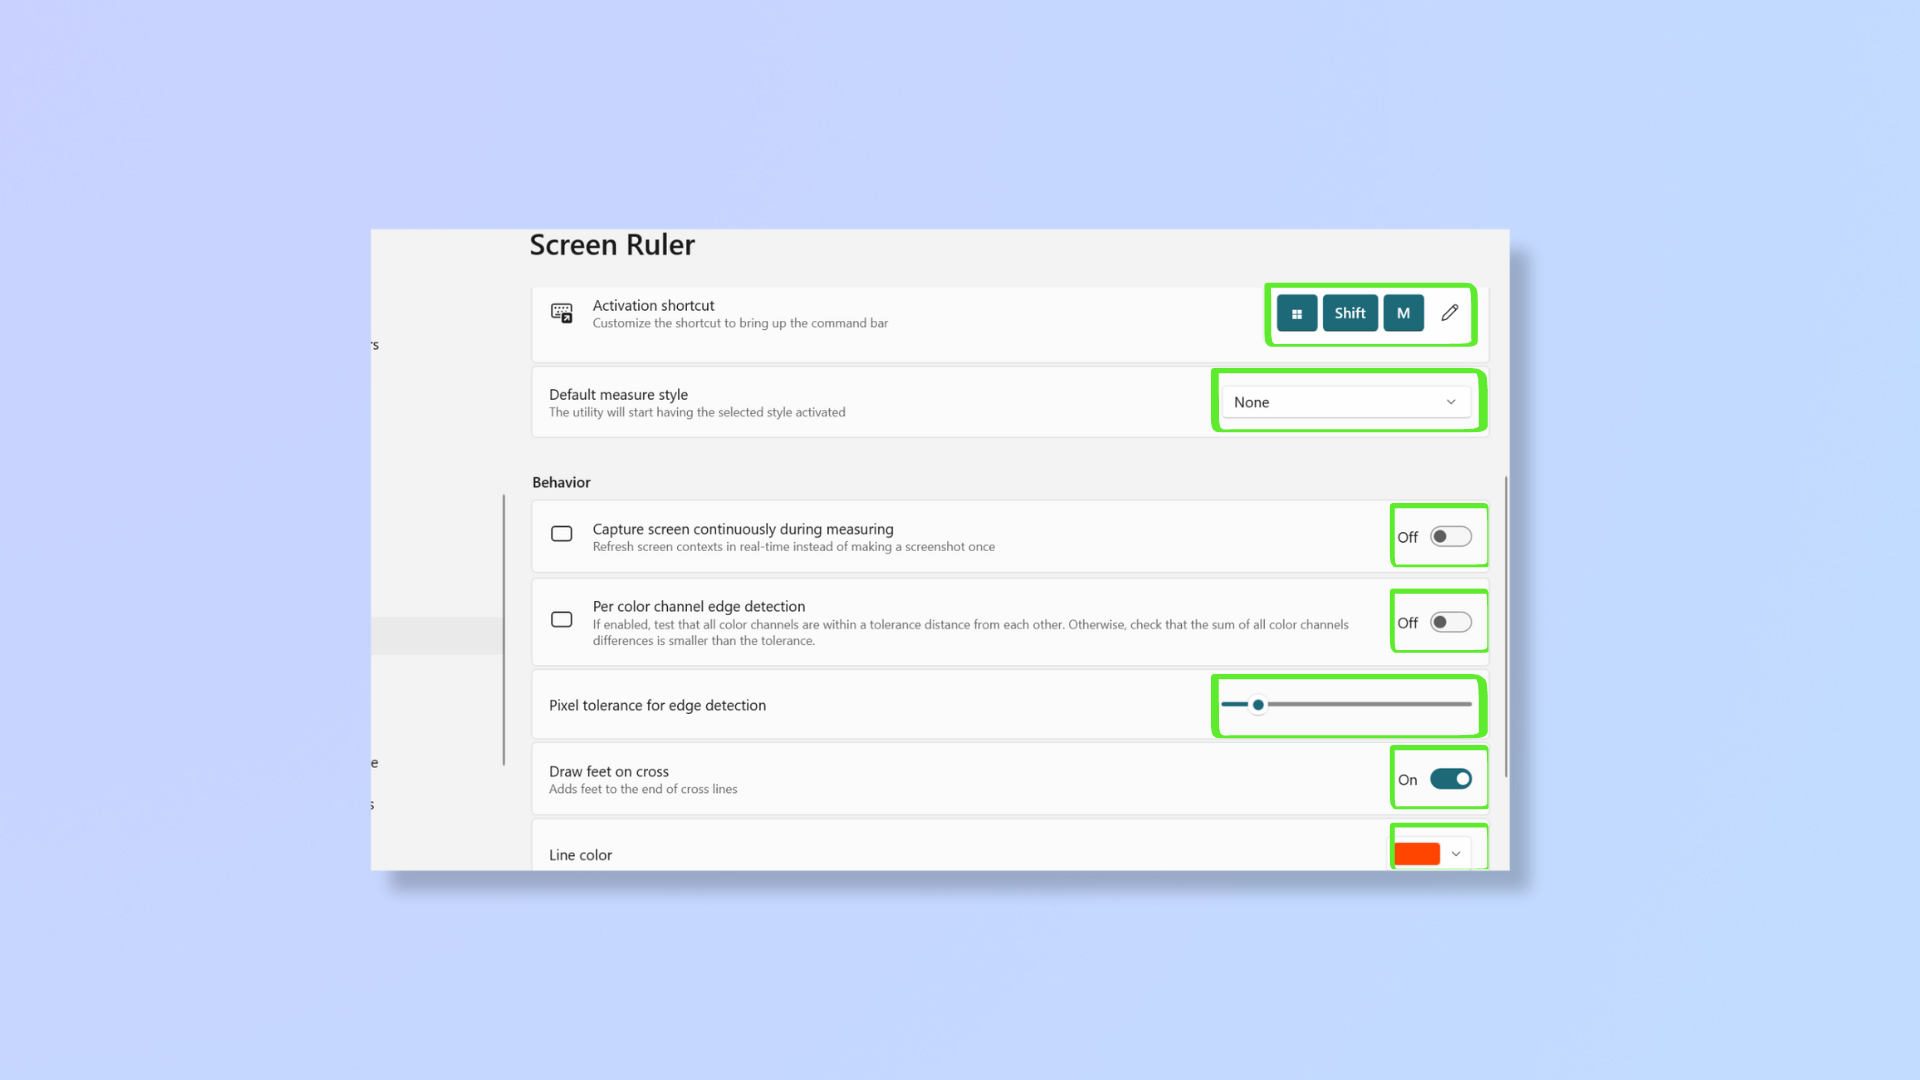
You can customize the Screen Ruler tool in the following ways:
a. Activation shortcut: Under Activation, you’ll find Activation Shortcut, where you can assign new shortcut keys to launch Screen Ruler. While the default shortcut is Windows key + Shift + M, you can assign anything else that begins with the Windows key, Alt, Ctrl, or Shift.
b. Default measure style: The default measure style drop-down lets you pick one of the four measuring tools as the default tool to launch upon activating the Screen Ruler.
c. Capture screen continuously during measuring: When toggled on, the tool uses real-time detection to continuously measure the screen. It’s useful when you want to measure pixel dimensions while objects on the screen move (like during videos), but you can’t take screenshots of measurements in this mode. When toggled off, the tool takes a single snapshot of your screen and lets you measure the dimensions on a still screen. If you use the tool in this mode during a video, your screen will remain fixed, but the video will continue playing in the background.
d. Per color channel edge detection: Toggle this on to make the measurement tools less sensitive to the on-screen colors, so if there isn’t much color difference between two elements, the measuring lines will go across them. Likewise, toggle this off to make the measurement tools more sensitive to the on-screen colors, so even slight color differences will prevent the measuring lines from crossing them.
e. Pixel tolerance for edge detection: This setting is a more meticulous version of per color channel edge detection. Adjust the pixel tolerance for edge detection slider to precisely increase or decrease the measuring lines’ sensitivity to color differences.
f. Draw feet on cross: Toggle this on to add small feet to the measuring lines for better visual recognition.
g. Line color: Adjust line color to change the measuring lines’ color.
Now that you’re familiar with Screen Ruler, it’s time to give it a spin! In some of our other guides, we cover how to speed up Windows 11, how to install Android apps on Windows 11, and how to use the Always On Top PowerToy.
Get instant access to breaking news, the hottest reviews, great deals and helpful tips.

Nikshep Myle is a freelance writer covering tech, health, and wellbeing. He has written for popular tech blogs like TechRadar, GadgetReview, SlashGear, and Creative Bloq, and has extensively reviewed consumer gadgets. When he’s not writing, you’ll find him meditating, gaming, discovering new music, and indulging in adventurous and creative pursuits.
 Club Benefits


