


When it comes to lawn care, it seems the grass is always greener on the other side.
And so it goes, we’re never happy with how our lawn looks, whether we’ve learned how often to mow our lawns, or the mistakes you’re making when planting grass seed. This often revolves around the thickness of our lawns, or rather the thinness of it. While the sun is out, and temperatures are on the rise, it seems the grass can quickly wear away to reveal more patches of soil than foliage.
There are ways to improve the appearance of your lawn. It’s not a process that can be achieved in a day, but by making some changes, your lawn can soon look full and vibrant again. If you're keen to learn more, here we cover the causes of a thinning lawn, as well as the best care tips to get it thriving and looking thicker.
Take care to avoid these 7 watering mistakes that are ruining your lawn too. And here are 5 ways to improve your soil for a healthier lawn.
1. Find the cause

Firstly, there’s no point trying to solve the problem if you don’t know the cause. Otherwise, as soon as you’ve made the necessary changes, your lawn might start thinning out again. The conditions of the soil can be a contributing factor, which we will discuss later. The level of shade is also a common problem. If your grass doesn’t get enough light, it won’t be able to photosynthesize as effectively, resulting in weak growth.
Of course, different grass types will have different preferences in terms of light requirements. Make sure what you’re growing suits the space. If there are changes you can make to improve conditions, such as cutting back trees or trimming a hedge, make them. If it’s something you can’t change, consider whether you’re growing the best grass type for your lawn. You can always make a note of the number of hours of direct sunlight your grass receives a day, and then take a sample to your local garden center to see if it’s compatible, and if not, what they would recommend instead. Here are 7 of the best grass types to grow — and which to get.
You should also consider whether any pests or disease have caused the thinning. You will need to address these issues first before making any repairs. Alternatively, it could be that your grass isn’t getting what it needs in terms of maintenance, such as water and fertilizer. We will cover the best care tips later on so you can make the necessary changes moving forward.
2. Test the soil

Be sure to check out the condition of your soil before anything. Depending on the composition and current level of nutrients, it may be holding back your grass’s growth. A soil test kit, such as MySoil Soil Test Kit ($29.99, Amazon), can break down exactly what you’re dealing with. Whether your soil is low on nitrogen, potassium or magnesium, such a kit can tell you what changes you can make to improve things. And by revealing an accurate pH reading, you will have another indication of whether your grass type is currently suitable or not.
Once you know what your soil needs, make the necessary adjustments with fertilizers and soil amendments and then test again to check conditions are ideal. Make sure the product you apply suits your needs. For instance, should you need to lower the soil’s pH or increase iron availability, Espoma Organic Iron-Tone Organic Fertilizer ($17.77, Amazon) could be a good choice.
3. Aerate the soil

You’re not quite finished with your soil yet. Despite containing everything your grass needs, if the soil is compact and lacks oxygen, your grass roots will struggle. It’s a messy process, but we recommend learning how to aerate a lawn if you want to encourage thick and fresh growth.
After cutting the lawn short, an aerator, whether manual or electric, such as the Ryobi ONE+ HP 18V Brushless 14 in. Cordless Battery Dethatcher/Aerator ($459, Home Depot), can help break up the soil and improve the circulation. It punctures the ground and redistributes it as it works.
Between spike and core aeration, core aeration is generally the most effective method, but bear in mind that it’s also the messiest. Once aerated, your lawn needs to be left for a couple of days for the soil to break down naturally on the surface. Then you’re ready to start overseeding.
If you don’t want to aerate the soil, you should still break it up as best you can using a metal rake. Mow the grass short, once again, then try to work the top ¼ inch of the soil and remove any obvious stones and debris as you go.
Here's 7 signs your lawn needs aerating for more guidance.
4. Overseed
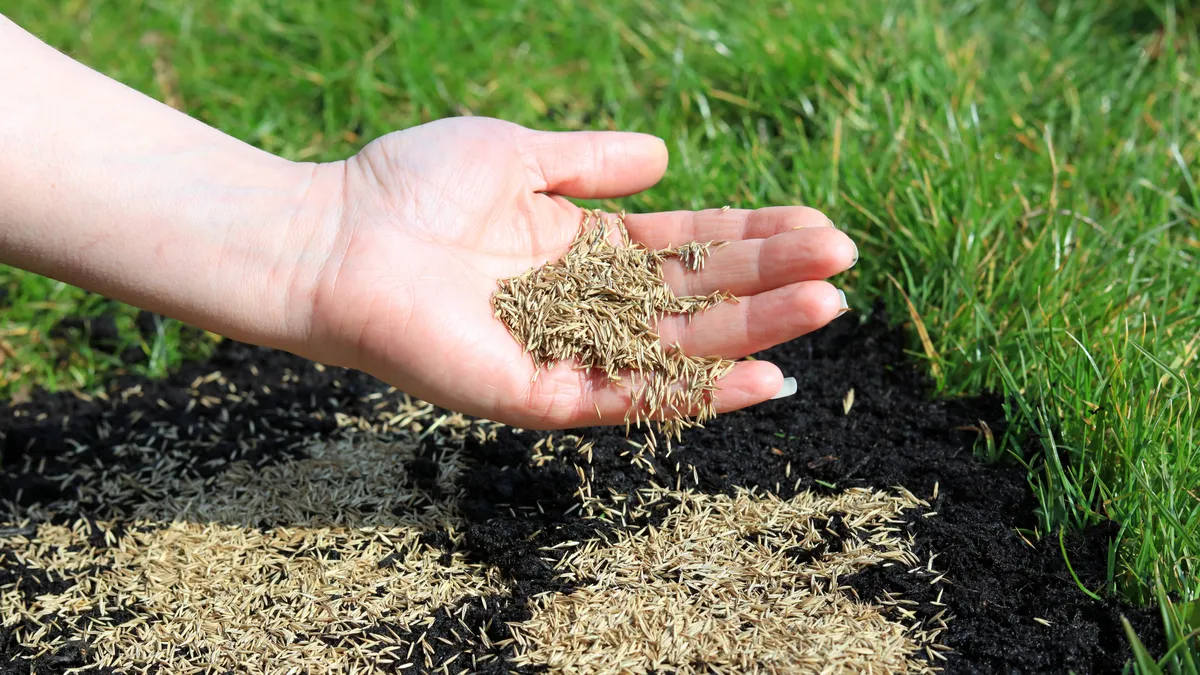
Now comes the main event, overseeding to establish a thick lawn. Above all, don’t make the mistake of applying too much grass seed. While this will technically grow more grass to start with, it will ultimately deter growth because too many grass seed will be competing for nutrients in the soil as well as sunlight above. In the end, its growth will be impeded, and you will just be wasting grass seed, money and time.
Instead, take the time to calculate the recommended levels of grass seed and follow the guidance exactly using an automatic spreader, such as the Scotts Turf Builder EdgeGuard Mini Broadcast Spreader ($47.97, Amazon). Spreading grass seed by hand is only recommended for small areas, because it’s more difficult to control the distribution and evenness.
Once the seeds are down, use a rake to cover with top soil, leaving them about ¼ inch deep. You can also layer some mulch or compost on top to protect from the wind and birds.
5. Aftercare
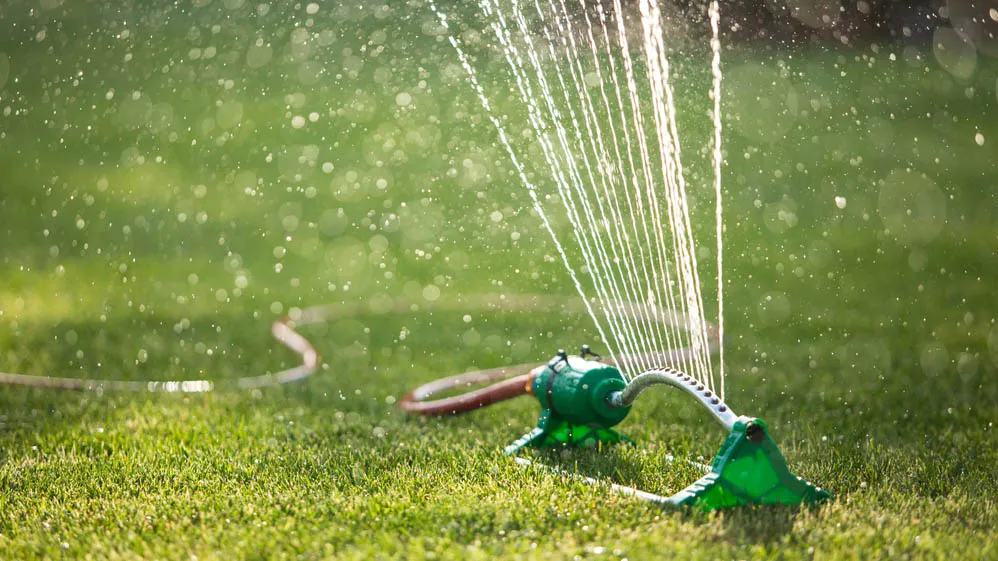
It is imperative that you give your fresh grass seed constant care and attention at first. It’s at this stage that it will be most vulnerable, needing a steady supply of water. The soil should be moist, not overly saturated, and it should be watered 1-2 times a day to start, taking the weather into account. You can start to pull back on the water once your grass reaches two inches in height. Then, once mature at three inches, it’s time to break out the lawn mower. But remember not to cut back by more than a third at a time.
Fertilizer should be applied as needed to encourage growth as well — you should apply this 4-6 weeks after the seeds germinate, following the guidance on the package for dosage and distribution moving forward. Set yourself up a lawn care schedule to make sure your lawn gets everything it needs in the future, from water and fertilizer to mowing. Do not neglect any one of these factors as it will impact the health of your lawn and ultimately its thickness. If you need some guidance, here’s how much you should water your lawn to keep it green according to the experts.
Keep an eye out for weeds while you’re at it too. Knowing how to get rid of crabgrass, or how to get rid of dandelions, before they grow abundant, can save a lot of effort and damage. Don’t forget about pests or disease either. Any issues should be dealt with as soon as possible to keep damage to a minimum.
6. Dethatch

Your work doesn’t stop here either. Another step to achieving thick and healthy grass is learning how to dethatch a lawn. Thatch is a layer of debris which will naturally build up on your soil’s surface. It’s good in that it can preserve moisture as well as protect from weeds and pests. However, too much can also reduce access to water and oxygen for your grass. Plus, fertilizer won't reach the roots as effectively, so it’s causing more of a problem than you know.
The solution is simple; once thatch reaches ½ inch in height, invest in a thatching rake to reduce it. You can also buy electric dethatchers as well as models which can be pulled behind ride on lawn mowers, such as Agri-Fab 40-Inch Tine Tow Dethatcher ($113.04, Amazon). You need to mow your lawn down to about two inches in height before you start dethatching. If you’re dethatching manually, be prepared for some hard work — you literally need to ‘rake’ the thatch away, which takes time. Dethatching should be done every 2-3 years while the lawn is mature and healthy.
7. Monitor

Finally, it may sound like common sense, but it’s where most of us fall down. Monitor your lawn and adjust your care schedule accordingly based on the seasons as well as the weather conditions. Your lawn’s needs will fluctuate throughout the year, and you need to keep on top of its requirements for the best growth. For instance, if your lawn faces a heavy downpour, take care not to overwater it. And in times of immense heat, don’t cut it down and leave it vulnerable.
Take the time to learn about your grass type as well; this can help clarify its needs as well as the best time to overseed if necessary. Once you understand your lawn and what to look out for when it struggles, you’ve got the best chance of keeping it healthy, thick and thriving.
More from Tom's Guide

