iOS 12 Complete Guide: Tips, Tricks and How-Tos for Your iPhone
iOS 12 is available today. Find out how to make the most of all the new features with our step-by-step advice.
How to Use Do Not Disturb in iOS 12
Some good news for fans of iOS's Do Not Disturb feature: it's little changed from previous versions. But the even better news is that a change Apple did introduce with iOS 12 is likely to make Do Not Disturb an even more valuable tool.
You can now stop notifications, phone calls and other distractions based on your location. In iOS 12, when you turn on Do Not Disturb, you have the option of keeping the feature enabled until you leave your current location. It's a feature that's sure to be valuable to anyone headed into a meeting, conference or child's activity who'd prefer their phone not to buzz for the duration.
Here's how to access Do Not Disturb's newly added powers, along with a recap of how to manage the rest of this iOS feature.—Philip Michaels
How to Tie Do Not Disturb to Your Location
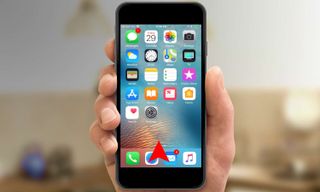
1. Swipe up on your iPhone's screen to summon iOS 12's Control Center.
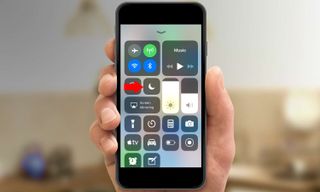
2. Long press on the Do Not Disturb icon. (it's the one that looks like a moon.)
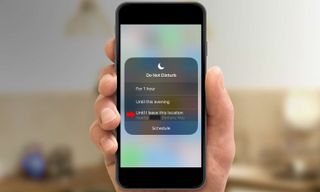
3. A list of options will appear, including one that offers to keep Do Not Disturb enabled until you leave the particular location you're at.
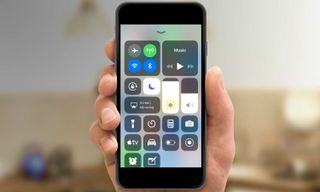
4. Tap that option, and Do Not Disturb will turn on. The feature will turn off automatically once you leave your current location, or you can tap the Do Not Disturb icon again to manually turn it off.
Sign up to get the BEST of Tom's Guide direct to your inbox.
Get instant access to breaking news, the hottest reviews, great deals and helpful tips.
Want more control over Do Not Disturb? As with previous versions of iOS, you can manage its various features from the Settings app.
How to Manage Do Not Disturb
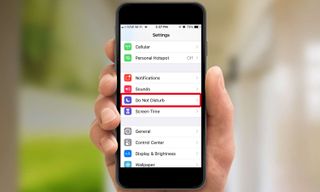
1. From Settings, tap on Do Not Disturb.
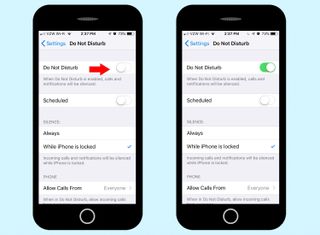
2. Turn on Do Not Disturb by toggling on the arrow at the top of the screen.
3. You can also schedule a set time for Do Not Disturb to turn on, if there's a regular time period when you'd prefer no interruptions. Slide on the switch next to Scheduled and tap the hours to bring up a scroll wheel to set how long the feature should stay on.
In the schedule section, you can also turn on Bedtime Mode, a new addition to Do Not Disturb that dims the lock screen, silences calls and sends alerts to the Notification Center rather than have them pop up as banners.
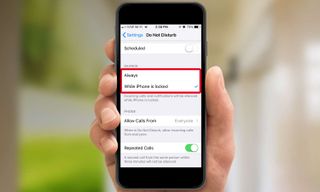
4. Determine how thorough you want Do Not Disturb to be. By default, the feature silences incoming calls and notifications only when your iPhone is locked. Tapping Always keeps those notifications at bay even if you're using your phone.
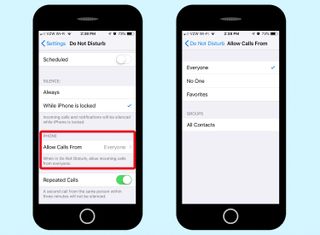
5. Determine who can override your Do Not Disturb settings. By default, everyone's calls are let through. But tapping on Everyone lets you fine-tune the control to only let in calls from favorites or block calls altogether. You can also manage Do Not Disturb calls for groups in your contacts.
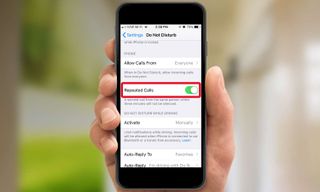
Do Not Disturb will let a second call from the same person through if they call back within 3 minutes; however, you have the option of turning off this feature.
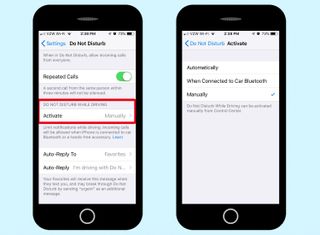
6. Last year's iOS 11 update added a Do Not Disturb While Driving feature, and that's back in iOS 12. By default, you have to turn the feature on manually, but if you tap on Manually, you can opt to activate it automatically or when your iPhone connects to your car via Bluetooth.
Note that if Do Not Disturb is turned on, calls can still get through if your phone is connected to your car's Bluetooth or to a hands-free accessory; notifications such as texts will be silenced, though.
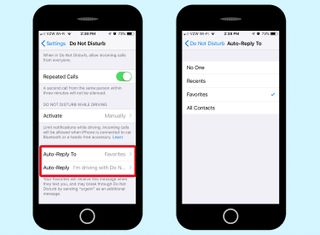
7. If people do try to text you when driving, you can manage who gets auto-replies alerting them that you're behind the wheel of a car. By default, your favorites receive an auto-reply, but you can extend it recents or all contacts. You can also turn off the feature altogether.
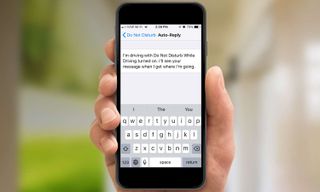
iOS 12 supplies you with a pre-written reply. Tapping Auto-Reply lets you edit that message to your liking.
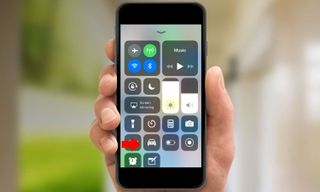
You can add a shortcut to the Control Center screen that lets you enable Do Not Disturb by tapping the icon of a car. You can add that shortcut in iOS 12 using the same method for customizing Control Center introduced in iOS 11.
Current page: How to Use Do Not Disturb in iOS 12
Prev Page How to Manage Notifications in iOS 12 Next Page How to Get Automatic Updates in iOS 12Tom's Guide upgrades your life by helping you decide what products to buy, finding the best deals and showing you how to get the most out of them and solving problems as they arise. Tom's Guide is here to help you accomplish your goals, find great products without the hassle, get the best deals, discover things others don’t want you to know and save time when problems arise. Visit the About Tom's Guide page for more information and to find out how we test products.
-
cothirteen "You don’t need to do anything special to use Google Maps or Waze on CarPlay, though of course, those apps first need to be installed on your iPhone. Once they are, you will see them on the CarPlay home screen alongside all of your other CarPlay-compatible apps. "Reply
Can anyone confirm this? I have the public beta installed but regular versions of those apps and it does not show up on CarPlay. From what I am reading the betas are needed. -
cazdabear Most likely, those versions of the apps that you have... don't support Carplay. I read from a Waze Community post, that Waze has only likely released this to their own pool of Waze Beta testers.Reply -
cothirteen Makes sense and that's what I've read too. Just didn't want to miss out on information I wasn't privy to!Reply -
otisjuhl I just downloaded the new, full iOS 12 to my iPhone and connected it to my CarPlay (2017 Subaru). Neither WAZE for Google Maps showed up. Does anyone have any idea how to get it appear? (I have them both on my iPhone and opened them while connected). Thanks!Reply -
rotolosc You need to make sure to update google maps in the app store. Waze is not supported as of yet but comingReply
-
otisjuhl Very helpful - thanks! I did update Google Maps and it appeared on my cars's screen yesterday and works! As noted, WAZE isn't there yet.Reply -
ashwincampbell I’m not sure if anyone else is experiencing this but under screen time > always allow, some apps show up as only numbers with no icon. There’s no way to tell what those apps are. Any idea what is causing this?Reply -
diem2222 After half an hour recording it is not possible to stop it, just the option restart and stop.Reply -
Jason3022 While details/specifics are great, they could have made this much simpler - it is overly complex.Reply
Here's why:
I simply want to know how much 'Screen Time' I've used since I unplugged my Ipad from the wall. That information is not available - it does not coincide with 'Battery' either, which is pure lunacy.
I'm not sure what these techs. are thinking but it positively is not with the average end-user in mind.
I am not alone in this thought.
