PC-Based Home Security: Do It Yourself
We test products that let you monitor and protect your home without the need for an outside security company's services: D-Link, Axis, Logitech, Schlage
Inside the DCS-1130
If you’ve worked with network cameras before, much of what lies waiting in the DCS-1130 will be old hat; this article is really aimed at people who are getting into home security for the first time. The screens and options you’ll see here are common throughout most of D-Link’s camera line. In fact, they’re pretty typical of consumer network cameras in general. So consider this a general education in IP cameras as well as a survey of this particular camera’s abilities.
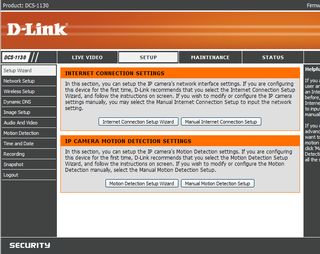
By default, the DCS-1130 appears at address 192.168.0.20 on your network. You bring this address up in a browser window, enter your user name and password, and encounter the camera’s setup screen, which encourages you to run through Internet connection and motion detection setup routines. In addition to the currently highlighted Setup tab, you’ll also see tabs for Live Video, Maintenance, Status, and Help.

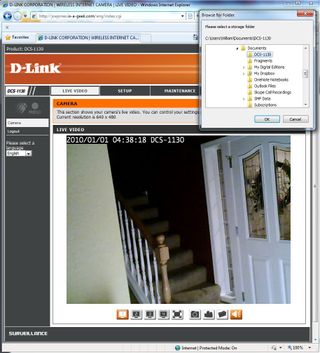
It would be exhausting for everyone if I detailed every screen D-Link provides, so let’s just stick to some of the key ones that relate most to our security topic. In the image below, you can see the Live Video view, showing an entryway at night lit by a single lamp. The camera defaults to showing a time stamp, and you can select how and where this displays in other settings. Near the bottom of the image, you’ll notice icons for snapping a still image and starting video recording. The adjacent folder icon lets you pick what folder on your local system to use for storing these files.

Perhaps you noticed the domain name I left showing in that image: joejones.is-a-geek.com. (Joe is a friend who helped me test several of the items in this article.) I was actually viewing this camera, located in Joe’s house, from a block away in my house. The way I did this here is with a dynamic DNS address.
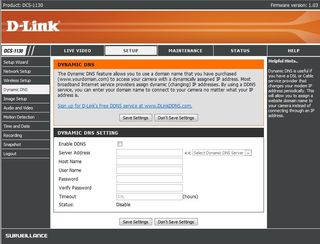
Within the camera’s pages, D-Link promotes its own free dynamic DNS domain, but others, such as “is-a-geek.com” (available through DynDNS.com) will serve just as well. A DDNS is a sort of mnemonic, an easy to remember domain name that simply points back at your camera’s true but often entirely forgettable IP address. Once you register for your free DDNS, you need to dip into your router’s settings screens and perform port forward on the IP address. In our case, this was port 8080, so we had joejones.is-a-geek.com point to the modem’s IP address at port 8080. With this done, you simply fill in the bits of DDNS server info on this screen:

At this point, there is no effective difference between sitting on the same LAN as the camera and sitting 5,000 miles away. It’s all just network traffic.
The Motion Detection options in the Setup tab are very simple. Just use your mouse to drag across an area of the shown live view. This leaves a red grid as shown below. Do this for any area in the field of view, set the sensitivity level, and the camera will watch for a suitable amount of changed pixels within the chosen areas from one frame to the next. When enough change is detected, as from someone entering that area, then an event is triggered. In the Recording screen, you can opt to have these triggers result in the saving of video to a Samba network drive, such as a local NAS appliance. Similarly, an event can trigger the taking of a snapshot and the second of those to an email address or FTP server.
Sign up to get the BEST of Tom's Guide direct to your inbox.
Get instant access to breaking news, the hottest reviews, great deals and helpful tips.


Image clarity and quality is important if you’re hoping to identify intruders or other elements in a scene. In regular use, I found that the 1130’s images ran a bit dark by default compared to most other cameras. Perhaps the sensor has a lower dynamic range. When a bright light was in a scene, the exposure seemed to favor that region at the expense of darker areas. In the setup menus, under Image Setup, you can tweak settings such as brightness, contrast, and white balance. Under Camera Environment, you’ll also find Night Mode, Indoor, and Outdoor toggles along with a shutter speed menu for night video. These allow you to fine-tune to your specific field of view. Given that surveillance cams rarely change their location, you may be able to get away with optimizing for a given scene, such as a window, and get much better results. Still, lighting conditions change throughout the day. Why most camera vendors fail to offer shortcuts for lighting profiles in their setup screens is beyond me.
If the event options in the DCS-1130 seem a bit cumbersome, check out D-Link’s bundled D-ViewCam Management software. This lets you configure motion detection, record streams, and send alerts with a much more intuitive interface. The app supports up to 32 cameras, and, unlike with the integrated Web server view, you can view cameras at once. A screen shot of D-ViewCam 2.0 is shown below since that’s what shipped with our camera, but version 3.0 launched during our review process, so be sure to download it if you have multiple cameras.

Current page: Inside the DCS-1130
Prev Page D-Link DCS-1130 Wireless N Network Camera Next Page D-Link DCS-930L mydlink-Enabled Wireless N Network CameraWilliam Van Winkle is a freelance editor and tech journalist who has been writing for more than 20 years. His work has appeared on Tom's Guide, Tom's Hardware, Tom's IT Pro, AMD, Seagate, Computer Shopper, and more. He is also an author, writing poetry, short stories, and science fiction and fantasy books.
-
thegreathuntingdolphin William,Reply
Cool article. I have been looking into security cameras for the home, especially ones that are outdoor or pointed outdoor (some noobcakes have been hitting cars and driving off in my apartment complex). I am a bit dissapointed that most of these don't really seem good for outdoors or for long distance night recording (I know some of these said up to 20 to 30 feet but in my experience that means they are really only clear at 10-15 feet). Foscam has a number of cheap IP cameras with pan and tilt, are for outdoor use or longer night vision use. Do you have any experience with them?
The Schlage system is looking good. Hopefully others will jump on the bandwagon and get more products out. I am glad the Schlage deadbolt is not motorized like the Kwikset one since it greatly improves the battery life. Whenever I get a house I am definitly going to do something like the LiNK system.
I too am disappointed in the current IP-based offerings. The perfect IP-based camera seems illusive. Too many have half the features. Most the N wireless ones seems to lack really good night vision capabilities and the ones with good night vision capabilities usually are G only or have N are stupidly expensive. -
Nice article!Reply
It’s interesting how IP cameras and emerging technology, such as Jabbakam.com enable average people to transform a home surveillance system into a shared camera network that can be accessed by whoever is invited by the camera owners, to view the footage via an online account accessible from anywhere at anytime.
Jabbakam is a system where you have complete access to your footage, to manage and share as you want. You can easily create a network (public or private) and invite your friends or neighbours to join and add their cameras so that you all have access to the footage of the cameras as a group.
You can set up alerts so that you will be notified by email or sms if your camera detects something happening in front of it, and you have peace of mind that your camera is doing its job and working, thanks to a monitoring system that checks your camera status every few minutes. The Jabbakam website offers users a lot more functionality besides. Check us out, and join us on Facebook.com/jabbakam and Twitter (@jabbakam). We’d love to hear from you! -
It is still an annual subscription of $80 a year it is only very well hidden by Logitech (just try and buy it and you will figure it out).Reply
The hiding of subscription cost itself is terrible, but also that they sell you just part of a product is outragous. It makes me mad and takes some of the joy of owning such a cool (and expensive) product. -
I'll never buy a product that requires a subscription or is dependent on another site or "the cloud". Excellent article, except for the WPS thing.. WTH is that?Reply