


Early Verdict
The PowerUp FPV adds powered flight and a camera to a paper plane, but it's expensive for what it offers.
Pros
- +
Good video quality
- +
Easy to assemble and fly
- +
Camera can point forward or back
Cons
- -
Expensive
- -
Video was glitch-y on our test unit
Why you can trust Tom's Guide Our writers and editors spend hours analyzing and reviewing products, services, and apps to help find what's best for you. Find out more about how we test, analyze, and rate.
We recently reviewed the PowerUp 3.0, a cute device that turns a paper plane into a drone. Now the PowerUp 3.0 has a big brother, the PowerUp FPV.

Editor's Note: We looked at a beta version of the PowerUP FPV; when the final product is available later this year, we will revisit this review and assign it a rating.
Design
What you get in the PowerUp FPV package is a few sheets of paper and the mechanism for the drone. The mechanism is surprisingly large, measuring 13 inches long and 3.5 inches wide. Much of that length comes from the two carbon-fiber struts, which hold the twin motors and the 2.5-inch propellers. These motors are independent, which is how the drone turns. It's pretty light: the mechanism, including battery, weighs just over 2.3 ounces.

The front of the mechanism is where you'll find most of the electronics, hidden inside the red plastic nose cone. On the front of this is a soft plastic bumper that protects the drone in crashes. The camera sticks out above the nose cone, which means that the bottom third of the view is taken up by the nose cone itself. You can rotate the camera holder to point the camera backward if you want to see what's behind you.
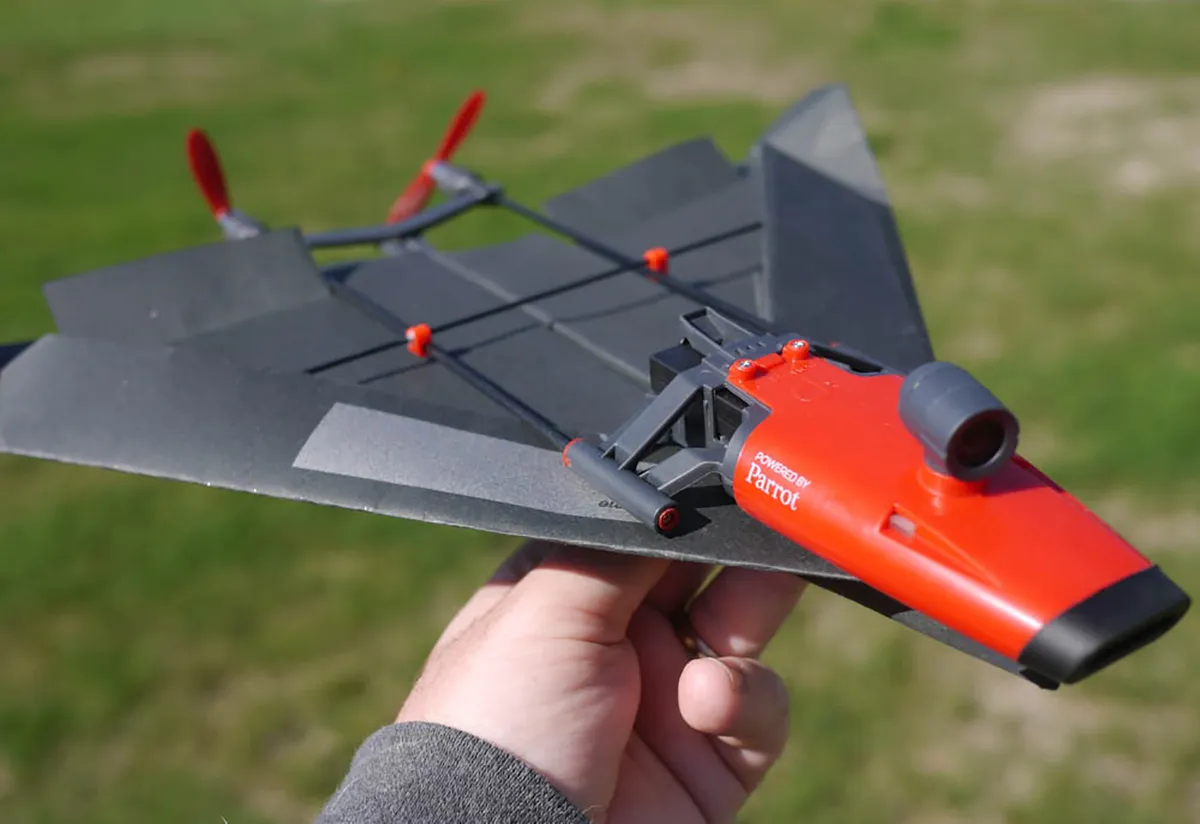
The battery slides into a space in the back of the nose cone, with a microSD card slot just below. No card comes with the PowerUp FPV, but you can use microSD cards with up to 32GB in capacity. The batteries are the same ones used by Parrot Microdrones, holding 550mAH of charge. Just below the microSD card slot is the micro USB port, which is used to both charge the battery and to read data from the microSD card.
The other part of the PowerUp FPV is the airplane itself. Because the mechanism is larger, the plane has to be larger, too, so the PowerUp FPV works with paper planes made from A3 sheets of paper (11.7 x 16.5 inches).

Eight sheets came with our test unit, pre-printed with instructions for folding them. When completed, this has a wingspan of about 11 inches, much larger than the PowerUp 3.0. The combination of the mechanism and the paper plane weighs about 3 ounces, or about 80 grams.
MORE: What the FAA's Drone Rules Mean for You
Specs
Rotors: 2 (2 blades per rotor), replaceable, 2.5-inch diameter
Battery Size: 550 mAh Li-ion polymer
Battery Life: 21/20 minutes (claimed/tested)
Size: 13 x 10.5 x 3 inches (with Invader paper plane)
Smartphone Connected: Yes
FAA registration required: No
Weight: 3 ounces
Controller
You control the PowerUp FPV from a smartphone app. At present, this is only available for iOS, but it will be available for Android in October; I tested it on an iPad Mini. This app connects to the drone over 2.4GHz and 5.8GHz Wi-Fi: the drone creates a Wi-Fi network that you join manually.
The app is pretty straightforward to use, showing a preview of the video from the camera, along with a couple of touch-screen controls. A vertical slider on the left controls the throttle, and a horizontal slider controls the heading.

In the middle of the screen is a horizon indicator and a box that shows if the drone is climbing or diving. It’s a simple setup that works pretty well, allowing you to see the video preview and use familiar touch-screen controls.

On the bottom of the screen are a few additional controls for turning the alarm sound on and off, starting/stopping the video and taking a still photo. Finally, the launch button at the bottom of the screen gets the drone ready to fly. Tap this, throw the plane into the air and the motors will start.
Flying
The PowerUp FPV is a fun little drone to fly. It's not particularly fast, but it does go quicker than you might think, so it needs space to maneuver. It takes some adjustment, though, to get the right combination of lift and power to fly well. PowerUp Toys recommends that you make the paper plane first and adjust the elevator panels so it flies straight and true, then add the mechanism and try powered flight.
The first-person view you get in the app does provide a good view, but it includes a slight delay that makes it difficult to fly from this alone.
Once you attach the mechanism to the plane, you then have to work out how to launch the plane. To do this, you press the launch button in the app, set the throttle to maximum and throw the plane into the air. The plane detects this, and starts the motors. This takes some practice: like a paper plane, throw it too fast and your plane will stall and crash. I found the best way to launch was with a long, smooth throw with the nose pointing slightly downward.

Once you master the launch, you have to master flight. The PowerUp FPV flies like a rather twitchy fixed-wing aircraft, with the internal gyroscope constantly adjusting the thrust and making the plane bounce around. Because there are no rudders or ailerons, the propellers are the only way to control the flight, so it’s a bumpy ride.
The FPV view you get in the app does provide a good look, but it includes a slight delay that makes it difficult to fly from that view alone. You can tweak the app to minimize the delay, but it is still there, and is most telling when using the included Google Cardboard viewer.
Press the Goggles button and put your phone into that head-mounted VR device and the app switches over to this mode. To pilot the plane now, you move your head, tilting up and down to climb or dive and left or right to turn. The app detects the movement, and translates it into commands for the drone. It's a rather fun (if somewhat disorienting) way to fly, but it does require a second set of eyes, as you won't always see obstacles and other problems from the first-person view (FPV). However, I was not able to use this mode for long periods: the combination of the disorientation and the delay made it difficult to fly.
There is no GPS on the PowerUp FPV, so it can't navigate or find its way home. However, PowerUp Toys is working on a feature that will try to return a drone to the takeoff point using an internal compass. This wasn't available to test at the time of writing: PowerUp told us it should be available through a firmware update in October.
The Invader paper plane that we mainly used is designed for ease of flying, but PowerUp Toys offers several other models designed for higher speed or maneuverability.
Photos and Video
The PowerUp FPV records 640 by 480-pixel resolution video and photos to the microSD card that sits below the battery, storing the video as a MOV file that can read by most video apps. The video was of good quality, with plenty of detail and color.
However, we did find that the video sometimes became glitchy, pausing for a fraction of a second and then catching up. To be fair, we were using a pre-production model with prototype firmware, but we hope that PowerUp Toys fixes this before release. The video and photo can be triggered from the app by tapping the icon in the bottom right to start/stop video or take a photo.
Battery Life
The small 550-mAh battery that powers the PowerUp FPV has a surprisingly good life: I got about 6 minutes of vigorous flight out of it. The battery is the same one used by Parrot Minidrones, which means that you can buy a spare one for about $15. You can recharge the battery in the mechanism through the USB port, which takes about 45 minutes. Alternatively, Parrot offers an alone charger and battery set for $22, and a charger that can fill four batteries at once for $19.99
MORE: Drones - Latest News and Reviews of Quadcopters
Repairability
Two sets of rotor blades and a spare front bumper are included, and PowerUp Toys offers a spare parts kit that includes four propellers, two bumpers and the screws that hold the latter in place for $19.99. The company doesn't offer other spare parts, though: if you break a motor or one of the carbon-fiber struts, you'll have to buy a complete new PowerUp FPV.
Bottom Line
The PowerUp FPV is an interesting device, combining the simplicity of a paper plane with many of the features of a full-fledged drone. But it feels like an odd compromise between the two. At $199, the PowerUp FPV is four times the price of its non-camera equipped cousin, pushing the drone out of impulse-buy territory. And the larger size of the mechanism (and thus the larger size of the paper plane that carries it) means it isn't really practical to fly indoors: it needs some space to fly properly, and it is heavy enough that it could do some damage if it crashes into something or someone.
The ability to record video and watch and control the device through the included Google Cardboard FPV headset is definitely fun, but you really need two people to use the headset. So, this puts the PowerUp FPV in a curious position: you can either spend a little less on a decent drone, such as one of the Parrot Minidrones, or spend a little more on an Aerix Black Talon, which gives you more bang for the buck. And, as a fun toy, the PowerUp 3.0 is a simpler, cheaper option. Still, the PowerUp FPV does what it says, creating an app-controlled, camera-equipped paper plane. It's just a rather expensive one.
