How To: Trick Out Your Desktop with Rainmeter
You can turn your desktop into an attractive information portal that requires no manual input thanks to this little program and some scripting skill.
Configuration, Part 2
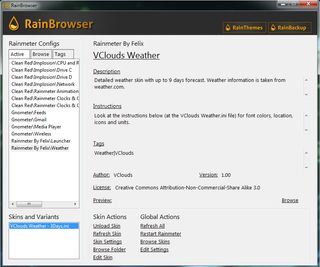
If you are still not comfortable with manual skin editing, there's always RainBrowser. You'll find it in the Rainmeter startup menu folder or you can right-click any of Rainmeter's applets and navigate to Configs>Manage Skins.
RainBrowser comes with version 1.3 and helps with the tweaking process for applications. It will show you a skin's functions and which variables you can change. It will show all of the skins you have running and you can turn them off from here, although you can also do that on the desktop. It also lets you browse all skins on your computer, even ones not in use, and you can turn them on from this window as well.
You can make changes to a single skin or apply a global action to all skins. Once you make the changes, you have to select Refresh Skin from the RainBrowser menu and the changes will be loaded into memory.

You can also make visual changes to the applet by clicking on Edit Skin. Doing so updates the main window with different settings, allowing you to do things like adjusting the transparency, making it click-through enabled or not, and a few other choices.
Transparency is purely for aesthetics, but it can really make a difference. Some skin collections come with shaded, translucent images for overlay in the corners. This lets you create a shaded effect. Again, it's all up to your creativity.
Sign up to get the BEST of Tom's Guide direct to your inbox.
Get instant access to breaking news, the hottest reviews, great deals and helpful tips.
Tom's Guide upgrades your life by helping you decide what products to buy, finding the best deals and showing you how to get the most out of them and solving problems as they arise. Tom's Guide is here to help you accomplish your goals, find great products without the hassle, get the best deals, discover things others don’t want you to know and save time when problems arise. Visit the About Tom's Guide page for more information and to find out how we test products.
-
ssddx ReplySample Destop...Mine
Hah! I see you use ObjectDock Plus! as well. Awsome program.
This looks interesting; I will have to check it out. Is that circle in the bottom right a working calendar? -
house70 Hey, tom's, how come we are still getting swamped with spam? Here's an idea: mark as spam any message that has more than 2 links in it and any message that has more than twice the symbol $ in it. That should help out for a while until you come up with even better filters.Reply -
shoelessinsight I downloaded Rainmeter after reading this article and have been experimenting with it for a few hours. Though I am having a hard time getting reliable readings of my system temperatures and my current wireless bandwidth, most of the skins are surprisingly easy to customize.Reply
Thanks for the article! =) -
gdroland Awesome article. I've got alot of Rainmeter desktops setup over on DeviantArt.com / With all the files you need to create them on your own computer. Check them out and don't hesitate to ask in the comments if you have questions/difficulties.Reply
http://gdroland.deviantart.com/ -
tgandy ssddxHah! I see you use ObjectDock Plus! as well. Awsome program.This looks interesting; I will have to check it out. Is that circle in the bottom right a working calendar?Reply
Yes it is. I've been on the computer at midnight and watched it update the day and date.
-
scottman777 I've also downloaded Rainmeter after reading your article - awesome! Where'd you get that calendar?Reply
Most Popular

