How-To: Upgrade Your Netbook, Easily
Pep up your dumbed-down netbook with these easy projects: upgrade RAM, get a bigger hard disk, and add SD flash memory. Trust us, this is easy.
Memory Upgrades
The basic process works like this:
1. Turn the netbook over on its top, so you can access its lower deck.
2. Loosen and remove the two screws that restrain the access hatch.
3. Open the access hatch
4. Locate the SO-DIMM slot, then grab the memory clips on each side of the module and pull them out gently. This unlocks the installed module, after which you can slide it out easily
5. Orient the replacement SO-DIMM so that its notch matches the notch in the SO-DIMM slot. Gently push the SO-DIMM all the way into the socket, then swing the clips into locked position on each side.
That’s all there is to it. Here are some photos of both machines.
Sign up to get the BEST of Tom's Guide direct to your inbox.
Get instant access to breaking news, the hottest reviews, great deals and helpful tips.
Upgrading the Dell Mini 9 RAM
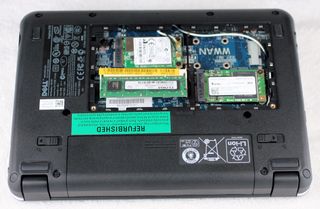
Grab the memory clips on each side of the module with your thumbs, and gently pull them away from the SO-DIMM. You can then lift up and remove the old module.
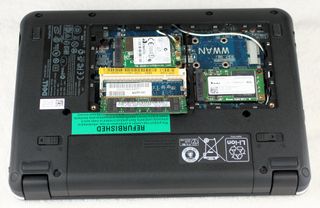
Lay the new memory module down in front of the SO-DIMM slot so that the notches match up.
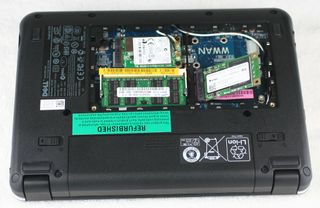
Slide the new SO-DIMM into the slot as far as it will go, then lift the memory clips into locked position on each side of the module.
Upgrading the Asus Eee PC 1000HE RAM
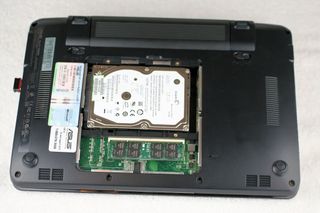
The memory slot in the 1000HE is easier to access than the Mini 9. As before, grab the memory clips with your thumbs, and gently pull them away from the module, then lift and remove.
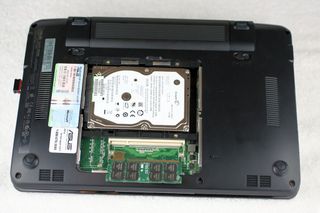
Line up the notch in the SO-DIMM with the notch in the slot, slide in the SO-DIMM as far as it will go, then gently lift the locking tabs into position.
Benefits of Bumping RAM from 1 GB to 2 GB
For Windows XP, you probably won’t notice a huge difference in performance and responsiveness between a 1 GB and a 2 GB configuration. But the more applications you run in tandem, or the more Web browser windows you open, the more breathing room the extra RAM will provide. And with Windows 7 RTM only weeks away as we write this story, we found that running the Windows 7 release candidate on these machines worked noticeably faster and more fluidly when it had more RAM. That said, 1 GB was still not too bad with Windows 7 on either machine.
-
jlee0585 ActiveMP made a similar set of tutorials as videos for the EeePC and the Mini 9. You might want to check it out.Reply
Here are the links:
http://www.youtube.com/watch?v=0TciyrKjLfU (EeePC)
http://www.youtube.com/watch?v=ARz6GbQnCwg (Mini 9)
Btw, you might want to remove the batteries before you remove and replace any internal parts. Just to be safe. ActiveMP also sells SSD replacements so you might want to check them out. -
mikestech I upgraded my Dell Mini 9 from the stock 8GB SSD to the 64GB Runcore SSD. I noticed a significant performance improvement. It's amazing what this little machine can do with a fast SSD and 2GB of RAM. I even occassionaly use it for video editing in Sony Vegas 9.Reply
Mike
http://solidstatedrivehome.com
-
I recently upgraded the hard disk in my Toshiba Satellite pro that had a 60 GB hard drive, with a Seagate 320GB 7200.3 drive. The disk cloning process I did using the DOS version of Seagates Seatools. In all I managed to complete the cloning and disk changeover in 40 minutes. It runs like a dream and is detectably faster in operation.Reply
Seatools is free, fast, small and relatively simple to use with a nice GUI in DOS. I have to admit I have tweaked the basic DOS configuration to recognise USB drives. -
mr_tuel Total cost of a netbook plus upgrades is > buying a full size laptop that is more powerful to begin with.Reply -
Well, mr_tuel, if you want to lug around 5 or 6 lbs with an optical drive you rarely use, feel free to carry your large, awkward full-size laptop. Size, portability and low weight are why these little beauties are such hot sellers. I just bought a 1000HE and love it.Reply
-
Luscious 2GB ram upgrades are a no-brainer at $25. I'm anticipating Win7 will replace XP as the de-facto Windows OS for netbooks.Reply
Not all netbooks come with 2.5" drives, and finding replacements for 1.8" models or units that use proprietary connectors/cradles will create trouble. Not all netbook hard drives are as easy to get to either.
Bumping up storage and ram won't do much though if you need more performance or a higher-res display. I was lucky to grab a HP 2133 last year that's still working well for me, but I'm eager to trade up to a Pinetrail unit as soon as Intel gets its act together. -
jn77 Ok, so I have had a Toshiba NB-205 for about 4 weeks now and I have upgraded it to 2gb, a 500gb 7200rpm drive, and Windows 7 RC. ( I understand that these are not suppose to be "Notebooks") but I want to know if there is any way to get around the 2gb ram limit.Reply
Is it a bios update, is it tied to the hardware, what will happen if I get a 4gb module to put in the netbook? -
michaelahess I've got a Mini 9 with the same 32GB SDD you guys used. Also have a touchscreen, gps, 8GB SD card, and an internal 4GB microSD card/reader. I use OS X almost exclusively for it and it works wonderfully. The stock 4GB SSD sucked and would pause at random. i've had no issues with speed on this guy. Best most usable laptop I've ever had. I always bring my normal laptop with but hardly ever use it except for work.Reply -
etittel Thanks for all the great comments and pointers. As for 4 GB in the netbooks, everything I've researched seems to indicate that Intel limits RAM to 2 GB as part of the Atom chipset/motherboard design specs. That said, I'm buying a couple of 4 GB SO-DIMMs for another machine of mine and will definitely pop one into either or both of these netbooks to see what happens. If they work or not, either way I'll report back here.Reply
As for the Aspire omission: I purchased both of these netbooks with my own hard-earned cash. The chancellor of the exchequer--my wife, that is--forbade me to purchase a 3rd netbook for cost reasons. If you want to loan me your Aspire, I'll gladly make the upgrades and photograph them, then return it to you exactly as it was sent to me (and cover shipping both ways). I wanted to get one of those, and a Samsung, and a ..., but "you can't always get what you want."
Thanks again to one and all,
--Ed--
