I did single-leg deadlifts for a week — here’s what happened
If you want a move that will confirm you’re slightly unbalanced, look no further

Most of us tend to favor one side of our body over the other — for a start, the majority of people are right-handed and right-footed — and with this dominance comes a certain amount of imbalance. You may not even notice it, but it’s there. And take it from me, there is no surer way to learn your level of bodily disharmony than with the single-leg deadlift.
As I noted in my piece on resistance band deadlifts, the deadlift in all its manifestations is a hugely effective strength-training move, so it’s extremely popular. It’s a compound move — it works the glutes, the hips, the hamstring muscles, the back, and the core — so it offers a lot of bang for your buck. The single-leg version, which you can do with or without weights, makes those muscles work harder, gives your ankles something to think about, and will also test your patience. It’s a great exercise but it will pitilessly expose your imbalances.
How to do a single-leg deadlift

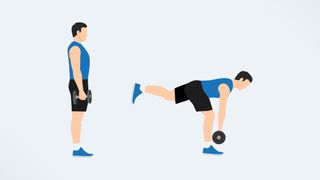
- Begin by standing straight, both feet under your hips, holding a dumbbell in your right hand (if you are just starting out, I highly recommend you perform this move without a weight).
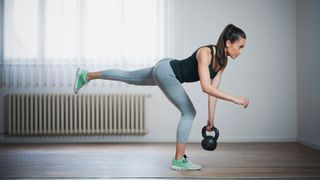
- Engage your core, shift your weight to your left leg and, with just the hint of a bend in your left knee, breathe out and hinge at the hips while you drive your right leg up and behind you, keeping it as straight as you can, while you lower your torso toward the ground.
- Don’t bend or arch your back, and maintain that almost-straight standing leg — at the end of the hinge movement you should be creating a relatively straight line from right foot to head. Imagine you are one of those plastic drinking birds, but with slightly more dignity.
- From here, breathe in as you slowly return to a standing position, maintaining the straight legs and back. That’s one rep. Aim for three sets of 10 on each side. Expect to fail a few times. Seriously — this is not easy.
I did single-leg deadlifts for a week — here’s what happened
I tend to resist single-leg exercises in the gym because I don’t like the taste of floor. I’m right-handed (though I’ve been told I write like a left-handed person) and right-footed, but am far better at balancing on my left foot than I am on my right. This may be because I’ve twisted my right ankle so often over the years that I’m now wary of walking on such hazardous surfaces as slightly uneven grass. I was keen to do this exercise (at home, away from prying eyes and scornful laughter), but I knew it would be hard.
Day 1
I started off with a 12lb weight, which was massively optimistic. I found it difficult to maintain my balance, especially (of course) when standing on my right leg. I was rising up too quickly from the hinged position, knowing I was tilting to the side, and my free arm was waving in the air, seeking a wall that wasn’t there. I kept an eye on myself in a full-length mirror, which did nothing to help me maintain my balance, and also made me feel vaguely inept. By the end of the third miserable, frustrating set on that first day, I was feeling the move more in my back and glutes than in my hamstrings, which was not what I had expected. But the thing about failing, or feeling that I’d failed, was that in its wake came the determination to get it right the next time.
Day 2
On day two, I decided to experiment. I did the first set with no weights: standing first on my left leg, I hinged forward, lifting my right leg and keeping my right arm straight until I was pointing down at the floor. I held my left arm out to the side, which helped with my balance. This variation felt more like the real deal. For the second set, I held a 6lb weight in each hand and, again, I found it easier to maintain my balance. For the final set, I returned to one heavier weight and, to my great lack of surprise, I wobbled. But a little less.
Days 3 and 4
On days three and four, I persevered with one weight, as I felt this was the most challenging version of the move. I was beginning to feel it in my hamstrings and lower back, which I took to be a good sign. On the other hand, I found myself hating the exercise, so I was still rushing the sets, which led to more wobbling.
Day 5
I keep notes of my progress when I’m doing these challenges. Here’s how I began my entry for day five: “Success! Three sets with hardly a wobble.” I slowed my movement, and my breathing, right down, which made me steadier and gave me time to concentrate. I noticed I had been resisting the weight rather than allowing it to take me into the hinged position, so I let it do some of the work. I tried holding the dumbbell in front of my body, knuckles forward, and with the weight to the side. I recommend the first option.
Sign up to get the BEST of Tom’s Guide direct to your inbox.
Upgrade your life with a daily dose of the biggest tech news, lifestyle hacks and our curated analysis. Be the first to know about cutting-edge gadgets and the hottest deals.
Days 6 and 7
By the end, I was feeling the move in all the right places and I was confident I could hold my form. It was as if I’d cracked a code. I was elated. I looked forward to doing the move on days six and seven and aced it on both days, without pushing my luck. Normally, I add some reps by the end of a challenge. Not this time. Not yet.
My verdict? This was the hardest exercise I have been tasked with so far (thanks, ed – seriously!). The key is patience. Most people will find it easier on one side than on the other — this is normal, so don’t be discouraged. It took me almost a week to do the move properly and I see that as an achievement. I can now do something I could not do seven days ago and that’s a wonderful feeling. I will continue doing this move from time to time, because it is improving my overall strength, sense of balance, and general bodily awareness. And because it’s hard. Try it.
More from Tom's Guide
John is a writer and editor based in London. He was worked for magazines such as Runner’s World, Men’s Health, Women’s Health and Cosmopolitan. A keen runner, what he lacks in ability he makes up for with enthusiasm and excuses.

