Why you can trust Tom's Guide Our writers and editors spend hours analyzing and reviewing products, services, and apps to help find what's best for you. Find out more about how we test, analyze, and rate.

Aimed at the education market, the $799 Polar 3D takes an unusual approach to 3D printing, with a rotating print bed. It offers a good range of features, including support for multiple types of filament and a webcam to monitor prints.
The real high point is the software, which lets multiple users build and load 3D models, and then queue them to a printer under one person's control. Educational users get a price break: The company is offering the printer for $599 to schools, teachers and students.
Design
Usually, 3D printers produce objects by moving the printhead left to right, front to back and up and down over a static, square print bed (or sometimes moving the printhead left to right and up and down, and the print bed front to back). In contrast, the Polar 3D moves the printhead up and down, moves the print bed front to back and also spins the print bed around.
It sounds odd, but by combining the motions, the Polar 3D can reach every part of the large 8-inch-diameter print bed without requiring a large overhanging mechanism. That allows a small printer to produce a sizable print volume of a little more than 400 cubic inches (8 inches high, and 6 inches in diameter) — nearly double the print area of the much larger LulzBot Mini, which manages 223.2 cubic inches (6 x 6 x 6.2 inches).
The lack of a heated print bed means that you have to use different methods to get the print to stick.
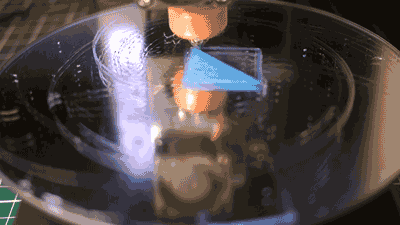
The Polar 3D has a simple look; it's composed of a black-painted "L"-shaped metal frame. The printhead protrudes from the upward arm of this "L," driven up and down by a motor in the base. A roll of plastic filament fits onto a hook on the back of the arm, with the filament fitting through a guide loop in the top and into the printhead.
The printhead is not covered, so you'll need to use some caution — you could easily burn your fingers on the exposed hot end from which the melted filament extrudes. The circular print bed sits on the bottom arm of the "L," with another motor in the base pushing it forward and backward. Additionally, a third motor underneath the print bed spins it around.
The print bed is made of mirrored glass. It isn't heated; instead, the printer comes with a canister of hair spray (Aqua Net Extra Super Hold brand) that you spray onto the print bed to make the plastic stick to the glass surface during printing.
MORE: Best 3D Printer - Top-Rated 3D Printers - Tom's Guide
You'll find a camera just under the print head, which is an unusual placement for 3D printers. This provides a live view of the print on the print bed, to see how well it's progressing.
The back of the L features a power port, Ethernet port and two USB ports (one input, one output). The Ethernet port is the primary method of connecting to the Internet, but the Polar 3D includes 802.11b/g wireless capabilities. When we tried to set the printer to automatically join an existing wireless network, it often failed to do so, creating its own wireless network instead. This is the default mode of the Polar 3D, so to get it onto our existing test network, we had to connect to it with another device and reset it from the Web interface.
Print Materials: Wide Range, But No Heated Bed
The Polar 3D comes with a roll of 1.75-mm PLA filament, but the printer supports other materials as well. However, the lack of a heated print bed means that you have to use different methods to get the print to stick.

With the included PLA, a quick spray of the included hair spray makes the glass build plate sticky enough that the PLA sticks to it. However, this won't work with ABS, the other commonly used print material. Instead, Polar 3D recommends the use of Elmer's X-treme Glue Stick, which is basically water-soluble superglue. After the printing model, you use water to remove the glue and lift the print off the print base.
We tried this method when printing in ABS, spreading a thin layer of the glue before printing — and it works, though removing the prints is rather awkward. With a heated print bed, ABS prints usually pop right off or require only a bit of prying to lift. Here, we did need to do quite extensive soaking to get a print with a large base (like our Thinker model) to lift off.
Print Speed: Midrange
The Polar 3D is a fairly fast printer, with our Thinker model taking about 5 hours and 19 minutes to print with the Draft quality setting, which has a default layer height of 0.32 mm. Changing this to the Medium quality setting (which had a layer height of 0.2 mm) upped the print time to 6 hours and 51 minutes. Those are the only two quality presets offered by this printer.

The printing times put the Polar 3D in the middle of the 3D printer pack for speed, comparable to both the more expensive Taz Mini, which took about 5 hours and 13 minutes for a similar print, and the similarly priced XYZ da Vinci 1.0 (5 hours and 9 minutes).
Interface: Controlled Through the Cloud
In addition to its rotating print bed, the Polar 3D is different from other 3D printers in how you control it. Rather than controlling the printer directly or through a program running on a PC, you run the Polar 3D via the Web, with a cloud interface that puts all of the features of the printer online. This ties in with the educational approach of the Polar 3D, as it allows a teacher to set up and control the printer, deciding which models are printed and in which order. These users (called managers) can also add, remove or alter models and printers, so a group of students can upload models and schedule prints, with the administrator overseeing the process and intervening as required.

This online approach also covers the creation of models. A basic Web-based modeling program comes with the 3D Polar and can create models from scratch using simple modeling tools. You can also use the modeling program to upload and edit other files in .STL format. Either way, models can be scaled, rotated and prepared for printing.
While this approach is adequate for basic use, the Polar 3D is missing some features. For instance, there's no way to scale a model to a particular size or to see the specific dimensions of a model. You're presented with a 3D view of the model on the build plate, but no specific measurements.
Once the model has been loaded or created, it can be saved (again to the cloud), shared or sent to a printer for printing. You can scale a model here, but again, you can't set a specific size; you have to look at the size and then calculate the scaling yourself.
You run the Polar 3D via the Web, with a cloud interface that puts all of the features of the printer online. This ties in with the educational approach of the Polar 3D, as it allows a teacher to set up and control the printer.
Polar 3D's online approach generally works well. It is easy to navigate and edit models, and create and share them. But it becomes a little confusing when you are looking at a saved model, and it isn't clear what, exactly, the buttons marked Edit and Open do. Edit opens the information for the model (who created it and when), while Open, somewhat confusingly, loads the model for more detailed editing in the built-in 3D modeler.
This interface also hides many of the features that other programs offer. Most of the technical settings that you customize for different printing materials (such as the layer height, the speed at which the printhead moves and so on) are kept out of sight. These are available by opening the model and selecting Cura Settings, although this process isn't really covered much in the documentation.
Print Process: Straightforward
To print with the Polar 3D, you first load the model to the cloud service, saving it for future printing. Then, you open the model and select Load To Printer. The system then gives you the option of which printer to use if you have more than one. From there, you go to the printer in the Printers tab, and hit Start Print.
MORE: 8 Awesome 3D Printing Trends to Watch
The printer screen shows the basic information on the printer and the progress of the print, including the time remaining, the printhead temperature and the amount of filament remaining. There is also a live view of the print in progress. It isn't necessary to stay on this Web page; the printer will happily keep printing if you turn off the computer and walk away. This page also works on portable devices; we had no problem loading and starting prints from an iPad and an Android phone.
Print Quality: Good, But Some Issues
We found that the Polar 3D generally produced high-quality prints with good levels of detail and smooth, natural curves. However, it struggled with one of our test models, and prints did require some cleaning up to remove odd whiskers of print material.

Our first test model was a scan of Auguste Rodin's "The Thinker" statue. We print this model (which is created from a scan of the original) at a height of about 4.5 inches. The Polar 3D had no major problems with this, producing a print that accurately captured the smooth curves and fine details of the original, especially around the shoulders and head. The levels of the print were fairly visible, and we did see some whiskers of the print material from where the printer had shifted the printhead between parts of the print, dragging a small whisker of material with it. These are easily removed, but they do leave some traces on the print that require trimming.
Next, we tried a set of gears that can be assembled into a planetary gears set. The Polar 3D did a decent job here, but again, some of the parts had to be trimmed with a knife to fit together. In particular, we found that the small holes in the gears that fit over pegs on other parts were overfilled with material, caused by the material slumping and spreading slightly as the print was formed.

Finally, we tried a 3D model of a modern sculpture that has lots of hard-to-print angles and edges. We were not able to get this model to print on the Polar 3D using the default settings, as the slicer — the program that converts the 3D model into layers that are printed one by one — created insufficient support for the model to stick to the print bed. After some testing, we were able to create a print by using the advanced settings to build a raft, a layer of plastic underneath the model that supported it while printing. But that's a weakness of the Polar 3D: Its hairspray method for getting models to stick does not work very well for small areas, so you need to make sure that there is sufficient area on the print bed to keep it held down.
Bottom Line
The Polar 3D is designed for educational users, and it excels in that area. The combination of excellent, cloud-based software for creating and managing 3D models and the printer itself makes it easy for a large group of users to build models and have them printed on one or a number of these printers. It is less suited for other users, though; these features are overkill for home users.
Although the Polar 3D is well priced, at $799, and can produce good-quality prints, the lack of a heated print bed makes the use of materials like ABS more complicated. If you are happy to stick to PLA or don't mind messing around with glue sticks and the like, the Polar 3D can work. But those who want to experiment more with other print materials will be better off spending a bit more on a printer that can handle them, like the LulzBot Mini.


