AT&T U-Verse: More Networking Perks Than Cable/Sat
AT&T’s home bundle gives you more networking and media sharing options than satellite and cable. Interested? We show you how to use it effectively.
Setting Up Your Own Wi-Fi Router
Using the built-in Wi-Fi access point of the 2Wire Gateway is convenient for most subscribers. However, if you already have a newer 802.11n Wi-Fi router, or do online gaming or other advanced networking, you might want to use your own wireless router instead or in addition to the built-in Wi-Fi.
If your computers have 802.11n Wi-Fi capability, file sharing will be faster using your own 802.11n router than if you use the built-in 802.11g Wi-Fi. You might also want to use your own router if you have other features and settings customized. Your router might also have features and functionality that the basic 2Wire Gateway doesn’t offer, such as guest access or USB drive sharing.
To use your own wireless router, you must first make sure it won’t interfere with the 2Wire Gateway. The gateway’s default IP subnet is 192.168.1.x, which is the default for Linksys and other routers. If your router is in the same subnet (for example, if the IP address is 192.168.1.1), you need to change it to some other subnet before connecting it to the 2Wire Gateway. For example, you could change the router’s IP address to 192.168.0.1 or 192.168.2.1.
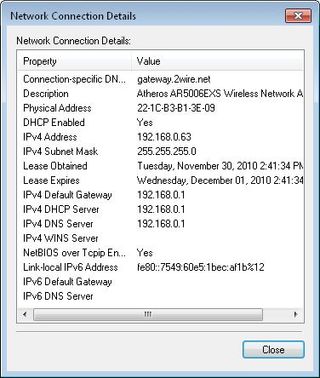
To check your router’s IP address and subnet plug it in, connect, open the Network Connection Status dialog window in Window and click the Details button. Then refer to the Default Gateway address, such as shown below.

If you need to change it, login to the router’s web-based control panel by entering the IP address into a web browser and find the network or LAN settings.
Next, plug-in your router by connecting one end of an Ethernet cable to the WAN (Internet) port of your router and the other end to one of the 4 Ethernet ports of the 2Wire Gateway. Don’t forget to plug the power cord into the wall.
Your router should receive an Internet IP address from the local network of the 2Wire Gateway. Though the Internet is accessible now on your router, you should configure the firewall of the 2Wire Gateway to connect the router directly to the Internet. This will prevent issues if you use certain Internet applications.
Sign up to get the BEST of Tom’s Guide direct to your inbox.
Upgrade your life with a daily dose of the biggest tech news, lifestyle hacks and our curated analysis. Be the first to know about cutting-edge gadgets and the hottest deals.
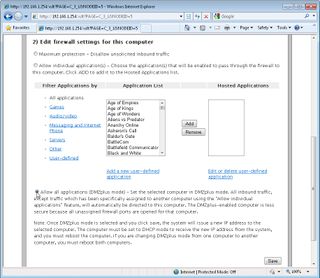
Connect to the gateway via the built-in Wi-Fi or Ethernet and bring up the web-based control panel by entering the IP address (192.168.1.254) into the web browser. Then click Settings, Firewall, and Applications, Pinholes and DMZ. Under the Select a computer step, select the link for your router, which may be labeled with the vendor name or the MAC address of the router. (If needed, you can find the MAC address printed on the router.) Next under the second step, select the Allow all applications option (see below), and click Save.

Note: The model number of the 2Wire Gateway I used is i38HG; the control panel of other models or firmware versions might vary.
You can optionally disable the built-in Wi-Fi of the 2Wire Gateway by clicking Settings, LAN, Wireless, and choosing Disabled for Wireless Access Point. However, don’t do this if you want to share photos and music from your computers to your TVs, as we’ll discuss next.
Current page: How to Use Your Own Router With AT&T U-Verse - Tom’s Guide
Prev Page How to Configure 2Wire Gateway - AT&T U-Verse - Tom’s Guide Next Page How to Enable Media Sharing on PCs - AT&T U-Verse - Tom’s Guide-
Many cable companies also rely on fiber backbone, so AT&T's UVerse is not that different. However, their service is limited "again" by distance from their local fiber node points, and cable is not limited by the distance, as a rule. IPTV distribution is a great idea in theory. However, in communities where AT&T has oversold their product above what their bandwidth can handle, this becomes a major issue for the consumer. Especially in older communities where the existent copper/cable in the neighborhoods has not been rebuilt or upgraded in 30+ years. So, figure that you are pushing the phone, internet and now cable over a broadband connection via old trunk lines back to their fiber node/mux and also figure in the factor of whether or not they were ready for the over usage, and you can see where they might be seeing problems.Reply
-
biao39 You do all of these network sharing as long as you have a network setup and it doesn't even have to be connected to the internet! What does U-verse have to do with this?Reply -
Luscious Too bad you didn't go into discussing HTPC integration. The Hauppauge 2250 has dual IR blasters to control two set-top boxes, eliminating the cable-card problem, and would allow an easy media server connection along with free DVR capability. With 2 such tuners, you could view and record 4 channels simultaneously using 4 set-top boxes. My only disappointment is that the 2250 lacks a HD video input, so video quality for TV would be only S-Video at best.Reply -
born2rock4life As posted by anonymous, the distance and line quality from the local fiber node to the customers home is the main concern. However, your comment on the product being oversold in an area and not being able to supply enough bandwidth is incorrect. The lines once they have a connection (sync) to the AT&T network are capable of carrying whatever the max connection speed is based on profile, and of course the more restricting factor being distance and line quality from that point. Like all services, especially any DSL variant is going to have these same restrictions. You're getting a solid through-put connection on your line that's not shared. Cable suffers from line sharing as the connection is split once it hits their local node or cross box. DSL variants supply an unshared (too an extent since it's all coming from one main source eventually later on in the chain), however that source has a backbone of T3 and OC-3+ connections and I highly doubt it's ever gonna be at fault for not supplying enough bandwidth to the individual nodes.Reply -
dustcrusher I hate those cursed 2Wire devices. Classic single point of failure, but that might be forgivable if they didn't suck so bad.Reply
If AT&T forced me to use one of these obnoxious devices I would never switch. As annoying as having more boxes sitting somewhere is, you're better off with a dedicated cable modem and a router/wireless setup of your choice. -
SiliconPride I truly come to to Toms to get the latest on new technologies and how to implement them to acquire the best ROI. I do not read this site so so that the AT&T Sales Rep Eric Geier can lie to me about how great U-Verse is as a provider. This guy is only interested in "Boob" tube. After reading the article... a real "Boob" has shown it's face here! AT&T's U-Verse is complete and utter trash! Not only is it over priced, but is truly a lie. They even go as far as try to sell the consumer that the internet broadband is blazing faster than DSL. When they first rolled out in my aunts neighborhood, they were re-selling DSL as Standard, Pro and Elite packages. They have dropped the Standard and added 3 Max services. All oft he Max services are truly a joke... compared to true Fiber TO The Premise Verizon FIOS. The sales man emphatically stated that Standard was faster than her current 6/1 DSL she was paying $30 for per month. Total lie... the reason they gave the low-band packages names is to disguise the stream speeds. The sales man could not tell you what speed any thing was... just that it was all faster than DSL... unfortunately with out asking me, she signed up. Then after it installed and she could barely Skype with her friends, she asked me to come over and look at their settings. And of course, like most ISP technicians, the ireless router was left completely open with default Username and password... allowing a script kiddie in the neighborhood to log in and change the password... I had to reset the router... and remove the antenna.. cause this kid as fast... After booting 6 neighbors off her service and locking it down, she still had difficulties, Choppy VOIP, slow web browsing pages... so off to speedtest and speakeasy I go... to find she now has dropped from 6/1.5 to less than 1.5/512k. The Standard AT&T U-Verse Broadband package was no more than a horrible version of the slowest DSL on the planet. She was now surfing with barely more than dial-up speeds. Why did Eric Geier talk so much about AT&T U-verse TV... cause that is what it is... A TV Service with Phone and DSL thrown into the mix. This article should have started with a huge red circle with a line through it... to warn good geeks to stay away from technology impostors. With Verizon FIOS I get 25/25 for $70 a month, true FIBER To The Premise... I can see the fiber cable coming into the wiring closest of my house. AT&T, from their offical u-verse website offers 24/3 for $65. I can barely contain myself with the excitement! So if you get a chance to go with AT&T U-Verse; DON'T! Go with Cable or stay with DSL, TimeWarner Cable in my area offers 50/10 speeds!Reply -
I decided to go and do my own research. I’ll be moving out on my own for the very first time soon and I need to ensure that I’m saving the most money and getting the most amount of value possible. I too have an employee account with DISH Network at my mother’s house, but I still had to know. I actually came across this site http://besttvforme.com/ and it outlines the major TV companies from pricing, fees and up to customer service. The best overall company was DISH Network and I can still enjoy my luxury apartment, maintain my shopping addiction and have money to spare so it looks like the dish is coming with me to Baton Rouge, LA!Reply
