How to turn your Galaxy S22's punch hole into a notification light
Turn your Galaxy S22 camera punch-hole into a modernized version of the notification LED
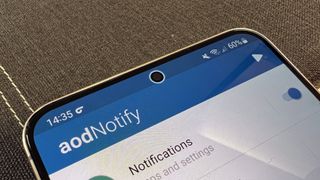
You won't see how to turn the Galaxy S22's punch-hole into a notification light in your regular settings app. Adding this handy feature requires downloading an app from the Google Play store, but after you've done that and gone through the set-up, you'll have a handy feature that Samsung never thought to add.
A few years back, it was common to find notification LEDs on Android phones that would blink, pulse and flash in various colors to make sure you knew you had something to check. With the move to full-screen designs, there's no longer room to spare in the bezels for these handy lights. That's why you need to download an app like aodNotify, which turns the perimeter of your punch-hole camera into a virtual LED indicator.
aodNotify works on the Galaxy S22 and other Samsung phones dating back a number of years. It lights up around your punch-hole camera when you get a notification, and there's an impressive amount of customization you can do to make it behave in different ways when notifications from certain apps come through, or if you plug in the phone to charge.
So without further ado, let's take a look at how to turn the Galaxy S22's punch-hole into a notification light, step-by-step.
How to turn the Galaxy S22's punch-hole into a notification light
The first step is to to download aodNotify from the Google Play store.
You can download this app for other Android phone brands, too,, so you won't feel left out if you decided to buy a Google Pixel 6 or OnePlus 9. However, in this guide, we're focusing on the Samsung Galaxy S22 experience. I tried this app on a Galaxy S22 Plus, but the experience should be the same for the standard Galaxy S22 and the Galaxy S22 Ultra.
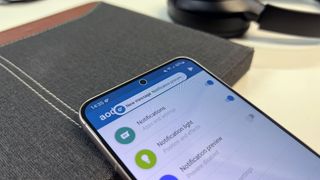
To set up the aodNotify app after you've downloaded it, there are quite a few processes to go through to get the app running. Happily the app acts as its own comprehensive guide, but follow along with our steps and images to make sure you're doing things correctly.
Sign up to get the BEST of Tom’s Guide direct to your inbox.
Upgrade your life with a daily dose of the biggest tech news, lifestyle hacks and our curated analysis. Be the first to know about cutting-edge gadgets and the hottest deals.
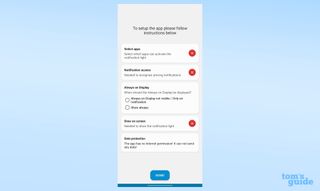
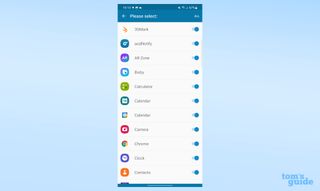
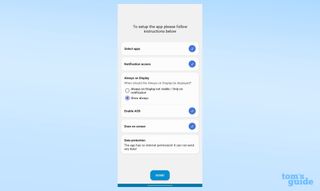
First, you need to select which apps you want to get the light-up treatment. You can pick any mix you like, or just select the "All" option.
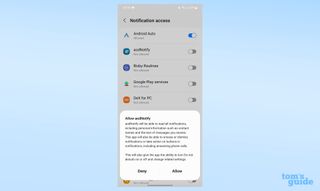
Next, give the app notification access, by switching the toggle to the blue On position. You will need to approve this again since this is a high-level permission to give to an app. It's safe to do so though since the app doesn't transmit any kind of data off of your phone.
Now you can pick whether you want the always-on display to be truly always on or only on when a notification pops up. You can pick the always-on option as long as you have that also enabled in your settings, but having it on selectively requires the installation of another app, AOD Manager.
The final step requires going into the Accessibility menu, then to Installed apps, where you'll allow the app to draw over your other apps and screens. This option will also require a confirmation since it gives the app a lot of power over your phone's functionality. Once this is done, you can get started with using and customizing the app.
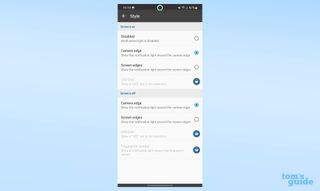
For example, you can enable display edge lights instead of the circle around the camera, with separate settings on offer for when the phone's screen is on or off.
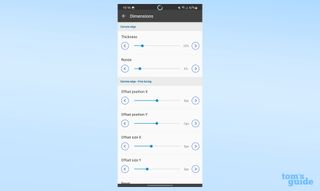
You can change the animation, the color, the thickness and the absolute position of the light. For example, I found moving the circle up two pixels meant it surrounded the camera more evenly on my Galaxy S22 Plus.
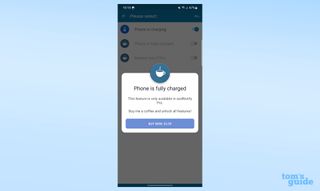
Bear in mind that many of the options are locked behind a £3.59/$4.99 paywall. The free version is still a worthwhile download though since there's enough customization to make it useful.
To continue getting the most out of your Android phone, why not learn how to move Android apps to an SD card? We've also got a guide on how to check Android battery health.
If you consider yourself a power user you may want to know how to install Android 13 for tying out the latest upcoming features. Or if you'd like something else cool to do with your S22, then take a look at our guide on how to activate hidden selfie features on Samsung Galaxy smartphones and how to set up Easy Mode on Samsung smartphones.

Richard is based in London, covering news, reviews and how-tos for phones, tablets, gaming, and whatever else people need advice on. Following on from his MA in Magazine Journalism at the University of Sheffield, he's also written for WIRED U.K., The Register and Creative Bloq. When not at work, he's likely thinking about how to brew the perfect cup of specialty coffee.
